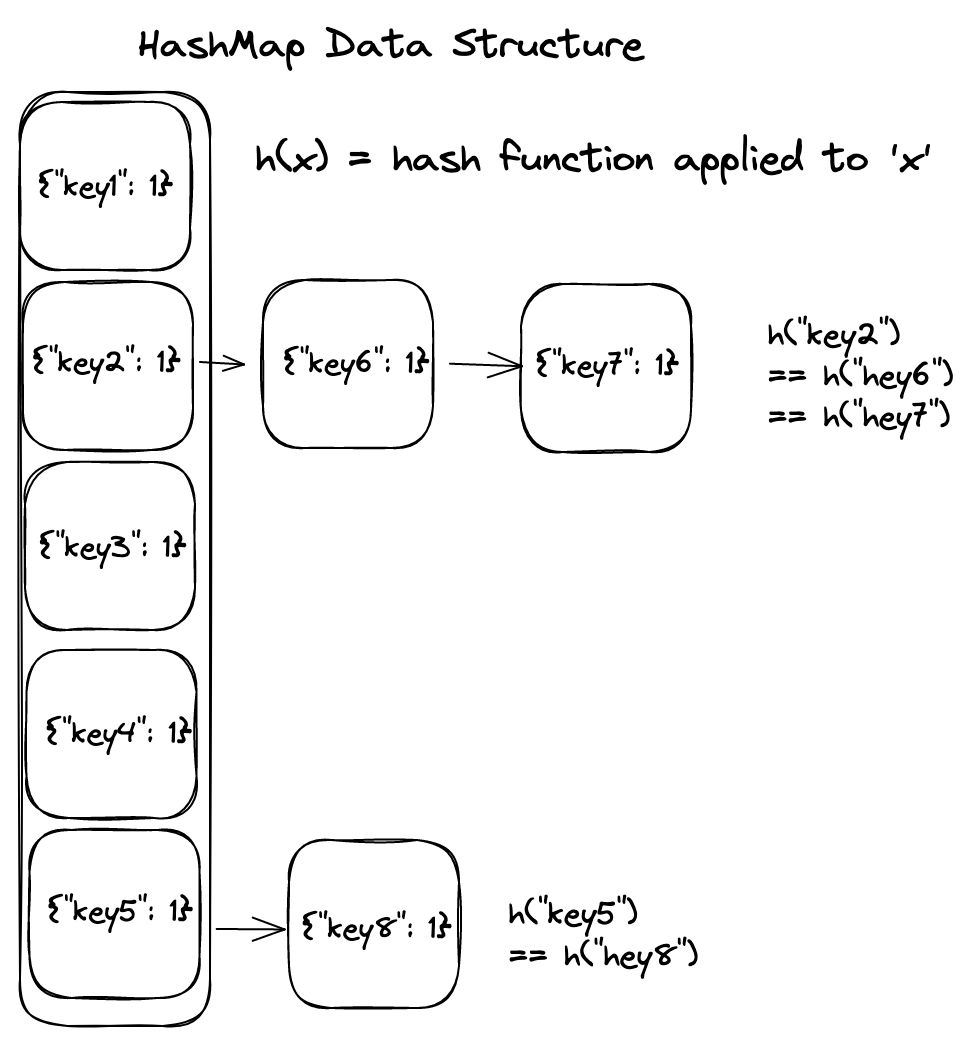
Perceive the information construction by way of diagrams
On this tutorial, we’re going that will help you construct your very personal HashMap in Rust. We’ll be explaining every step alongside the way in which, so don’t fear in the event you’re new to the language. Nonetheless, some fundamental information of Rust is anticipated for this tutorial — we received’t be protecting ideas like mutable references or Rust syntax intimately.
If you wish to skip previous the tutorial and step-by-step explanations, be happy to leap straight to the mission on GitHub. This mission additionally contains some unit exams which, for brevity’s sake, I’ve skipped previous including on this tutorial.
Earlier than we dive in, greatest to debate our understanding of what a hashmap is.
Let’s start with arrays, and why they’re nice. An array is a set of information saved in sequential order.
Every information ingredient within the array is assigned a numerical index, which can be utilized to entry and retrieve the ingredient.
For instance, if we need to retrieve a selected piece of information from an array and we all know its index, we are able to simply use that index to entry the ingredient at that place within the array.
The array offers a place to begin or “pointer” for the sequence of information, and the index tells us how far to maneuver from that place to begin to entry the specified ingredient.

That is helpful as a result of by understanding the index of a worth we are able to instantly (minus a while taken to carry out the addition and multiplication) soar to the in-memory location of an object.
One limitation of utilizing arrays to retailer information is that we should know the index of the ingredient to entry it.
This may be inconvenient if we solely know the worth of the ingredient itself or if we need to use a special kind of knowledge, resembling a key, to entry the ingredient.
In these instances, a hashmap could be a extra appropriate information construction. A hashmap is a set of information that’s saved and accessed utilizing keys reasonably than indices. This permits us to retrieve components based mostly on their related key reasonably than their place within the assortment.
For instance, we might use an individual’s title as a key to entry their telephone quantity in a hashmap. Hashmaps provide extra flexibility and energy in terms of storing and accessing information in comparison with arrays.
So how does this legendary factor work?
At their underlying construction, a hashmap is, in essence, an array. Nonetheless, we at the moment are altering the strategy of accessing that array. That is the place a hash perform is available in. A hash perform takes a key as enter and returns some integer which we are able to use as an index into that underlying array.
A easy hash perform for changing a string into an integer could look as follows in rust.
fn simple_hash(string: &str) -> u32 {
let mut whole = 0;
for c in string.chars() {
whole += c as u32;
}
whole
}
As soon as we have now the integer worth returned by the hash perform, we are able to use the modulus operator to cut back it to a worth throughout the bounds of the array. For instance:
let index = simple_hash("howdy") % array_size;This may give us an index throughout the bounds of the array, permitting us to entry the ingredient at that index utilizing the important thing “howdy”.
A “good” or “ultimate” hash perform would have the next properties:
- It ought to be deterministic, that means that it all the time produces the identical output for a given enter.
- It ought to distribute keys uniformly throughout the vary of potential output values in order that keys are evenly distributed among the many indices within the underlying array.
- It ought to produce a singular output worth for each potential key in order that there aren’t any collisions.
- It ought to be quick to compute in order that it doesn’t considerably affect the efficiency of the hashmap.
- It ought to be proof against collision assaults, that means that it ought to be tough for an attacker to craft keys that may produce collisions.
Remember that it’s typically unimaginable to attain all of those properties on the similar time, particularly when coping with giant units of keys. Subsequently, most hash capabilities goal to stability these properties and commerce off a point of efficiency or safety to attain an affordable degree of effectiveness.
Collisions
the reality is, collisions are inevitable when working with hashmaps. Both the hash perform produces the identical index for 2 values, or the underlying array is smaller than the variety of values it holds. Both means in some unspecified time in the future two or extra keys could also be pointing on the similar location in reminiscence, and we need to keep away from any unwritten information.
A typical resolution to this, and the answer we can be utilizing, is to create a linked checklist at every index within the array when a collision happens. Then, when looking for a key/worth, we traverse this linked checklist till we discover our key.

For our tutorial, we’re going to be implementing the 4 most simple operations of a hashmap.
HashMap<T, V>.get(key: T)HashMap<T, V>.push(key: T, worth: V)HashMap<T, V>.delete(key: T)HashMap<T, V>.clear()
Word that we are able to see kind annotations right here, which permits our implementation to be totally generic and settle for any kind (with some caveats) for our key and worth pair.
First, initialise a brand new cargo mission, utilizing the --lib flag.
cargo init --libThen, take away the contents of src/lib.rs , and exchange it with the next
const DEFAULT_MAX_SIZE: u64 = 256;pub struct HashMap<T, V> {
curr_size: usize,
arr: [Option<KeyValue<T, V>>; DEFAULT_MAX_SIZE as usize],
}
pub struct KeyValue<T, V> {
key: T,
worth: V,
subsequent: Choice<Field<KeyValue<T, V>>>,
}
Right here we have now declared our two structs for the hashmap.
- The
HashMapitself, which maintains a present measurement, and its underlying array of key/worth pairs. - A
KeyValuepair struct, which shops the important thing and values for the hashmap.
We set our default max measurement of the underlying array to be 256.
Word that the hashmap shops an array of Choice<KeyValue<T,V>> . We are able to use this to examine if a component within the array has been initialised or not.
The KeyValue additionally has a discipline subsequent which shops Choice<Field<KeyValue<T,V>>> . This refers to an elective subsequent KeyValue in a linked checklist, within the case of collisions. The Field is a pointer kind for heap allocation — permitting us to retailer generic variables varieties with out understanding their measurement at compile time.
Subsequent, we outline our 4 major public capabilities.
impl<T, V> HashMap<T, V> {
pub fn put(&mut self, key: T, val: V) -> Choice<V> {
todo!()
}
pub fn get(&self, key: T) -> Choice<V> {
todo!()
}
pub fn take away(&self, key: T) -> Choice<V> {
todo!()
}
pub fn clear(&mut self) {
todo!()
}
}
The implementation of every of those is designed to have the identical performance because the official rust hashmap implementation:
putinserts a key-value pair into the hashmap. ReturnsNoneif the worth didn’t exist, or returns the previous worth if the important thing was current.getwill get the worth for a given key. Returns the worth if it exists, orNonein any other casetake awayremoves the key-value pair from the map for a given key. Returns the worth if that key existed,Nonein any other case.clearclears the hashmap.
Implementing Put
We’ll begin with put since we want this working to examine if anything works!
We’ll begin by first hashing the given key, and calculating a place within the array to insert the worth.
pub fn put(&mut self, key: T, val: V) -> Choice<V> {
let hash_val: u64 = hash_key(key.clone());
let place = hash_val % DEFAULT_MAX_SIZE;None
}
Then let’s outline a hash perform — outline this exterior of your struct implementation
fn hash_key<T: Hash>(key: T) -> u64 {
let mut hasher = DefaultHasher::new();
key.hash(&mut hasher);
let hash_val = hasher.end();
hash_val
}
Add the next two imports to the highest of the file to make your compiler happier, though it’s going to nonetheless be throwing up some errors.
use std::collections::hash_map::DefaultHasher;
use std::hash::{Hash, Hasher};
Word, I’ve determined to easily use the DefaultHasher given to us by rust to hash my keys.
Your will nonetheless be complaining, it’s because your kind, T doesn’t implement some required traits. We are able to repair this by including the next to our implementation signature
impl<T: Clone + Hash, V> HashMap<T, V> {This requires our kind T to have the clone and hash traits.
Nice — we have now efficiently hashed our generic key’s worth, giving us a legitimate index into our array. Subsequent, lets use it.
pub fn put(&mut self, key: T, val: V) -> Choice<V> {
let hash_val: u64 = hash_key(key.clone());let place = hash_val % DEFAULT_MAX_SIZE;
match &self.arr[position as usize] {
Some(_) => self.update_or_link_new_val(key, val, place as usize),
None => {
self.insert_new_value(key, val, place as usize);
None
}
}
}
We now examine the place within the array, utilizing the match clause to see if there’s an present KeyValue in that index. If there isn’t any worth there, we insert a brand new worth and return None .
First, we want a means of making a brand new worth, lets try this by including the implementation for KeyValue
impl<T, V> KeyValue<T, V> {
pub fn new(key: T, worth: V) -> KeyValue<T, V> {
KeyValue {
key,
worth,
subsequent: None,
}
}
}
Now, let’s add insert_new_value to our HashMap implementation
fn insert_new_value(&mut self, key: T, val: V, place: usize) {
let new_entry = KeyValue::new(key, val);self.arr[position] = Some(new_entry);
self.curr_size += 1;
}
Right here we merely create a brand new KeyValue , put it into the array, and increment the array’s measurement.
Now we get again to our authentic match case — what can we do if a worth is already current at our index? There are two instances we should deal with for the discovered KeyValue :
- If the important thing of that
KeyValuematches ours, we replace its worth and return the previous worth. - If not, we traverse the linked checklist till we both discover a
KeyValuewith an identical key, or we insert our newKeyValuepair onto the top of the linked checklist.
Let’s take a look at the implementation of update_or_link_new_val
fn update_or_link_new_val(&mut self, key: T, val: V, place: usize) -> Choice<V> {
// traverse linked checklist till both discover worth (replace)
// or stick a brand new worth on the top// can safely unwrap as we have already checked this pos exists
let key_val = self.arr[position].as_mut().unwrap();
if key_val.key == key {
let old_val = key_val.worth;
key_val.worth = val;
// return the previous worth
return Some(old_val);
}
let mut present = key_val;
whereas present.subsequent.is_some() {
let node = present.subsequent.as_mut().unwrap();
if node.key == key {
// replace the worth
let old_val = node.worth;
node.worth = val;
return Some(old_val);
}
present = node;
}
// append the brand new worth to the top of the linked checklist
let new_key_val = KeyValue::new(key, val);
present.subsequent = Some(Field::new(new_key_val));
self.curr_size += 1;
None
}
That is various code to get by way of, so naked with me.
Let’s take a look at the primary part:
// can safely unwrap as we have already checked this pos exists
let key_val = self.arr[position].as_mut().unwrap();
if key_val.key == key {
let old_val = key_val.worth;
key_val.worth = val;
// return the previous worth
return Some(old_val);
}
Right here we seize the important thing worth at that place, and easily examine if our keys match. In the event that they do, we replace the worth, and return the previous worth.
Now the following part
let mut present = key_val;
whereas present.subsequent.is_some() {
let node = present.subsequent.as_mut().unwrap();if node.key == key {
// replace the worth
let old_val = node.worth;
node.worth = val;
return Some(old_val);
}
present = node;
}
// append the brand new worth to the top of the linked checklist
let new_key_val = KeyValue::new(key, val);
present.subsequent = Some(Field::new(new_key_val));
self.curr_size += 1;
None
This part iterates by way of the linked checklist, utilizing is_some() to examine if we’ve reached the top of the linked checklist. For each present node we examine
- If that node’s key matches ours
- If it does, we replace the worth, and return the previous worth held there.
- If not, we transfer to the following.
If we attain the top with out discovering our key, we create a brand new KeyValue, and set the subsequent attribute of our last KeyValue within the checklist to our new KeyValue . We then increment the dimensions and return None .
We now additionally want so as to add some extra traits to HashMap and so as to be sure that these capabilities could be happy. We add the PartialEq to T and the Copy trait to V . (the PartialEq trait will want importing with use std::cmp::PartialEq; )
impl<T: Clone + Hash + PartialEq, V: Copy> HashMap<T, V> {Beautiful! That is put applied.
Implementing Get
Now we’ll see if we are able to truly seize values from our HashMap.
We’ll begin out the identical means, by hashing our key to seek out an index of the array to make use of.
pub fn get(&self, key: T) -> Choice<V> {
let hash_val: u64 = hash_key(key.clone());
let place = hash_val % DEFAULT_MAX_SIZE;None
}
Then, we’ll do once more the identical as earlier than and examine the worth at that index.
pub fn get(&self, key: T) -> Choice<V> {
let hash_val: u64 = hash_key(key.clone());
let place = hash_val % DEFAULT_MAX_SIZE;match &self.arr[position as usize] {
Some(_) => self.check_list_for_key(key, place as usize),
None => None,
}
}
This time, the case the place there is no such thing as a worth is even simpler — there is no such thing as a worth to get so we return None.
If there’s a worth current, we once more will examine by way of that linked checklist for a key, returning None if we attain the top with out discovering a worth.
Right here is the implementation of check_list_for_key in our HashMap implementation the place that is carried out.
fn check_list_for_key(&self, key: T, place: usize) -> Choice<V> {
let mut present = self.arr[position].as_ref().unwrap();
if present.key == key {
return Some(present.worth);
}whereas let Some(node) = present.subsequent.as_ref() {
if node.key == key {
return Some(node.worth);
}
present = node;
}
None
}
The construction is just like our implementation of update_or_link_new_val the place we first examine the primary KeyValue then iterate by way of the linked checklist till we both discover a matching KeyValue or attain the top of the checklist. Word this time we’re utilizing as_ref() reasonably than as_mut() as we don’t have to mutate any of the values!
Nice, we have now each put and get applied now — however at the moment we have now no strategy to check them!
Let’s add a new perform to our HashMap implementation to permit us to instantiate a brand new HashMap.
const INIT: Choice<KeyValue<T, V>> = None;
pub fn new() -> HashMap<T, V> {
HashMap {
curr_size: 0,
arr: [Self::INIT; DEFAULT_MAX_SIZE as usize],
}
}
We outline a const right here, with the required worth of None . This will get round requiring the Copy trait on kind T as if we have been to instantiate the array utilizing the next
arr: [None; DEFAULT_MAX_SIZE as usize]this trait could be required. This may imply our HashMap wouldn’t have the ability to settle for String as a legitimate key kind, which might be annoying. Utilizing this const permits us to get round this.
Now, we are able to run a check as follows which is able to go.
#[test]
fn test_can_get_item() {
let key = "howdy".to_string();
let worth: i32 = 1;let mut my_hash: HashMap<String, i32> = HashMap::new();
my_hash.put(key.clone(), worth);
let end result = my_hash.get(key).unwrap();
assert_eq!(end result, worth)
}
Good!
Implementing Take away
The construction of take away follows a really comparable construction to put and get , so we’ll pace by way of the primary half.
pub fn take away(&mut self, key: T) -> Choice<V> {
let hash_val: u64 = hash_key(key.clone());
let place: u64 = hash_val % DEFAULT_MAX_SIZE;match &self.arr[position as usize] {
Some(_) => self.check_item_in_list_and_remove(key, place as usize),
None => None,
}
}
Once more, we hash the important thing to supply a place, if that place is empty we return None, in any other case we traverse by way of the linked checklist in search of that worth.
Let’s take a look at the implementaiton of check_item_in_list_and_remove
fn check_item_in_list_and_remove(&mut self, key: T, place: usize) -> Choice<V> {
let mut present = self.arr[position].as_ref().unwrap();
if present.key == key {
let return_val = present.worth;// examine if there's a subsequent val
// if there's subsequent, replace array to level to this val
if let Some(node) = present.subsequent.to_owned() {
self.arr[position] = Some(*node);
} else {
self.arr[position] = None
}
// return the worth the node held
self.curr_size -= 1;
return Some(return_val);
}
// iterate by way of till key discovered
whereas present.subsequent.is_some() {
let subsequent = present.subsequent.as_mut().unwrap();
if subsequent.key == key {
let return_val = subsequent.worth;
// examine if there's a subsequent val
// if there's subsequent, replace array to level to this val
if let Some(next_next) = subsequent.subsequent.to_owned() {
present.subsequent = Some(Field::new(*next_next));
} else {
present.subsequent = None
}
// return the worth the node held
self.curr_size -= 1;
return Some(return_val);
}
// set present equal to the following
present = present.subsequent.as_mut().unwrap();
}
None
}
Now this is a little more advanced — so as to take away a worth from a linked checklist we should do the next
- examine if the
KeyValuebeing eliminated has asubsequentworth - If it does, we set the
subsequentworth of the earlierKeyValueto level to thisKeyValue - If the
KeyValuebeing eliminated is the first worth, we set the worth within the array to be the following worth, if subsequent exists.
Let’s take a look at the primary a part of this perform
let mut present = self.arr[position].as_ref().unwrap();
if present.key == key {
let return_val = present.worth;// examine if there's a subsequent val
// if there's subsequent, replace array to level to this val
if let Some(node) = present.subsequent.to_owned() {
self.arr[position] = Some(*node);
} else {
self.arr[position] = None
}
// return the worth the node held
self.curr_size -= 1;
return Some(return_val);
}
We examine if the primary node’s key matches our price. If it does, we save the worth it held in order that we are able to return it later. We then examine if subsequent exists, if it doesn’t, we merely replace that place to be None . If it does exist, we set that place to be the tackle of that node. Therefore using * .
We then decrement the dimensions of the HashMap, and return the worth.
Now let us take a look at the second little bit of code, this seems a bit grotesque, however naked with me.
// iterate by way of till key discovered
whereas present.subsequent.is_some() {
let subsequent = present.subsequent.as_mut().unwrap();
if subsequent.key == key {
let return_val = subsequent.worth;// examine if there's a subsequent val
// if there's subsequent, replace array to level to this val
if let Some(next_next) = subsequent.subsequent.to_owned() {
present.subsequent = Some(Field::new(*next_next));
} else {
present.subsequent = None
}
// return the worth the node held
self.curr_size -= 1;
return Some(return_val);
}
// set present equal to the following
present = present.subsequent.as_mut().unwrap();
}
None
Let’s undergo step-by-step.
- We examine if the following
KeyValueshouldn’t beNone - If it isn’t
None, we examine if its key matches the important thing we’re in search of. - If it does, we retailer the return worth to return later.
- We then examine if the subsequent
KeyValueafter that is additionally a worth - Whether it is, we set our present worth to level to this “subsequent subsequent” worth.
- If there is no such thing as a “subsequent subsequent” worth, we set our present worth to level to
None - We then decrement the present measurement, and return the worth.
That is the essential algorithm for deleting a node in a linked checklist. Should you’re uncertain about this, I’d advocate going away and researching information buildings resembling a linked checklist to know extra.
If we attain the top of the linked checklist with no worth, we merely return None .
This requires one different small factor to make the compiler completely happy; including the #[derive(Clone)] tag to our KeyValue struct.
#[derive(Clone)]
pub struct KeyValue<T, V> {
key: T,
worth: V,
subsequent: Choice<Field<KeyValue<T, V>>>,
}
And that is take away applied!
Implementing clear
To complete up, we have now by far the simplest operation to implement: clear. Lets see how thats carried out;
pub fn clear(&mut self) {
// overwrite the array to yeet all the things
self.curr_size -= 0;
self.arr = [Self::INIT; DEFAULT_MAX_SIZE as usize];
}
We merely set the dimensions to 0, and reinstantiate the array!
And that is all! We’ve efficiently applied all of the traditional capabilities of a HashMap in rust from scratch!
Congrats on making it by way of this tutorial on implementing a hashmap in Rust! By now, you must have a great understanding of how hashmaps work and the right way to implement one from scratch. You must also be aware of one potential implementation of the varied strategies {that a} hashmap offers, resembling put, get, and take away.
I hope that you just discovered this tutorial useful and that it has given you the boldness to implement a hashMap in your individual Rust tasks. Be happy to mess around with the code and check out completely different configurations and strategies to get a greater understanding of the way it all works.
You can even try the totally accomplished code for this tutorial on the GitHub repository right here, full with just a few unit exams for the code.
Thanks for studying, and completely happy coding!