
Welcome to Git and GitHub for Beginners! This complete information is tailor-made that can assist you navigate the world of model management and collaboration.
Whether you are a beginner simply beginning out or an skilled developer seeking to brush up in your abilities, this information gives a step-by-step method to understanding and successfully utilizing Git and GitHub.
By the top of this journey, you will have a stable basis in Git and GitHub. You’ll be geared up with sensible data to streamline your coding workflow, collaborate seamlessly with groups, and contribute to open-source initiatives.
So, let’s dive in and get began in your Git and GitHub journey!
Table of Contents
Who is This Guide For?
This information is for everybody who desires to degree up their coding abilities and turn into proficient in utilizing Git and GitHub.
Whether you are:
- simply beginning your tech profession and must study the fundamentals of model management.
- an aspiring developer wanting to combine
Gitinto your workflow. - an skilled programmer seeking to refresh your data or uncover new options.
- a group lead or supervisor focused on fostering a tradition of collaboration and environment friendly code administration.
Regardless of your background or expertise, this information is designed to empower you with the instruments and data you want to excel in your coding endeavors.
Technologies
Before you begin, ensure that:
Terms
They are loads of phrases round Git and Github that you could be meet while you’re working with model management. Let me break it down for you earlier than we begin:
- Branch: A model of the codebase that diverges from the principle department to isolate adjustments for particular options, fixes, or experiments.
- Commit: A snapshot of your adjustments, saved to your native repository. Each commit is uniquely recognized by a checksum.
- Stage: The space the place Git tracks adjustments which are able to be included within the subsequent commit. Files within the staging space are ready (staged) for the subsequent commit.
- Merge: The strategy of integrating adjustments from one department into one other, usually the principle department.
- Pull Request: A proposal to merge adjustments from one department into one other, usually utilized in collaborative environments to assessment and focus on adjustments earlier than they’re merged.
- Fork: A private copy of another person’s challenge that lives in your GitHub account.
- Clone: The act of downloading a repository from a distant supply to your native machine.
- Remote: A standard repository that each one group members use to alternate their adjustments.
- Origin: The default identify Git provides to the server from which you cloned.
- Upstream: The authentic repository that was cloned.
- Master: The default department identify given to a repository when it’s created. In fashionable follow, it’s usually changed with
most important. - Repository: A storage location the place your challenge lives, containing all of the recordsdata and revision historical past.
- Working Directory: The listing in your pc the place you make adjustments to your challenge.
- Staging Area: Also generally known as the “Index,” it is an space the place Git tracks adjustments which are able to be dedicated.
- Index: Another identify for the staging space, the place Git tracks adjustments which are able to be dedicated.
- HEAD: A reference to the final commit within the presently checked-out department.
- Checkout: The motion of switching from one department to a different or to a particular commit.
- Push: The motion of sending your commits to a distant repository.
- Pull: The motion of fetching adjustments from a distant repository and merging them into your present department.
- Fetch: The motion of retrieving updates from a distant repository with out merging them into your present department.
What is GitHub?

GitHub is a platform that hosts code, offering model management and collaboration options. It allows you and others to work collectively on initiatives from anyplace on the planet.
This information will introduce you to important GitHub ideas akin to repositories, branches, commits, and Pull Requests. You will discover ways to create your individual ‘Hello World’ repository and perceive GitHub’s Pull Request workflow, a widely-used methodology for creating and reviewing code.
By the top of this information, you will be geared up with the data and abilities to collaborate successfully on GitHub.
What is GitHub Used For?
GitHub is greater than only a code internet hosting platform. It’s a instrument that permits for seamless collaboration and model management. Here are a few of its makes use of:
- Hosting and sharing your code with others.
- Tracking and assigning points to take care of an organized workflow.
- Managing pull requests to assessment and incorporate adjustments into your challenge.
- Creating your individual web site utilizing GitHub Pages, a static web site internet hosting service.
- Collaborating with others on initiatives, making it a wonderful instrument for open-source contributions.
What is Git?
Git is a free and open-source distributed model management system. It’s designed to deal with all the pieces from small to very giant initiatives with pace and effectivity
Git is simple to study and has a tiny footprint with lightning-fast efficiency. It outclasses SCM instruments like Subversion, CVS, Perforce, and ClearCase with options like low cost native branching, handy staging areas, and a number of workflows
Git was initially designed and developed by Linus Torvalds for Linux kernel improvement.
Some options/advantages of Git:
- Allows you to trace adjustments to your code over time.
- Enables you to collaborate with others on the identical codebase.
- You can simply revert to a earlier model of your code or experiment with new options with out affecting the principle codebase.
- Provides a document of all adjustments made to your code, together with who made them and when which might be helpful for auditing and debugging.
Common Tasks You’ll Perform with Git
- Create a repository
- Create a department
- Make adjustments to a file
- Stage adjustments
- Commit adjustments
- Push adjustments to a distant repository
- Merge adjustments
- Revert adjustments
- Delete a department
How to Install Git
To set up Git in your native machine, you want to comply with these steps:
Download Git from the official web site: Git Downloads
Install Git in your native machine by following the directions supplied on the official web site: Installing Git
Congratulations! You have efficiently put in Git in your native machine. You at the moment are prepared to begin utilizing Git to your initiatives.
How to Configure Git
Git gives a wide range of configurations that may streamline your workflow. In this part, I’ll information you thru the method of establishing Git in your native machine. Let’s get began.
Configuring your identify and electronic mail tackle in your native machine is a necessary step in establishing Git. These particulars are hooked up to every commit you make, offering context and possession. Let’s discover ways to use the git config --global command to set your identify and electronic mail globally in your native machine.
To arrange your identify, you want to kind the next command in your terminal:
# Set a reputation that's identifiable for credit score when reviewing model historical past

$ git config --global person.identify "Your Name"
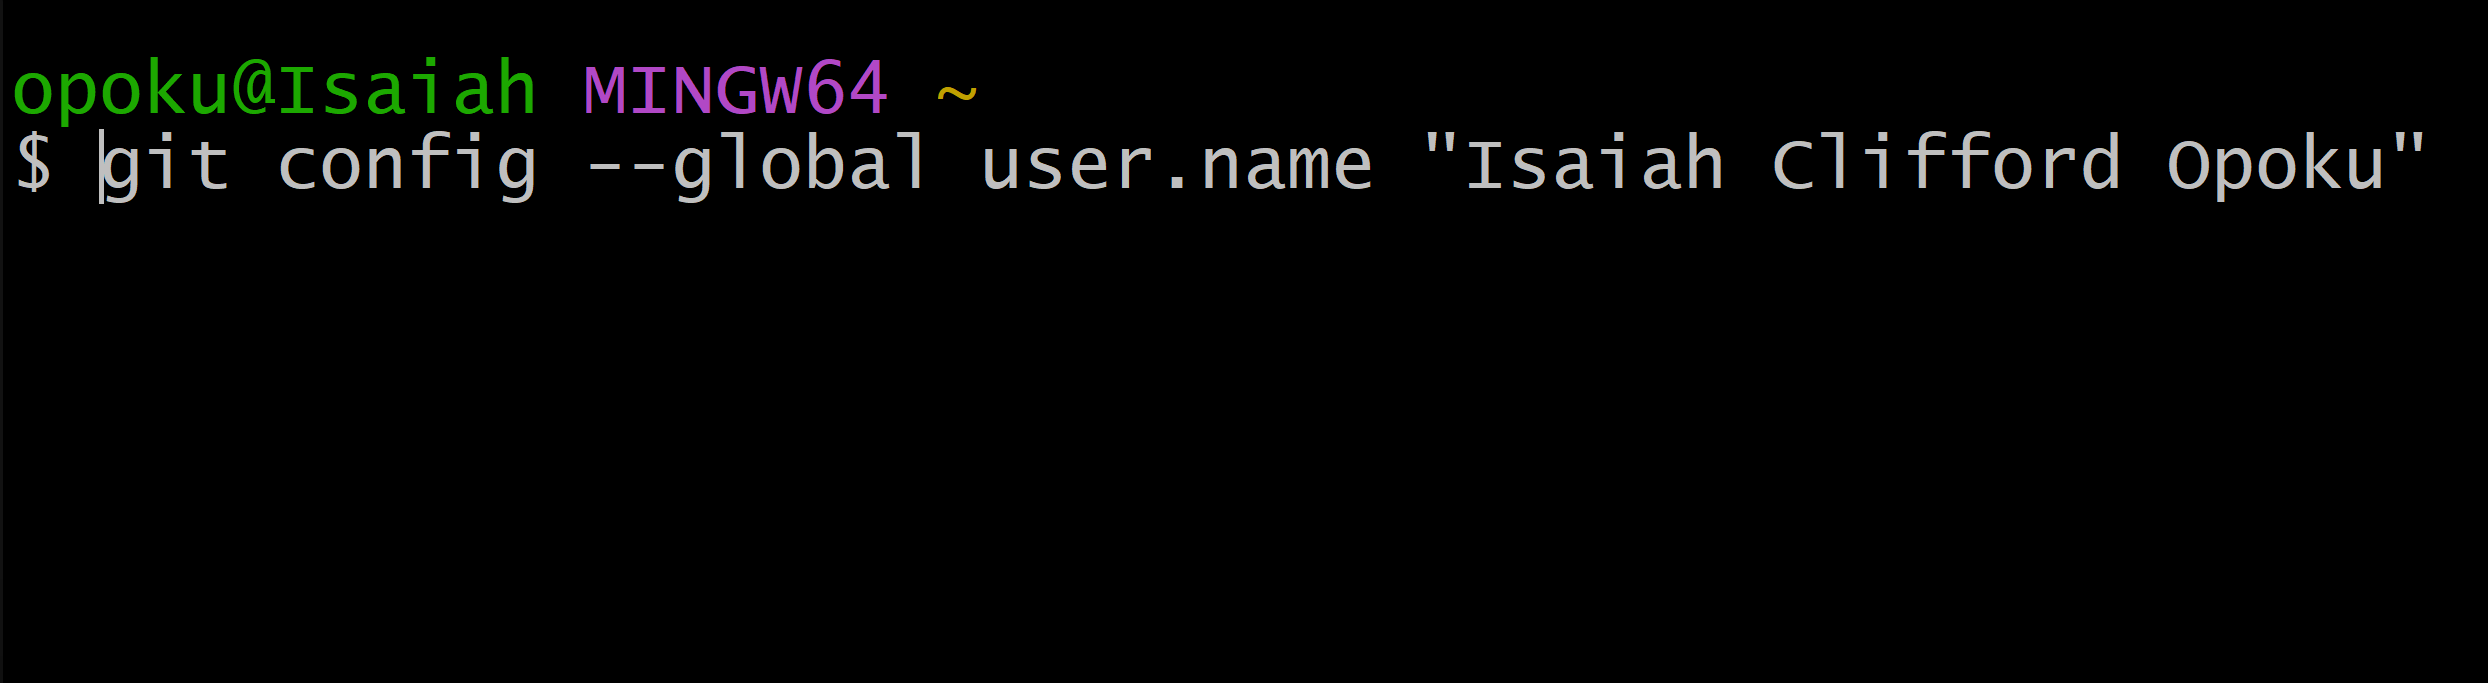
As you may see within the picture above, I’ve entered my identify.
After getting into your identify, press Enter to reserve it. You will not obtain any response, however relaxation assured, your identify has been saved efficiently.
Just like we arrange the person identify, we additionally must arrange the person electronic mail. This electronic mail shall be related to every commit you make. Let’s discover ways to use the git config --global command to set your electronic mail globally in your native machine.
# Set an electronic mail tackle that shall be related to every historical past marker
$ git config --global person.electronic mail "[email protected]"
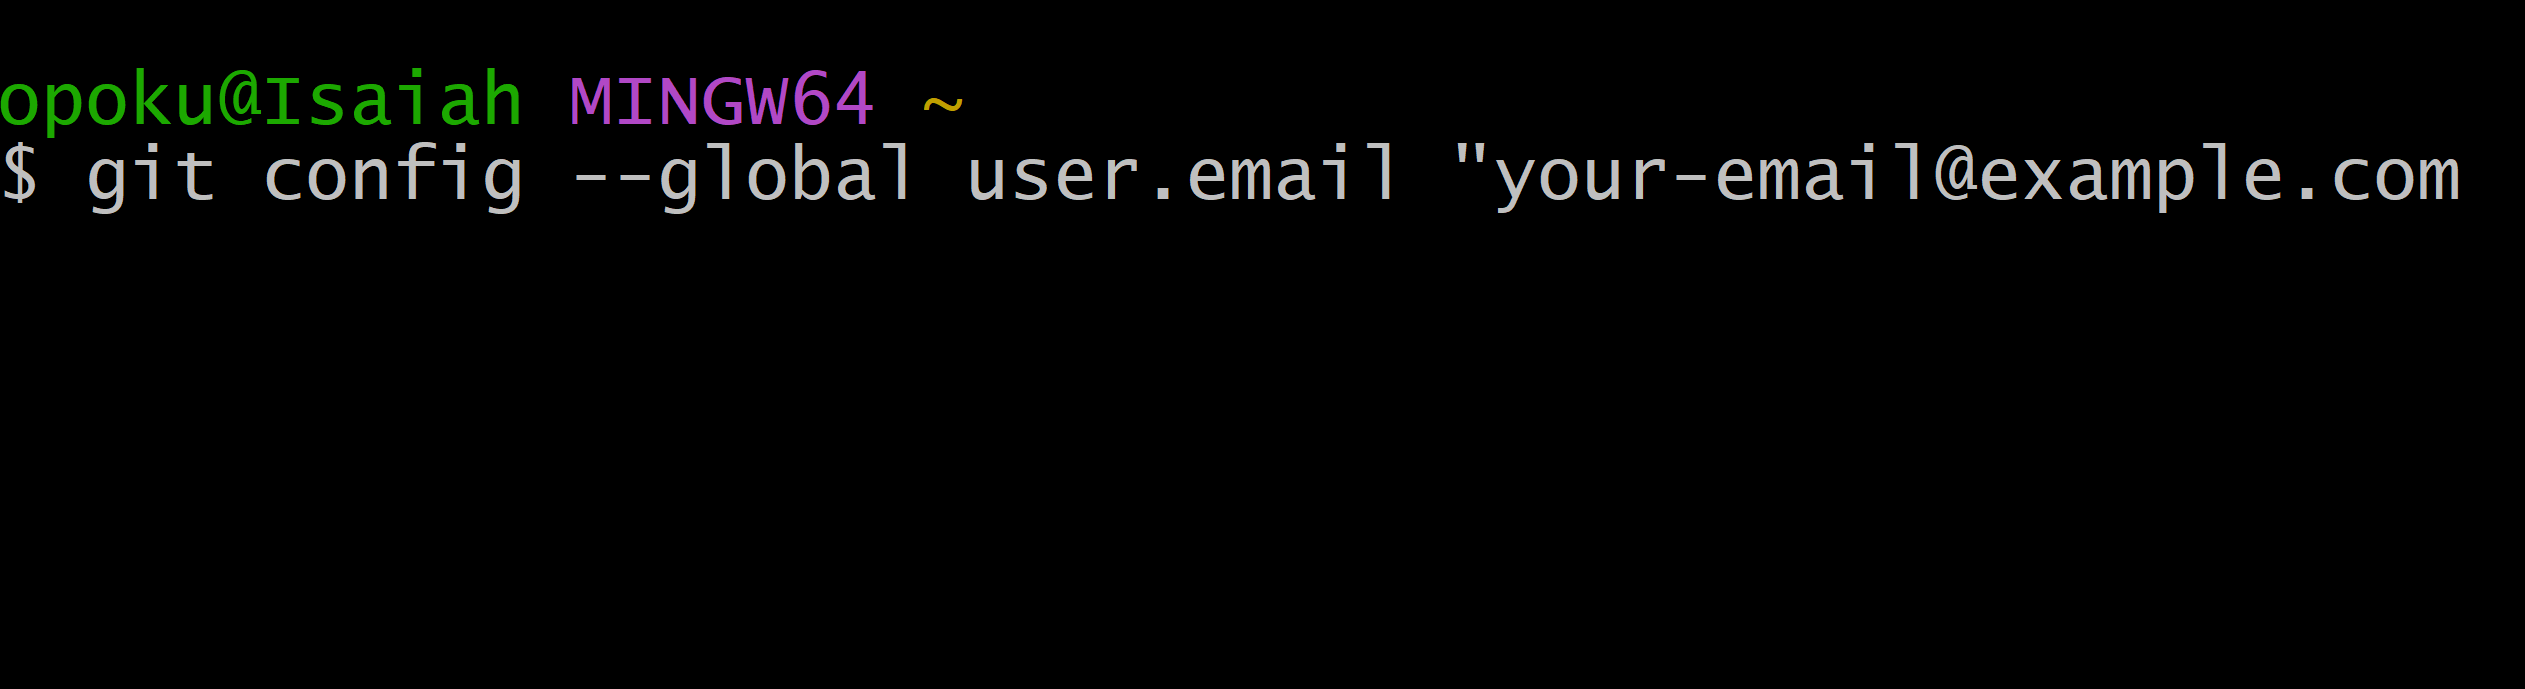
Make certain to interchange this together with your precise electronic mail utilized in your GitHub account.
Now that we have now completed establishing your username and electronic mail for Git and GitHub, let’s confirm that all the pieces is configured appropriately.
To do that, use the next command:
git config --global --list .
This command will checklist the username and electronic mail getting used within the console so that you can see.
You ought to see some info displayed in your terminal.
How to Set the Default Editor
In fashionable improvement, having a code editor can considerably simplify your workflow, particularly while you’re targeted on coding.
Now, let’s examine methods to configure Git to make use of a default editor through the use of this command:
# Set the default editor for Git
$ git config --global core.editor "code --wait"
Congratulations! You have efficiently configured Git in your native machine. You at the moment are prepared to begin utilizing Git to your initiatives.
How to Create a Repository Using the Github Website
Creating a repository is step one in utilizing Git. A repository is a storage location the place your initiatives stay, containing all of the recordsdata and revision historical past.
In this part, I’ll information you thru the method of making a repository on GitHub.
There are two methods to create a repository: utilizing the GitHub web site or the command line. Let’s get began. In this part, we’ll deal with making a repository utilizing the GitHub web site and the command line.
After logging into your GitHub account, you may create a brand new repository by following these steps:
- Click on the
+signal within the prime proper nook of the web page and chooseNew Repositoryfrom the dropdown menu.
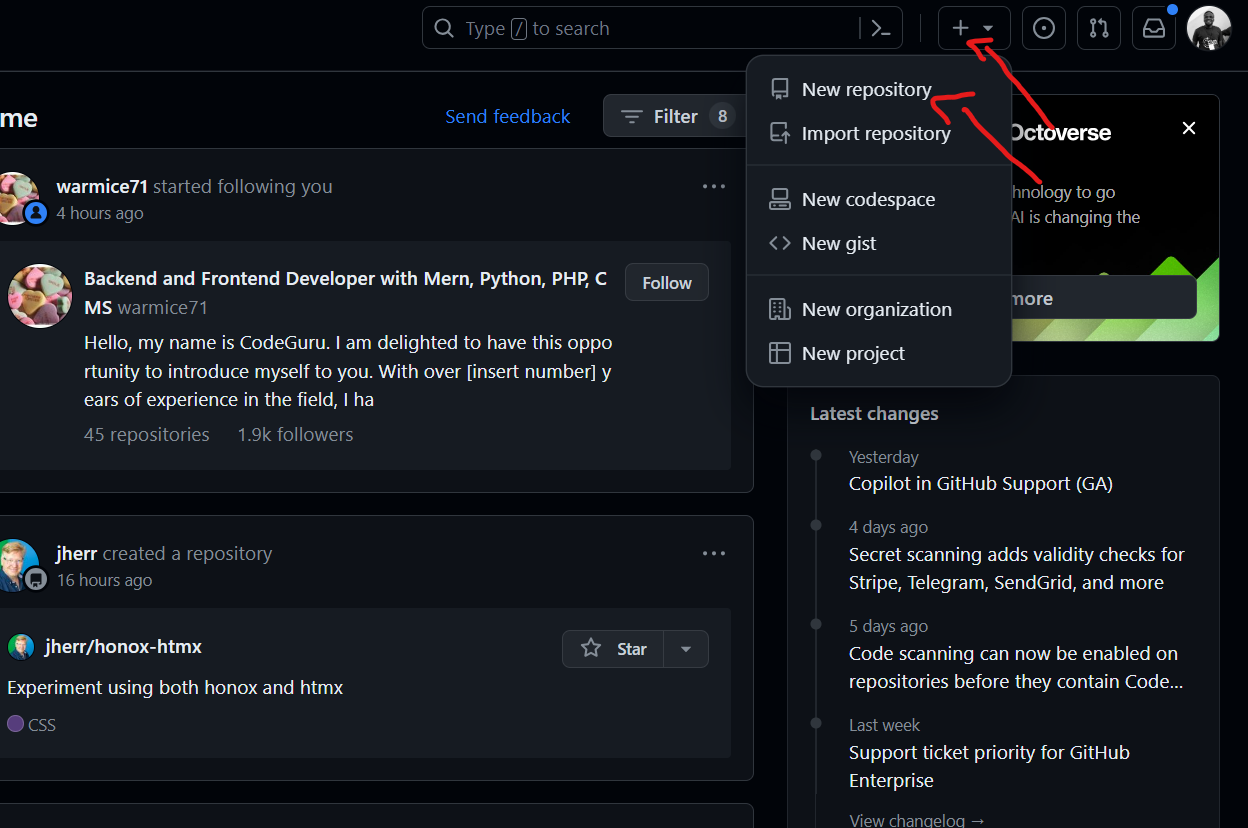
Above is a picture of the brand new repository button on GitHub.
- You shall be directed to a brand new web page the place you may fill within the particulars of your new repository. You might want to enter the next info:
Repository identify: This is the identify of your repository. It must be distinctive and descriptive.Description: A short description of your repository.Public or Private: You can select to make your repository public or personal. Public repositories are seen to everybody, whereas personal repositories are solely seen to you and the folks you share them with.Initializethis repository with a README: You can select to initialize your repository with a README file. This is helpful if you wish to present details about your challenge or directions on methods to use it.
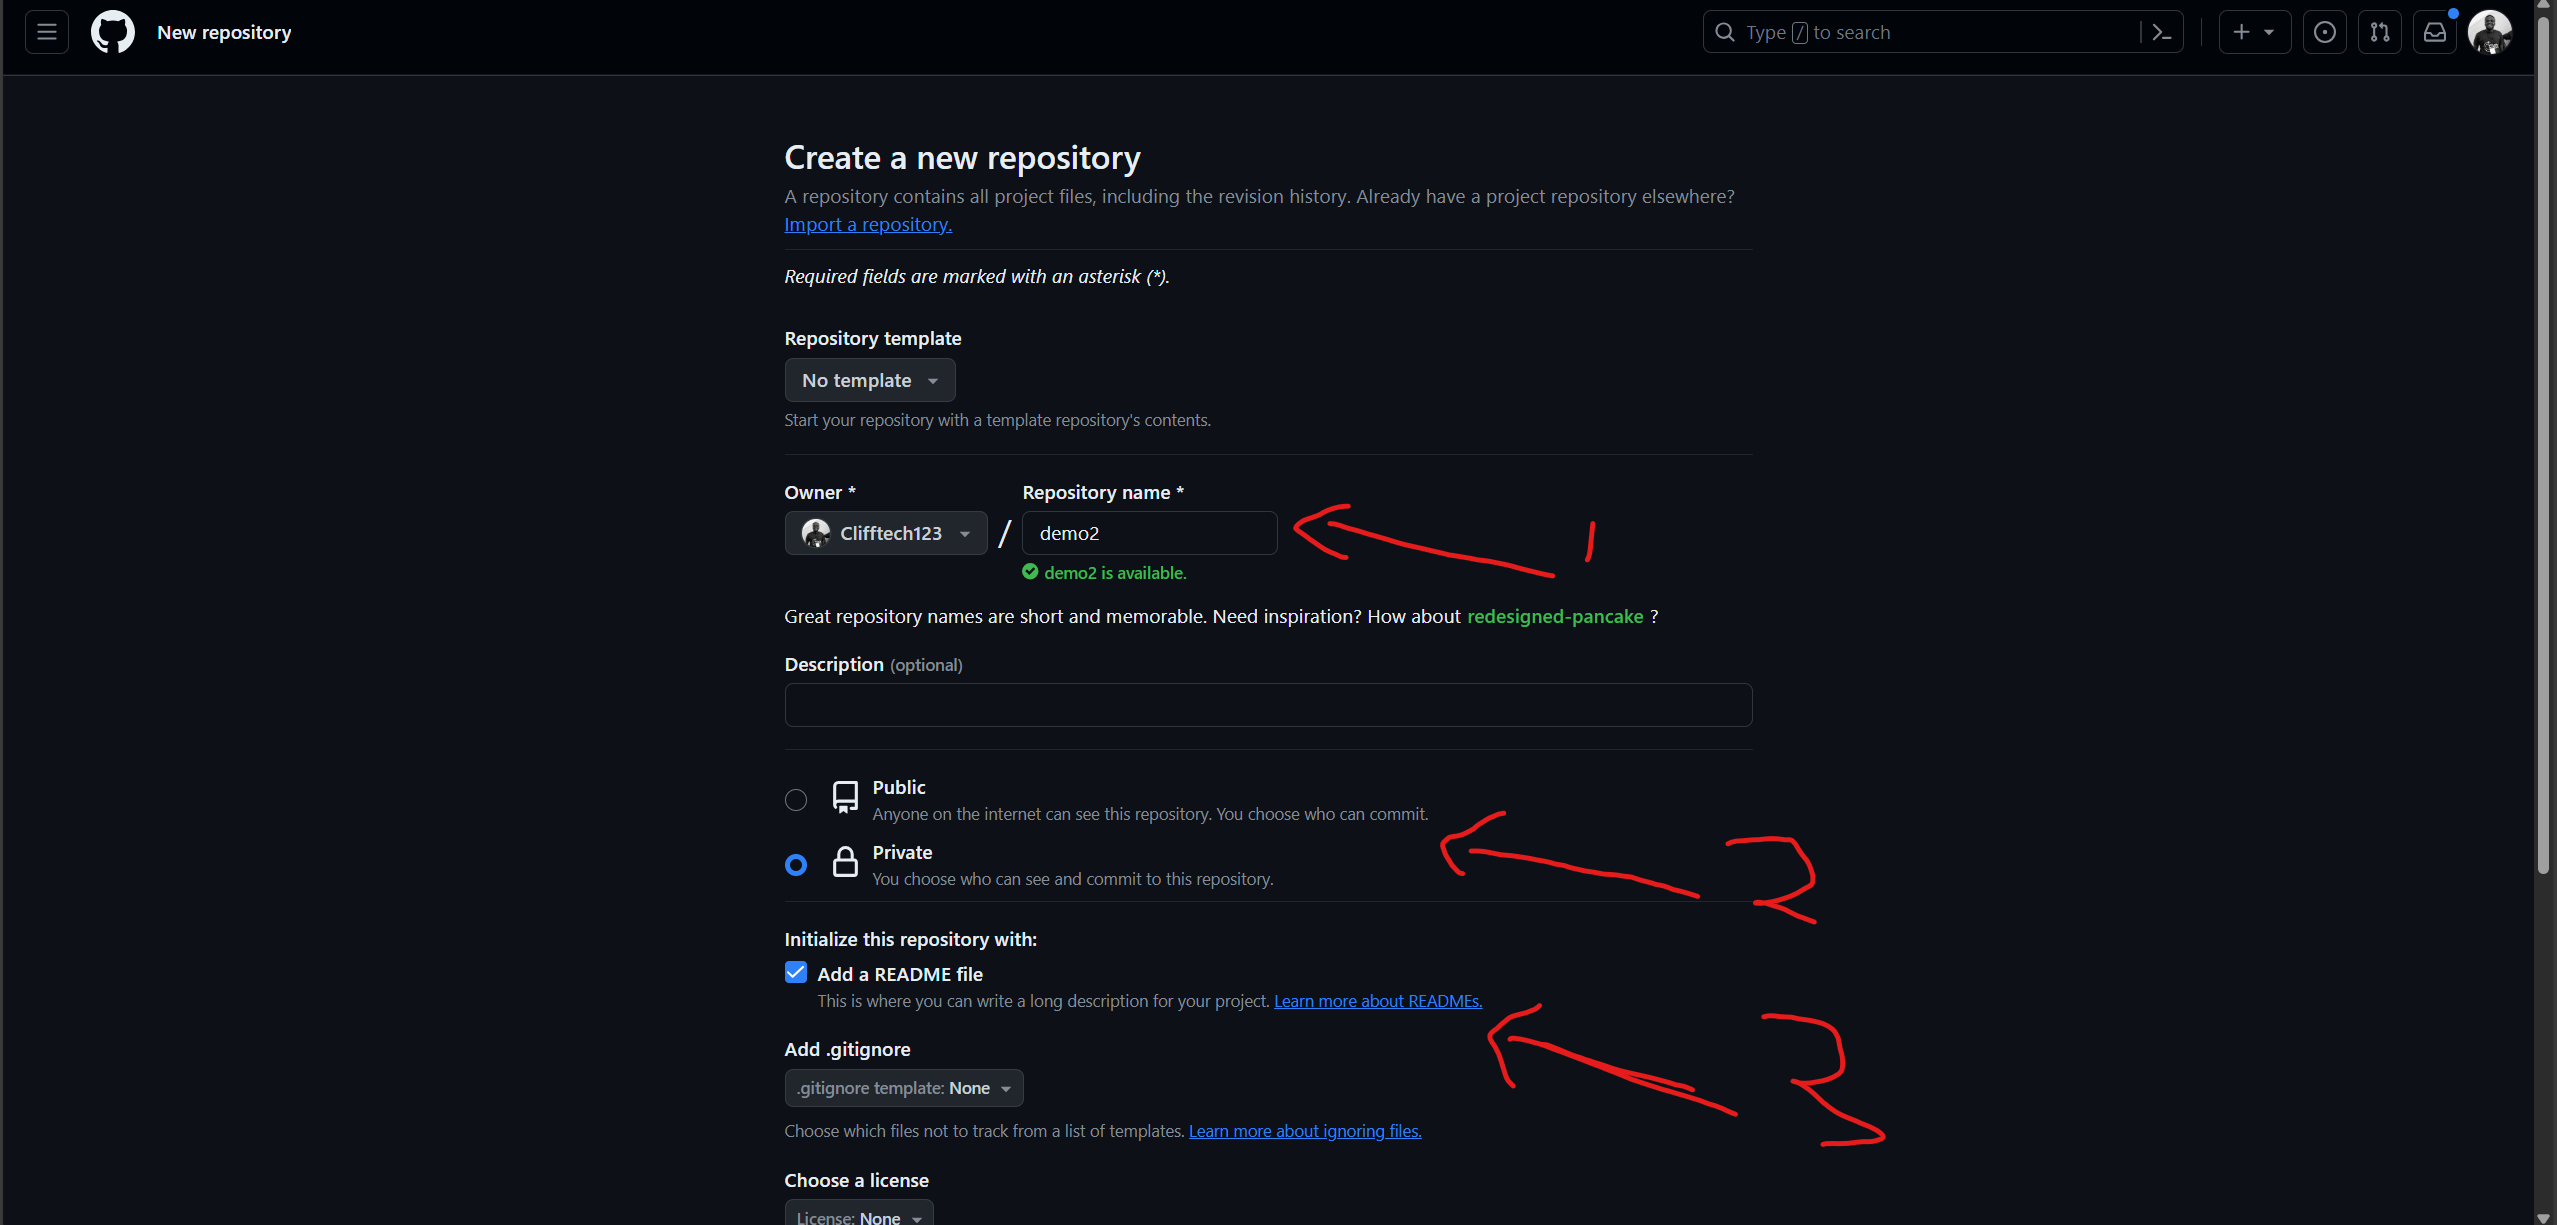
The picture above reveals the shape the place you will fill within the particulars of your new repository.
- Once you’ve gotten crammed within the particulars, click on on the
Create Repositorybutton to create your new repository.
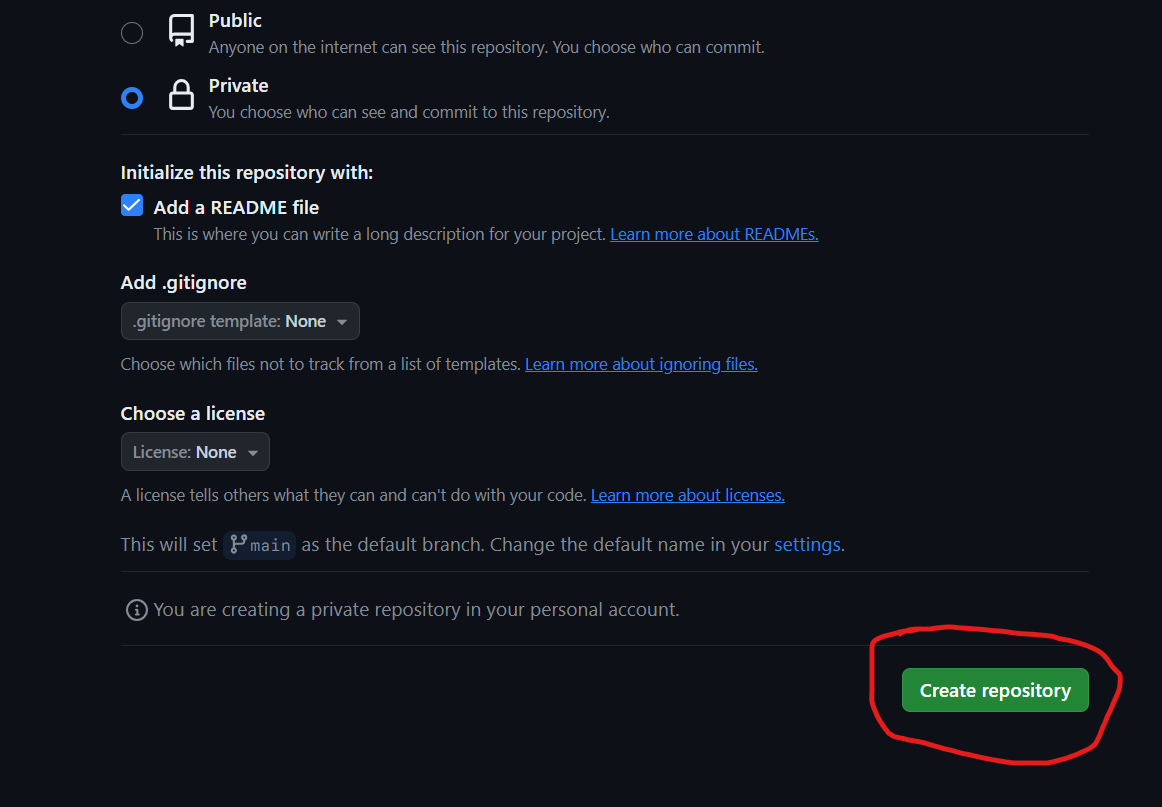
The picture above reveals the Create Repository button_.
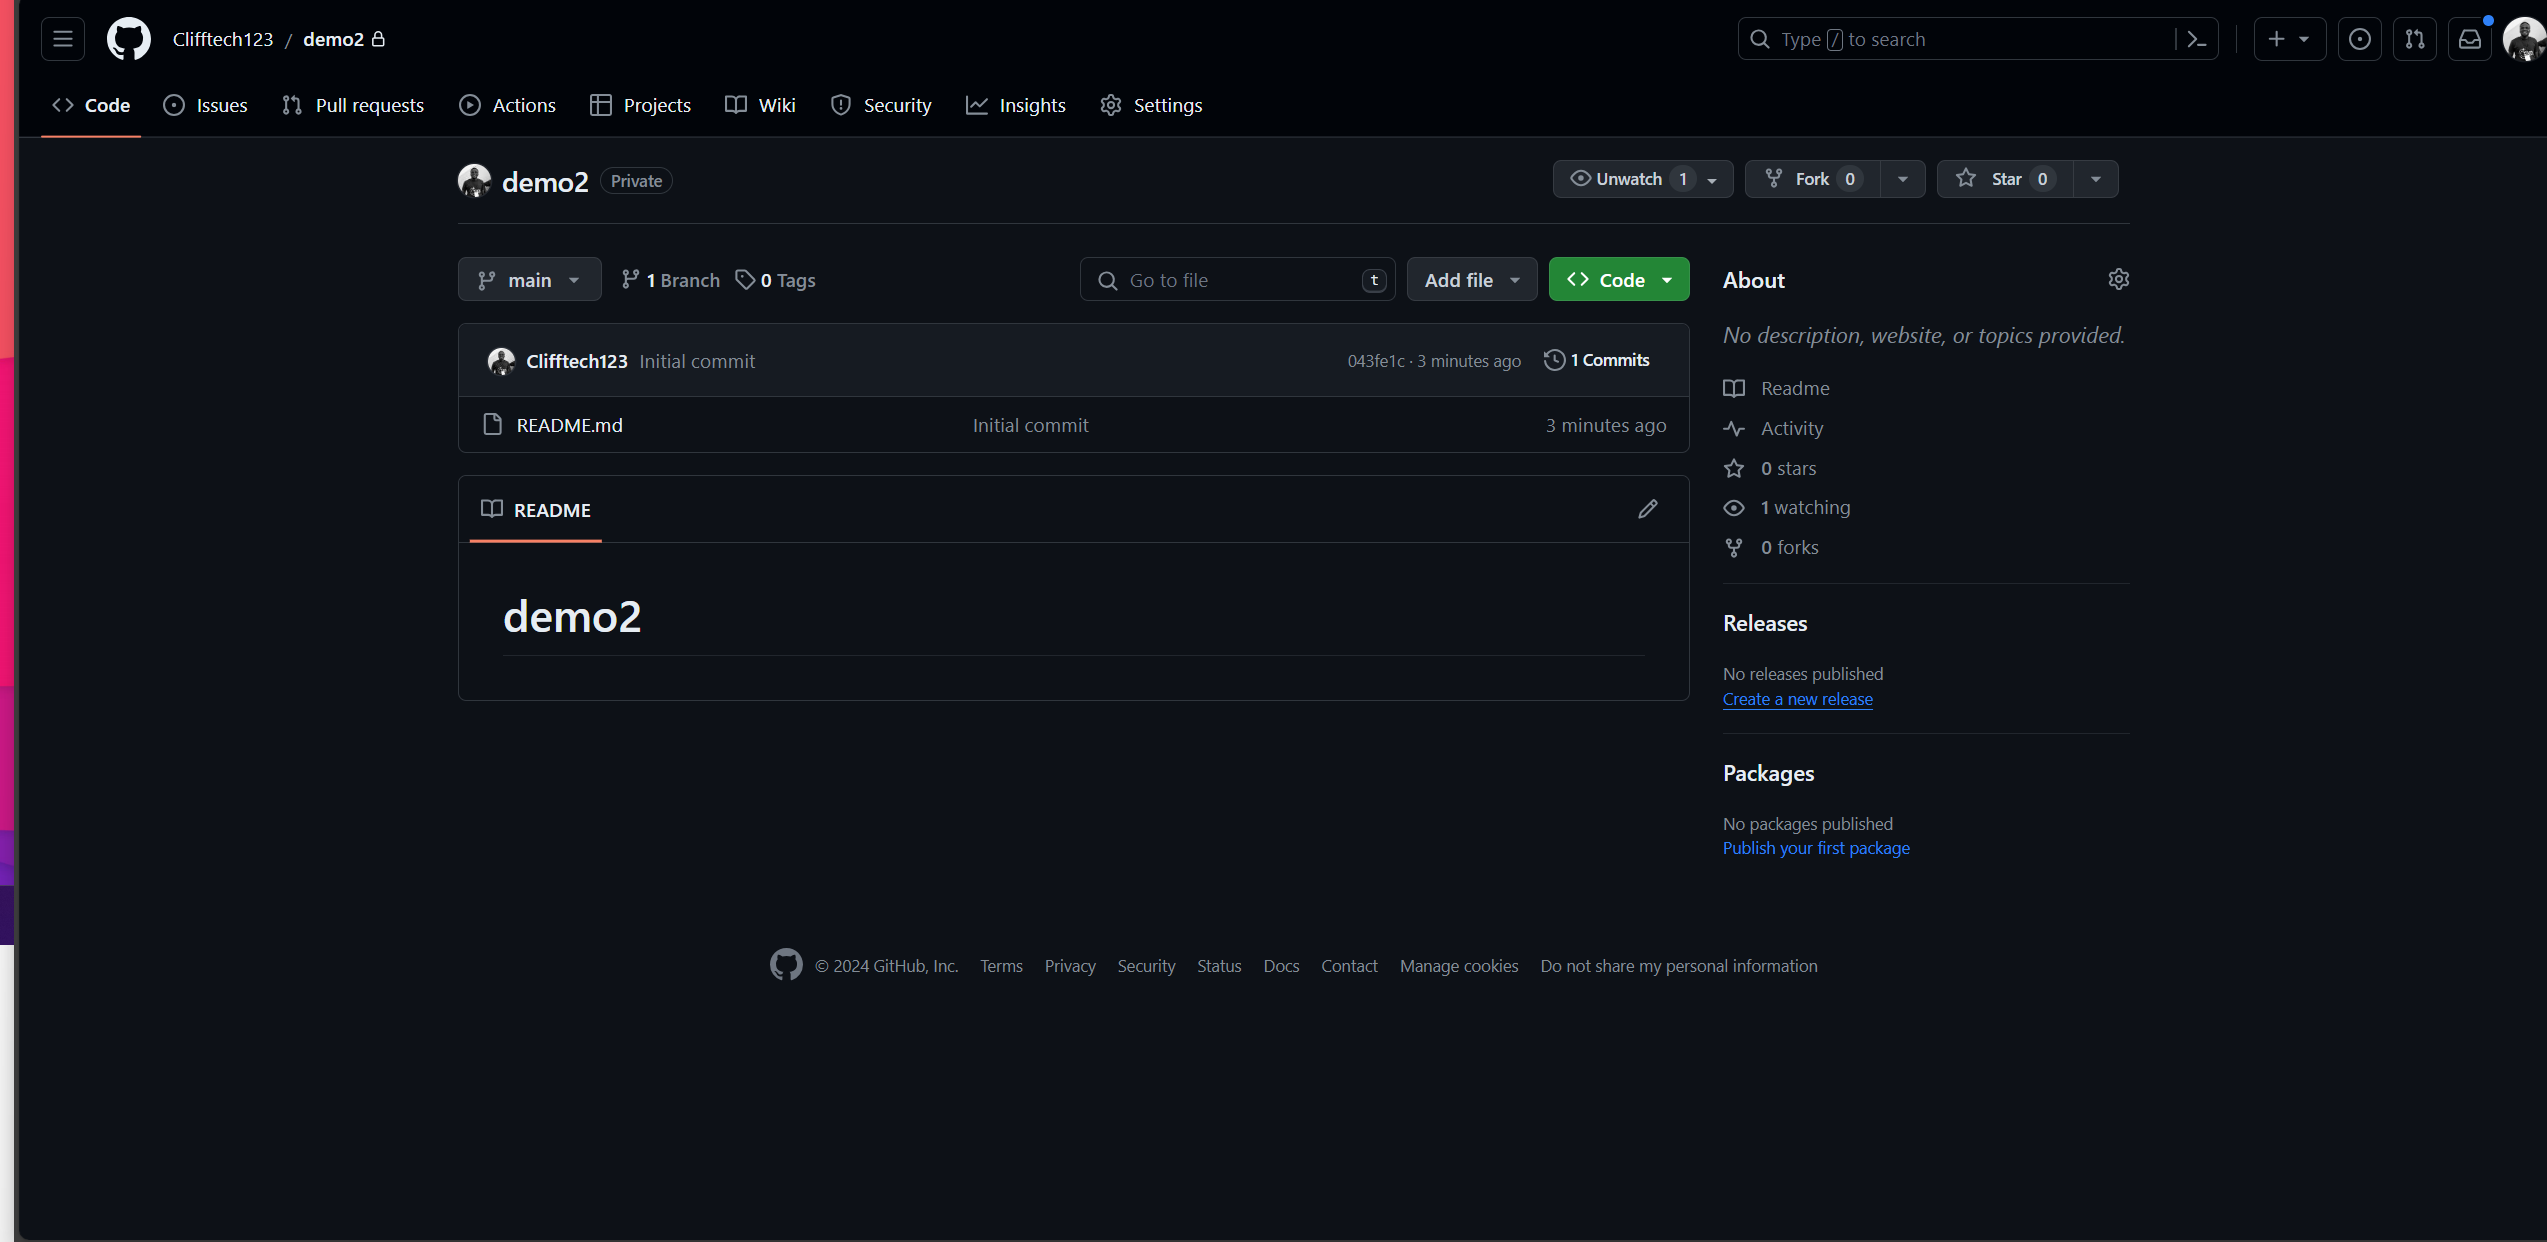
Congratulations! You have efficiently created a brand new repository on GitHub. You can now begin including recordsdata and making adjustments to your repository.
You ought to see a web page just like the one beneath:
Now let’s create a repository utilizing the command line.
How to Create a Repository Using the Git Command Line
To create a brand new repository utilizing the command line, you want to comply with these steps:
Open your terminal and navigate to the listing the place you need to create your new repository.
Use the
git initcommand to create a brand new repository. This command will create a brand new listing referred to as.gitin your present listing, which is able to include all the mandatory recordsdata to your repository.
# initialize a brand new repository referred to as my-project

$ git init my-project

The picture above reveals the command to initialize a brand new repository referred to as my-project.
- Once you’ve gotten created your new repository, you can begin including recordsdata and making adjustments to it. You can even join your native repository to a distant repository on GitHub by following the directions supplied on the GitHub web site.
Congratulations! You have efficiently created a brand new repository utilizing the command line.
Now we have now efficiently created a repository utilizing the GitHub web site and the command line – however how will we join them? Now let’s discover ways to join a neighborhood repository to a distant repository on GitHub.
How to Connect a Local Repository to a Remote Repository on GitHub
To join your native repository to a distant repository on GitHub, you want to comply with these steps:
On GitHub, navigate to the principle web page of the repository you created earlier.
Click on the
Codebutton to repeat the URL of your repository.
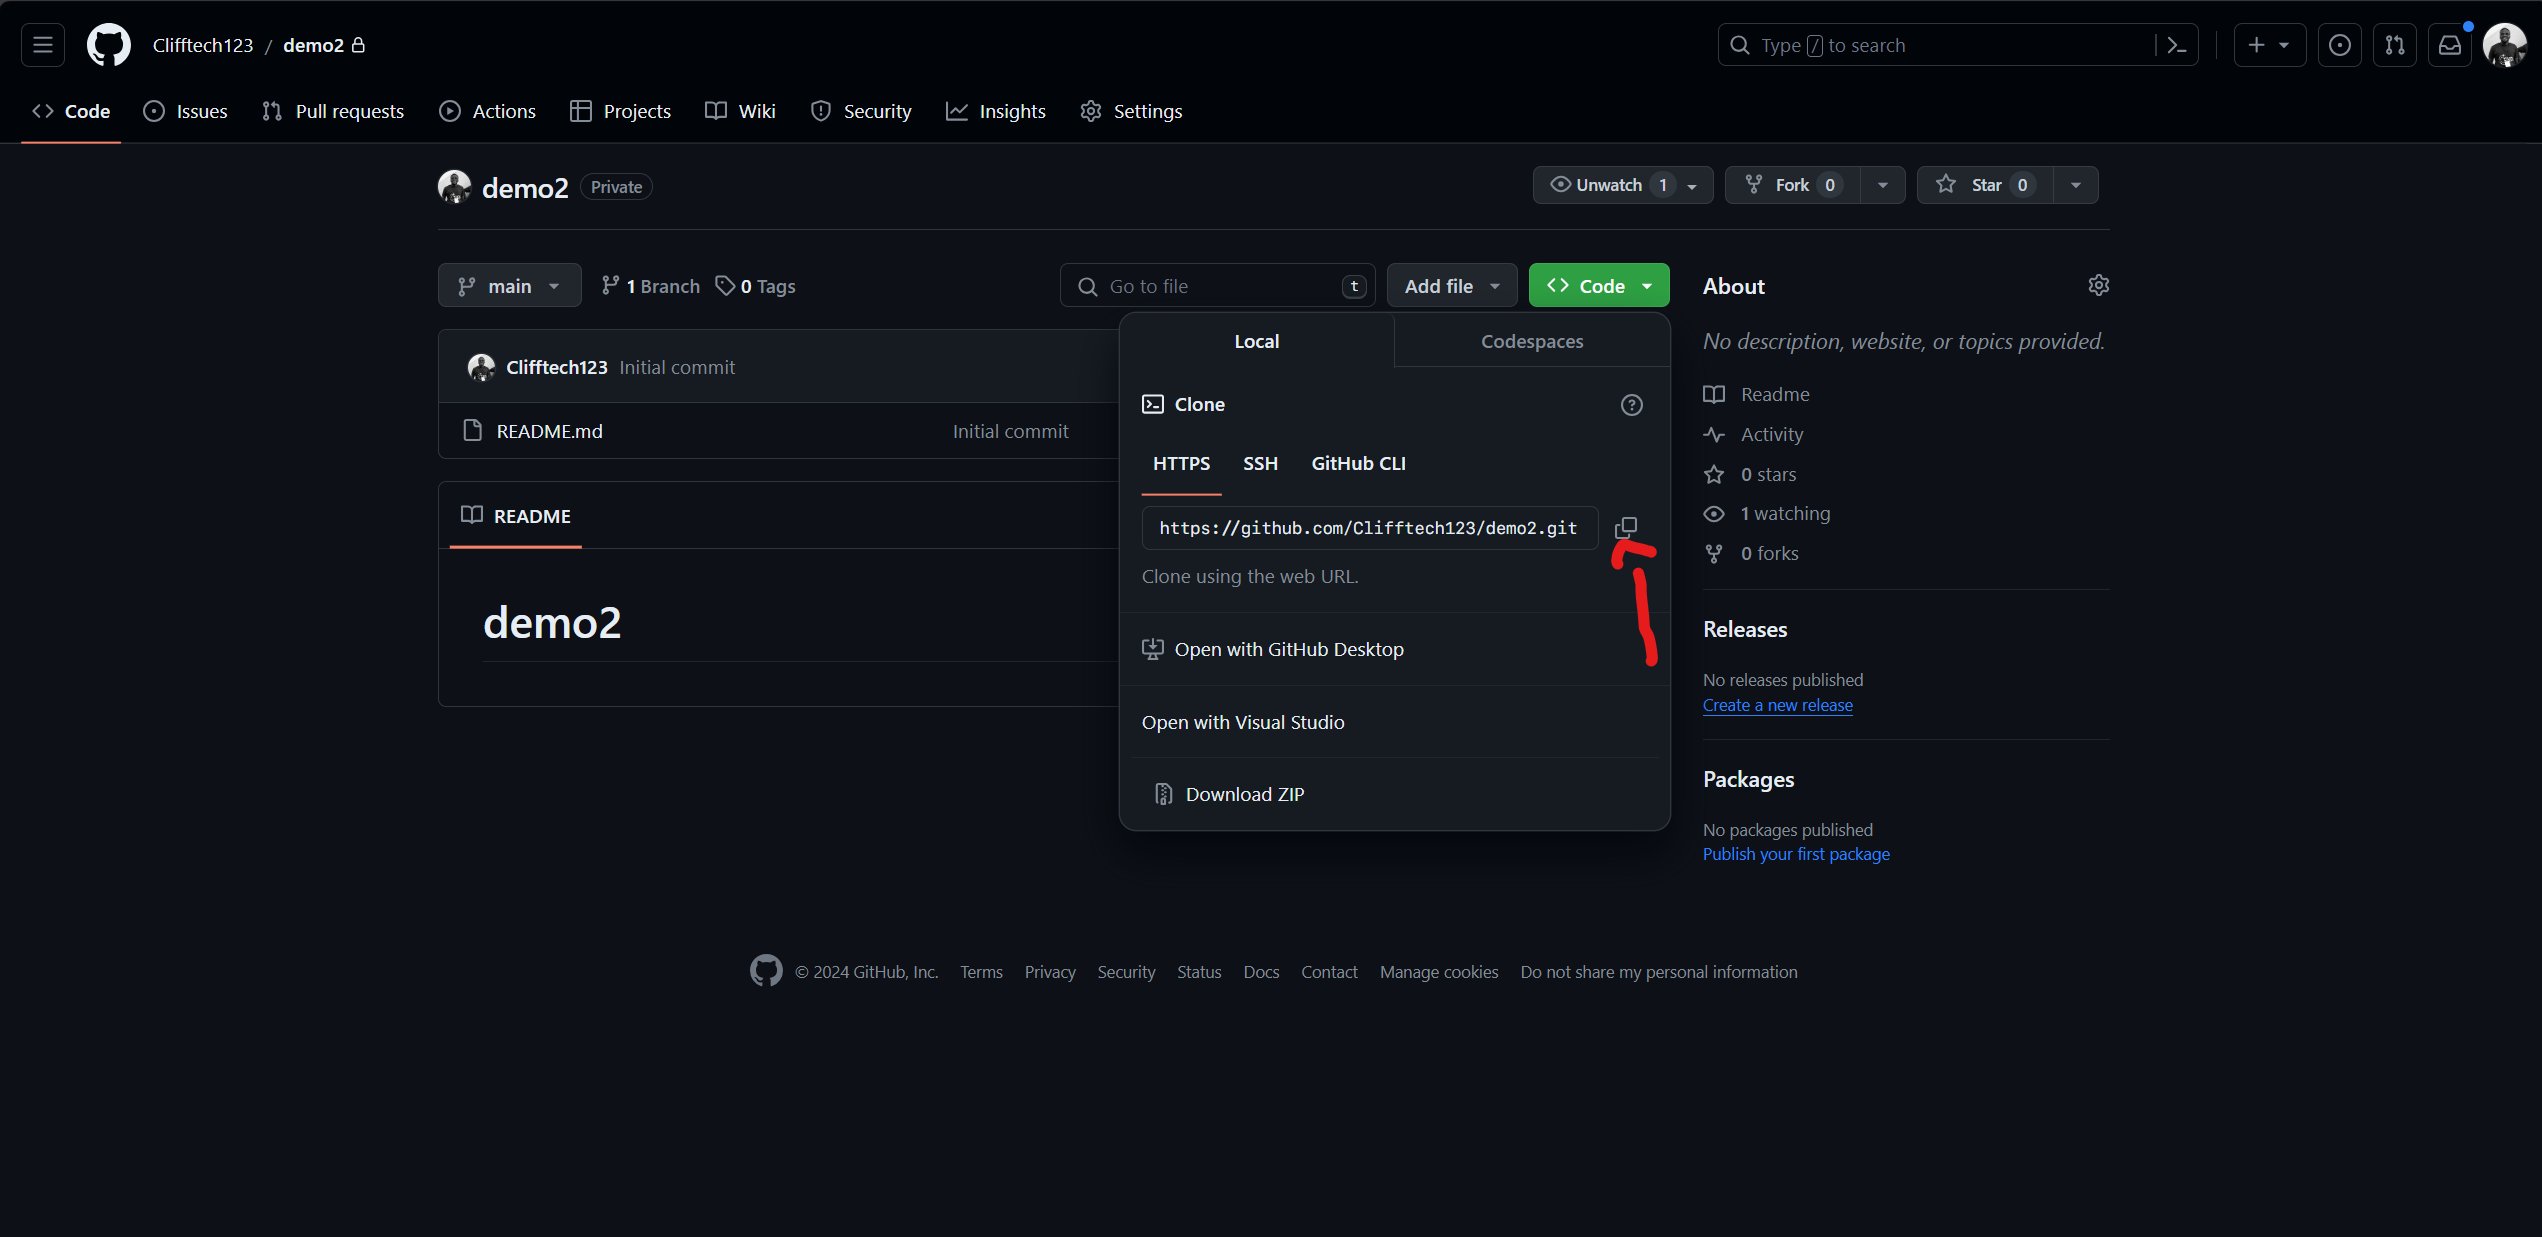
The picture above reveals the code button to repeat the URL of your repository.
In your terminal, navigate to the listing of your native repository.
Use the
git distant add origincommand to attach your native repository to the distant repository on GitHub. Replace repository-URL with the URL of your repository.
$ git distant add origin repository-url
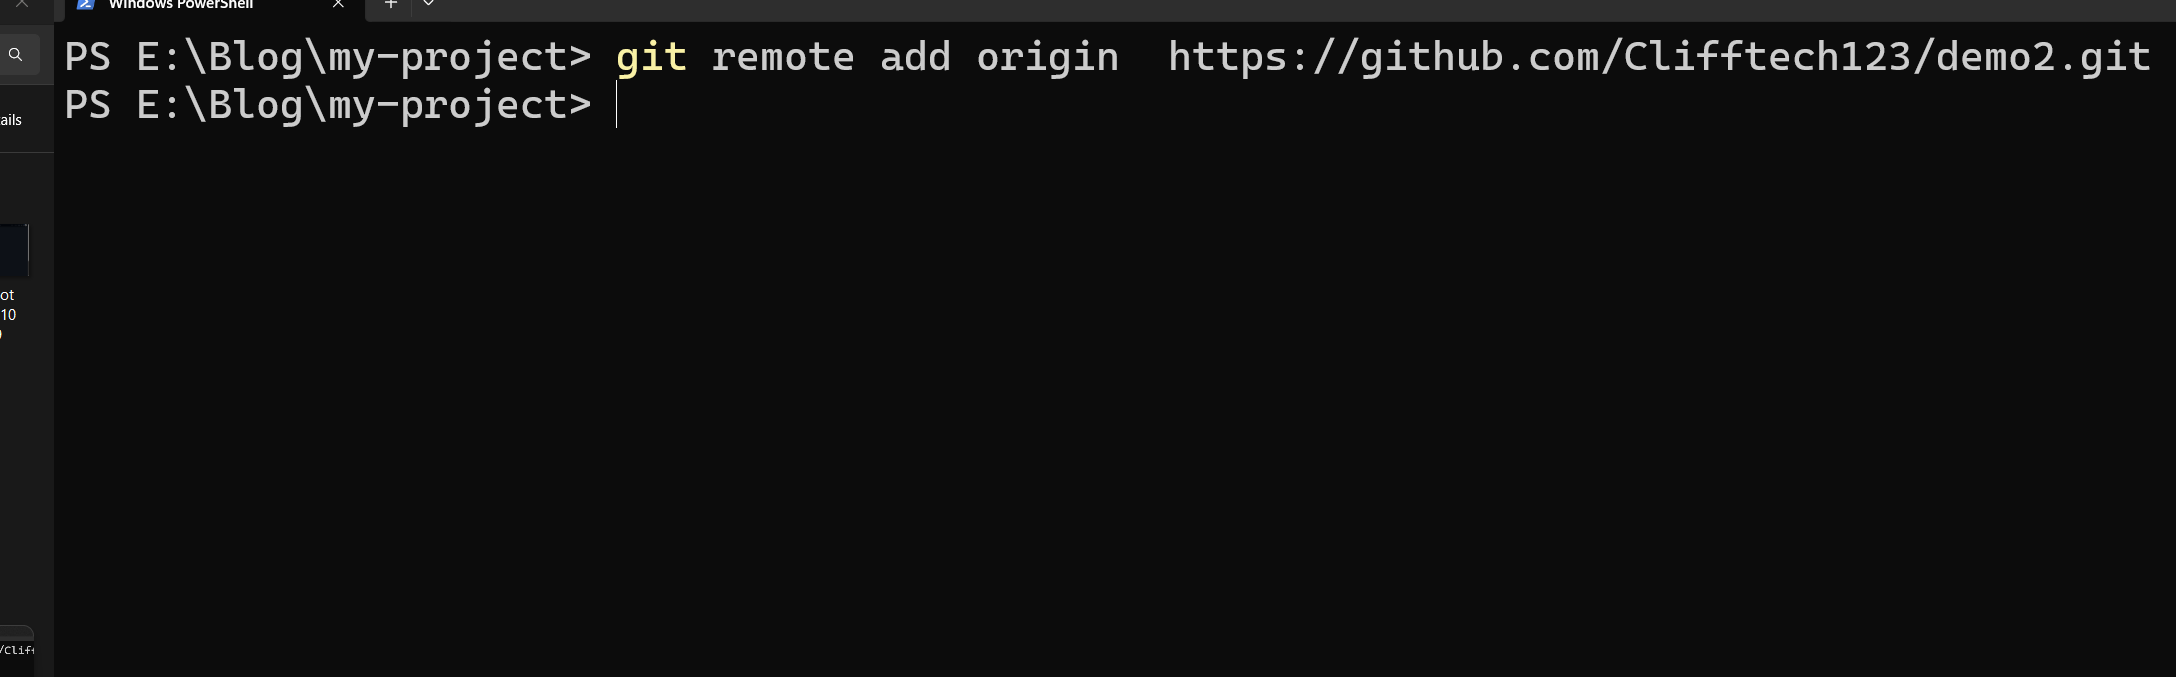
The picture above reveals the command to attach your native repository to the distant repository on GitHub.
- Once you’ve gotten linked your native repository to the distant repository on GitHub, you can begin pushing your adjustments to the distant repository utilizing the
git pushcommand.
Congratulations! You have efficiently linked your native repository to the distant repository on GitHub.
How to Pull Changes from a Remote Repository to a Local Repository
To pull adjustments from the distant repository to the native repository, you want to comply with these steps:
In your terminal, navigate to the listing of your native repository.
Use the
git pullcommand to tug adjustments from the distant repository to the native repository.
$ git pull origin most important
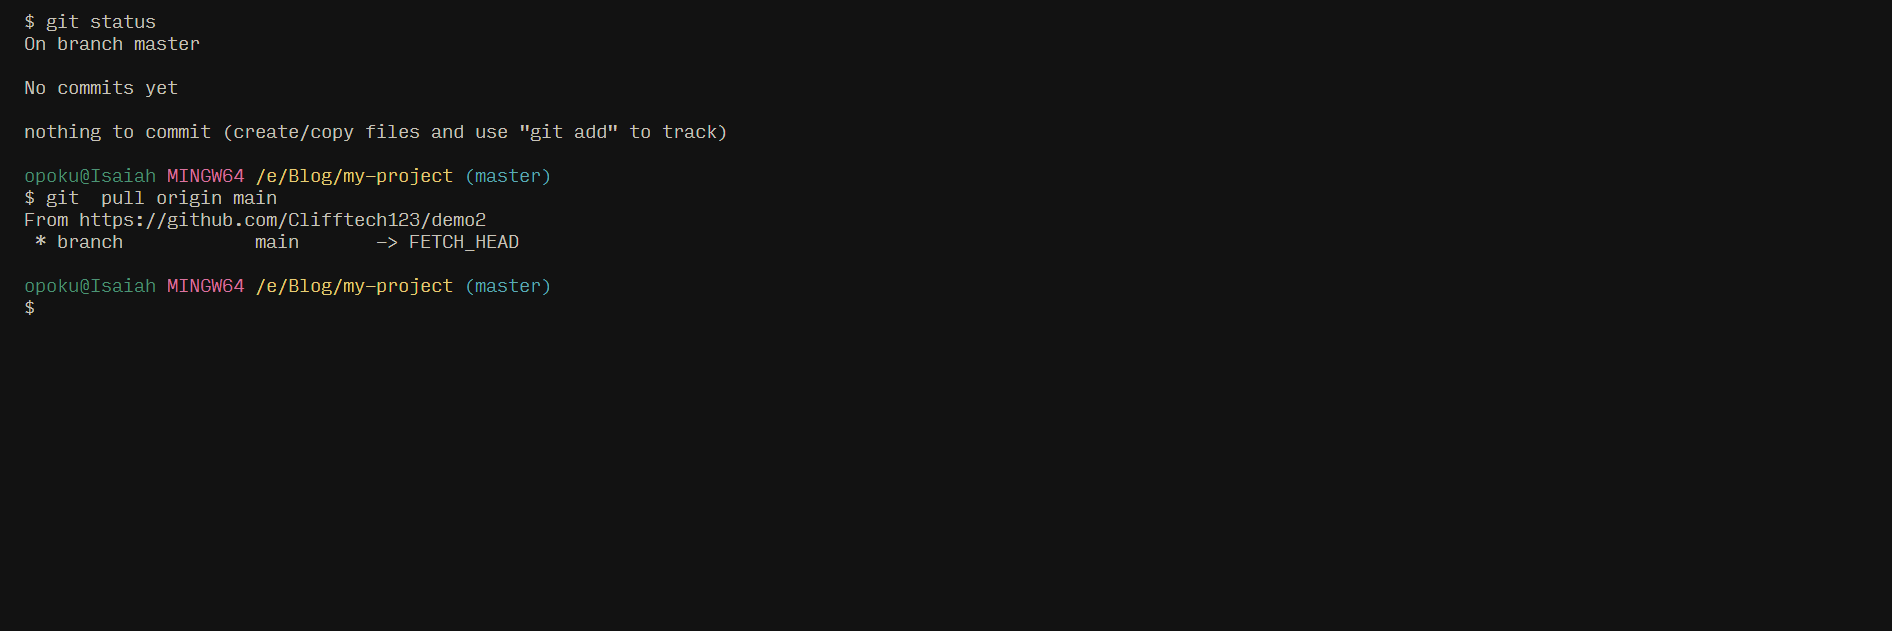
The picture above reveals the command to tug adjustments from the distant repository to the native repository.
After that, navigate the principle department through the use of the next command:
$ git checkout most important
Congratulations! You have efficiently pulled adjustments from a distant repository to a neighborhood repository. Your native repository is now up-to-date with the distant repository on GitHub*.
How to Work with Git Commands
In this part, we’ll cowl among the mostly used Git instructions and their capabilities. These instructions will enable you to navigate your approach by way of the Git workflow in your GitHub repository. Let’s get began.
First, I’ll add some recordsdata in order that we are able to begin utilizing the Git instructions.
How to Make Changes to a File
To make adjustments to a file in Git, you want to comply with these steps:
Open your terminal and navigate to the listing of your native repository.
Use a textual content editor to make adjustments to the file. For instance, you should use the
codecommand to open the file in Visual Studio Code.
$ code file-name # For instance, code index.html
- Once you’ve gotten made your adjustments, save the file and shut the textual content editor.
Congratulations! You have efficiently made adjustments to a file in your native repository. Next, let’s proceed to the subsequent step: staging adjustments.
The picture above reveals the brand new file I added which is a React and TypeScript app.
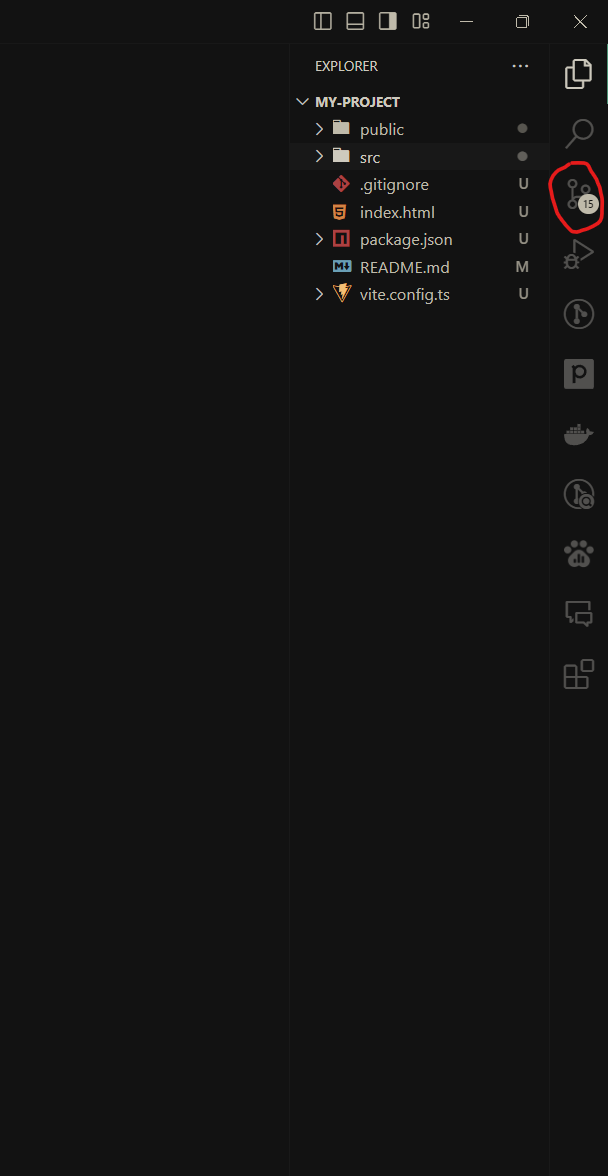
Visual Studio Code (VS Code) features a supply management function that permits you to work together instantly together with your GitHub repository. This function helps a wide range of operations, together with staging, committing, pushing, and pulling adjustments.
In addition to the supply management function, you can too use the built-in terminal in VS Code to work together together with your GitHub repository.
Currently, when you take a look at the supply management part in VS Code, you will see the file we added listed underneath adjustments.
Next, let’s discover methods to use the terminal to work together with our GitHub repository.
Open your terminal and navigate to the listing of your native repository.
Now, let’s use the git standing command to examine the standing of the present department.
How to Check the Status of the Current Branch
The git standing command reveals the standing of the present department, together with any adjustments which have been made to the recordsdata within the repository. It offers details about which recordsdata have been modified, which recordsdata have been staged, and which recordsdata are untracked.
This command is helpful for understanding the present state of your repository and figuring out which recordsdata have to be staged and dedicated.
#  Check the standing of the present department

$ git standing  # On department grasp
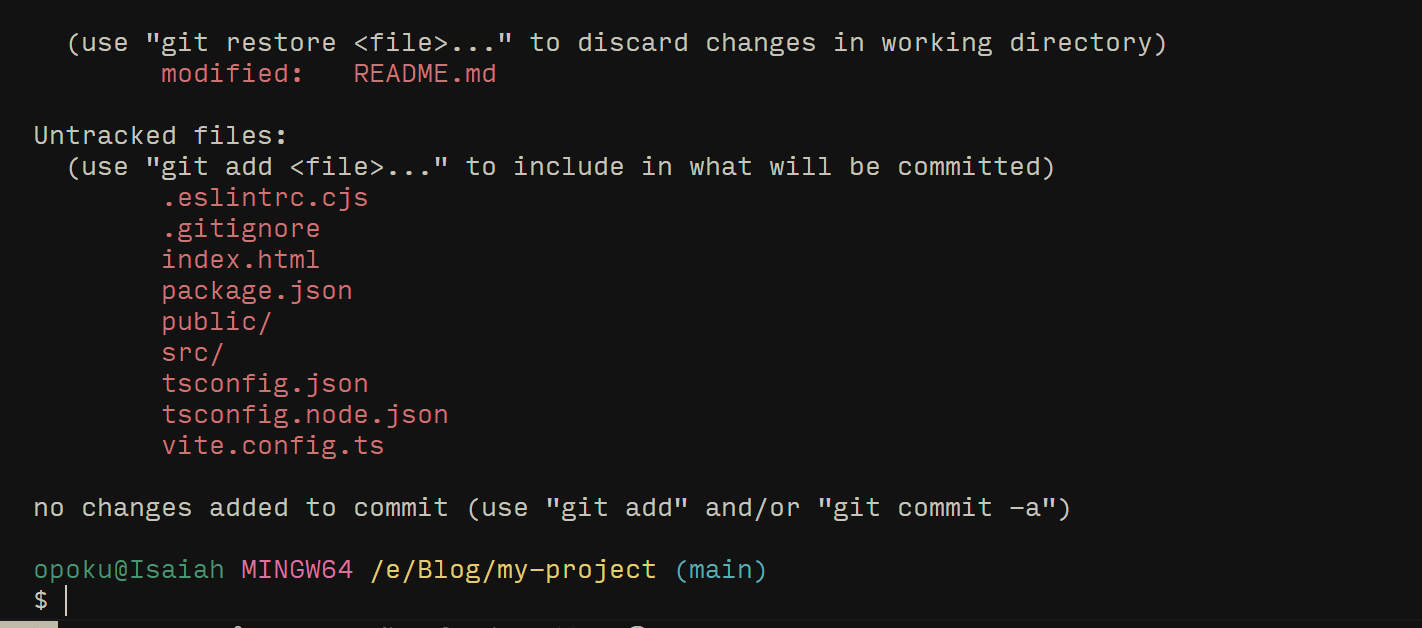
The picture above reveals the command to examine the standing of the present department.
You might discover that components of the file are highlighted in several colours. The pink coloration signifies that the file has been modified, whereas the inexperienced coloration signifies that the file has been added to the staging space.
Currently, all recordsdata must be highlighted in pink as a result of we have now not but added any recordsdata to the staging space.
Let’s add the file to the staging space utilizing the git add command.
How to Stage Changes
The git add command provides recordsdata to the staging space, making ready them for the subsequent commit. You can add all of the recordsdata within the present listing to the staging space utilizing the git add . command.
If you need to add a particular file, use the git add <file-name> command, changing <file-name> with the identify of your file. This course of is called staging, which prepares recordsdata for the subsequent commit.
# Add recordsdata to the staging space

$ git add .  # Changes to be dedicated:

or

$ git add file-name  # Changes to be dedicated:
Think of it like this: stepping into the automobile is like including recordsdata to the staging space, and driving the automobile is like making a commit.
Now, let’s use the git commit command to commit the adjustments to the present department.
How to Commit Changes
The git commit command commits the adjustments to the present department. You can use the -m flag so as to add a message to your commit. This message ought to present a quick abstract of the adjustments you have made.
For occasion, “Initial commit” may very well be your commit message. This command is used to avoid wasting the adjustments to the native repository.
# Commit adjustments to the present department

$ git commit -m "Commit message"   # For instance, git commit -m "Initial commit"
We’ve efficiently dedicated the adjustments to the present department. Next, we’ll push these adjustments to the distant repository on GitHub utilizing the git push command.
How to Push Changes to a Remote Repository
The git push command pushes adjustments out of your native repository to a distant repository on GitHub. You can use the git push command to push adjustments out of your native repository to the distant repository on GitHub. This course of is crucial for updating the distant repository with the adjustments you have made regionally.
# Push adjustments to a distant repository

$ git push origin most important  # For instance, git push origin grasp
Congratulations! You have efficiently pushed your adjustments to the distant repository on GitHub. You can now view your adjustments on the GitHub web site.
Now that we have efficiently pushed our adjustments to the distant repository on GitHub, let’s proceed to the subsequent step: making a department.
Depending in your PC atmosphere, your native repository might have a default department named both most important or grasp. In this information, we’ll use most important because the default department identify, aligning with GitHub’s current change from grasp to most important.
Before we begin including recordsdata, let’s guarantee our native repository is up-to-date with the distant repository by pulling any adjustments.
If the time period department appears unfamiliar, don’t fret. In the subsequent part, we’ll cowl methods to create a department and methods to pull adjustments from the distant repository to the native repository.
How to Create a Branch
Branching is a elementary idea in Git. It permits you to diverge from the principle line of improvement and proceed working with out impacting the principle codebase.
In this part, I’ll information you thru the method of making a brand new department utilizing the git department command. This command creates a brand new department however doesn’t change to it. In the next steps, we’ll additionally cowl methods to change to your newly created department utilizing the git checkout command. Let’s dive in.
To create a brand new department, you want to comply with these steps:
Open your terminal and navigate to the listing of your native repository.
Use the
git departmentcommand to create a brand new department. Replace<branch-name>with the identify of your new department.
# Create a brand new department

$ git department <branch-name>  # For instance, git department feature-branch
The git department command creates a brand new department however doesn’t change to it. To change to your newly created department, use the git checkout command.
# Switch to the newly created department

$ git checkout <branch-name>  # For instance, git checkout feature-branch
The git checkout command is used to modify from one department to a different. Replace <branch-name> with the identify of your new department. In this case, we’re switching to the feature-branch department. But we if need to delete the department, we are able to use the next command:
# Delete a department

$ git department -d <branch-name>  # For instance, git department -d feature-branch
The git department -d command is used to delete a department. Replace <branch-name> with the identify of the department you need to delete. In this case, we’re deleting the feature-branch department.
Congratulations! You have efficiently created a brand new department and switched to it. You can now begin including recordsdata and making adjustments to your new department.
Now you know the way to create GitHub repository, join a neighborhood repository to a distant repository on GitHub, pull adjustments from a distant repository to a neighborhood repository, work with Git instructions, and create a department.
Let’s proceed to the subsequent part, the place we’ll cowl methods to create a pull request. This is a vital step within the collaborative workflow, because it permits you to suggest adjustments and request a assessment from different collaborators.
How to Create a Pull Request
A pull request is a proposal to merge adjustments from one department into one other. It’s a widely-used methodology for creating and reviewing code. In this part, I’ll information you thru the method of making a pull request utilizing the GitHub web site.
For occasion, as an instance you’ve gotten a department named feature-branch and also you need to merge it into the most important department. We’ll stroll you thru methods to create a pull request for this state of affairs. Let’s get began.
First, let’s make a change to our function department by including a file to it:
$ git checkout feature-branch
You ought to see one thing like this in your terminal:
git checkout feature-branch
Switched to a brand new department 'feature-branch'
department 'feature-branch' set as much as observe 'origin/feature-branch'.
Now, let’s add a file to the function department.
$ contact feature-branch-file.txt
After working the command, you must see a brand new file referred to as feature-branch-file.txt in your listing.
The contact command is used to create a brand new file. Replace feature-branch-file.txt with the identify of your file. In this case, we’re creating a brand new file referred to as feature-branch-file.txt.
Now, let’s add some content material to the file.
$ echo "This is a file within the function department" >> feature-branch-file.txt
This command provides the textual content “This is a file within the function department” to the feature-branch-file.txt file.
The echo command is used so as to add content material to a file. In this case, we’re including the textual content “This is a file within the function department” to the feature-branch-file.txt file.
Now that we have now some textual content within the file, let’s stage and commit the adjustments to the function department.
$ git add .
The git add . command phases all of the adjustments within the present listing.
$ git commit -m "Add file to function department"
The git commit -m command commits the adjustments to the present department. Replace Add file to function department with your individual descriptive message. This message ought to present a quick abstract of the adjustments you have made. In this case, we’re committing the adjustments to the function department.
Now, let’s push the adjustments to the distant repository on GitHub.
$ git push origin feature-branch
The git push command is used to push adjustments out of your native repository to the distant repository on GitHub. Replace feature-branch with the identify of your department. In this case, we’re pushing the adjustments to the feature-branch department.
Congratulations! You have efficiently pushed your adjustments to the distant repository on GitHub. You can now view your adjustments on the GitHub web site.
Now while you open your GitHub repository, you must see a message indicating that you simply just lately pushed a brand new department. You can click on on the Compare & pull request button to create a pull request for the feature-branch department.
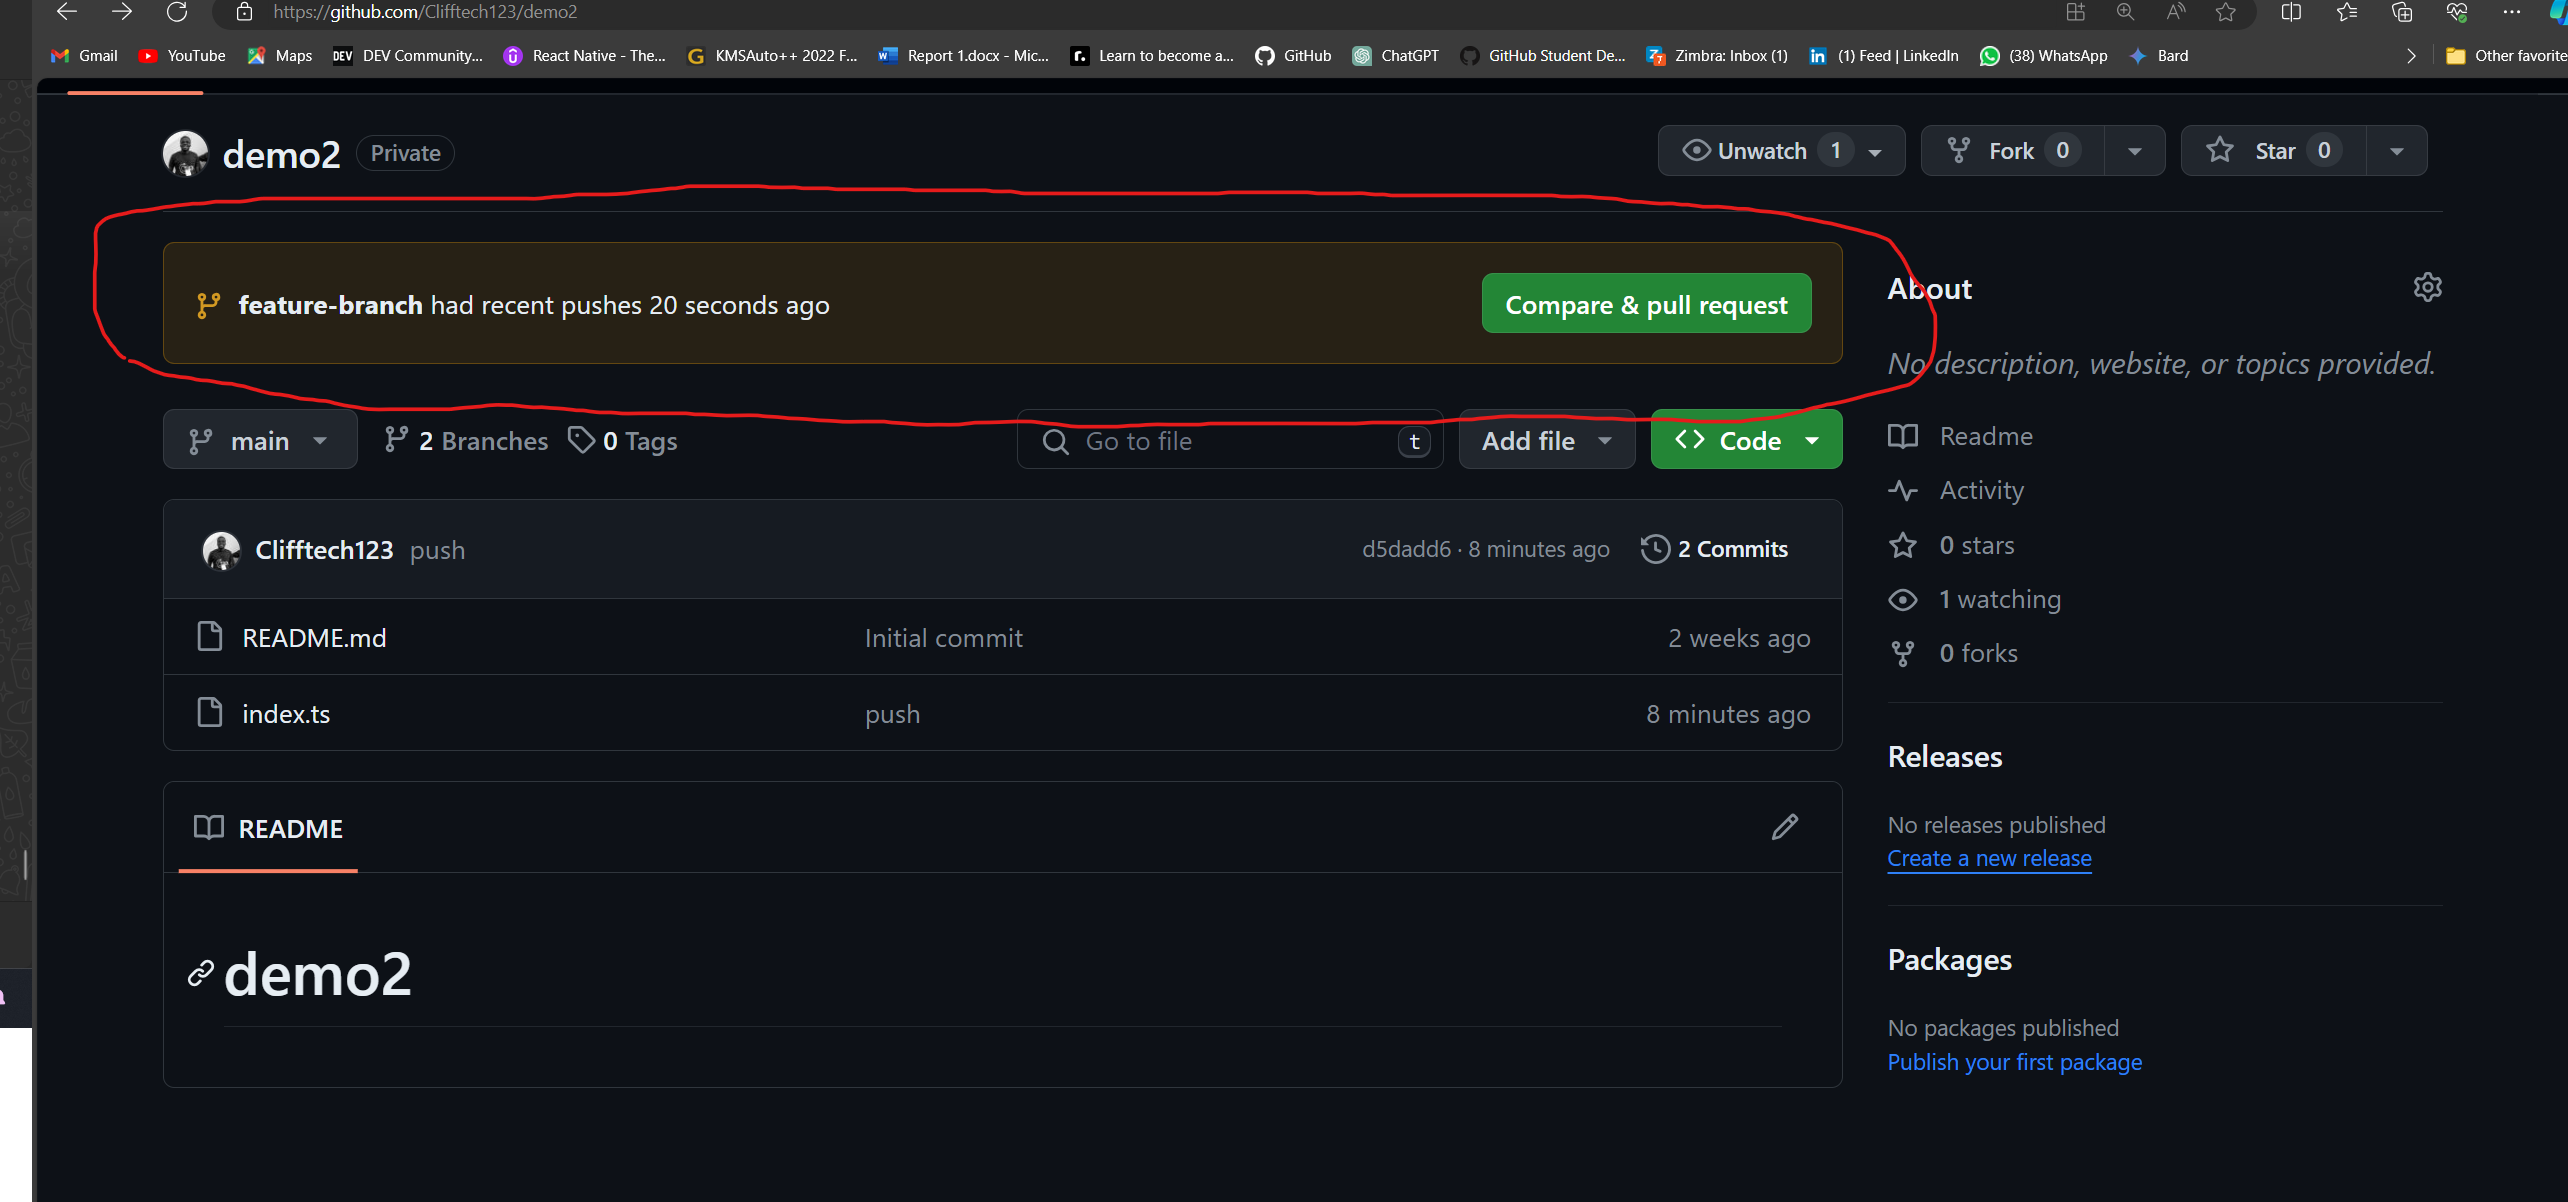
The picture above reveals the Compare & pull request button on GitHub.
After clicking on the Compare & pull request button, you can be directed to a brand new web page the place you may fill within the particulars of your pull request.
You might want to enter the next info:
- Title: a quick abstract of your pull request.
- Description: an in depth description of your pull request, together with details about the adjustments you have made and why you have made them.
- Reviewers: you may select to request a assessment from particular collaborators.
- Assignees: you may select to assign your pull request to particular collaborators.
- Labels: you may select so as to add labels to your pull request to categorize it.
- Projects: you may select so as to add your pull request to a challenge board.
- Milestone: you may select so as to add your pull request to a milestone.
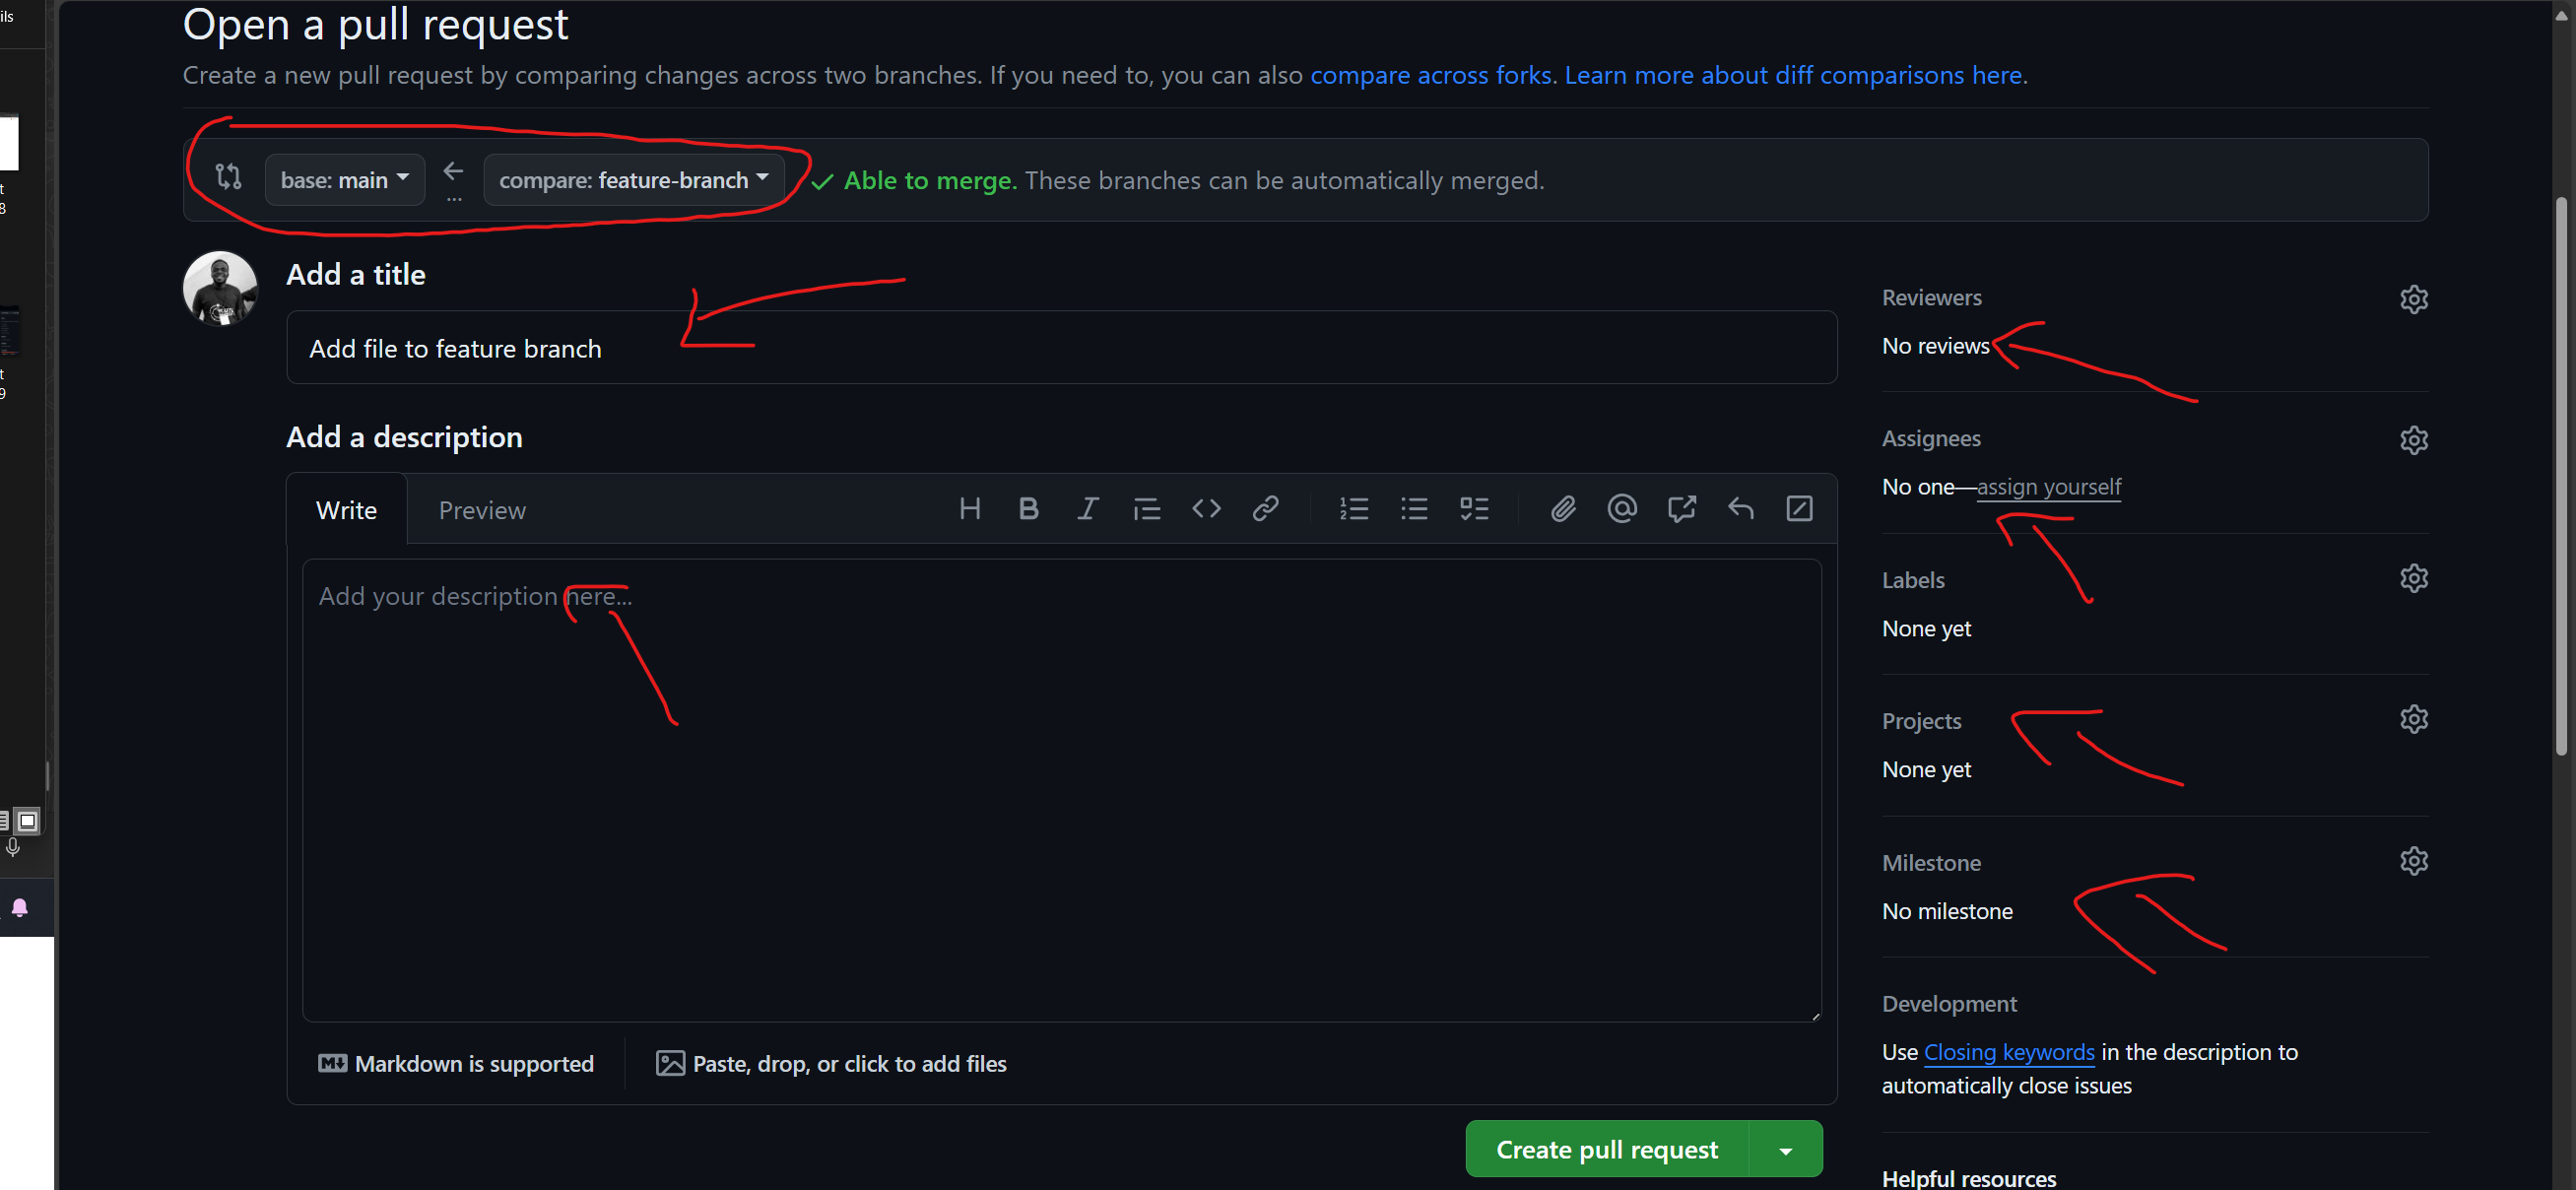
The picture above reveals the shape to fill within the particulars of your pull request.
You can resolve to file the main points of your pull request or create the pull request. After creating the pull request, you may view it on the GitHub web site. You can even request a assessment from particular collaborators and make adjustments to your pull request if crucial.
Once your pull request has been reviewed and authorized, you may merge it into the most important department. In our case we not going to file the shape however we’re going to create the pull request.
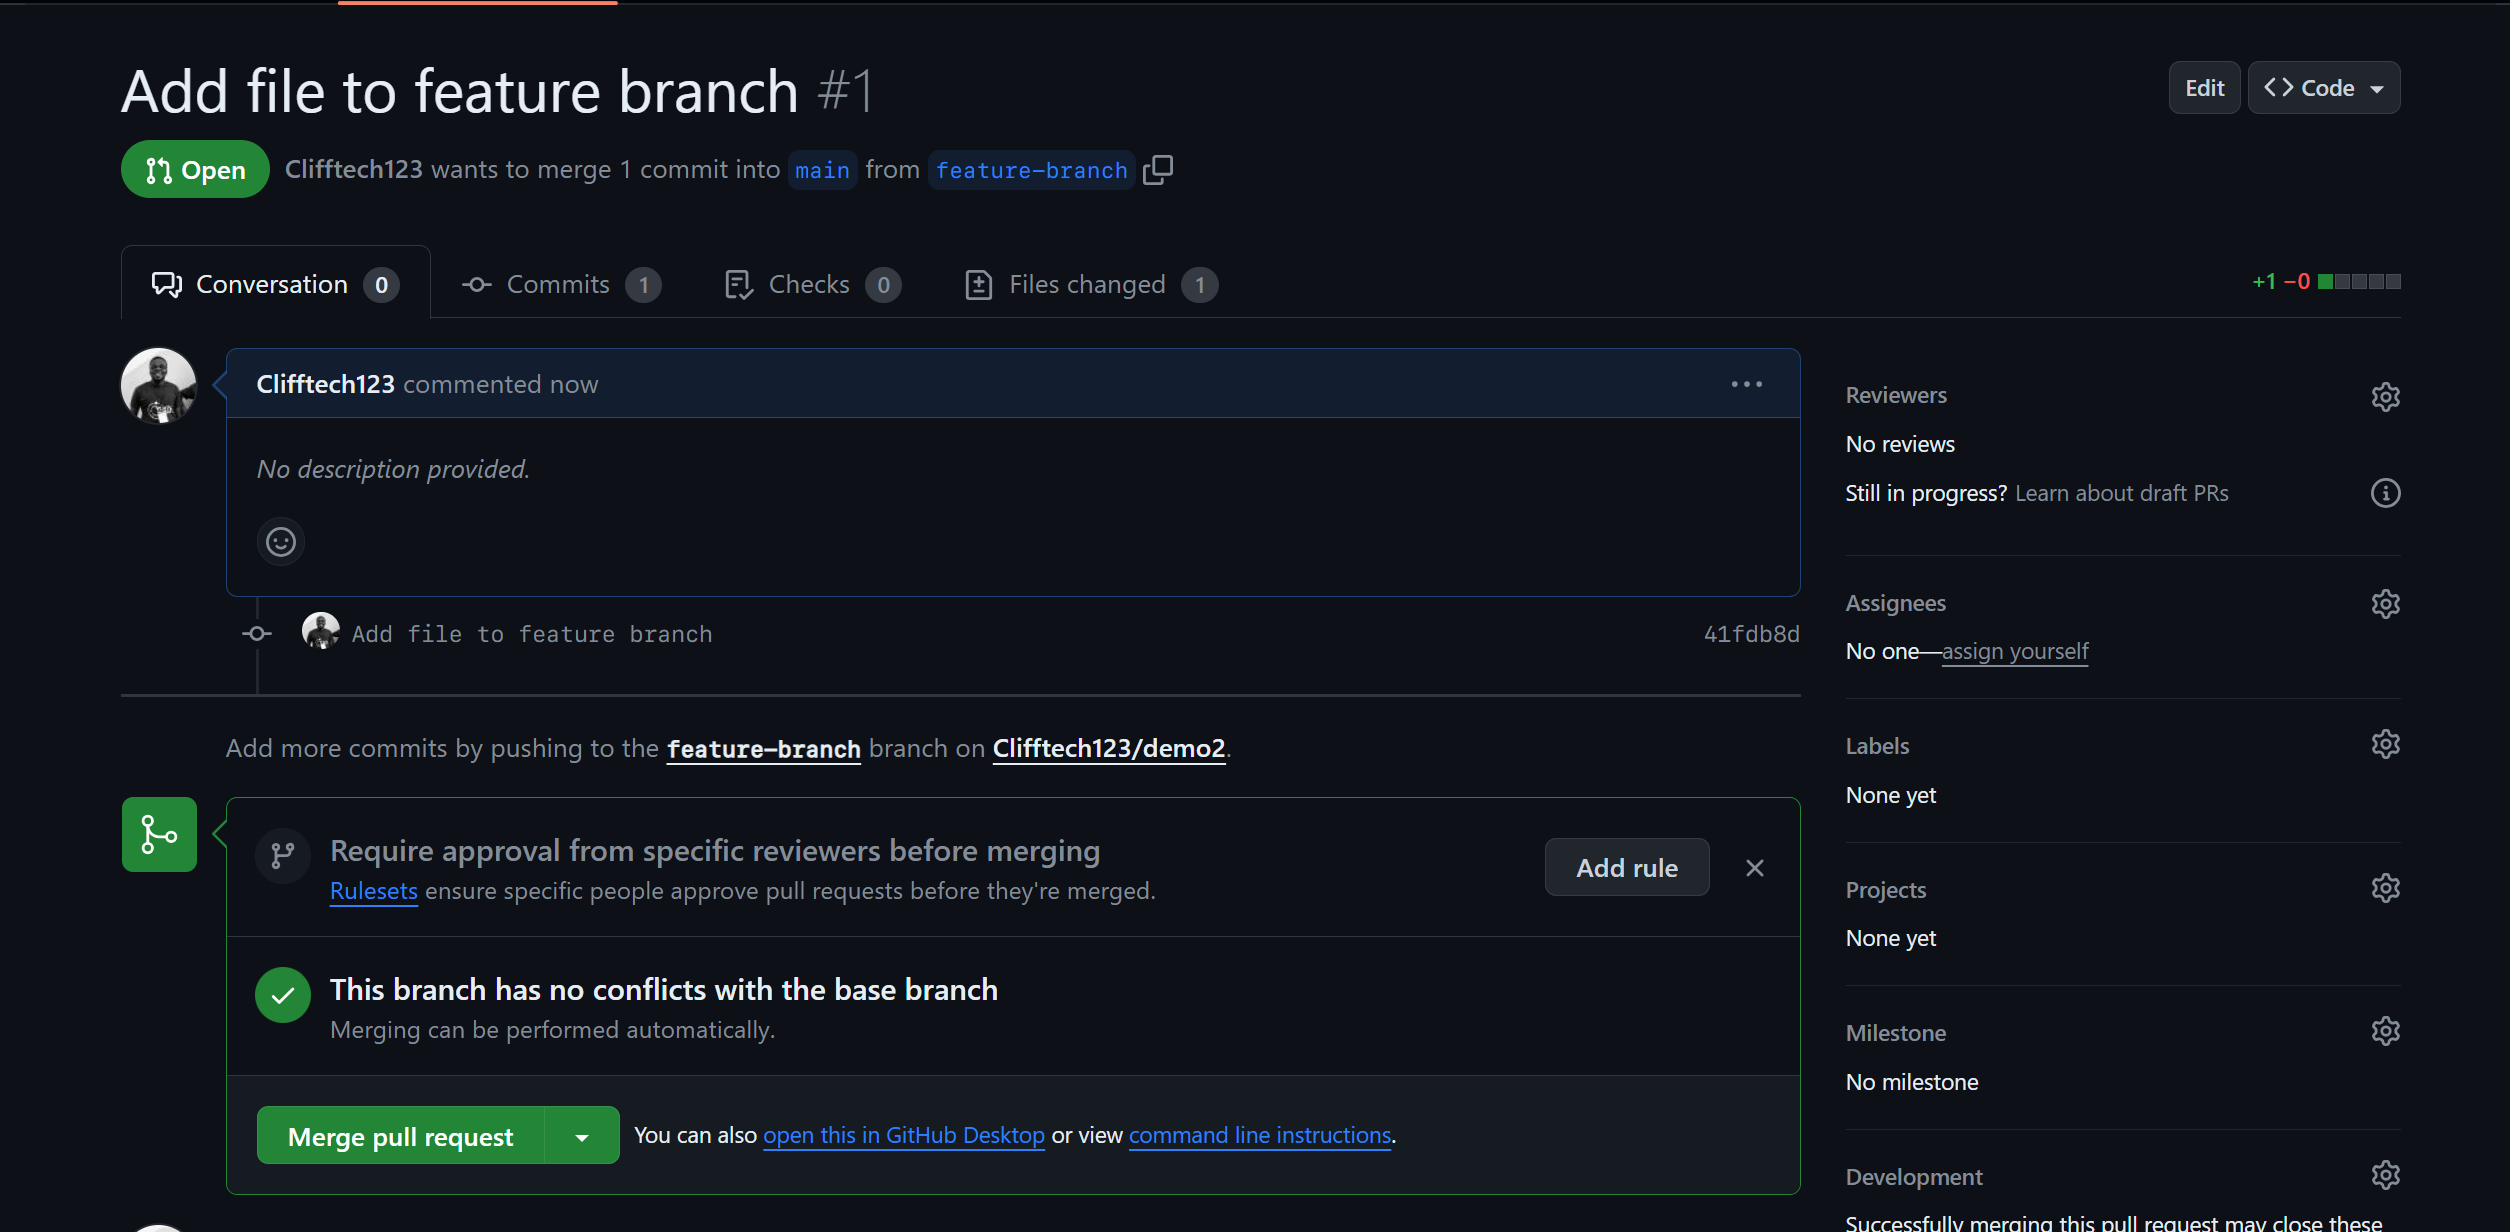
The picture above reveals the pull request created on GitHub.
Now that we have now created a pull request, let’s proceed to the subsequent part, the place we’ll cowl methods to merge a pull request. This is the ultimate step within the collaborative workflow, because it permits you to incorporate adjustments into the principle codebase.
How to Merge a Pull Requset
Merging a pull request signifies the mixing of adjustments from one department into one other, usually the principle department. This step is pivotal in collaborative workflows, enabling the assimilation of modifications into the first codebase.
In this part, we’ll navigate the method of merging a pull request through the GitHub web site.
After making a pull request, you may merge it into the most important department by following these steps:
On GitHub, navigate to the principle web page of the repository the place you created the pull request.
Click on the
Pull requeststab to view the checklist of pull requests.
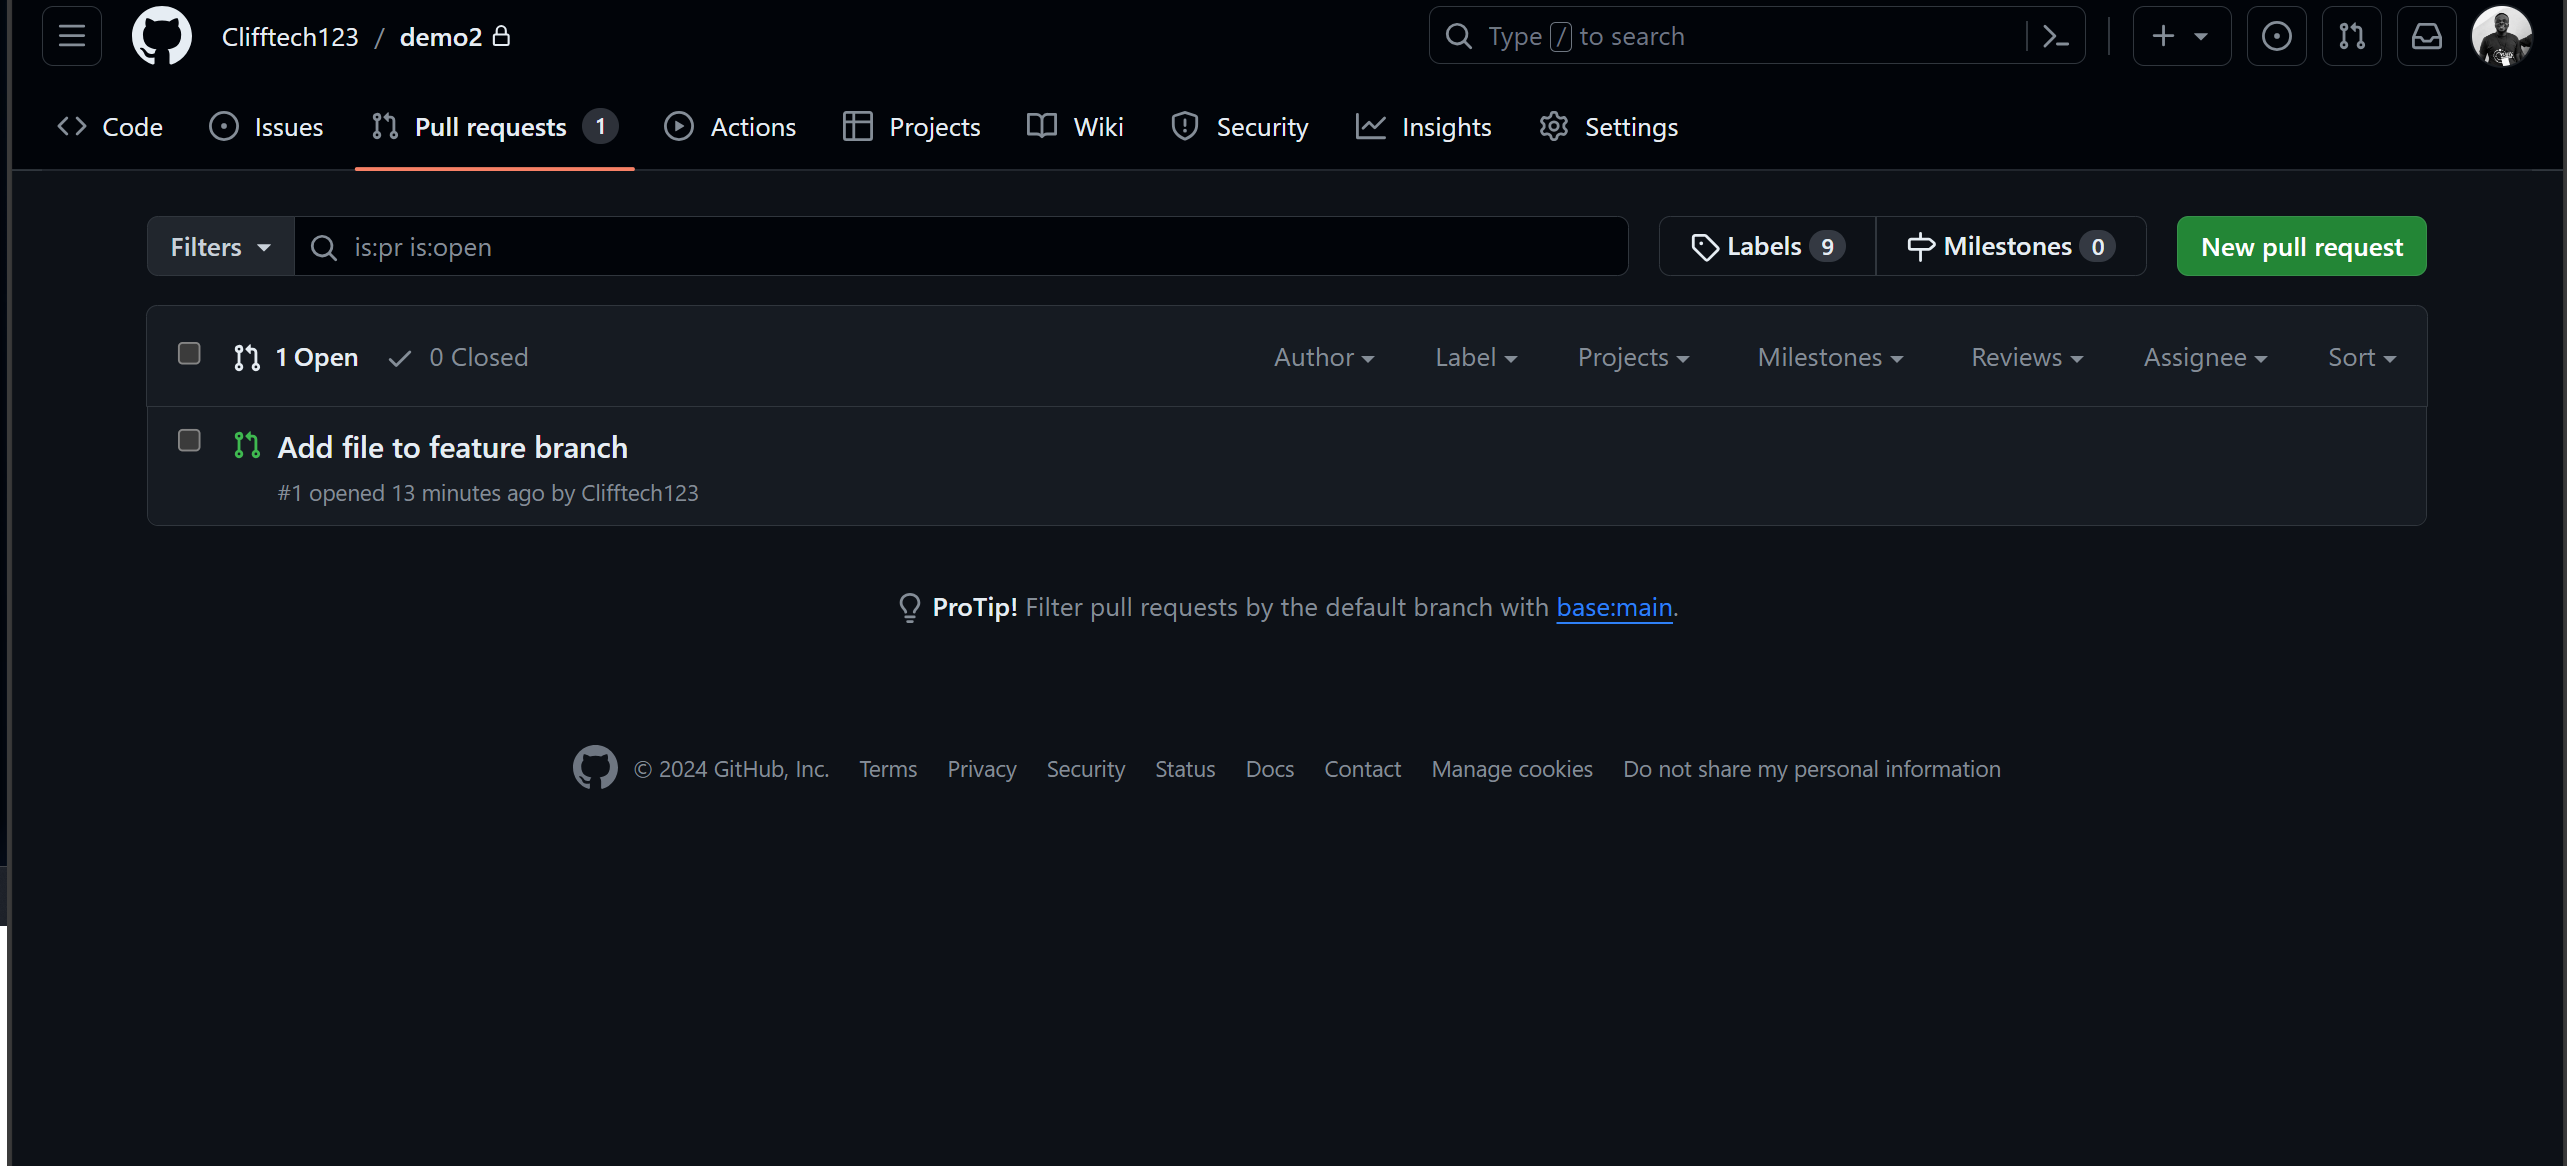
The picture above reveals the Pull requests tab on GitHub.
Click on the pull request you need to merge.
Click on the
Merge pull requestbutton to merge the pull request into themost importantdepartment.Click on the
Confirm mergebutton to verify the merge.
After that you must see a message indicating that the pull request has been efficiently merged. You can even delete the department after merging the pull request.
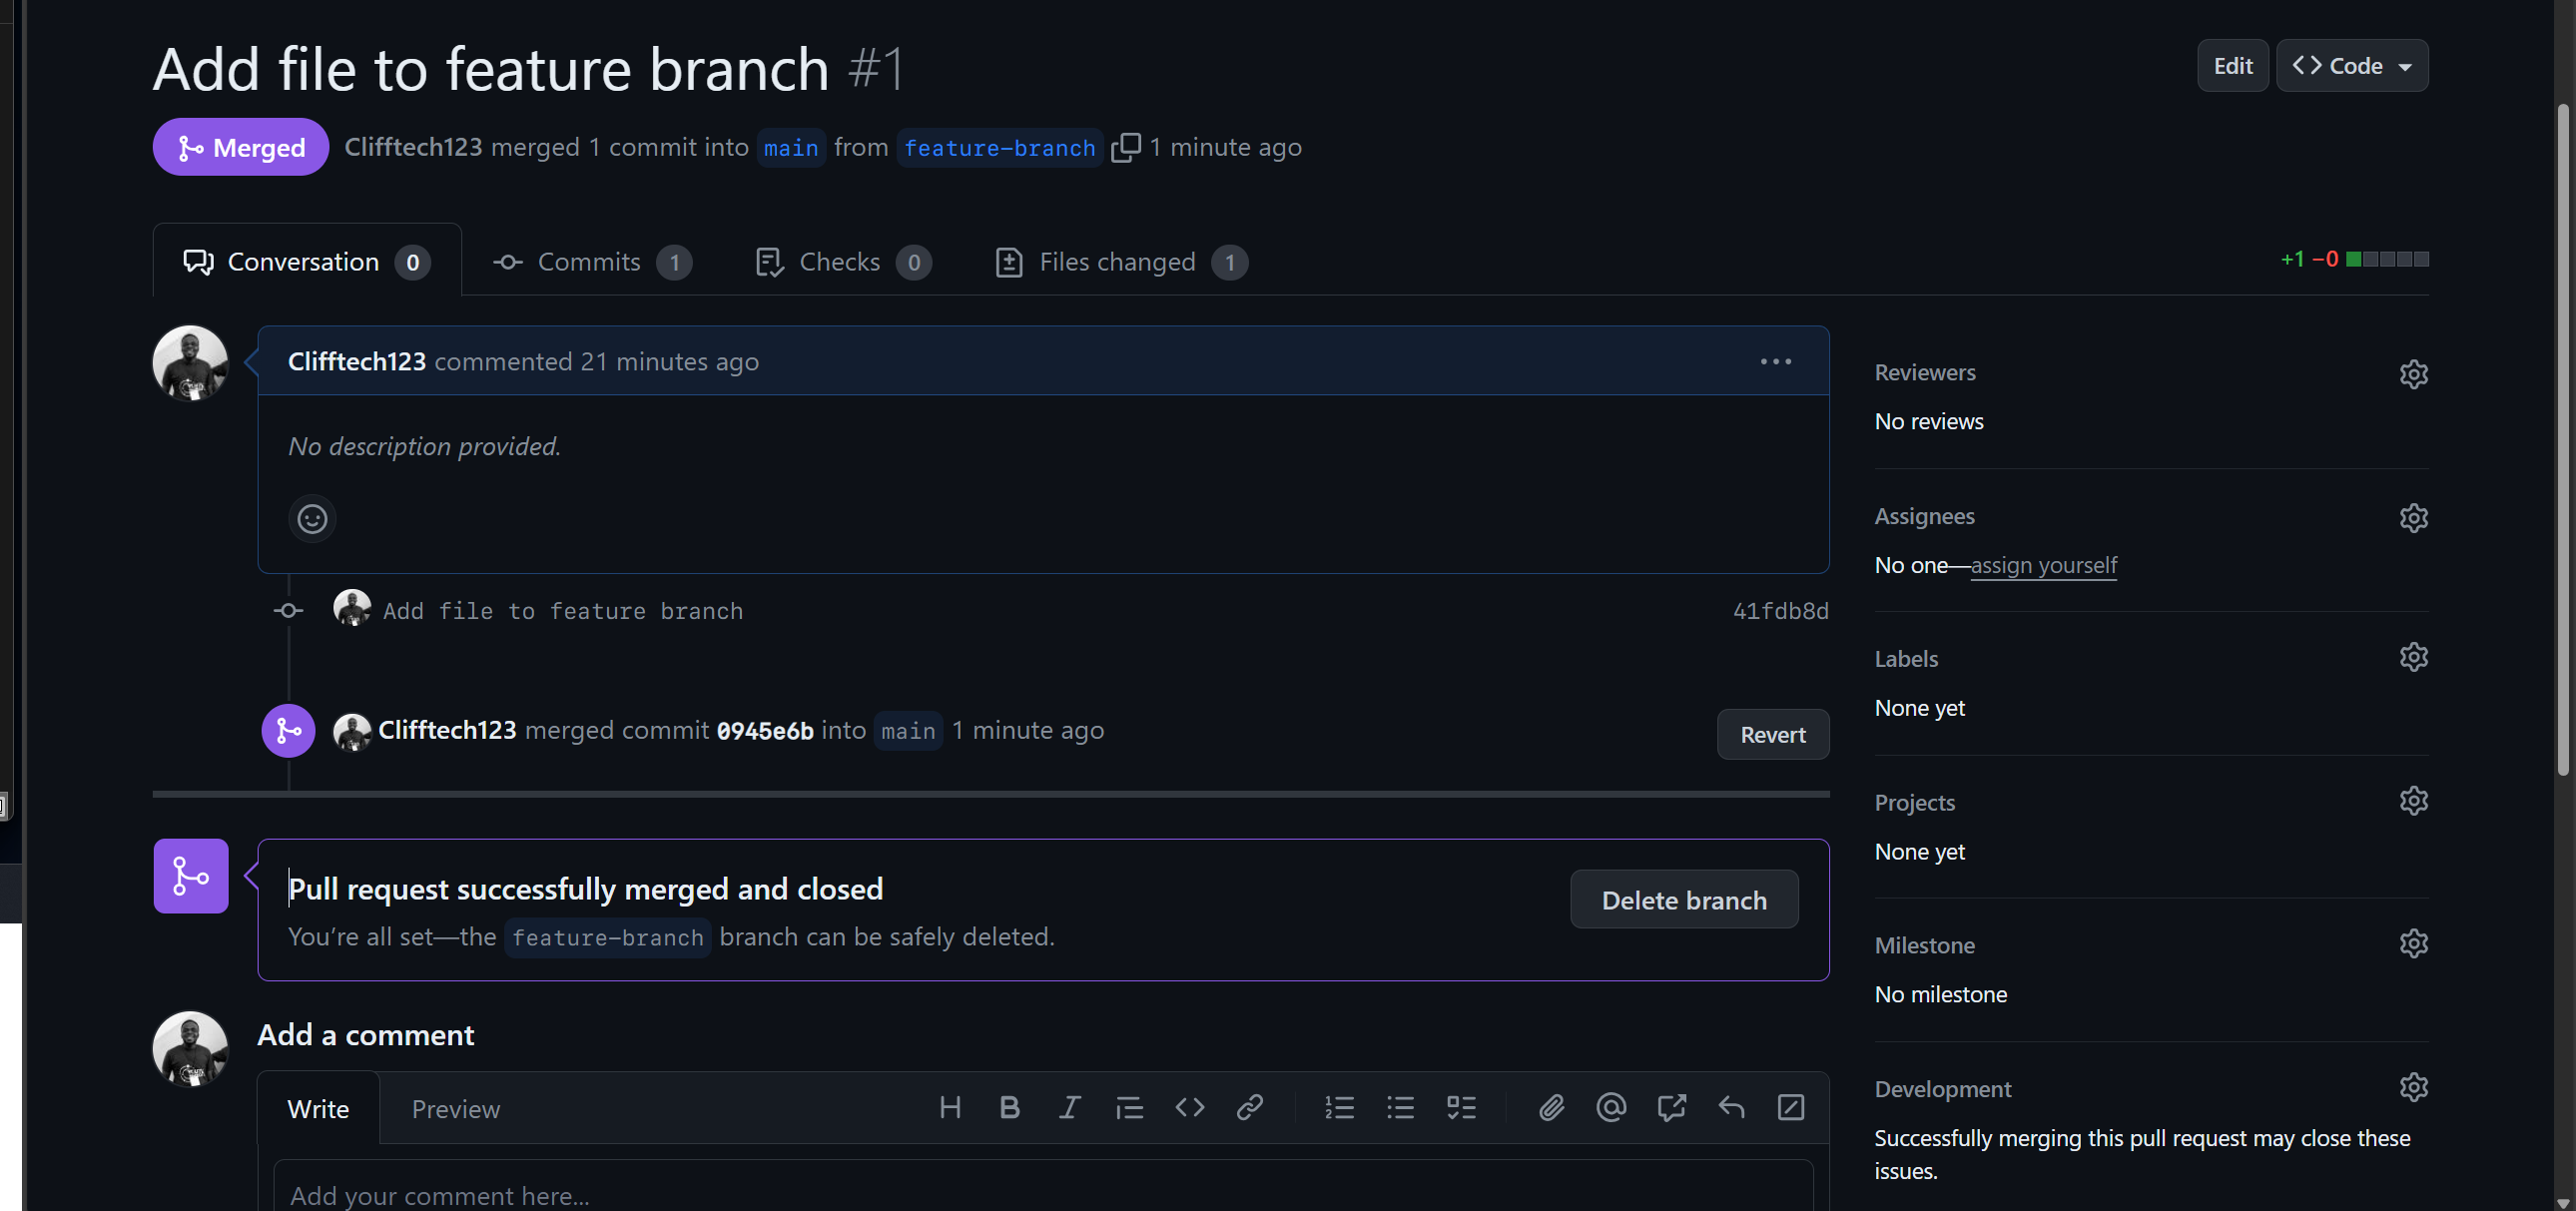
Now you’ve gotten efficiently merged the pull request into the most important department. You can now delete the feature-branch department, as it’s now not wanted.
Wrapping Up
Throughout this information, we have delved into the core ideas of Git and GitHub, equipping you with a strong understanding of model management and collaborative practices.
We’ve navigated the important Git operations, together with establishing a repository, linking the native repository to its distant counterpart on GitHub, synchronizing adjustments between the native and distant repositories, executing Git instructions, branching, initiating pull requests, and merging these requests.
Mastering these ideas will considerably improve your coding workflow, facilitate seamless group collaboration, and allow significant contributions to open-source initiatives.
I belief that this information has instilled in you the data and confidence to excel in your programming journey and begin contributing to open supply initiatives. Here’s to your success in coding!
You can contact me on Twitter or LinkedIn for any questions or suggestions. I’d love to listen to from you!