
In this in-depth tutorial, you may learn to construct a full-stack Kanban job administration app. Along the best way, we’ll discover the synergies between applied sciences like Next.js (that includes a dive into the app router), Next-auth for person authentication, and Firebase, a backend as a service platform to avoid wasting person knowledge in a database.
We’ll additionally cowl how one can combine Firebase Firestore with Redux Toolkit which allows you to cache knowledge you will have retrieved from the database to enhance efficiency. You may even learn to handle state with Redux Toolkit.
To wrap it up, we are going to make use of React-beautiful-dnd, a library that effortlessly integrates drag-and-drop interactions into our Kanban boards to boost the person expertise.
Here’s what we’ll cowl:
- How to implement authentication with the
next-auth.jslibrary - How to arrange and combine the
Reduxretailer with Firestore in Next.js. - How to construct and populate the Kanban app markup with knowledge
- How to implement Create, Read, Update, and Delete (CRUD) operations on boards and duties.
- How to implement drag and drop with
react-beautiful-dndlibrary.
Prerequisites
- You ought to have prior expertise working with the
Reactjs/Next.jsframework. - You ought to have an understanding of kind annotations in TypeScript, and finally, working with
TypeScriptin React. - An understanding of DSA in
JavaScriptis a plus. - Experience with
Redux-toolkitlibrary may even be a plus.
Just a few notes:
- This article will focus totally on performance, however we’ll use
Tailwind CSSfor styling. - I’ll additionally embody feedback with every code snippet offered all through this text to elucidate the code higher. Keep an eye fixed out for them.
Table Of Contents
- How To Implement Authentication With next-auth.js
- How to Configure the Redux Store
- How to Create Your Kanban App Markup
- How to Configure Firebase Firestore
- How to Add Initial Data to the Firestore Database
- How to Use RTK Query to Fetch Data from Cloud Firestore
- How to Fetch and Populate Data
- How to Implement CRUD Operations
- How to Implement Drag and Drop Functionality
- Conclusion
When you might be prepared, let’s dive in.
How To Implement Authentication With next-auth.js
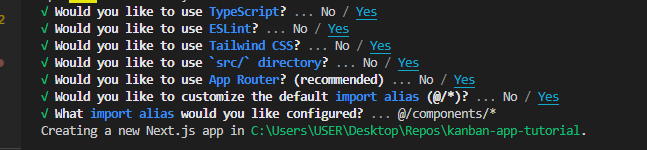
Begin by working the next command in your terminal to create a brand new Next.js undertaking:
npx create-next-app@newest kanban-app-tutorial
Throughout the set up course of, you’ll encounter prompts. Make positive you allow TypeScript and Tailwind CSS, as each will probably be integral to our undertaking improvement.
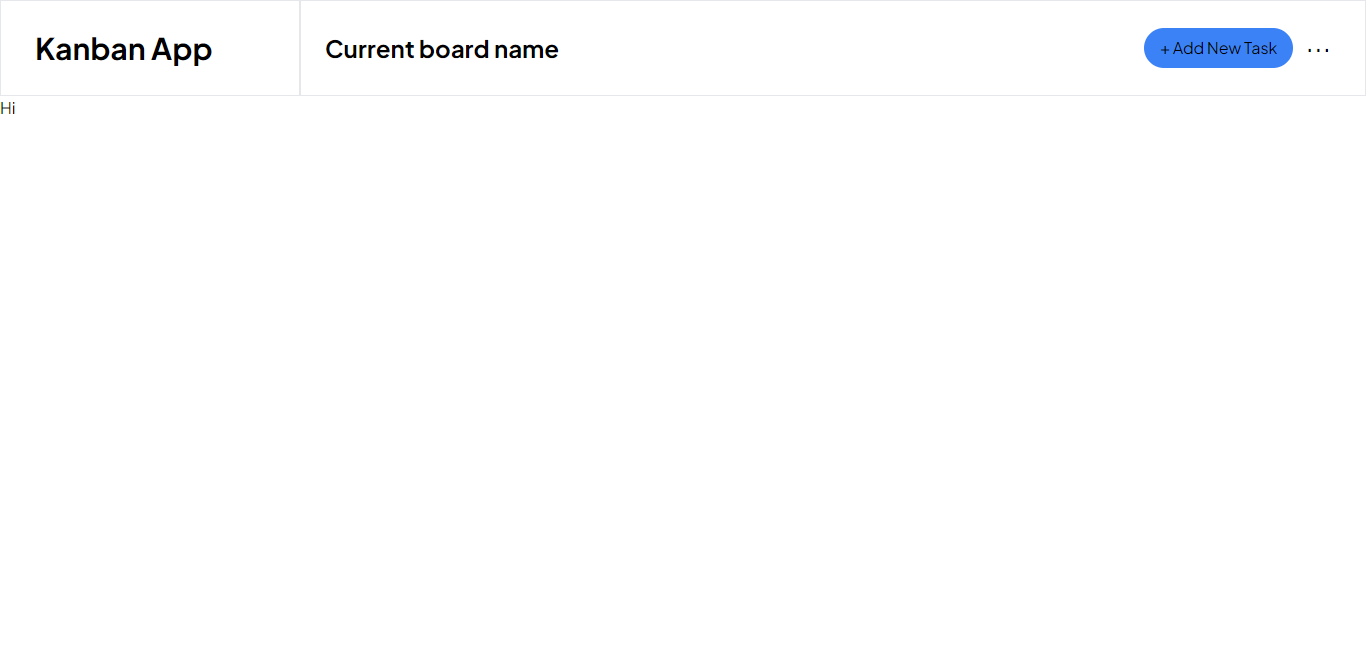
Go forward and clear out the redundant code that comes with the undertaking. Delete the content material within the web page.tsx file and paste the code beneath as a placeholder:
export default perform Home() {
  return (
    <primary>
      <p>Hi</p>
    </primary>
  )
}
Also, edit the content material within the world.css file and go away solely the Tailwind CSS imports.
Once these modifications are full, set up the next-auth.js library with the next command:
npm set up next-auth
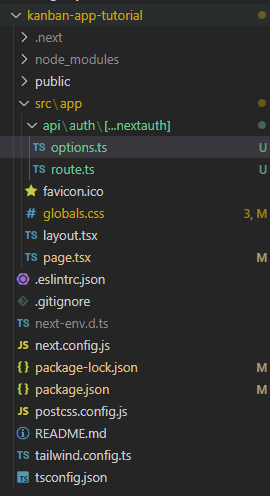
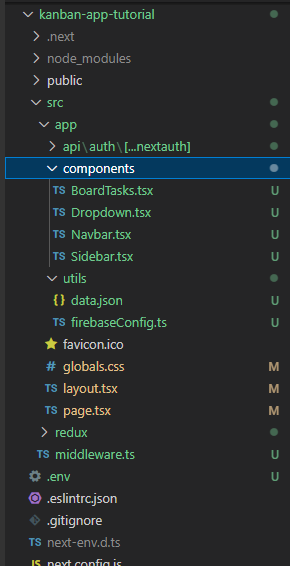
After profitable set up, create an api folder in your root app folder, and inside it create an auth folder. Then, create a [...nextauth] folder contained in the auth folder.
Finally, create two information named route.ts and choices.ts contained in the [...nextauth] folder.
Your file construction ought to appear like the next:
Among the varied next-auth.js suppliers, we are going to completely make the most of the Google Provider to execute the authentication course of.
In the possibility.ts file, paste the next code:
import kind { NextAuthOptions } from "next-auth";
import GoogleProvider from "next-auth/suppliers/google";

export const choices: NextAuthOptions = {
  suppliers: [
    GoogleProvider({
      clientId: process.env.GOOGLE_CLIENT_ID as string,
      clientSecret: process.env.GOOGLE_CLIENT_SECRET as string,
    }),
  ],
  secret: course of.env.NEXTAUTH_URL,
};
Here, we imported the NextAuthOptions kind offered by next-auth for the sake of kind security regarding the choices variable.
In the above code, the choices object is the place whichever supplier we need to make the most of will probably be housed (the Google Provider on this case).
You can get your clientId and clientSecret values from the Google Cloud Platform. If you want a step-by-step information on get them, consult with this information.
Once you will have gotten them, create a .env file within the root folder of your utility and paste the values of their respective variables.
Lastly, create a secret key for the NEXTAUTH_SECRET variable utilizing the next terminal command:
openssl rand -base64 32
Ultimately, your .env file ought to comprise these variables and values:
GOOGLE_CLIENT_ID = <shopper ID worth>
GOOGLE_CLIENT_SECRET = <shopper secret worth>
NEXT_AUTH_SECRET = <subsequent auth secret>
Important: You’ll additionally want these atmosphere variables in manufacturing. So, don’t neglect to replace your manufacturing atmosphere variable in your undertaking settings on Vercel.
Proceed to the route.ts file and paste the next code in it:
import NextAuth from "next-auth/subsequent";
import { choices } from "./choices";

const handler = NextAuth(choices);

export { handler as GET, handler as POST };
Here, we imported the choices variable from the possibility.ts file and handed it as a parameter to the NextAuth perform, assigning the outcome to the handler variable.
The ultimate assertion ensures that any GET or POST request despatched to the api/auth/[...nextauth] route will probably be managed by next-auth.js.
However, authentication will not be initiated but as a result of we’ve not knowledgeable next-auth.js about which pages must be protected.
To implement protected routes, generate a middleware.ts file within the root src folder and insert the next code:
export { default } from 'next-auth/middleware'

export const config = { matcher: ['/'] }
The matcher property within the config object is an array containing the routes you need the middleware to guard. In this case, '/' designates the house web page, indicating that the middleware protects the house web page.
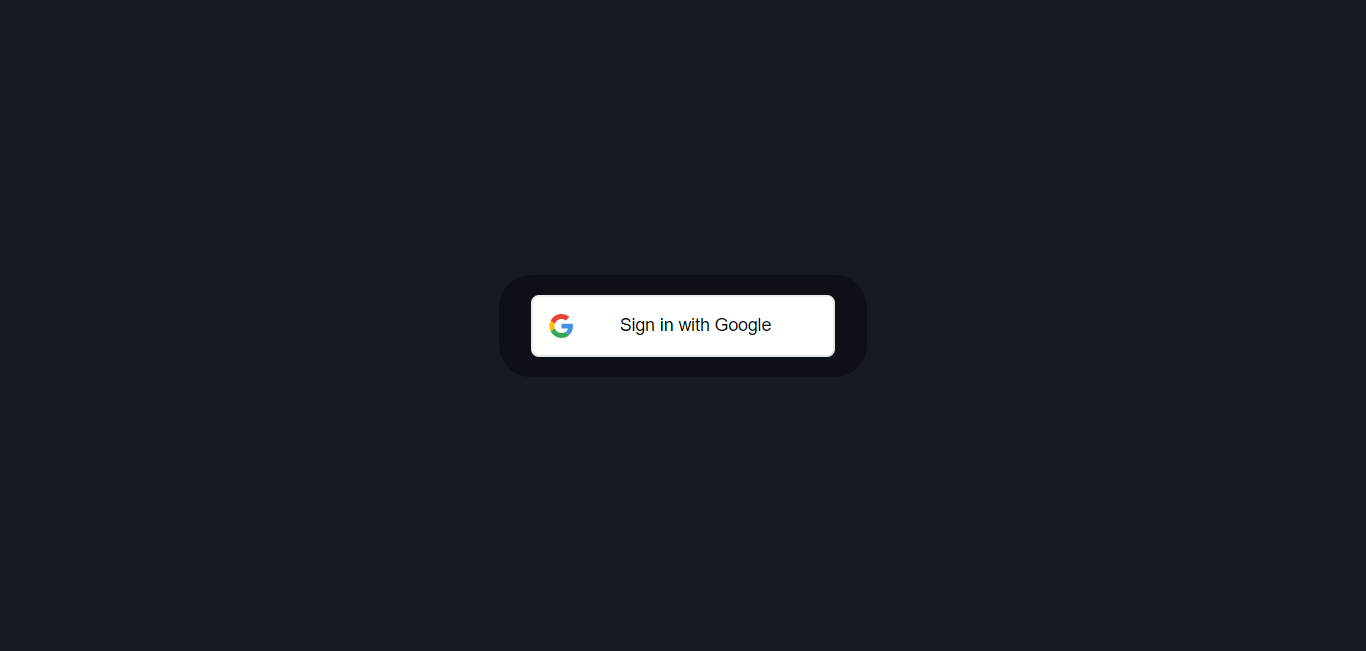
When you run your undertaking server (with npm run dev), it is best to see an authentication web page as seen beneath:
Now, let’s configure the Redux retailer in our utility.
How to Configure the Redux Store
To arrange the Redux retailer in your utility, comply with these steps:
- Begin by putting in the mandatory packages. Run the next command in your terminal:
npm set up @reduxjs/toolkit react-redux
This installs the Redux Toolkit and react-redux for React bindings.
- In the foundation
srclisting, create a folder namedredux. Within this folder, create aretailer.tsfile. Paste the next code into theretailer.tsfile:
   // retailer.ts

   import { configureStore } from "@reduxjs/toolkit";
   import { setupListeners } from "@reduxjs/toolkit/dist/question";

   // Create the Redux retailer
   export const retailer = configureStore({
     reducer: {}, // Add your reducers right here
   });

   // Setup listeners for refetch behaviors
   setupListeners(retailer.dispatch);

   // Define RootState and AppDispatch varieties
   export kind RootState = ReturnType<typeof retailer.getState>;
   export kind AppDispatch = typeof retailer.dispatch;
In this code snippet, configureStore is used to create the Redux retailer, and setupListeners is named to deal with refetchOnFocus and refetchOnReconnect behaviours.
- Now, create one other file in the identical
reduxfolder namedhooks.tsand add the next code:
// hooks.ts
import { TypedUseSelectorHook, useDispatch, useSelector } from "react-redux";
import kind { RootState, AppDispatch } from "./retailer";
// Typed variations of useDispatch and useSelector hooks

export const useAppDispatch = () => useDispatch<AppDispatch>();
export const useAppSelector: TypedUseSelectorHook<RootState> = useSelector;
This code creates typed variations of the useDispatch and useSelector hooks to make sure kind security when interacting with the Redux retailer.
- Still within the
reduxfolder, create a file namedsupplier.tsxwith the next code snippet:
// supplier.tsx
'use shopper'
import { retailer } from "./retailer";
import { Provider } from "react-redux";

// Custom supplier part
export perform Providers({ kids }: { kids: React.ReactNode }) {
   return <Provider retailer={retailer}>{kids}</Provider>;
 }
This file defines a customized supplier part to wrap round your utility elements.
- In your utility format file (
src/app/format.tsx), import theProviderspart and wrap it round your primary format as seen beneath:
// format.tsx

import kind { Metadata } from 'subsequent'
import { Plus_Jakarta_Sans } from "subsequent/font/google";
import './globals.css'
import { Providers } from "@/elements/redux/supplier";

//font we'll use all through the undertaking
const pjs = Plus_Jakarta_Sans({ subsets: ["latin"], show: "swap" });
// Metadata definition
export const metadata: Metadata = {
   title: 'Create Next App',
   description: 'Generated by create subsequent app',
  }

// RootLayout part
export default perform RootLayout({
   kids,
   }: {
   kids: React.ReactNode
 }) {
   return (
      <html lang="en" className={pjs.className}>
        <physique>
          <Providers>
            {kids}
          </Providers>
        </physique>
      </html>
  );
}
By wrapping your elements with the Providers part, you make sure that each part in your utility has entry to the Redux retailer.
Up thus far, your folder construction ought to appear like this:
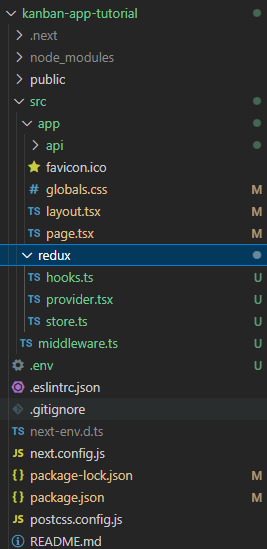
With these steps, you will have efficiently built-in the Redux retailer into your utility, and you might be able to create slices in your utility.
Before diving into the implementation of slices, let’s create the markup for our utility.
How to Create Your Kanban App Markup
This part guides you thru the method of constructing the markup in your Kanban app. By the tip of this part, your markup ought to resemble the picture beneath:

Let’s begin by creating the navbar part.
- Begin by establishing a
elementsfolder inside theapplisting. Inside it, create aNavbar.tsxfile and insert the next code:
// src/app/elements/Navbar.tsx

export default perform Navbar() {

return (
  <nav className="bg-white border flex h-24">
    <div className="flex-none w-[18.75rem] border-r-2 flex items-center pl-[2.12rem]">
      <p className="font-bold text-3xl"> Kanban App </p>
    </div>

   <div className="flex justify-between w-full items-center pr-[2.12rem]">
       <p className="text-black text-2xl font-bold pl-6">
         Board Name
       </p>

      <div className="flex items-center space-x-3">
        <button className="bg-blue-500 text-black px-4 py-2 flex rounded-3xl items-center space-x-2">
           <p>+ Add New Task</p>
        </button>
          <div className="flex items-center">
            <button className="text-3xl mb-4">...</button>
          </div>
        </div>
      </div>
    </nav>
  )}
- Next, render the
Navbarpart within thesrc/app/format.tsxfile:
   import kind { Metadata } from 'subsequent'
   import { Providers } from "@/elements/redux/supplier";
   import Navbar from './elements/Navbar';
   import { Plus_Jakarta_Sans } from "subsequent/font/google";
   import './globals.css'

   const pjs = Plus_Jakarta_Sans({ subsets: ["latin"], show: "swap" });

   export const metadata: Metadata = {
    title: 'Create Next App',
    description: 'Generated by create subsequent app',
   }

   export default perform RootLayout({
    kids,
   }: {
    kids: React.ReactNode
   }) {
   return (
    <html lang="en" className={pjs.className}>
      <physique>
        <Providers>
          <Navbar />  {/* Render the part right here */}
          {kids}
        </Providers>
      </physique>
    </html>
    )}
Now, the Navbar part is offered globally throughout all pages within the utility because it’s rendered within the root format part.
After implementing these adjustments, upon signing in to your utility on localhost:3000, it is best to observe the UI as depicted within the picture beneath.
The placeholder “Current board title” within the navbar will finally get replaced with the title of an lively board as soon as we populate the app with knowledge.
The “Add New Task” button is designed to open the “Add new duties” modal, and the ellipsis subsequent to it can set off a dropdown for modifying and deleting a board. The implementation of this dropdown is the main target of the following step.
- Create a
Dropdown.tsxfile in the identicalelementsfolder, and paste the next code into it:
   //src/app/elements/Dropdown.tsx

   interface IDropdown {
    present: boolean
   }

   export default perform Dropdown({ present }: IDropdown) {

    return (
      <div
        className={`${
          present ? "block" : "hidden"
        } w-48 absolute top-full bg-white
         border shadow-lg right-0 py-2 rounded-2xl`}
      >
        <div className="hover:bg-gray-300">
          <button className="text-sm px-4 py-2">Edit Board</button>
        </div>
        <div className="hover:bg-gray-300">
          <button className="text-sm px-4 py-2">
            Delete Board
          </button>
        </div>
      </div>
    )}
This part takes a present parameter of kind boolean as a prop. The dropdown content material is displayed when present is true and hidden when it is false.
Now, proceed to the Navbar.tsx file and replace the code to render the Dropdown part. Pay consideration to the feedback within the code snippet beneath to get a grasp of the updates right here:
   //src/app/elements/Navbar.tsx

   'use shopper' // we made this a shopper part since we have now to utilize useState

   import Dropdown from "./Dropdown";
   import { useState } from 'react'

   export default perform Navbar() {

   const [show, setShow] = useState<boolean>(false); // it will handle the state of the present variable

   return (
    <nav className="bg-white border flex h-24">
      <div className="flex-none w-[18.75rem] border-r-2 flex items-center pl-[2.12rem]">
        <p className="font-bold text-3xl"> Kanban App </p>
      </div>

      <div className="flex justify-between w-full items-center pr-[2.12rem]">
        <p className="text-black text-2xl font-bold pl-6">Current board title</p>

        <div className="flex items-center space-x-3">
          <button className="bg-blue-500 text-black px-4 py-2 flex rounded-3xl items-center space-x-2">
            <p>+ Add New Task</p>
          </button>
          <div className="relative flex items-center">
            <button
            onClick={() => setShow(!present)} // set off perform that reveals dropdown right here
            className="text-3xl mb-4">...</button>
            <Dropdown present={present}/>  {/* render dropdown right here and go present as prop */}
          </div>
        </div>
      </div>
    </nav>
    )}
After you make these changes in your Navbar part, now you can toggle the dropdown by clicking on the ellipsis:

In the following step, we’ll implement elements that make up the physique of our utility, particularly the sidebar elements and board that shows the duties.
- To implement the sidebar, create a
Sidebar.tsxfile inside the similarelementslisting. Paste the next code into it:
   // src/app/elements/Sidebar.tsx

   export default perform Sidebar() {
   return (
    <apart className="w-[18.75rem] flex-none darkish:bg-dark-grey h-full py-6 pr-6">
      <p className="text-medium-grey pl-[2.12rem] text-[.95rem] font-semibold uppercase pb-3">
        {`All Boards (0)`}
      </p>
      <div className="cursor-pointer flex items-center rounded-tr-full rounded-br-full bg-blue-500 space-x-2 pl-[2.12rem] py-3 pb-3">
        <p className="text-white text-lg capitalize">Current board title</p>
      </div>
      <button className="flex items-center space-x-2 pl-[2.12rem] py-3">
        <p className="text-base font-bold capitalize text-main-purple">
          + Create New Board
        </p>
      </button>
    </apart>
   );
   }
- Following this, create one other file named
BoardTasks.tsxand paste the code beneath to it. This part will comprise the contents of an lively board job. Since the app is just not but populated with knowledge, we’ll use a placeholder that will probably be substituted by precise duties later.
   // src/app/elements/BoardTasks.tsx

   export default perform BoardTasks() {
   return (
    <div className="overflow-x-auto overflow-y-auto w-full bg-stone-200">
      <div className="w-full h-full flex justify-center items-center">
        <div className="flex flex-col items-center">
          <p className="text-black text-sm">
            This board is empty. Create a brand new column to get began.
          </p>
          <button className="bg-blue-500 text-black px-4 py-2 flex mt-6 rounded-3xl items-center space-x-2">
            <p>+ Add New Column</p>
          </button>
        </div>
      </div>
    </div>
    );
   }
- Then, paste the next code in your
src/app/web page.tsxfile to render each theSidebarandBoardTaskselements:
   import Sidebar from "./elements/Sidebar";
   import BoardTasks from "./elements/BoardTasks";

   export default perform Home() {
   return (
    <primary className="flex h-full">
      <Sidebar />
      <BoardTasks />
    </primary>
   );
   }
Up thus far, your file construction ought to resemble the next:
- Finally, within the root
format.tsxfile, replace the model of thephysiquetag as proven beneath:
 // src/app/format.tsx
   // remainder of the code right here
   export default perform RootLayout({
   kids,
   }: {
   kids: React.ReactNode;
   }) {
   return (
    <html lang="en" className={pjs.className}>
      <physique className="pb-24 h-screen overflow-hidden"> {/* replace model right here*/}
        {/* remainder of the code right here */}
      </physique>
    </html>
   );
   }
This adjustment ensures that the content material within the BoardTasks part is scrollable on each the x and y axis if it exceeds the size and breadth of the display screen.
With this, the markup for our app is full. Your UI ought to resemble this when you’ve got been following alongside:
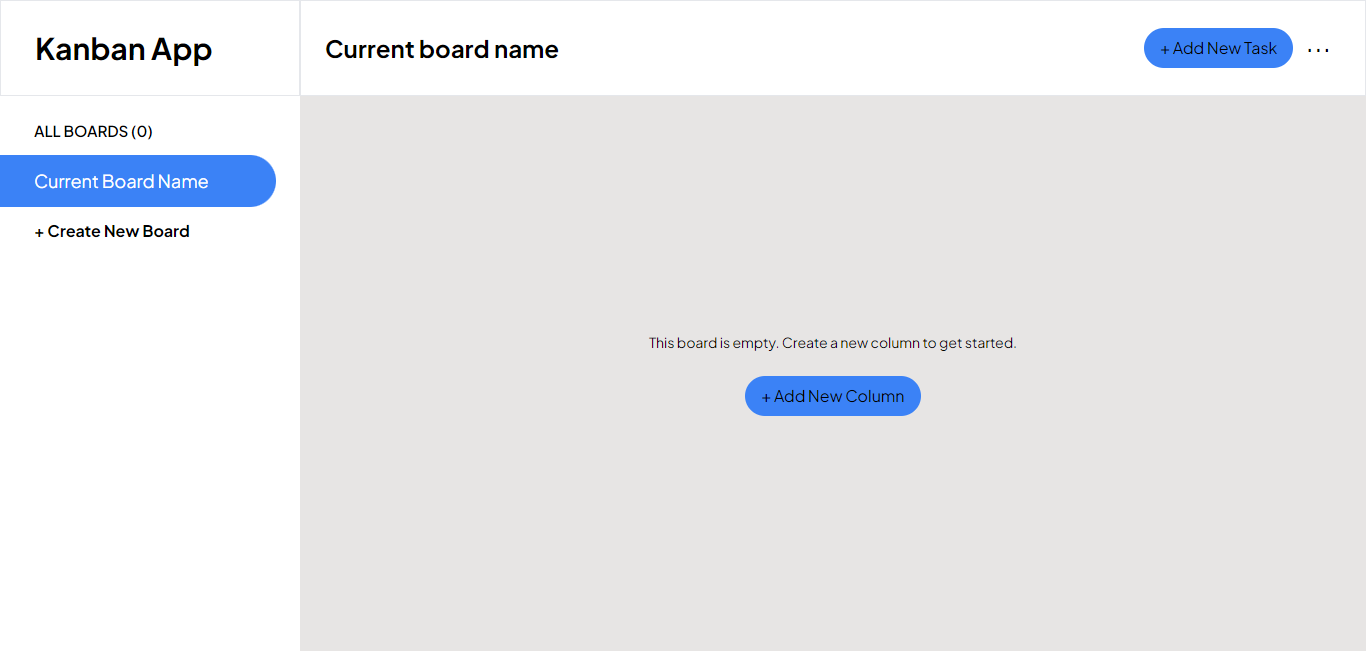
The sidebar will show the variety of boards and the names of obtainable boards within the app. Clicking totally different boards within the sidebar will swap to the chosen board, and clicking “Create New Board” within the sidebar opens the “Add New Board” modal.
Right subsequent to the sidebar, the duties in every board will probably be displayed in columns. The present display screen will probably be displayed if the board has no duties but. The “+Add New Column” button will open a modal used so as to add a column to a board.
All these options will probably be activated as we populate the appliance with knowledge.
Moving ahead, the following part will information you in integrating Firebase Firestore into your utility.
How to Configure Firebase Firestore
To combine Firestore into your utility, you may must create a Firebase undertaking utilizing the Firebase console. Feel free to call the undertaking in keeping with your desire, however for the sake of this tutorial, let’s title it “Kanban-app-tutorial.”
Once the undertaking is created, you may be prompted to register your app. After registration, set up Firebase in your utility. Install the Firebase package deal with the next command in your terminal:
npm set up firebase
Now, it’s essential initialize Cloud Firestore in your utility. Create a folder named utils and inside it, create a firebaseConfig.ts file. Paste your Firebase configuration into it as proven beneath:
import { initializeApp } from "firebase/app";
import { getFirestore } from "firebase/firestore";

// Your net app's Firebase configuration
const firebaseConfig = {
 // Paste your Firebase config right here
};

// Initialize Firebase
const app = initializeApp(firebaseConfig);
// Initialize Firestore and export it
export const db = getFirestore(app);
Finally, navigate to your newly created undertaking on the cloud platform and create a Cloud Firestore database. Following this, proceed to the “Rules” tab and modify the learn and write guidelines from false to true as illustrated within the picture:
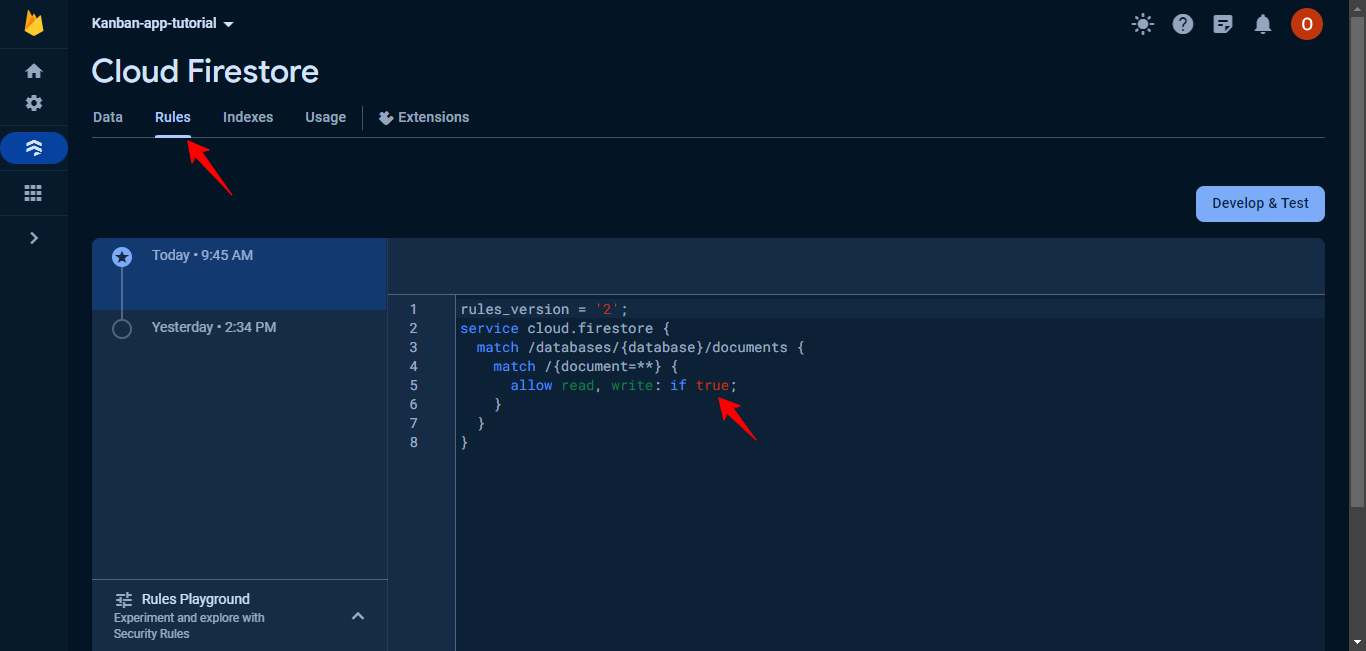
This will allow anybody so as to add knowledge to the database with out restrictions. Note that this isn’t beneficial for manufacturing – we’re implementing it like this for the aim of this text.
With this setup full, we will now start including knowledge to the Cloud Firestore.
How to Add Initial Data to the Firestore Database
Our purpose is to make sure that customers aren’t greeted with an empty board after they full the authentication course of. Instead, we need to current them with dummy job knowledge that they’ll work together with, permitting them to discover the appliance’s options.
Also, we goal to make this knowledge user-specific, forming the muse for every person to construct upon by creating new boards and duties.
To accomplish this, when a brand new person indicators in, we’ll generate a brand new doc within the database for that person.
Here’s a breakdown of our method:
Check if the person is new:
We want to find out whether or not the person is signing in for the primary time. This method, we will mechanically create a brand new doc for the person within the database.Create a brand new person doc:
If the person is new, we proceed to create a brand new knowledge entry within the database particularly for that person.
To start, create a knowledge.js file contained in the utils folder we created earlier (it will comprise our dummy knowledge for a board). Paste the offered knowledge code into it.
//used to generate new id
export const id = () => Math.random().toString(36).substring(2, 10);

export const knowledge = {
  "boards": [
    {
      id: id(),
      name: "Roadmap",
      columns: [
        {
          id: id(),
          name: "Now",
          tasks: [
            {
              id: id(),
              title: "Launch version one",
              status: "Now"
            },
            {
              id: id(),
              title: "Review early feedback and plan next steps for roadmap",
              status: "Now"
            }
          ]
        },
        {
          id: id(),
          title: "Next",
          duties: []
        },
        {
          id: id(),
          title: "Later",
          duties: []
        }
      ]
    }
  ]
}
Now, navigate to the src/app/web page.tsx file and modify it as demonstrated beneath:
"use shopper";
import Sidebar from "./elements/Sidebar";
import BoardTasks from "./elements/BoardTasks";
// Firestore strategies: assortment and getDocs for doc reference, addDoc for including a doc
import { assortment, getDocs, addDoc } from "firebase/firestore";
// Connect our app to Firestore
import { db } from "./utils/firebaseConfig";
import { useEffect, useState } from "react";
// Import getSession from next-auth library to retrieve signed-in person particulars
import { getSession } from "next-auth/react";
// Import knowledge from knowledge.json, used to initialize the Firestore database for brand spanking new customers
import { knowledge } from "./utils/knowledge.json";

export default perform Home() {
  // Manage person particulars on this state. Key index in TypeScript ensures kind security.
  const [userDetails, setUserDetails] = useState<{ [key: string]: any }>();

  // Get person session utilizing getSession. Contains person's title and electronic mail, then handed to person particulars state.
  const getUserSession = async () => {
    const session = await getSession();
    if (session) {
      setUserDetails(session.person);
    }
  };

  const deal withAddDoc = async () => {
    if (userDetails) {
      // Execute code inside curly braces solely when `userDetails` is true.

      // Reference to the doc with the person's electronic mail to test its existence within the database.
      const docRef = assortment(db, "customers", userDetails.electronic mail, "duties");
      const getDos = await getDocs(docRef);

      // If the doc exists, terminate this system.
      if (getDos.docs.size > 0) {
   ;     return;
      } else {
        // If not, submit a brand new doc containing the information from knowledge.json for the person within the database.
        attempt {
          await addDoc(
            assortment(db, "customers", userDetails.electronic mail, "duties"),
            knowledge
          );
        } catch (e) {
          console.error("Error including doc: ", e);
        }
      }
    }
  };

  useEffect(() => {
    getUserSession(); // Call getUserSession perform after the web page renders.
  }, []);

  useEffect(() => {
    deal withAddDoc(); // Call deal withAddDoc perform after the person particulars replace.
  }, [userDetails]);

  return (
    <primary className="flex h-full">
      <Sidebar />
      <BoardTasks />
    </primary>
  );
}
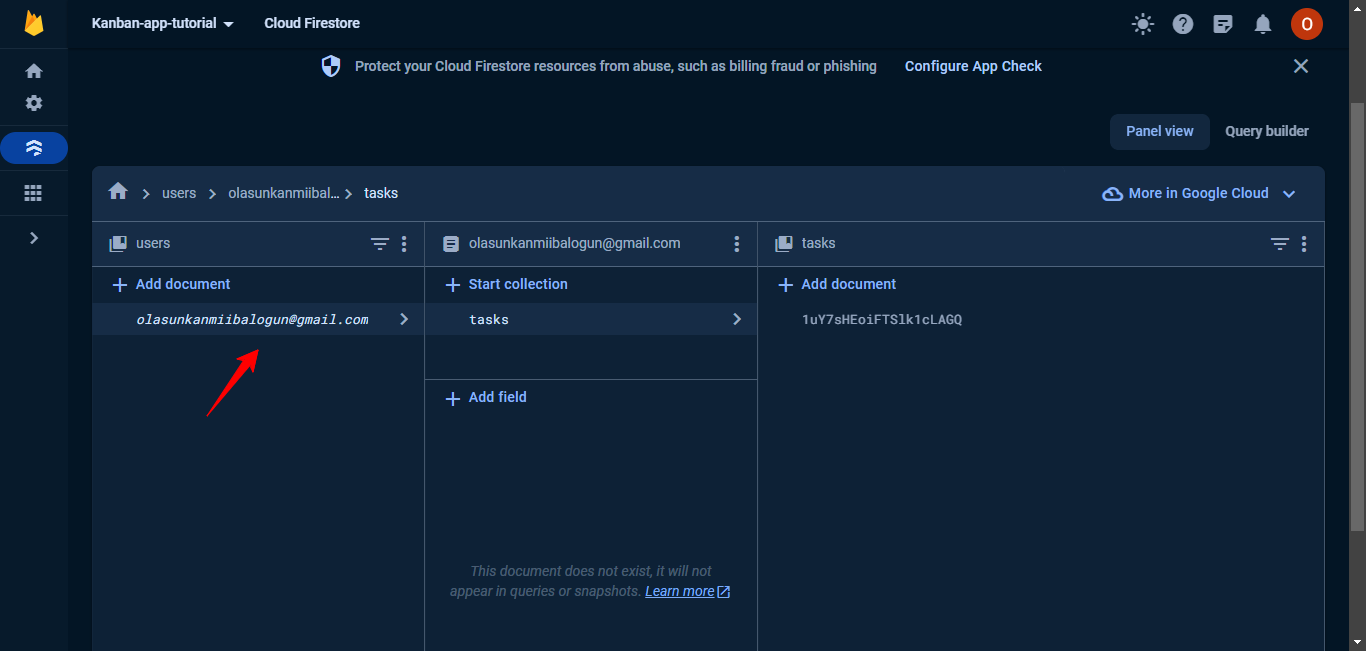
This code ensures that when a person logs in, their particulars are fetched and checked. If it is a new person, a brand new doc with preliminary dummy knowledge is added to the Firestore database beneath the person’s electronic mail. Make positive you have learn by means of the feedback I added in the event you want any additional clarification.
Upon visiting your undertaking console, you may discover the presence of a doc created for the signed-in person (which is you):
The preliminary setup is now full, enabling us to fetch knowledge and provoke the inhabitants of our utility. But earlier than immediately interacting with the information, we’ll make use of RTK question, which is included within the Redux toolkit package deal, as an middleman.
This method not solely eliminates the necessity to write knowledge fetching and caching logic in varied elements repeatedly, but additionally eliminates background revalidation, so we do not want specific guide refreshes.
The subsequent part will discover this course of.
How to Use RTK Query to Fetch Data from Cloud Firestore
Here, we’ll start the method of making slices for the reducer, beginning with the event of the slice devoted to knowledge fetching.
Within the src/redux listing, create a brand new folder named providers.
Inside the newly created providers folder, set up a file named apiSlice.ts. Copy and paste the offered code into this file:
   import { createApi, fakeBaseQuery } from "@reduxjs/toolkit/question/react";
   import { getSession } from "next-auth/react";
   import { assortment, getDocs } from "firebase/firestore";
   import { db } from "@/elements/app/utils/firebaseConfig";

   // Create the Firestore API utilizing createApi
   export const hearthStoreApi = createApi({
   reducerPath: "firestoreApi", // Specifies the trail for the reducer
   baseQuery: fakeBaseQuery(), // Utilizes fakeBaseQuery as a result of Firebase has no conventional REST API endpoint
   tagTypes: ["Tasks"], // Defines tag varieties for caching functions
   endpoints: (builder) => ({
    fetchDataFromDb: builder.question<{ [key: string]: any }[], void>({
      // Utilizes builder.question for making requests; builder.mutation can be utilized for CRUD operations
      async queryFn() {
        // Employs queryFn since we aren't fetching knowledge from a standard API;
        // This permits us to incorporate arbitrary code, so long as we return our knowledge within the { knowledge: outcomes } format

        attempt {
          const session = await getSession();
          const { person } = session!;
            const ref = assortment(db, `customers/${person?.electronic mail}/duties`);
            const querySnapshot = await getDocs(ref);
            return { knowledge: querySnapshot.docs.map((doc) => doc.knowledge()) };
            // Data have to be returned on this format when utilizing queryFn

        } catch (e) {
          return { error: e };
        }
      },
      providesTags: ["Tasks"], // Specifies tags for caching
    }),
   }),
   });

   // Export hooks for utilizing the created endpoint
   export const { useFetchDataFromDbQuery } = hearthStoreApi;
This code establishes a Firestore API utilizing createApi, defining an endpoint for fetching knowledge. The use of fakeBaseQuery is intentional, contemplating Firebase would not have a standard base URL.
The code additionally integrates caching and invalidation by means of tags. In this slice, we have specified tagTypes as 'Tasks'. In subsequent sections, we’ll discover how invalidation and refetching may be performed by means of tags.
In the slice, endpoints may be perceived as API endpoints. Functions outlined inside this endpoints perform will probably be exported within the type of use...Query if it is a builder.question perform (as on this case, useFetchDataFromDbQuery), and use...Mutation if it is a builder.mutation perform (extra on this later).
Now, we’ll lay the muse for incorporating the slices we generate into the Redux retailer. Since we are going to create a number of slices sooner or later, it is prudent to compile them right into a devoted file utilizing combineReducers.
Next, create a rootReducer.ts file inside the src/redux folder. Embed the next code snippet into this file to combine the beforehand created apiSlice:
  import { combineReducers } from "@reduxjs/toolkit";
   import { hearthStoreApi } from "./providers/apiSlice";

   export const rootReducer = combineReducers({
    [fireStoreApi.reducerPath]: hearthStoreApi.reducer,
   });
In this snippet, we imported the earlier-created apiSlice and embody it within the combineReducers perform, specifying the key-value pair as [fireStoreApi.reducerPath]: hearthStoreApi.reducer.
This configuration ensures that the state managed by the apiSlice is successfully built-in into the Redux retailer.
Finally, we’ll add the rootReducer to the Redux retailer right here. Navigate to the src/redux/retailer.ts and modify it like beneath:
import { configureStore } from "@reduxjs/toolkit";
   import { setupListeners } from "@reduxjs/toolkit/dist/question";
   import { rootReducer } from "./rootReducer";
   import { hearthStoreApi } from "./providers/apiSlice";

   export const retailer = configureStore({
    reducer: rootReducer,
    middleware: (getDefaultMiddleware) => getDefaultMiddleware().concat(hearthStoreApi.middleware),
   });
   setupListeners(retailer.dispatch)
   export kind RootState = ReturnType<typeof retailer.getState>;
   export kind AppDispatch = typeof retailer.dispatch;
Here, we combine our rootReducer into the shop and go the hearthStoreApi.middleware to the middleware prop of the configureStore perform. This ensures that the Redux retailer makes use of the middleware for making requests to Firestore.
Now, we will safely begin the method of fetching and populating our utility with knowledge, which would be the focus of the upcoming part.
How to Fetch and Populate Data
Our method begins with populating knowledge within the Navbar part, adopted by the Sidebar, and eventually, the BoardTasks.
How to populate the navbar
For the Navbar, we need to show the title of the present board. But since we’ll want this info in different elements of the app, we’ll additionally retailer it centrally within the Redux retailer.
To obtain this, we’ll create a brand new slice referred to as appSlice, which is able to handle the state associated to the present board title. This slice may even be chargeable for dealing with logic and state unrelated to API calls.
First, create a options folder inside the src/redux listing.
Inside the options folder, create a file named appSlice.ts and paste the next code:
   import { createSlice, PayloadAction } from "@reduxjs/toolkit";
   import { RootState } from "../retailer";

   // Define the preliminary state for the slice
   const preliminaryState = {
    presentBoardName: "",
   };

   export const options = createSlice({
   // Name of the slice
   title: "options",
   preliminaryState,
   // Functions that replace the preliminaryState are written contained in the reducers object
   reducers: {
    // This perform updates the board title when referred to as
    setPageTitle: (state, motion: PayloadAction<string>) => {
      state.presentBoardName = motion.payload;
    },
   },
   });

   // Export the features outlined contained in the reducers right here
   export const { setPageTitle } = options.actions;

   // Selector perform to retrieve the present board title from the state
   export const getPageTitle = (state: RootState) => state.options.presentBoardName;

   // Export the reducer to be used within the Redux retailer
   export default options.reducer;
This code defines the appSlice slice, which incorporates the preliminary state, reducers, and actions for managing the present board title.
To make the appSlice out there globally, we should combine it into the Redux retailer. Open the src/redux/rootReducer.ts file and modify it as follows:
   // src/redux/rootReducer.ts
   import { combineReducers } from "@reduxjs/toolkit";
   import { hearthStoreApi } from "./providers/apiSlice";
   import  featuresReducer  from "./options/appSlice";

   export const rootReducer = combineReducers({
   //add the options slice right here
   options: featuresReducer,
   [fireStoreApi.reducerPath]: hearthStoreApi.reducer,
   });
This up to date rootReducer now consists of the featuresReducer, making the appSlice out there all through the appliance.
Next, we have to replace the Navbar part to fetch the present board title from the Redux retailer and show it. Open the app/elements/Navbar.tsx file and make the next adjustments:
  'use shopper'

   import Dropdown from "./Dropdown";
   import { useState, useEffect } from 'react'
   // Import Redux features and selectors for managing board names
   import { setCurrentBoardName, getCurrentBoardName } from '../../redux/options/appSlice'
   import { useAppDispatch, useAppSelector } from '@/elements/redux/hooks'
   // Import the data-fetching hook from the API slice
   import { useFetchDataFromDbQuery } from "@/elements/redux/providers/apiSlice";

   export default perform Navbar() {
    const [show, setShow] = useState<boolean>(false);
   // Destructuring project to extract knowledge from the useFetchDataFromDbQuery hook
   const { knowledge } = useFetchDataFromDbQuery();
   // Access the Redux dispatch perform for calling actions
   const dispatch = useAppDispatch();

   // Effect hook to run when the information updates
   useEffect(() => {
    if (knowledge) {
      // When a person indicators in, set the presentBoardName to the primary board's title
      const livelyBoard = knowledge[0].boards[0];
      dispatch(setCurrentBoardName(livelyBoard.title));
    }
   }, [data]);

   // Select the present board title from the Redux retailer
   const presentBoardName = useAppSelector(getCurrentBoardName);

   return (
    <nav className="bg-white border flex h-24">
      <div className="flex-none w-[18.75rem] border-r-2 flex items-center pl-[2.12rem]">
        <p className="font-bold text-3xl"> Kanban App </p>
      </div>

      <div className="flex justify-between w-full items-center pr-[2.12rem]">
        {/* populate the present board title within the navbar */}
        <p className="text-black text-2xl font-bold pl-6">{presentBoardName}</p>

        <div className="flex items-center space-x-3">
          <button className="bg-blue-500 text-black px-4 py-2 flex rounded-3xl items-center space-x-2">
            <p>+ Add New Task</p>
          </button>
          <div className="relative flex items-center">
            <button onClick={() => setShow(!present)} className="text-3xl mb-4">
              ...
            </button>
            <Dropdown present={present} />
          </div>
        </div>
      </div>
    </nav>
   );
   }
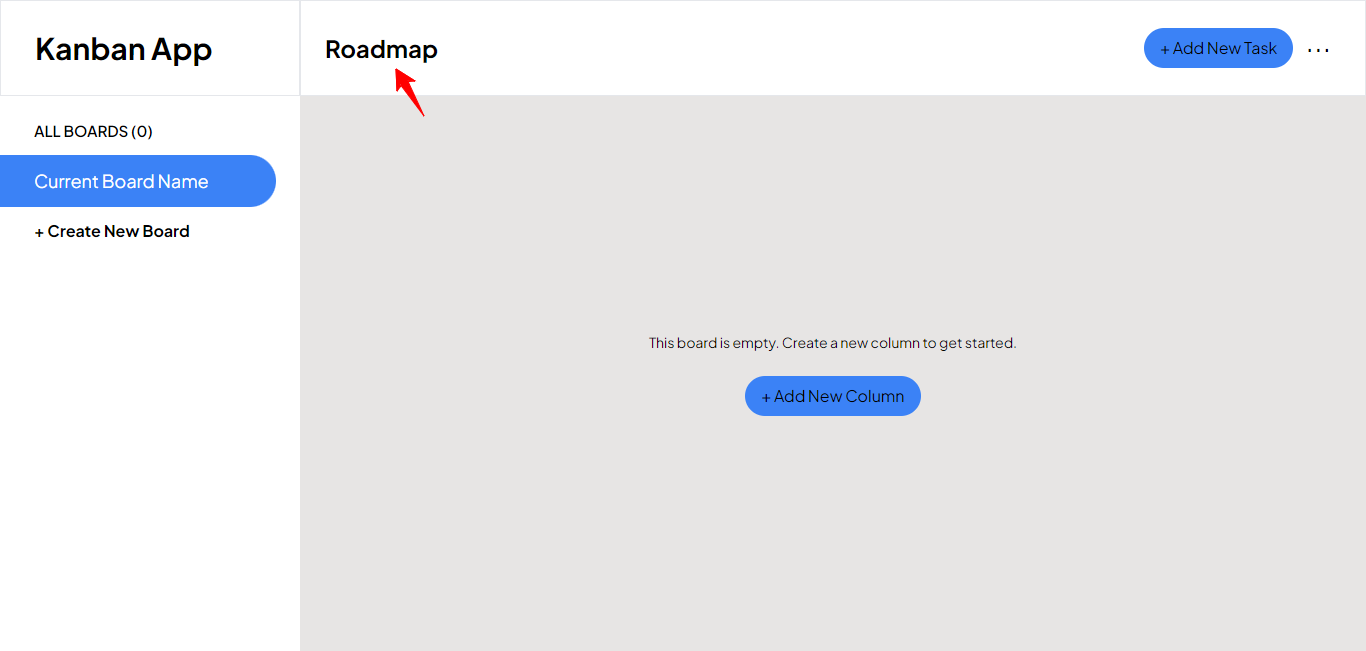
After these updates, your navbar ought to now show the title of the present board, which is “Roadmap”:
Once populated with knowledge, the sidebar will show the variety of boards and the names of the out there boards within the utility. Clicking on totally different boards within the sidebar will swap the view to the chosen board.
While we at present solely have one board out there within the knowledge, we’ll lay the groundwork for these options to assist a number of boards sooner or later.
Navigate to the Sidebar part and make the next edits as seen beneath:
import { useState } from "react";
import { useAppDispatch } from "@/elements/redux/hooks";
import { useFetchDataFromDbQuery } from "@/elements/redux/providers/apiSlice";
import { setCurrentBoardName } from "@/elements/redux/options/appSlice";

export default perform Sidebar() {
  // State to maintain observe of the index of the lively board throughout navigation
  const [active, setActive] = useState<quantity>(0);

  const { knowledge } = useFetchDataFromDbQuery();
  const dispatch = useAppDispatch();

  // Function to deal with navigation by means of boards
  const handleNav = (index: quantity, title: string) => {
    setActive(index);
    dispatch(setCurrentBoardName(title));
  };

  return (
    <apart className="w-[18.75rem] flex-none darkish:bg-dark-grey h-full py-6 pr-6">
      {knowledge && (
        <>
          {/* Display the variety of boards out there within the knowledge */}
          <p className="text-medium-grey pl-[2.12rem] text-[.95rem] font-semibold uppercase pb-3">
            {`All Boards (${knowledge[0]?.boards.size})`}
          </p>
          {/* Display the names of every board */}
          {knowledge[0]?.boards.map(
            (board: { [key: string]: any }, index: quantity) => {
              const { title, id } = board;
              const isActive = index === lively; // Check if the board is lively
              return (
                <div
                  key={id}
                  onClick={() => handleNav(index, title)} // Handle navigation by means of boards on click on
                  className={`${
                    isActive ? 'rounded-tr-full rounded-br-full bg-blue-500 text-white' : 'text-black'
                  } cursor-pointer flex items-center
                  space-x-2 pl-[2.12rem] py-3 pb-3`}
                >
                  <p className="text-lg capitalize">{title}</p>
                </div>
              );
            }
          )}
        </>
      )}
      <button className="flex items-center space-x-2 pl-[2.12rem] py-3">
        <p className="text-base font-bold capitalize text-main-purple">
          + Create New Board
        </p>
      </button>
    </apart>
  );
}
With the above code, we have now ready the sidebar for dealing with a number of boards sooner or later. When a number of boards can be found within the knowledge, the sidebar will dynamically show them, permitting customers to change between them seamlessly.
Up thus far, your sidebar UI ought to mirror these updates:

Moving ahead, within the subsequent part we’ll populate the BoardTasks part.
How to populate the BoardTasks part
In this part, the purpose is to current a most of seven job columns on the display screen. If there are fewer than seven columns, we’ll show an possibility so as to add extra. Also, we’ll need to have a sign of an empty column for columns with out duties.
Each job card ought to characteristic edit and delete icons. These will function placeholders for forthcoming modal functionalities.
To implement these adjustments, go to the BoardTasks part and make the next updates:
import { useEffect, useState } from "react";
import { useFetchDataFromDbQuery } from "@/elements/redux/providers/apiSlice";
import { useAppSelector } from "@/elements/redux/hooks";
import { getCurrentBoardName } from "@/elements/redux/options/appSlice";
import { MdEdit, MdDelete } from "react-icons/md";

// Define varieties for the duties knowledge
interface ITask {
  title: string;
  description: string;
  standing: string;
}

// Define varieties for the information in every column
interface Column {
  title: string;
  duties?: ITask[];
}

export default perform BoardTasks() {
  // Get loading state and knowledge from the useFetchDataFromDbQuery endpoint
  const { isLoading, knowledge } = useFetchDataFromDbQuery();
  // Manage column knowledge in columns state
  const [columns, setColumns] = useState<Column[]>([]);
  // Get lively board title from the redux retailer
  const livelyBoard = useAppSelector(getCurrentBoardName);

  // Once knowledge fetches efficiently, this perform within the useEffect runs
  useEffect(() => {
    if (knowledge !== undefined) {
      const [boards] = knowledge;
      if (boards) {
        // Get the information of the lively board
        const livelyBoardData = boards.boards.discover(
          (board: { title: string }) => board.title === livelyBoard
        );
        if (livelyBoardData) {
          const { columns } = livelyBoardData;
          setColumns(columns);
        }
      }
    }
  }, [data, activeBoard]);

  return (
    <div className="overflow-x-auto overflow-y-auto w-full p-6 bg-stone-200">
      {/* If knowledge has not been fetched efficiently, show a loading state, else show the column of duties */}
      {isLoading ? (
        <p className="text-3xl w-full text-center font-bold">Loading duties...</p>
      ) : (
        <>
          {/* If columns of duties is not empty: show the duties, else show the immediate so as to add a brand new column */}
          {columns.size > 0 ? (
            <div className="flex space-x-6">
              {columns.map((column) => {
                const { id, title, duties } = column;
                return (
                  <div key={id} className="w-[17.5rem] shrink-0">
                    <p className="text-black">{`${title} (${
                      duties ? duties?.size : 0
                    })`}</p>

                    {duties &&
                      // Display the duties if there are duties within the column, if not, show an empty column
                      (duties.size > 0 ? (
                        duties.map((job) => {
                          const { id, title, standing } = job;

                          return (
                            <div
                              key={id}
                              className="bg-white p-6 rounded-md mt-6 flex items-center justify-between border"
                            >
                              <p>{title}</p>
                              <div className="flex items-center space-x-1">
                                <MdEdit className="text-lg cursor-pointer" />
                                <MdDelete className="text-lg cursor-pointer text-red-500" />
                              </div>
                            </div>
                          );
                        })
                      ) : (
                        <div className="mt-6 h-full rounded-md border-dashed border-4 border-white" />
                      ))}
                  </div>
                );
              })}
              {/* If the variety of columns of duties is lower than 7, show an possibility so as to add extra columns */}
              {columns.size < 7 ? (
                <div className="rounded-md bg-white w-[17.5rem] mt-12 shrink-0 flex justify-center items-center">
                  <p className="cursor-pointer font-bold text-black text-2xl">
                    + New Column
                  </p>
                </div>
              ) : (
                ""
              )}
            </div>
          ) : (
            <div className="w-full h-full flex justify-center items-center">
              <div className="flex flex-col items-center">
                <p className="text-black text-sm">
                  This board is empty. Create a brand new column to get began.
                </p>
                <button className="bg-blue-500 text-black px-4 py-2 flex mt-6 rounded-3xl items-center space-x-2">
                  <p>+ Add New Column</p>
                </button>
              </div>
            </div>
          )}
        </>
      )}
    </div>
  );
}
After you make these edits, your UI ought to now mirror the adjustments as demonstrated within the GIF beneath:

Next, we’ll flip our consideration to implementing CRUD (Create, Read, Update, and Delete) operations all through our utility.
How to Implement CRUD Operations
Before we dive into implementing CRUD functionalities all through our app, we have to set up the replaceBoardToDb mutation endpoint inside the apiSlice. This endpoint will permit us to make obligatory updates to our database for CRUD actions.
Integrate the next code into your redux/providers/apiSlice.ts file to incorporate the mutation endpoint:
import { createApi, fakeBaseQuery } from "@reduxjs/toolkit/question/react";
import { getSession } from "next-auth/react";
// moreover import the doc and updateDoc technique from firestore to get person doc reference and replace the doc, respectively
import { assortment, doc, getDocs, updateDoc } from "firebase/firestore";
import { db } from "@/elements/app/utils/firebaseConfig";

export const hearthStoreApi = createApi({
  reducerPath: "firestoreApi",
  baseQuery: fakeBaseQuery(),
  tagTypes: ["Tasks"],
  endpoints: (builder) => ({
    fetchDataFromDb: builder.question<{ [key: string]: any }[], void>({
      async queryFn() {
        attempt {
          const session = await getSession();
          if (session?.person) {
            const { person } = session;
            const ref = assortment(db, `customers/${person.electronic mail}/duties`);
            const querySnapshot = await getDocs(ref);
            return { knowledge: querySnapshot.docs.map((doc) => doc.knowledge()) };
          }
        } catch (e) {
          return { error: e };
        }
      },
      providesTags: ["Tasks"],
    }),
    // endpoint for CRUD actions
    replaceBoardToDb: builder.mutation({
      async queryFn(boardData) {
        attempt {
          const session = await getSession();
          if (session?.person) {
            const { person } = session;
            const ref = assortment(db, `customers/${person.electronic mail}/duties`);
            const querySnapshot = await getDocs(ref);
            const boardId = querySnapshot.docs.map((doc) => {
              return doc.id;
            });
            await updateDoc(doc(db, `customers/${person.electronic mail}/duties/${boardId}`), {
              boards: boardData,
            });
          }
          return { knowledge: null };
        } catch (e) {
          return { error: e };
        }
      },
      invalidatesTags: ["Tasks"], // this will probably be used to invalidate the initially fetched knowledge.
      // Data should be refetched as soon as this enpoint has been referred to as
    }),
  }),
});

// Export hooks for utilizing the created endpoint
export const { useFetchDataFromDbQuery, useUpdateBoardToDbMutation } =
  hearthStoreApi;
Upon calling the useUpdateBoardToDbMutation endpoint, our database knowledge will probably be up to date accordingly.
Following every replace, Redux seamlessly performs background refreshes to make sure we’re working with the most recent knowledge. This performance is enabled by the invalidatesTags property we handed to the replaceBoardToDb endpoint.
Having efficiently applied the CRUD endpoint, our subsequent step is to implement the options for including and modifying boards.
How so as to add and edit a board
Once we have accomplished the UI implementation, the modal for including a brand new board ought to resemble the next:

Similarly, for modifying a board:
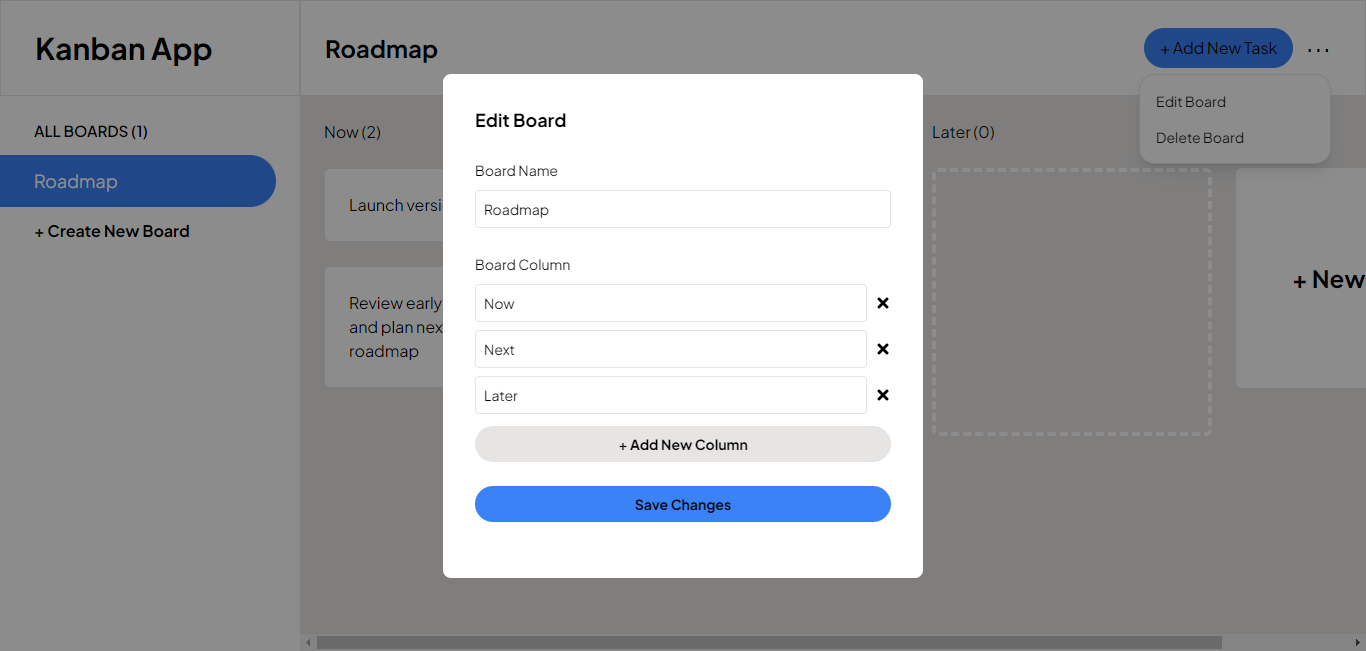
If you take a look at the photographs above, you’ll be able to see that each modals share a hanging resemblance, differing solely of their titles.
This presents a superb alternative to implement the DRY (Don’t Repeat Yourself) idea in programming. In a couple of steps, we’ll discover leverage a single modal to satisfy each functions.
First, we’ll use the react-modal library to create a customized modal part. This permits us to keep away from constructing from scratch.
To start, set up the react-modal library by working the next command:
npm i react-modal
Then create a Modal.tsx file within the app/elements listing and add the offered code. This code defines a customized modal part with styling.
import ReactModal from "react-modal";

interface ModalProps {
  kids?: React.ReactNode;
  isOpen: boolean;
  onRequestClose: () => void;
}

ReactModal.setAppAspect("*");

export perform Modal({ kids, isOpen, onRequestClose }: ModalProps) {
  const modalStyle = {
    overlay: {
      zIndex: "900000",
      backgroundColor: "rgba(0,0,0,0.45)",
      show: "flex",
      justifyContent: "heart",
      alignItems: "heart",
    },
    content material: {
      prime: "50%",
      left: "50%",
      proper: "auto",
      backside: "auto",
      marginRight: "-50%",
      remodel: "translate(-50%, -50%)",
      padding: "0px",
      borderRadius: ".5rem",
      width: "auto",
      backgroundColor:  "#fff",
      border: "none",
    },
  };

  return (
    <ReactModal
      onRequestClose={onRequestClose}
      isOpen={isOpen}
      model={modalStyle}
    >
      {kids}
    </ReactModal>
  );
}

interface ModalPhysique {
  kids: React.ReactNode;
}

export perform ModalPhysique({ kids }: ModalPhysique) {
  return <kind className="w-[21.4rem] md:w-[30rem] p-8">{kids}</kind>;
}
In this code, we have now applied and styled the overlay and physique (content material) of the modal.
Now, create a folder named AddAndEditBoardModal.tsx and paste the offered code into it as a placeholder. Don’t fear concerning the crimson squiggly traces you get in your code editor for now – we’ll deal with them in a bit.
   import { Modal, ModalPhysique } from "./Modal";

   export default perform AddAndEditBoardModal() {

    return (
      <Modal isOpen onRequestClose>
        <ModalPhysique>
         <p>Add and Edit Board Modal</p>
        </ModalPhysique>
      </Modal>
    );
   }
In this code, we imported our customized modal part, and we have wrapped it round a placeholder textual content.
Next, render the newly created modal part within the app/web page.tsx part:
   // remainder of imports right here
   import AddAndEditBoardModal from "./elements/AddAndEditBoardModal";
   // remainder of the code right here
   export default perform Home() {
   return (
    <primary className="flex h-full">
      <Sidebar />
      <BoardTasks />
      {/* render modal part right here */}
      <AddAndEditBoardModal />
    </primary>
   );
   }
In this step, we have created a placeholder for the AddAndEditBoardModal part and rendered it within the Page.tsx part.
Next, we’ll implement the features to set off the modal and handle the open and shut state within the redux retailer to take care of clear code and keep away from prop drilling.
Navigate to your redux/options/appSlice.ts file and replace it with the code beneath:
import { createSlice, PayloadAction } from "@reduxjs/toolkit";
import { RootState } from "../retailer";

const preliminaryState = {
presentBoardName: "",
// Manage the state for opening and shutting the Add and Edit Board modal
isAddAndEditBoardModal: { isOpen: false, variant: "" },
};

export const options = createSlice({
 title: "options",
 preliminaryState,

 reducers: {
  setCurrentBoardName: (state, motion: PayloadAction<string>) => {
   state.presentBoardName = motion.payload;
 },
 // Open the Add and Edit Board modal with a specified variant (add or edit)
 openAddAndEditBoardModal: (state, { payload }) => {
   state.isAddAndEditBoardModal.isOpen = true;
   // Set the form of modal to open (add board or edit board) based mostly on the variant parameter
   state.isAddAndEditBoardModal.variant = payload;
 },
 // Close the Add and Edit Board modal
 shutAddAndEditBoardModal: (state) => {
   state.isAddAndEditBoardModal.isOpen = false;
   state.isAddAndEditBoardModal.variant = "";
 },
},
});
export const {
setCurrentBoardName,
openAddAndEditBoardModal,
shutAddAndEditBoardModal,
} = options.actions;
export const getCurrentBoardName = (state: RootState) => state.options.presentBoardName;
// Selector features to retrieve isOpen worth of state from the isAddAndRditBoardModal state
export const getAddAndEditBoardModalWorth = (state: RootState) => state.options.isAddAndEditBoardModal.isOpen;
// Selector features to retrieve isOpen worth of state from the isAddAndRditBoardModal state
export const getAddAndEditBoardModalVariantValue = (state: RootState) => state.options.isAddAndEditBoardModal.variant;
// Export the reducer to be used within the Redux retailer
export default options.reducer;
Then, navigate again to the AddAndEditBoardModal.tsx part and replace it as seen beneath:
import { Modal, ModalPhysique } from "./Modal";
import { useAppSelector, useAppDispatch } from "@/elements/redux/hooks";
//import wanted features from the appSlice
import {
getAddAndEditBoardModalWorth,
getAddAndEditBoardModalVariantValue,
shutAddAndEditBoardModal,
} from "@/elements/redux/options/appSlice";

export default perform AddAndEditBoardModal() {
// get the variant of the modal
const modalVariant = useAppSelector(getAddAndEditBoardModalVariantValue);
const dispatch = useAppDispatch();
// opens that modal is isOpen evaluates to true
const isOpen = useAppSelector(getAddAndEditBoardModalWorth);
// shut the modal
const shutModal = () => dispatch(shutAddAndEditBoardModal());

return (
 <Modal isOpen={isOpen} onRequestClose={shutModal}>
   <ModalPhysique>
     {/* show the variant(title) of the modal */}
     <p>{modalVariant}</p>
   </ModalPhysique>
 </Modal>
);
}
Following these updates, we will safely implement the set off for the add and edit board modal.
Next, navigate to the Sidebar part and replace the button with the “+ Create new board” textual content so it opens the “Add Board” modal when clicked:
// add this to the imports
import { openAddAndEditBoardModal } from "@/elements/redux/options/appSlice";

export default perform Sidebar() {
 // remainder of code right here
return (
  <apart className="w-[18.75rem] flex-none darkish:bg-dark-grey h-full py-6 pr-6">
    {/* remainder of code right here */}
    {/* set off the create new board modal */}
    <button
      onClick={() => dispatch(openAddAndEditBoardModal("Add New Board"))}
      className="flex items-center space-x-2 pl-[2.12rem] py-3"
    >
      <p className="text-base font-bold capitalize text-main-purple">
        + Create New Board
      </p>
    </button>
  </apart>
);
}
Now, upon clicking the “+ Create new board” button within the sidebar, the modal containing the “Add new board” textual content ought to seem. You also needs to be capable of shut it by clicking on the overlay:

Next, we’ll implement the set off for the edit board modal.
Navigate to the app/elements/Dropdown.tsx part and replace the “Edit board” button as follows:
import { useAppDispatch } from '@/elements/redux/hooks'
import { openAddAndEditBoardModal } from '@/elements/redux/options/appSlice';

interface IDropdown {
 present: boolean
}

export default perform Dropdown({ present }: IDropdown) {

 const dispatch = useAppDispatch()

 return (
   <div
     className={`${
       present ? "block" : "hidden"
     } w-48 absolute top-full bg-white
      border shadow-lg right-0 py-2 rounded-2xl`}
   >
     <div className="hover:bg-gray-300">
 	{/* set off Edit Board modal right here */}
       <button
        onClick={() => dispatch(openAddAndEditBoardModal('Edit Board'))}
        className="text-sm px-4 py-2">Edit Board</button>
     </div>
     <div className="hover:bg-gray-300">
       <button className="text-sm px-4 py-2">
         Delete Board
       </button>
     </div>
   </div>
 );
}
After making this replace, clicking on the “Edit board” button within the dropdown will open the edit board modal, as illustrated within the GIF beneath:
The possibility so as to add a brand new column to the BoardTasks part also needs to open this modal when clicked. So navigate to the BoardTasks part and import the openAddEditBoardModal perform and useAppDispatch hook from appSlice and redux hooks, respectively.
Then declare the dispatch perform within the part with this assertion: const dispatch = useAppDispatch()
Finally, replace the “+New Column” div ingredient to open the “Edit board” modal when clicked:
  // remainder of the code
   <div
   onClick={() => dispatch(openAddAndEditBoardModal("Edit Board"))
   className="rounded-md bg-white w-[17.5rem] mt-12 shrink-0 flex justify-center items-center">
  <p className="cursor-pointer font-bold text-black text-2xl">  + New Column </p>
  </div>
  //remainder of the code
After these updates, the “Edit board” modal ought to open up when the “+New Column” card is clicked:

In the upcoming steps, we’ll assemble the whole markup and functionalities for our modal.
Referring to the photographs of each modals offered in the beginning of this part, within the “Add New Board” modal, the fields for board and column names must be clean. In distinction, the “Edit Board” modal ought to show the present title and columns of the board and must be editable.
The “+ Add New Column” button in each modals permits the addition of extra fields to the board’s columns, and subsequently, the up to date knowledge is shipped to the database.
Keep in thoughts that, given the frontend-centric nature of this undertaking, a good portion of the enterprise logic will probably be dealt with on the front-end. However, don’t fear; we are going to take this snippet by snippet till we fully implement all options.
To start, replace the AddAndEditBoardModal part by pasting the code beneath:
import { useState, useEffect } from "react";
import { Modal, ModalPhysique } from "./Modal";
import { useAppSelector, useAppDispatch } from "@/elements/redux/hooks";
//import wanted features from the appSlice
import {
  getAddAndEditBoardModalWorth,
  getAddAndEditBoardModalVariantValue,
  shutAddAndEditBoardModal,
  getCurrentBoardName,
} from "@/elements/redux/options/appSlice";
import {
  useFetchDataFromDbQuery,
  useUpdateBoardToDbMutation,
} from "@/elements/redux/providers/apiSlice";
import { FaTimes } from "react-icons/fa";
import { id } from '../utils/knowledge'
// outline varieties for boarddata
interface IBoardData {
  id: string,
  title: string;
  columns: {
    id: string;
    title: string;
    columns?: { title: string; duties?: { [key: string]: any }[] };
  }[];
}
// dummy add board knowledge for the "Add board" modal
let addBoardData = {
  id: id(),
  title: "",
  columns: [
    {
      id: id(),
      name: "",
      tasks:
 [],
    },
  ],};

export default perform AddAndEditBoardModal() {
// remainder of the code
}
Here, we have now made the mandatory imports and outlined a kind for board knowledge – which we are going to use when populating the modal. We additionally applied dummy knowledge for the add board modal. We will see how this will probably be of use in a bit.
Next, go to the AddAndEditBoardModal perform and paste the next code into it to declare variables and state values. The feedback clarify the long run use of every of the declarations.
 //handle the board knowledge state
  const [boardData, setBoardData] = useState<IBoardData>();
  // test if the board title subject is empty
  const [isBoardNameEmpty, setIsBoardNameEmpty] = useState<boolean>(false);
  // will probably be used to test if any of the board column subject is empty
  const [emptyColumnIndex, setEmptyColumnIndex] = useState<quantity>();

  // get the variant of the modal
  const modalVariant = useAppSelector(getAddAndEditBoardModalVariantValue);
  // test the kind of the open modal, whether or not Add new board, or Edit board
  const isVariantAdd = modalVariant === "Add New Board";
  const dispatch = useAppDispatch();
  // opens that modal if isOpen evaluates to true
  const isOpen = useAppSelector(getAddAndEditBoardModalWorth);
  const presentBoardTitle = useAppSelector(getCurrentBoardName);
  // shut the modal
  const shutModal = () => dispatch(shutAddAndEditBoardModal());
  // Fetch knowledge from the database to populate the edit board modal
  let { knowledge } = useFetchDataFromDbQuery();
  // Mutation hook for updating the board within the database
  const [updateBoardToDb, { isLoading }] = useUpdateBoardToDbMutation();
Here, we’ll implement the features that will probably be chargeable for the modal’s performance. Paste the next code slightly below the declarations above:
  // Effect to set preliminary knowledge for the modal based mostly on the variant
  useEffect(() => {
    if (knowledge) {

      if (isVariantAdd) {
        setBoardData(addBoardData);
      } else {
        const livelyBoard = knowledge[0].boards.discover(
          (board: { title: string }) => board.title === presentBoardTitle
        );
        setBoardData(livelyBoard);
      }
    }
  }, [data, modalVariant]);

  // Effect to clear error messages after a sure time
  useEffect(() => {
    const timeoutId = setTimeout(() => {
      setIsBoardNameEmpty(false);
      setEmptyColumnIndex(undefined);
    }, 3000);
    return () => clearTimeout(timeoutId);
  }, [emptyColumnIndex, isBoardNameEmpty]);

  // Handler for board title change
  const deal withBoardNameChange = (e: React.ChangeEvent<HTMLInputElement>) => {
    if (boardData) {
      const newName = { ...boardData, title: e.goal.worth };
      setBoardData(newName);
    }
  };

  // Handler for column title change. These form of features are referred to as closures

  const deal withColumnNameChange = (index: quantity) => {
    return perform (e: React.ChangeEvent<HTMLInputElement>) {
      // deal with change for create new board modal
      if (boardData) {
        const modifyColumns = boardData.columns.map((column, columnIndex) => {
          if (columnIndex === index) {
            return { ...column, title: e.goal.worth };
          }
          return column;
        });
        const modifiedColumn = { ...boardData, columns: modifyColumns };
        setBoardData(modifiedColumn);
      }
    };
  };

  // Handler for including a brand new column to the shape
  const deal withAddNewColumn = () => {
    // max columns we need to have in a board is 7
    if (boardData && boardData.columns.size < 6) {
      // Make a duplicate of the present boardData
      const up to dateBoardData = { ...boardData };
      // Create a brand new column object
      const newColumn = { id: id(), title: "", duties: [] };
      // Push the brand new column to the columns array within the copy
      up to dateBoardData.columns = [...updatedBoardData.columns, newColumn];
      // Update the state with the modified copy
      setBoardData(up to dateBoardData);
    }
  };

  // Handler for deleting a column within the kind
  const deal withDeleteColumn = (index: quantity) => {
    if (boardData) {
      const filteredColumns = boardData.columns.filter(
        (_column, columnIndex) => columnIndex !== index
      );
      setBoardData({ ...boardData, columns: filteredColumns });
    }
  };

  // Handler for including a brand new board to the database
  const deal withAddNewBoardToDb = (e: React.FormEvent<HTMLButtonElement>) => {
    e.preventDefault();

    // test if any of the column names are empty earlier than submiting
    const emptyColumnStringChecker = boardData?.columns.some(
      (column) => column.title === ""
    );

    //situation to run if the board title is empty
    if (boardData?.title === "") {
      setIsBoardNameEmpty(true);
    }

    //if any of the column names is empty, replace the emptyColumnIndex with its index
    if (emptyColumnStringChecker) {
      const emptyColumn = boardData?.columns.discoverIndex(
        (column) => column.title == ""
      );
      setEmptyColumnIndex(emptyColumn);
    }

    if (boardData?.title !== "" && !emptyColumnStringChecker) {
      //undergo the database after verifying that the board title and not one of the column names aren't empty
      if (knowledge) {
        let [boards] = knowledge;
        const addBoard = [...boards.boards, boardData];
        boards = addBoard;
        replaceBoardToDb(boards);
      }
    }
  };

  // Handler for modifying a board within the database
  const deal withEditBoardToDb = (e: React.FormEvent<HTMLButtonElement>) => {
    e.preventDefault();
    const emptyColumnStringChecker = boardData?.columns.some(
      (column) => column.title === ""
    );
    //situation to run if the board title is empty
    if (boardData?.title === "") {
      setIsBoardNameEmpty(true);
    }
    //if any of the column names is empty, replace the emptyColumnIndex with its index
    if (emptyColumnStringChecker) {
      const emptyColumn = boardData?.columns.discoverIndex(
        (column) => column.title == ""
      );
      setEmptyColumnIndex(emptyColumn);
    }
    //undergo the database after verifying that the board title and not one of the column names aren't empty
    if (boardData?.title !== "" && !emptyColumnStringChecker) {
      if (knowledge) {
        const [boards] = knowledge;
        const boardsCopy = [...boards.boards];
        const livelyBoardIndex = boardsCopy.discoverIndex(
          (board: { title: string }) => board.title === presentBoardTitle
        );
        const up to dateBoard = {
          ...boards.boards[activeBoardIndex],
          title: boardData!.title,
          columns: boardData!.columns,
        } ;
        boardsCopy[activeBoardIndex] = up to dateBoard;
        replaceBoardToDb(boardsCopy);
      }
    }
  };
Finally, replace the return assertion of the part by pasting the beneath code snippet into it:
return (
    <Modal isOpen={isOpen} onRequestClose={shutModal}>
      <ModalPhysique>
        {boardData && (
          <>
            {/* show the variant(title) of the modal */}
            <p className="text-lg font-bold">{modalVariant}</p>
            <div className="py-6">
              <div>
                <label htmlFor="boardName" className="text-sm">
                  Board Name
                </label>
                <div className="pt-2">
                  <enter
                    id="boardName"
                    className={`${
                      isBoardNameEmpty ? "border-red-500" : "border-stone-200"
                    } border w-full p-2 rounded text-sm cursor-pointer focus:outline-none`}
                    placeholder="Name"
                    worth={boardData.title}
                    onChange={deal withBoardNameChange}
                  />
                </div>
                {/* show this error if the board title is empty */}
                {isBoardNameEmpty ? (
                  <p className="text-xs text-red-500">
                    Board title can't be empty
                  </p>
                ) : (
                  ""
                )}
              </div>

              <div className="mt-6">
                <label htmlFor="" className="text-sm">
                  Board Column
                </label>
                {boardData &&
                  boardData.columns.map(
                    (column: { title: string, id: string }, index: quantity) => {
                      let { title, id } = column;
                      return (
                        <div key={id} className="pt-2">
                          <div className="flex items-center space-x-2">
                            <enter
                              className={`${
                                emptyColumnIndex === index
                                  ? "border-red-500"
                                  : "border-stone-200"
                              } border border-stone-200 focus:outline-none text-sm cursor-pointer w-full p-2 rounded`}
                              placeholder="e.g Doing"
                              onChange={(e) => deal withColumnNameChange(index)(e)}
                              worth={title!}
                            />
                            <div>
                              <FaTimes
                                onClick={() => deal withDeleteColumn(index)}
                              />
                            </div>
                          </div>
                          {/* show this error if the board title is empty */}
                          {emptyColumnIndex === index ? (
                            <p className="text-xs text-red-500">
                              Column title can't be empty
                            </p>
                          ) : (
                            ""
                          )}
                        </div>
                      );
                    }
                  )}
                <div className="mt-3">
                  <button
                    kind="button"
                    onClick={deal withAddNewColumn}
                    className="bg-stone-200 rounded-3xl py-2 w-full text-sm font-bold"
                  >
                    <p>+ Add New Column</p>
                  </button>
                </div>
              </div>
              <div className="pt-6">
                <button
                  kind="submit"
                  onClick={(e: React.FormEvent<HTMLButtonElement>) => {
                    // perform to run relying on the variant of the modals
                    isVariantAdd
                      ? deal withAddNewBoardToDb(e)
                      : deal withEditBoardToDb(e);
                  }}
                  className="bg-blue-500 rounded-3xl py-2 w-full text-sm font-bold"
                >
                  {/* textual content to show relying on the variant of the modal */}
                  <p>
                    {isLoading
                      ? "Loading"
                      : `${isVariantAdd ? "Create New Board" : "Save Changes"}`}
                  </p>
                </button>
              </div>
            </div>
          </>
        )}
      </ModalPhysique>
    </Modal>
  );
In the above GIF, we launched a “Marketing” board with “Todo” and “Doing” columns to our app. You also can see the real-time replace of the boards within the sidebar.
Likewise, you’ll be able to carry out edits on a board:

Here, a brand new column, “After,” was added to the “Roadmap” board.
In the upcoming part, we are going to implement the “Add new job” and “Edit job” functionalities.
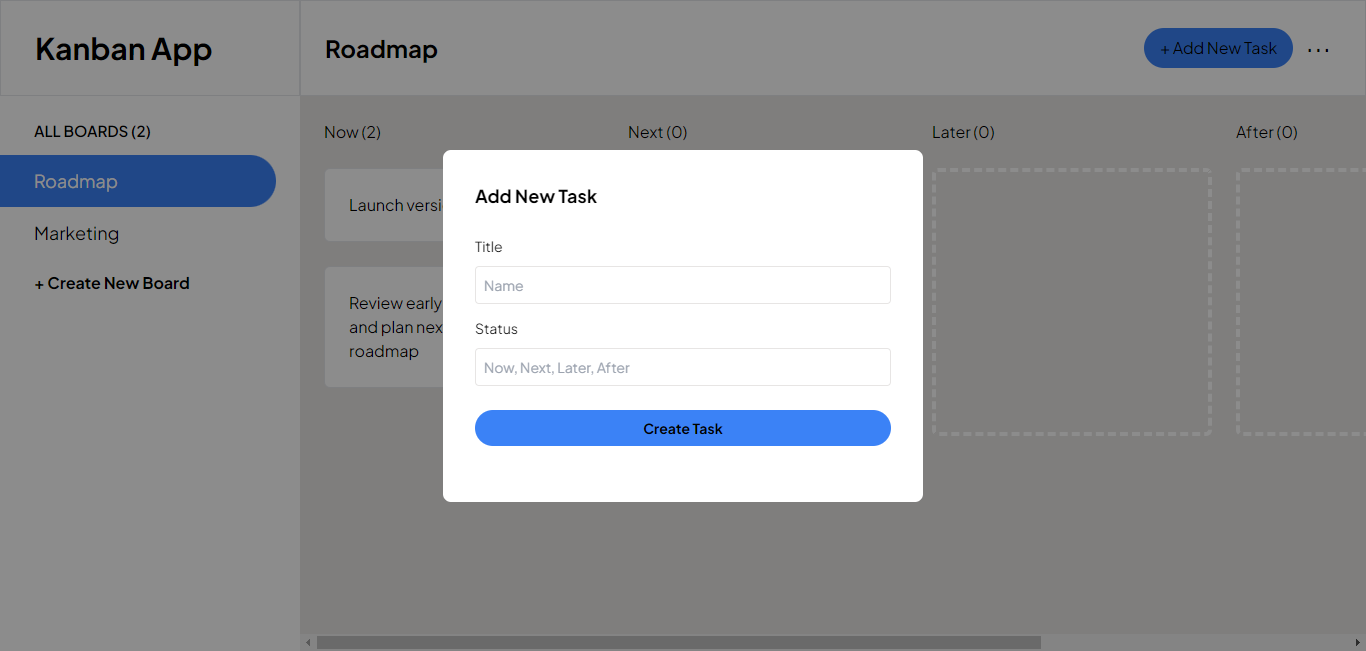
How so as to add and edit duties
Once you have accomplished this part, the “Add New Task” modal ought to resemble the next:
Similarly, for the “Edit Task” modal:
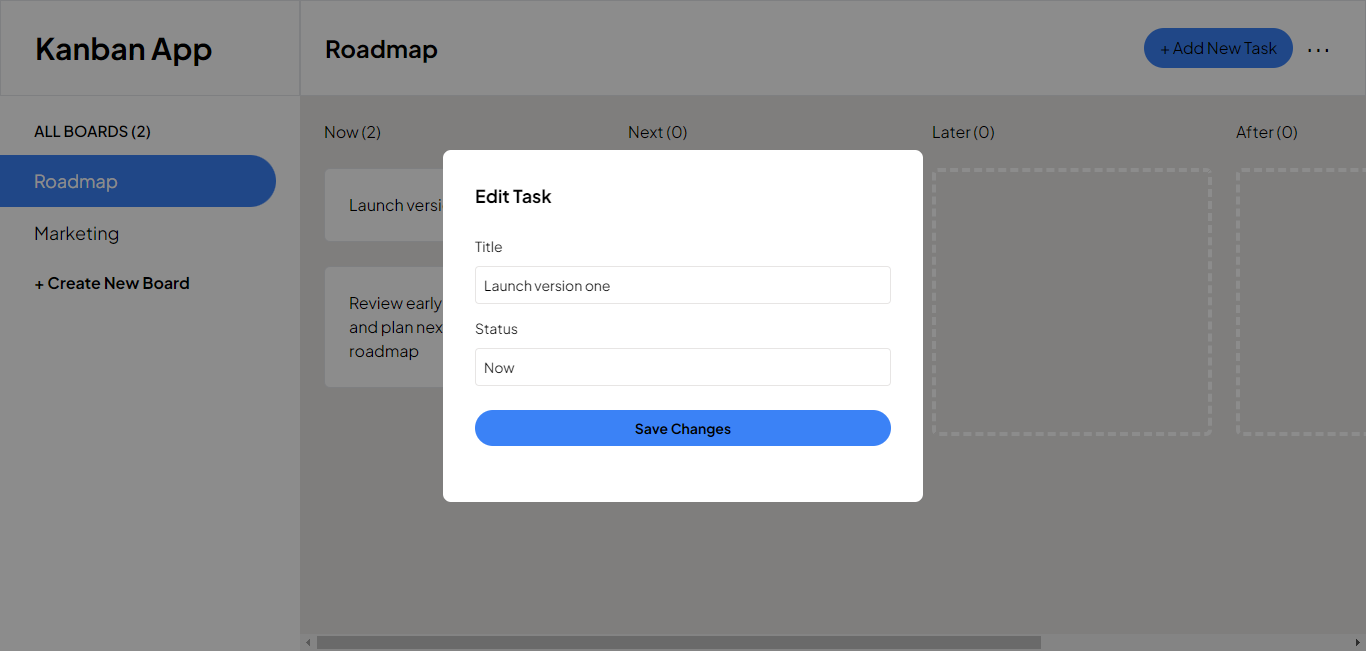
You’ll see that these modals share similarities, so we are going to implement them utilizing the identical method employed within the earlier part.
We’ll begin by updating the preliminaryState object in our appSlice to handle the state of the “Add and Edit duties” modal.
   const preliminaryState = {
   //add and edit duties modal state
   isAddAndEditTaskModal: { isOpen: false, variant: "", title: "", index: -1, title: ""},
   };
The keys title and index will respectively retailer the title and index of the duty being edited, whereas the title key will retrieve the title of the duty’s column. We’ll discover make the most of this info to edit a job within the upcoming steps.
Next, embody the next features within the reducers object. These would be the features that will probably be referred to as to open and shut the modal:
    // Open the Add and Edit job modal with a specified variant (add or edit), title, description, standing
    openAddAndEditTaskModal: (state, { payload }) => {
      state.isAddAndEditTaskModal.isOpen = true;
      state.isAddAndEditTaskModal.variant = payload.variant;
      state.isAddAndEditTaskModal.title = payload.title;
	  state.isAddAndEditTaskModal.index = payload.index;
     state.isAddAndEditTaskModal.title = payload.title;
    },
    // Close the Add and Edit job modal
    shutAddAndEditTaskModal: (state) => {
      state.isAddAndEditTaskModal.isOpen = false;
      state.isAddAndEditTaskModal.variant = "";
      state.isAddAndEditTaskModal.title = "";
	  state.isAddAndEditTaskModal.index = "";
	  state.isAddAndEditTaskModal.title = "";
    },
Lastly, embody the newly applied features and the selector features within the exports:
 export const {
 openAddAndEditTaskModal,
 shutAddAndEditTaskModal,
 //remainder of the imports
 } = options.actions;

 // Selector perform to retrieve isOpen state worth
 export const getAddAndEditTaskModalWorth = (state: RootState) => state.options.isAddAndEditTaskModal.isOpen;
 // Selector perform to retrieve variant state worth
 export const getAddAndEditTaskModalVariantValue = (state: RootState) => state.options.isAddAndEditTaskModal.variant;
 // Selector perform to retrieve title state worth
 export const getAddAndEditTaskModalTitleWorth = (state: RootState) => state.options.isAddAndEditTaskModal.title;
 // Selector perform to retrieve index state worth
 export const getAddAndEditTaskModalIndexValue = (state: RootState) => state.options.isAddAndEditTaskModal.index;
 // Selector perform to retrieve title state worth
 export const getAddAndEditTaskModalNameWorth = (state: RootState) => state.options.isAddAndEditTaskModal.title;
 //remainder of the imports
Now, we’ll implement the onClick features that allow customers to work together with the modal and carry out task-related actions. These features will permit customers to open the “Add new job” modal from the navbar and the “Edit job” modal by clicking the edit icon inside particular person job playing cards.
In the elements/Navbar, embody the openAddAndEditTaskModal among the many imported features from the appSlice:
import { setCurrentBoardName, getCurrentBoardName, openAddAndEditTaskModal } from '../../redux/options/appSlice'
Then, modify the “+Add new job” button to include an onClick perform that triggers the “Add new job” modal:
   <button
    kind="button"
    onClick={() => dispatch(openAddAndEditTaskModal({variant: 'Add New Task'}))}
    className="bg-blue-500 text-black px-4 py-2 flex rounded-3xl items-center space-x-2">
        <p>+ Add New Task</p>
   </button>
Next, navigate to the BoardTasks part, the place we may even implement the set off for the “Edit job” modal.
Here, embody the openAddAndEditTaskModal perform among the many imported features from the appSlice:
import { openAddAndEditBoardModal, openAddAndEditTaskModal } from "@/elements/redux/options/appSlice";
Then, replace the <MdEdit/> React icon to include the onClick perform that triggers the “Edit Task” modal:
    <MdEdit
    onClick={() =>
    dispatch(
      openAddAndEditTaskModal({
        variant: "Edit Task", title, index, title
      }),
    )
   }
   className="text-lg cursor-pointer"
   />;
Next, we’ll create the Add and Edit Board modal part, additionally integrating its functionalities.
As depicted within the modal photos offered in the beginning of this part, inside the “Add New Task” modal, the title subject is meant for the duty’s title a person needs so as to add, and the standing subject ought to completely comprise the correct names of the columns. Any try and enter a column title that does not exist will end in an error.
In the “Edit Task” modal, the title and standing fields will show the present title and standing of a job. Altering the title will replace the duty’s title whereas modifying the standing will relocate it to the specified column.
To start, inside your src/app/elements listing, create a file named AddAndEditTaskModal.tsx, and firstly, insert the offered code to make the mandatory imports, kind definitions, and preliminary knowledge for the add job modal:
"use shopper";

import { useEffect, useState } from "react";
import { Modal, ModalPhysique } from "./Modal";
import { useAppDispatch, useAppSelector } from "@/elements/redux/hooks";
import {
 getAddAndEditTaskModalWorth,
 getAddAndEditTaskModalVariantValue,
 getAddAndEditTaskModalTitle,
 shutAddAndEditTaskModal,
 getCurrentBoardName,
 getAddAndEditTaskModalIndex,
 getAddAndEditTaskModalName,
} from "@/elements/redux/options/appSlice";
import {
 useFetchDataFromDbQuery,
 useUpdateBoardToDbMutation,
} from "@/elements/redux/providers/apiSlice";
import { id } from '../utils/knowledge'

interface ITaskData {
 id: string,
 title: string;
 standing: string;
}
// preliminary job knowledge for the add job modal
let preliminaryTaskData: ITaskData = {
 id: id(),
 title: "",
 standing: "",
};

export default perform AddOrEditTaskModal() {
//variable declarations, features, JSX
}
Next, go to the AddAndEditTaskModal perform and paste the next code into it to declare variables and state values. The feedback offered clarify the long run use of every of the declarations.
  let { knowledge } = useFetchDataFromDbQuery();
  let [updateBoardToDb, { isLoading }] = useUpdateBoardToDbMutation();
  const [taskData, setTaskData] = useState<ITaskData>();
  const [isTaskTitleEmpty, setIsTaskTitleEmpty] = useState<boolean>();
  const [isTaskStatusEmpty, setIsTaskStatusEmpty] = useState<boolean>();
  const [statusExists, setStatusExists] = useState<boolean>(true);
  const [columnNames, setColumnNames] = useState<[]>();
  const dispatch = useAppDispatch();
  const isModalOpen = useAppSelector(getAddAndEditTaskModalWorth);
  const modalVariant = useAppSelector(getAddAndEditTaskModalVariantValue);
  const isVariantAdd = modalVariant === "Add New Task";
  const shutModal = () => dispatch(shutAddAndEditTaskModal());
  const presentBoardTitle = useAppSelector(getCurrentBoardName);
  // get job title, index and title from redux retailer
  const presentTaskTitle = useAppSelector(getAddAndEditTaskModalTitle);
  const presentTaskIndex = useAppSelector(getAddAndEditTaskModalIndex);
  const preliminaryTaskColumn = useAppSelector(getAddAndEditTaskModalName);
Here, we’ll implement features chargeable for the modal performance. Just beneath the variable definitions above, paste the next features:
  // Effect to set preliminary knowledge for the modal based mostly on the variant
  useEffect(() => {
    if (knowledge) {
      const livelyBoard = knowledge[0].boards.discover(
        (board: { title: string }) => board.title === presentBoardTitle
      );
      if (livelyBoard) {
        const { columns } = livelyBoard;
        const columnNames = columns.map(
          (column: { title: string }) => column.title
        );

        if (columnNames) {
          setColumnNames(columnNames);
        }

        if (isVariantAdd) {
          setTaskData(preliminaryTaskData);
        }

        else {
          const livelyTask = columns
            .map((column: { duties: [] }) => column.duties)
            .flat()
            .discover((job: { title: string }) => job.title === presentTaskTitle);
          setTaskData(livelyTask);
        }
      }
    }
  }, [data, modalVariant]);

  // Effect to clear error messages after a sure time
  useEffect(() => {
    const timeoutId = setTimeout(() => {
      setIsTaskStatusEmpty(false);
      setIsTaskStatusEmpty(false);
      setStatusExists(true);
    }, 3000);
    return () => clearTimeout(timeoutId);
  }, [isTaskStatusEmpty, isTaskTitleEmpty, statusExists]);

  // Handler for job title change
  const deal withTaskTitleChange = (e: React.ChangeEvent<HTMLInputElement>) => {
    if (jobData) {
      const newTitle = { ...jobData, title: e.goal.worth };
      setTaskData(newTitle);
    }
  };

  // Handler for job standing change
  const deal withTaskStatusChange = (e: React.ChangeEvent<HTMLInputElement>) => {
    if (jobData) {
      const newTitle = { ...jobData, standing: e.goal.worth };
      setTaskData(newTitle);
    }
  };

  // Handler so as to add new job to the db
  const deal withAddNewTaskToDb = (e: React.FormEvent<HTMLButtonElement>) => {

    e.preventDefault();
    const { title, standing } = jobData!;

    if (!title) {
      setIsTaskTitleEmpty(true);
    }

    if (!standing) {
      setIsTaskStatusEmpty(true);
    }

    // test if the standing enter exists among the many present columns
    const doesStatusExists = columnNames?.some(
      (column) => column === jobData?.standing
    );

    if (!doesStatusExists) {
      setStatusExists(false);
    }

    // if all situations are met
    if (title && standing && doesStatusExists) {
      if (knowledge) {
        const [boards] = knowledge;
        const boardsCopy = [...boards.boards];
        const livelyBoard = boardsCopy.discover(
          (board: { title: string }) => board.title === presentBoardTitle
        );
        const livelyBoardIndex = boardsCopy.discoverIndex(
          (board: { title: string }) => board.title === presentBoardTitle
        );
        const { columns } = livelyBoard;
        // discover the column within the board to replace
        const getStatusColumn = columns?.discover(
          (column: { title: string }) => column.title === standing
        );
        const getStatusColumnIndex = columns?.discoverIndex(
          (column: { title: string }) => column.title === standing
        );
        // desctructure duties in a column. "Now" for instance.
        const { duties } = getStatusColumn;
        const addNewTask = [...tasks, { id: id(), title, status }]; //add new job
        const up to dateStatusColumn = { ...getStatusColumn, duties: addNewTask };
        //replace the columns in a board
        const columnsCopy = [...columns];
        columnsCopy[getStatusColumnIndex] = up to dateStatusColumn;
        const up to dateBoard = {
          ...boards.boards[activeBoardIndex],
          columns: columnsCopy,
        };
        //replace the board within the db
        boardsCopy[activeBoardIndex] = up to dateBoard;
        replaceBoardToDb(boardsCopy);
      }
    }
  };

  const deal withEditTaskToDb = (e: React.FormEvent<HTMLButtonElement>) => {
    e.preventDefault();
    const { title, standing } = jobData!;
    if (!title) {
      setIsTaskTitleEmpty(true);
    }
    if (!standing) {
      setIsTaskStatusEmpty(true);
    }
    // test if the standing enter exists among the many present standing
    const doesStatusExists = columnNames?.some(
      (column) => column === jobData?.standing
    );
    if (!doesStatusExists) {
      setStatusExists(false);
    }
    if (title && standing && doesStatusExists) {
      if (knowledge) {
        const [boards] = knowledge;
        const boardsCopy = [...boards.boards];
        const livelyBoard = boardsCopy.discover(
          (board: { title: string }) => board.title === presentBoardTitle
        );
        const livelyBoardIndex = boardsCopy.discoverIndex(
          (board: { title: string }) => board.title === presentBoardTitle
        );
        const { columns } = livelyBoard;
        const getStatusColumnIndex = columns?.discoverIndex(
          (column: { title: string }) => column.title === standing
        );

        // Check if the duty standing to edit is the same as the column.title
        if (standing === preliminaryTaskColumn) {
          const up to dateStatusColumn = {
            ...columns[getStatusColumnIndex],
            duties: columns[getStatusColumnIndex]?.duties?.map(
              (job: any, index: quantity) => {
                if (index === presentTaskIndex) {
                  return { title, standing };
                }
                return job;
              }
            ),
          };
          const columnsCopy = [...columns];
          columnsCopy[getStatusColumnIndex] = up to dateStatusColumn;
          const up to dateBoard = {
            ...boards.boards[activeBoardIndex],
            columns: columnsCopy,
          };
          //replace the board within the db
          boardsCopy[activeBoardIndex] = up to dateBoard;
          replaceBoardToDb(boardsCopy);
        } else {
          // Find the column with the title within the job standing and append the edited job
          const getStatusColumn = columns?.discover(
            (column: { title: string }) => column.title === standing
          );
          // delete job from earlier column
          const getPrevStatusColumn = columns?.discover(
            (column: { title: string }) => column.title === preliminaryTaskColumn
          );
          const getPrevStatusColumnIndex = columns?.discoverIndex(
            (column: { title: string }) => column.title === preliminaryTaskColumn
          );
          //replace the earlier column of the duty
          const updatedPrevStatusColumn = {
            ...getPrevStatusColumn,
            duties: getPrevStatusColumn?.duties.filter(
              (_task: [], index: quantity) => index !== presentTaskIndex
            ),
          };
          // replace the brand new column of the duty
          const up to dateStatusColumn = {
            ...getStatusColumn,
            duties: [...getStatusColumn?.tasks, { title, status }],
          };
          const columnsCopy = [...columns];
          columnsCopy[getStatusColumnIndex] = up to dateStatusColumn;
          columnsCopy[getPrevStatusColumnIndex] = updatedPrevStatusColumn;
          const up to dateBoard = {
            ...boards.boards[activeBoardIndex],
            columns: columnsCopy,
          };
          //replace the board within the db
          boardsCopy[activeBoardIndex] = up to dateBoard;
          replaceBoardToDb(boardsCopy);
        }
      }
    }
  };
Finally, on this part, paste the code beneath to implement the JSX of the modal:
return (
    <Modal isOpen={isModalOpen} onRequestClose={shutModal}>
      <ModalPhysique>
        <p className="font-bold text-lg">{modalVariant}</p>
        <div className="py-6">
          <div>
            <label htmlFor="title" className="text-sm">
              Title
            </label>
            <div className="pt-2">
              <enter
                id="title"
                className={`${
                  isTaskTitleEmpty ? "border-red-500" : "border-stone-200"
                } border w-full p-2 rounded text-sm cursor-pointer focus:outline-none`}
                placeholder="Name"
                worth={jobData?.title}
                onChange={deal withTaskTitleChange}
              />
            </div>
            {isTaskTitleEmpty ? (
              <p className="text-xs text-red-500">Task title can't be empty</p>
            ) : (
              ""
            )}
          </div>

          <div className="mt-3">
            <label htmlFor="standing" className="text-sm">
              Status
            </label>
            <div className="pt-2">
              <enter
                id="standing"
                className={`$ border w-full p-2 rounded text-sm cursor-pointer focus:outline-none`}
                placeholder={columnNames?.be a part of(", ")}
                worth={jobData?.standing}
                onChange={deal withTaskStatusChange}
              />
            </div>
            {isTaskStatusEmpty ? (
              <p className="text-xs text-red-500">
                Task standing can't be empty
              </p>
            ) : !statusExists ? (
              <p className="text-xs text-red-500">Column doesn't exist</p>
            ) : (
              ""
            )}
          </div>
          <div className="pt-6">
            <button
              kind="submit"
              onClick={(e: React.FormEvent<HTMLButtonElement>) => {
                // perform to run relying on the variant of the modals
                isVariantAdd ? deal withAddNewTaskToDb(e) : deal withEditTaskToDb(e);
              }}
              className="bg-blue-500 rounded-3xl py-2 w-full text-sm font-bold"
            >
              <p>
                {isLoading
                  ? "Loading"
                  : `${isVariantAdd ? "Create Task" : "Save Changes"}`}
              </p>
            </button>
          </div>
        </div>
      </ModalPhysique>
    </Modal>
  );
Lastly, import and render the part in your src/app/web page.tsx file as seen beneath:
//remainder of the imports
import AddAndEditTaskModal from "./elements/AddAndEditTaskModal";
  //remainder of the code
  return (
 <primary className="flex h-full">
   <Sidebar />
   <BoardTasks />
   <AddAndEditBoardModal />
   <AddAndEditTaskModal/>  //render right here
 </primary>
 );
With this performance, you’ll be able to effortlessly add duties to any desired columns. For occasion, let’s add a brand new job titled “Buy tomatoes” to the “Next” column:
Likewise, we’ll illustrate the task-editing characteristic by altering the column of “Launch model two” from “Now” to “Later”:
Finally, within the subsequent part, we’ll implement the delete functionalities for each boards and duties.
How to delete boards and duties
By the tip of this part, the “Delete Board” modal ought to appear like this:
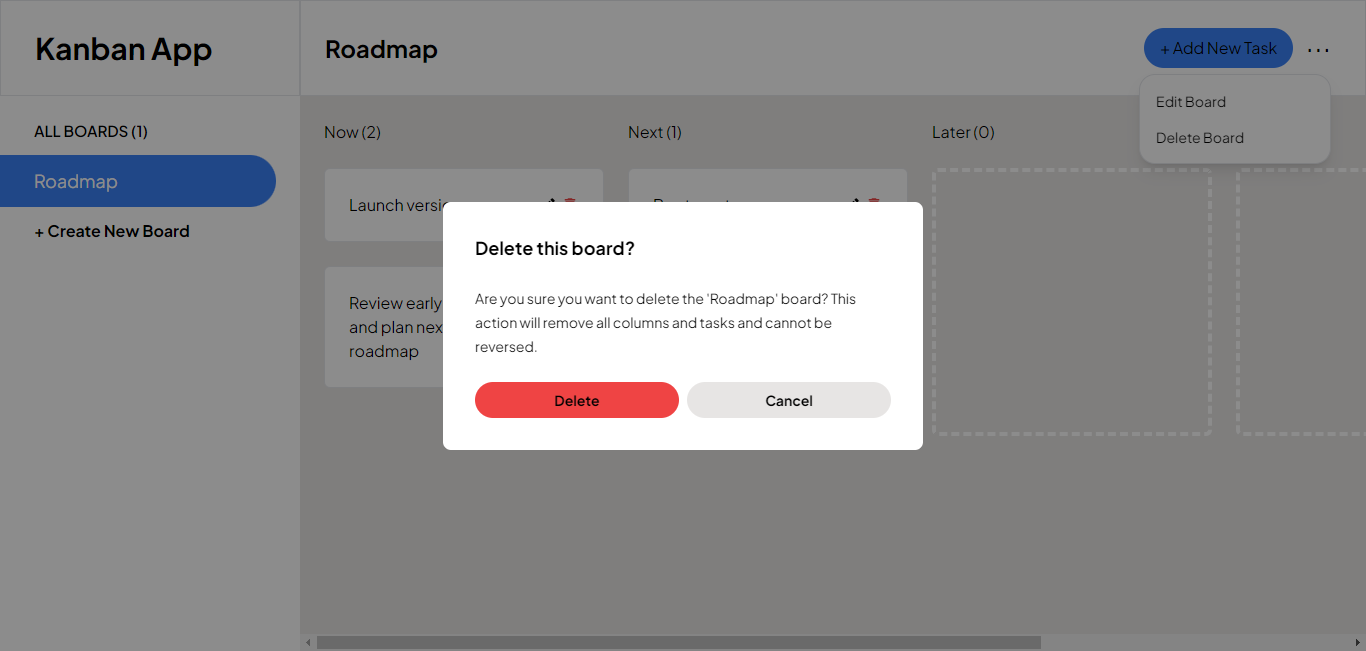
Likewise, the “Delete Task” modal:
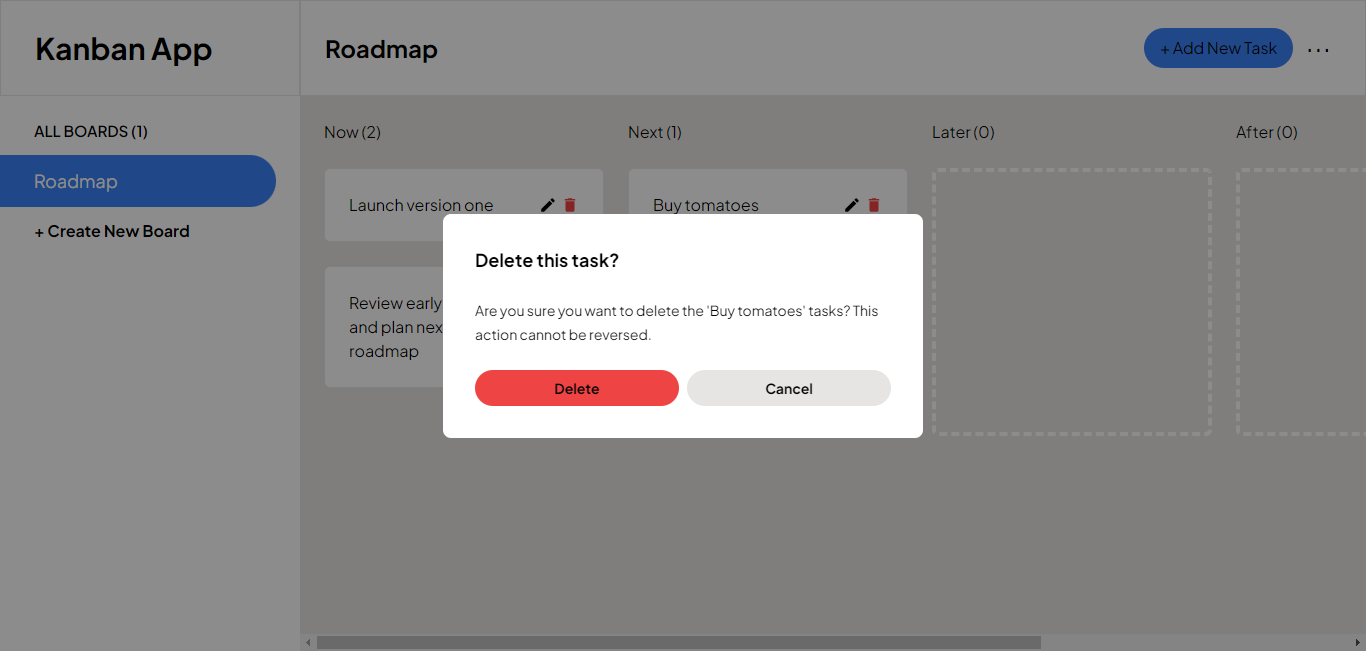
As you’ll be able to see, these modals share similarities, so we are going to use the identical methodology as we did for the earlier modal implementations.
To start, let’s replace the preliminaryState object in our appSlice to handle the state of the “Delete Board and Tasks” modal. Integrate the isDeleteBoardAndTaskModal state into the preliminaryState object as illustrated beneath:
    const preliminaryState = {
      //remainder of the state
      isDeleteBoardAndTaskModal: { isOpen: false, variant: "",  title:'', standing: "", index: -1 },
Next, embody the next features within the reducers object. These features will probably be invoked to open and shut the modal:
    // Open the delete board and job modal with a specified variant (delete board or job)
   openDeleteBoardAndTaskModal: (state, { payload }) => {
      state.isDeleteBoardAndTaskModal.isOpen = true;
      state.isDeleteBoardAndTaskModal.variant = payload.variant;
	  state.isDeleteBoardAndTaskModal.title = payload.title;
      state.isDeleteBoardAndTaskModal.standing = payload.standing;
      state.isDeleteBoardAndTaskModal.index = payload.index;
    },
   // Close the delete board and job modal
   shutDeleteBoardAndTaskModal: (state) => {
      state.isDeleteBoardAndTaskModal.isOpen = false;
      state.isDeleteBoardAndTaskModal.variant = "";
	  state.isDeleteBoardAndTaskModal.title = "";
      state.isDeleteBoardAndTaskModal.standing = "";
      state.isDeleteBoardAndTaskModal.index = -1;
    },
Lastly, embody the newly applied features and the selector features within the exports:
export const {
   openDeleteBoardAndTaskModal,
   shutDeleteBoardAndTaskModal,
  } = options.actions;

  // Delete job and board
  export const getDeleteBoardAndTaskModalWorth = (state: RootState) => state.options.isDeleteBoardAndTaskModal.isOpen;
  // Selector perform to retrieve variant state worth
  export const getDeleteBoardAndTaskModalVariantValue = (state: RootState) => state.options.isDeleteBoardAndTaskModal.variant;
  // Selector perform to retrieve title state worth
  export const getDeleteBoardAndTaskModalTitle = (state: RootState) => state.options.isDeleteBoardAndTaskModal.title;
  // Selector perform to retrieve standing state worth
  export const getDeleteBoardAndTaskModalStatus = (state: RootState) => state.options.isDeleteBoardAndTaskModal.standing;
  // Selector perform to retrieve index state worth
  export const getDeleteBoardAndTaskModalIndex = (state: RootState) => state.options.isDeleteBoardAndTaskModal.index;
Following that, we’ll implement the onClick features to allow customers to work together with the modal and execute delete-related actions. These features will allow customers to open the “Delete board” modal from the dropdown within the navbar and the “Delete job” modal by clicking the delete icon inside particular person job playing cards.
In the elements/Dropdown.tsx file, add the openDeleteBoardAndTaskModal perform to the checklist of imported features from the appSlice:
import { openDeleteBoardAndTaskModal } from '@/elements/redux/options/appSlice';
Then modify the “Delete board” button to include the onClick perform to open the modal. This motion will set off the “Delete board” modal:
      <div className="hover:bg-gray-300">
         <button
            onClick={() => dispatch(openDeleteBoardAndTaskModal({variant: "Delete this board?"}))}
            className="text-sm px-4 py-2">
            Delete Board
         </button>
      </div>
Move on to the BoardTasks part, and equally, embody the perform for deleting duties and boards among the many imports from the appSlice:
      import {
         //different imports
         openDeleteBoardAndTaskModal
      } from "@/elements/redux/options/appSlice";
Adjust the delete React icon to incorporate the onClick perform to open the modal:
      <MdDelete
         onClick={() =>
            dispatch(
               openDeleteBoardAndTaskModal({
                  variant: "Delete this Task?",
                  standing,
                  index,
               }),
            )
         }
         className="text-lg cursor-pointer text-red-500"
      />;
Now we’ll begin constructing the markup for the delete board and duties modal, coupled with the implementation of its functionalities.
In your app/elements folder, create a file named DeleteBoardAndTask modal and paste the offered code within it:
   import { Modal, ModalPhysique } from "./Modal";
   import { useAppDispatch, useAppSelector } from "@/elements/redux/hooks";
   import {
   shutDeleteBoardAndTaskModal,
   getDeleteBoardAndTaskModalWorth,
   getDeleteBoardAndTaskModalVariantValue,
   getDeleteBoardAndTaskModalTitle,
   getDeleteBoardAndTaskModalIndex,
   getDeleteBoardAndTaskModalStatus,
   getCurrentBoardName,
   } from "@/elements/redux/options/appSlice";
   import {
   useFetchDataFromDbQuery,
   useUpdateBoardToDbMutation,
   } from "@/elements/redux/providers/apiSlice";

   export default perform DeleteBoardAndTaskModal() {
     //variable declarations, features, JSX
   }
Next, go to the DeleteBoardAndTaskModal perform and paste the next code into it to declare variables and state values. The feedback offered clarify the long run use of every of the declarations.
   const dispatch = useAppDispatch();
   const isModalOpen = useAppSelector(getDeleteBoardAndTaskModalWorth);
   const shutModal = () => dispatch(shutDeleteBoardAndTaskModal());
   const presentBoardName = useAppSelector(getCurrentBoardName);
   const modalVariant = useAppSelector(getDeleteBoardAndTaskModalVariantValue);
   const jobTitle = useAppSelector(getDeleteBoardAndTaskModalTitle);
   const jobIndex = useAppSelector(getDeleteBoardAndTaskModalIndex);
   const jobStatus = useAppSelector(getDeleteBoardAndTaskModalStatus);
   let { knowledge } = useFetchDataFromDbQuery();
   const [updateBoardToDb, { isLoading }] = useUpdateBoardToDbMutation();
Here, we’ll implement the perform chargeable for the modal performance. Just beneath the variable definitions above, paste the next perform:
   const deal withDelete = (e: React.FormEvent<HTMLButtonElement>) => {
    e.preventDefault();
    if (knowledge) {
      if (modalVariant === "Delete this board?") {
        // Implement the logic for deleting the board
        if (presentBoardName) {
          //  Assuming knowledge is offered, it's essential deal with the logic to replace the information
          const [boards] = knowledge;
          const up to dateBoards = boards.boards.filter(
            (board: { title: string }) => board.title !== presentBoardName
          );
          replaceBoardToDb(up to dateBoards);
        }
      } else {
        // Implement the logic for deleting a job
        if (jobIndex !== undefined && jobStatus && presentBoardName) {
          const [boards] = knowledge;
          //  Handle the logic to replace the duties
          const up to dateBoards = boards.boards.map(
            (board: {
              title: string;
              columns: [{ name: string; tasks: [] }];
            }) => {
            // test the board lively board
              if (board.title === presentBoardName) {
                // loop by means of the columns of the board to seek out the column during which the duty to edit is
                const up to dateColumns = board.columns.map((column) => {
                  if (column.title === jobStatus) {
                    // delete the the duty
                    const up to dateTasks = column.duties.filter(
                      (_, index: quantity) => index !== jobIndex
                    );
                    return { ...column, duties: up to dateTasks };
                  }
                  return column;
                });
                return { ...board, columns: up to dateColumns };
              }
              return board;
            }
          );
          replaceBoardToDb(up to dateBoards);
        }
      }
    }
   };
Finally, on this part, paste the code beneath to implement the JSX of the modal:
  return (
   <Modal isOpen={isModalOpen} onRequestClose={shutModal}>
     <ModalPhysique>
       <p className="text-red font-bold text-lg">{modalVariant}</p>
       <div className="pt-6">
         <p className="text-sm text-medium-grey leading-6">
           {modalVariant === "Delete this board?"
             ? `Are you positive you need to delete the '${presentBoardName}' board? This motion will take away all columns
               and duties and can't be reversed.`
             : `Are you positive you need to delete the '${jobTitle}' duties? This motion can't be reversed.`}
         </p>
       </div>
       <div className="pt-6 flex space-x-2">
         <div className="w-1/2">
           <button
             kind="submit"
             onClick={(e: React.FormEvent<HTMLButtonElement>) =>
               deal withDelete(e)
             }
             className="bg-red-500 rounded-3xl py-2 w-full text-sm font-bold"
           >
             {" "}
             {isLoading ? "Loading" : "Delete"}
           </button>
         </div>
         <div className="w-1/2">
           <button
             onClick={shutModal}
             className="bg-stone-200 rounded-3xl py-2 w-full text-sm font-bold"
           >
             Cancel
           </button>
         </div>
       </div>
     </ModalPhysique>
   </Modal>
  );
  }
After making this replace, import the part within the web page.tsx and render it as seen beneath:
	 //remainder of the imports
	 import DeleteBoardOrTaskModal from "./elements/DeleteBoardAndTaskModal";
	 //remainder of the code
	   return (
    <primary className="flex h-full">
      <Sidebar />
      <BoardTasks />
      <AddAndEditBoardModal />
      <AddAndEditTaskModal/>
      <DeleteBoardAndTaskModal/>
    </primary>
    );
After rendering the part, now you can delete a board. As an instance, we’ll delete the “Marketing” board we beforehand created:
Likewise, you’ll be able to delete a job:
In the following part, we’ll discover the implementation of the drag and drop performance with the react-beautiful-dnd library.
How to Implement Drag and Drop Functionality
At the tip of this part, it is best to be capable of transfer duties between columns and throughout columns.
To start, set up the react-beautiful-dnd library with the next command:
npm i react-beautiful-dnd
It’s value noting that the react-beautiful-dnd library doesn’t work contained in the StrictMode wrapper which is enabled by default within the app router. So we have now to create a customized hook which is able to allow us use the react-beautiful-dnd library safely with StrictMode.
Create a file named StrictModeDroppable.tsx inside your src/app/elements folder and paste the offered code beneath within it:
import { useEffect, useState } from "react";
import { Droppable, DroppableProps } from "react-beautiful-dnd";

export const StrictModeDroppable = ({ kids, ...props }: DroppableProps) => {
  const [enabled, setEnabled] = useState(false);

  useEffect(() => {
    const animation = requestAnimationFrame(() => setEnabled(true));

    return () => {
      cancelAnimationFrame(animation);
      setEnabled(false);
    };
  }, []);

  if (!enabled) {
    return null;
  }

  return <Droppable {...props}>{kids}</Droppable>;
};
This method, we have now made it suitable with StrictMode, permitting us to securely implement the drag and drop characteristic.
Next, navigate to the BoardTasks.tsx part and replace it with the code beneath:
Firstly, import wanted elements from the react-beautiful-dnd library and in addition from our customized StrictModeDroppable.tsx part:
//import useRef hook
import { useEffect, useState, useRef } from "react";
import { DragDropContext, Draggable } from "react-beautiful-dnd";
// import Droppable from the customized hook
import { StrictModeDroppable as Droppable } from "./StrictModeDroppable";
After updating the imports, go to the BoardTasks perform and embody the next features:
// test if it’s the primary render
const preliminaryRender = useRef(true);


  const deal withDragFinish = async ({ vacation spot, supply }: any) => {
    // Check if the vacation spot is just not null (i.e., it was dropped in a sound droppable)
    if (!vacation spot) return;


    // get a deep nested copy of the columns state
    const newColumns = columns.map((column) => ({
      ...column,
      duties: [...column.tasks], // Create a brand new array for duties
    }));


    // Find the supply and vacation spot columns based mostly on their droppableIds
    const supplyColumnIndex = newColumns.discoverIndex(
      (col) => col.id === supply.droppableId
    );
    const vacation spotColumnIndex = newColumns.discoverIndex(
      (col) => col.id === vacation spot.droppableId
    );


    // Task that was dragged
    const merchandiseMoved = newColumns[sourceColumnIndex]?.duties[source.index];


    // Remove from its supply
    newColumns[sourceColumnIndex].duties.splice(supply.index, 1);


    // Insert into its vacation spot
    newColumns[destinationColumnIndex].duties.splice(
      vacation spot.index,
      0,
      merchandiseMoved
    );


    // Update the state
    setColumns(newColumns);
  };


  useEffect(() => {
    // Check if it is the preliminary render, to keep away from sending the information to the backend on mount
    if (!preliminaryRender.present) {
      // Update the backend with the brand new order
      attempt {
        if (knowledge) {
          const [boards] = knowledge;
          const boardsCopy = [...boards.boards];
          const livelyBoardIndex = boardsCopy.discoverIndex(
            (board: { title: string }) => board.title === presentBoardTitle
          );
          const up to dateBoard = {
            ...boards.boards[activeBoardIndex],
            columns,
          };
          boardsCopy[activeBoardIndex] = up to dateBoard;
          replaceBoardToDb(boardsCopy);
        }
      } catch (error) {
        // Handle error
        console.error("Error updating board:", error);
      }
    } else {
      // Set preliminary render to false after the primary render
      preliminaryRender.present = false;
    }
  }, [columns]);
So far right here, we applied a perform which will probably be triggered after a job has been dragged. After every set off of this perform, the columns knowledge is being up to date and despatched to the Cloud Firestore through the useEffect hook. I added some extra feedback within the code that can assist you perceive higher.
Finally, replace the JSX within the return assertion as seen beneath:
 return (
    <div className="overflow-x-auto overflow-y-auto w-full p-6 bg-stone-200">
      {/* If knowledge has not been fetched efficiently, show a loading state, else show the column of duties */}
      {isLoading ? (
        <p className="text-3xl w-full text-center font-bold">
          Loading duties...
        </p>
      ) : (
        <>
          {/* If columns of duties is not empty: show the duties, else show the immediate so as to add a brand new column */}
          {columns.size > 0 ? (
            <DragDropContext onDragFinish={deal withDragFinish}>
              <div className="flex space-x-6">
                {columns.map((column, index) => {
                  const { id, title } = column;
                  return (
                    <div key={id} className="w-[17.5rem] shrink-0">
                      <p className="text-black">{`${column.title} (${
                        column.duties ? column.duties?.size : 0
                      })`}</p>
                      <Droppable droppableId={id}>
                        {(offered) => (
                          <div
                            ref={offered.innerRef}
                            {...offered.droppableProps}
                            className="h-full"
                          >
                            {column.duties &&
                              // Display the duties if there are duties within the column, if not, show an empty column
                              (column.duties.size > 0 ? (
                                column.duties.map((job, index) => {
                                  const { id, title, standing } = job;
                                  return (
                                    <Draggable
                                      key={id}
                                      draggableId={id}
                                      index={index}
                                    >
                                      {(offered) => (
                                        <div
                                          ref={offered.innerRef}
                                          {...offered.draggableProps}
                                          {...offered.dragHandleProps}
                                          className="bg-white p-6 rounded-md mt-6 flex items-center justify-between border"
                                        >
                                          <p>{job.title}</p>
                                          <div className="flex items-center space-x-1">
                                            <MdEdit
                                              onClick={() =>
                                                dispatch(
                                                  openAddAndEditTaskModal({
                                                    variant: "Edit Task",
                                                    title,
                                                    index,
                                                    title,
                                                  })
                                                )
                                              }
                                              className="text-lg cursor-pointer"
                                            />
                                            <MdDelete
                                              onClick={() =>
                                                dispatch(
                                                  openDeleteBoardAndTaskModal({
                                                    variant:
                                                      "Delete this job?",
                                                    title,
                                                    standing,
                                                    index,
                                                  })
                                                )
                                              }
                                              className="text-lg cursor-pointer text-red-500"
                                            />
                                          </div>
                                        </div>
                                      )}
                                    </Draggable>
                                  );
                                })
                              ) : (
                                <div className="mt-6 h-full rounded-md border-dashed border-4 border-white" />
                              ))}
                            {offered.placeholder}
                          </div>
                        )}
                      </Droppable>
                    </div>
                  );
                })}
                {/* If the variety of columns of duties is lower than 7, show an possibility so as to add extra columns */}
                {columns.size < 7 ? (
                  <div
                    onClick={() =>
                      dispatch(openAddAndEditBoardModal("Edit Board"))
                    }
                    className="rounded-md bg-white w-[17.5rem] mt-12 shrink-0 flex justify-center items-center"
                  >
                    <p className="cursor-pointer font-bold text-black text-2xl">
                      + New Column
                    </p>
                  </div>
                ) : (
                  ""
                )}
              </div>
            </DragDropContext>
          ) : (
            <div className="w-full h-full flex justify-center items-center">
              <div className="flex flex-col items-center">
                <p className="text-black text-sm">
                  This board is empty. Create a brand new column to get began.
                </p>
                <button className="bg-blue-500 text-black px-4 py-2 flex mt-6 rounded-3xl items-center space-x-2">
                  <p>+ Add New Column</p>
                </button>
              </div>
            </div>
          )}
        </>
      )}
    </div>
  );
In the code snippet above, we wrapped DragDropContext across the columns of duties with its onDragFinish attribute, which accepts the deal withDragFinish perform, which will probably be triggered after a job has been dragged.
Don’t neglect that after every set off of this perform, the columns knowledge is being up to date and despatched to the Cloud Firestore through the useEffect hook.
Each column of job can also be wrapped across the Droppable part. This signifies that this can be a location you’ll be able to drop a job. It additionally accepts a droppableId attribute which we handed the id of every column to it.
Each job card can also be wrapped across the Draggable part, this makes them draggable inside and amongst columns.
With these adjustments, we have now simply applied the drag and drop characteristic for our app:

Conclusion
This tutorial guided you thru implementing authentication utilizing the next-auth library, organising a Redux retailer, and integrating Firebase with its RTK Query in Next.js purposes.
You additionally discovered to implement CRUD operations in a Kanban job administration app, and seemed into kind validations with JavaScript.
And lastly, we coated the implementation of drag-and-drop performance utilizing the react-beautiful-dnd library.
Across the tutorial, we additionally leveraged present libraries to streamline improvement relatively than constructing every part from scratch.
If you need to see all of the code, you’ll be able to go to the undertaking’s GitHub repository right here. Feel free to fork the undertaking and open a PR in the event you really feel the necessity for any enhancements. If you’d additionally wish to mess around with the stay web site, you will discover it right here.
If you’d additionally wish to discover this undertaking with extra superior options, like darkish mode, sleeker UI design, and higher functionalities, go to it right here.