
As a part of the Google CASA course of, builders can run static evaluation on their software’s supply code utilizing an inline integration with OpenTextual content’s Fortify Source Code Analyzer (SCA) by way of the CASA portal.
Naturally, I needed to put together my supply code as per instruction. In this text, I’ll share how I packaged and submitted my Add-on’s supply code in Ubuntu OS.
But earlier than that, let’s discuss slightly about Tier 2 CASA evaluation.
What is Tier 2 CASA Security Assessment?
The Tier 2 CASA (Cloud Application Security Assessment) is a self-service safety evaluation course of for candidates searching for entry to Google Workspace knowledge or to adjust to particular Google Workspace insurance policies.
It permits builders to scan their functions and submit the outcomes for verification with out an exterior assessor accessing the code or infrastructure.
Importance Tier 2 CASA safety evaluation
Tier 2 CASA is vital for a number of causes:
- Security Assurance: It offers unbiased verification of your software’s safety posture, lowering the danger of knowledge breaches and defending consumer privateness.
- Compliance: It helps meet safety necessities for accessing Google Workspace knowledge or adhering to Google insurance policies, just like the Workspace Marketplace Terms of Service.
- Efficiency: It’s a quicker and cheaper various to Tier 1 assessments, which includes exterior assessors instantly analyzing your software.
- Trust: If your addon is printed with out verification it’s going to show an “unverified” message to the shoppers whereas putting in the addon, which creates mistrust and might result in the set up means of your addon to be deserted.
In the context of my Google Workspace Addon Scan Me, the usage of restrictive OAuth scope auth/drive of Google Drive API seemingly triggered the necessity for a Tier 2 evaluation. This scope grants your addon entry to see, edit, create, and delete all your Google Drive information, which falls below Google’s safety and privateness necessities.
Additional Resources
Disclaimer: While I’ll clarify the Tier 2 CASA course of, it is essential to seek the advice of the official documentation and Google’s safety tips for particular necessities and steerage.
The evaluation certification is free, by the way in which. To put together your addon for the CASA evaluation course of observe the next steps.
Step 1 – Sign up for the brand new Assessment Procedure
If you are utilizing restrictive scopes, you may obtain an electronic mail from Google’s Verification workforce sooner or later requesting to confirm the scopes after you have submitted your add-on for verification.
This electronic mail is the notification doc. So, you might want to obtain this electronic mail as a PDF, which have to be submitted within the software type afterward.
In that electronic mail, you may discover the next directions for Tier 2 analysis. You’ll discover a hyperlink to register or log-in to the CASA portal. Click the hyperlink and register to the location. Then click on on Start New Assessment> Create New Assessment.
Fill within the info requested rigorously. Upload the beforehand downloaded electronic mail the place you are requested for a Tier 2 notification pdf.
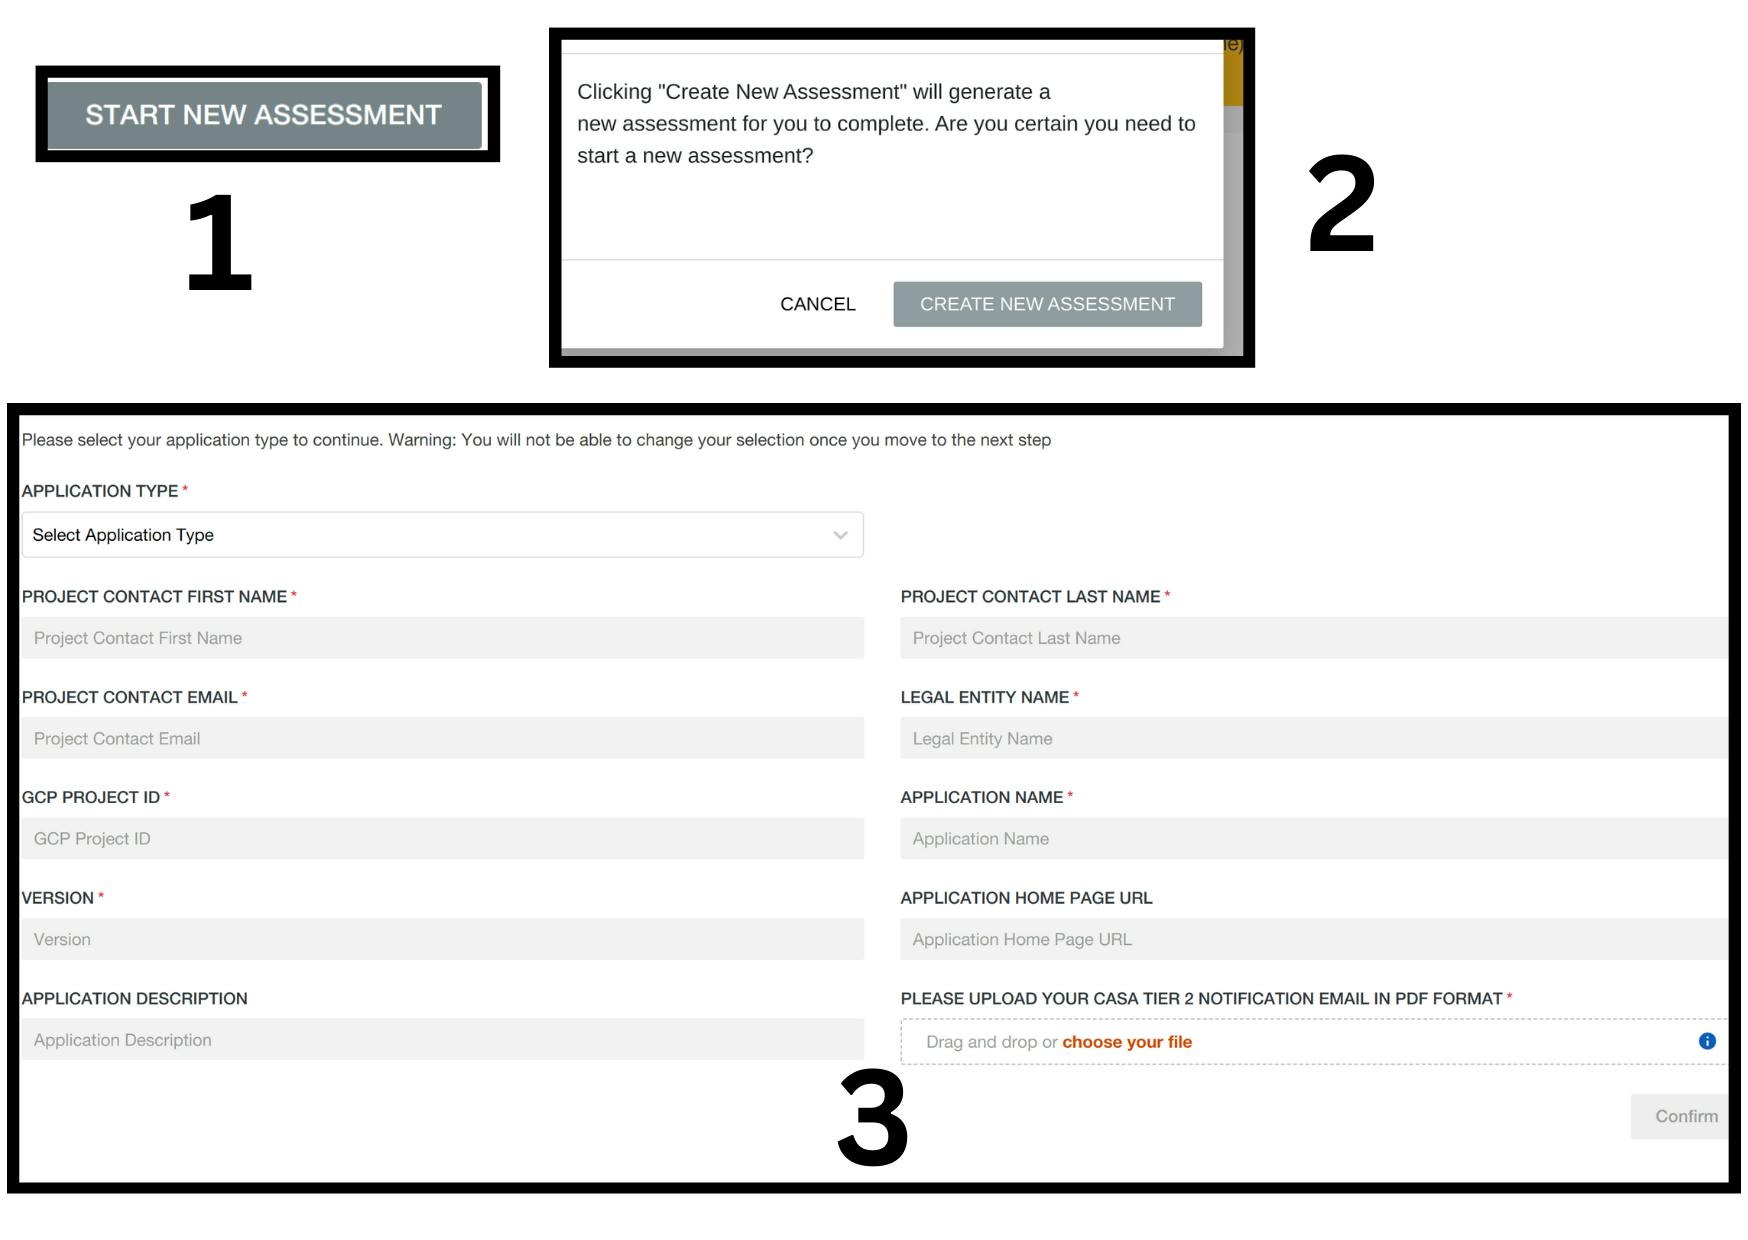
Note: For Google Workspace Addon, the kind of software is Local App.
Caution: As proven within the picture above, regardless that “Project ID” is requested within the enter discipline, they’re asking for the Project Number included within the electronic mail, not the Project ID of your Google Cloud Console undertaking.
After you rigorously fill within the particulars and submit the shape, you may arrive at a brand new display screen – Application Screening – the place there are two issues that it is best to obtain:

- Fortify Scan Central Package.
- Instruction on compressing your software’s supply code for preliminary evaluation.
Step 2 – Download and Setup Java JDK
To use the Scan Central package deal as talked about within the directions, a minimal of JDK 11 is required.
For organising the trail for the Java setting in Linux, I adopted this instruction on StackOverflow.
Step 3 – Setup Path for Scan Central
Now let’s add the trail to the Scan Central in our system.
In your CLI, open .bashrc file with sudo nano ~/.bashrc. Append the next path on the finish of the file:
# SCAN Central
# Path seems like following
#/house/<username>/Fortify_ScanCentral_Client_22.2.1_x64/bin

 export PATH=$PATH:<Path To bin folder in Scan Central>
Save (CTRL+S) and exit (CTRL + X) the file.
Open .profile with sudo nano ~/.profile and add the identical path as above. You can verify the model of Scan Central in your CLI with the command scancentral -version, to verify the setup was profitable.
Step 4 – Packaging Source Code for Assessment
To package deal the supply code on your Google Workspace Addon, go to the basis listing of your undertaking. If you are following the instruction handbook, go to the part for JavaScript code packaging.
In the basis listing run any of the next instructions:
#cmd 1
scancentral package deal -bt none -o myPackage.zip
# or cmd 2
scancentral package deal -bt none --scan-node-modules -o myPackage.zip
Note: The command scancentral.bat is for Windows customers.
As talked about within the instruction, command 2 will increase the dimensions of the package deal and isn’t needed for Node.js or Angular. I created Workspace Addon so I haven’t got node-modules in my supply code.
After that, you may see a compressed package deal named myPackage within the listing the place you ran the packaging operation.
Step 5 – Initiate the Scan Process
After packaging, return to the CASA portal and click on in your evaluation ID hyperlink within the checklist, and open up the Application Screening window. Here:
- Click the Begin Scan Process button.
- Upload the package deal you simply compressed.
- Click the Upload File & Initiate Scan button.

This will provoke auto scanning of your software which is the start of evaluation on your Addon.
Reminder: As I’ve personally skilled, in case your supply code makes use of the Math.random() technique, then the auto-scanner is not going to go your code.
If you go this section, the handbook verification course of will start the place you may should fill in types for the survey. Go to this hyperlink for the questions that’ll be requested within the CASA survey. Here, select the Local App possibility for App Type for a Google Workspace Add-on. I wish to remind you that they’ll change based mostly on the reply supplied.
Conclusion
Alright, I’m hoping this weblog helped you cut back the time and confusion that I needed to encounter after I was making an attempt to evaluate my addon. And please do not hand over halfway through the analysis in any other case your months of laborious work will likely be in useless.
My addon Scan Me, scans the Google Drive and prepares an audit report in a spreadsheet file of your selecting in your Google Drive. It makes it extraordinarily straightforward so that you can analyze your Google Drive from one place, and it additionally provides a free quota. If you are searching for an identical addon I hope you may do that addon.
This is Nibesh khadka, have an excellent day.