
The aim of this handbook is to offer light step-by-step directions that can enable you study the important thing ideas of React.
Instead of protecting all of the theories and ideas of React of their entirety, I’ll be instructing you essential constructing blocks of the library. You’ll study JSX, elements, props, states, occasion handlers, creating kinds, and working community requests.
Table of Contents
By protecting these ideas, you may be outfitted to dive additional into superior React subjects.
Requirements
To get the total advantage of this handbook, it is best to have fundamental information of HTML, CSS, and JavaScript. No earlier information about React is required, as we are going to begin from the very fundamentals.
If you want a JavaScript refresher, you possibly can get my JavaScript e book right here.
Chapter 1: Introduction
React is a highly regarded JavaScript front-end library. It’s acquired a lot of love from builders all over the world for its simplicity and quick efficiency.
React was initially developed by Facebook as an answer to entrance finish issues they have been going through:
- DOM manipulation is an costly operation and needs to be minimized
- No library specialised in dealing with front-end improvement on the time (there’s Angular, but it surely’s an ENTIRE framework.)
- Using quite a lot of vanilla JavaScript can flip an internet utility into a large number that is arduous to take care of.
Why do builders love React? As a software program developer myself, I can assume of some explanation why I adore it:
- It’s minimalist. React takes care of solely ONE factor: the person interface and the way it adjustments in accordance with the info you feed into it. React makes your interface dynamic with minimal code.
- It has a low studying curve. The core ideas of React are comparatively straightforward to study, and you do not want months or 40 hours of video lectures to study the fundamentals.
- It’s unopinionated. React might be built-in with a lot of completely different applied sciences. On the front-end, you should utilize completely different libraries to deal with Ajax calls (Axios, Superagent, or simply plain Fetch.) On the back-end, you should utilize PHP/ Ruby/ Go/ Python or no matter language you favor.
- It has sturdy neighborhood assist. To improve React’s capabilities, open supply contributors have constructed a tremendous ecosystem of libraries that lets you make much more highly effective functions. But most open supply libraries for React are optionally available. You needn’t study them till you have mastered React fundamentals.
The backside line is that with a low studying curve, React offers you unbelievable energy in making your UI versatile, reusable, and spaghetti-free.
Learning React opens great alternatives if you wish to work as an internet developer.
Computer Setup
To begin programming with React, you may must have three issues:
- An internet browser
- A code editor
- Node.js
We’re going to make use of the Chrome browser to run our JavaScript code, so if you do not have it, you possibly can obtain it right here.
The browser is accessible for all main working techniques. Once the obtain is full, set up the browser in your laptop.
Next, you may want to put in a code editor for those who do not have already got one. There are a number of free code editors obtainable on the Internet, reminiscent of Sublime Text, Visual Studio Code, and Notepad++.
Out of those editors, my favourite is Visual Studio Code, as a result of it is quick and straightforward to make use of.
How to put in Visual Studio Code
Visual Studio Code, or VSCode for brief, is an utility created for the aim of writing code. Aside from being free, VSCode is quick and obtainable on all main working techniques.
You can obtain Visual Studio Code right here.
When you open the hyperlink above, there needs to be a button exhibiting the model suitable together with your working system as proven under:
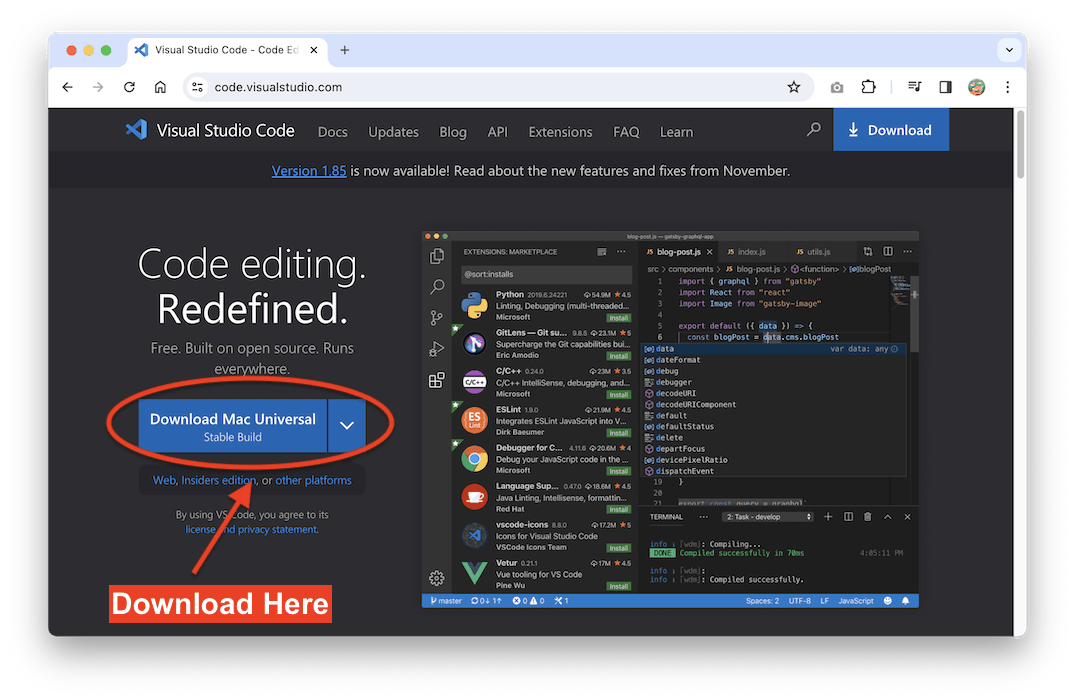
Click the button to obtain VSCode, and set up it in your laptop.
Now that you’ve a code editor put in, the following step is to put in Node.js
How to put in Node.js
Node.js is a JavaScript runtime utility that lets you run JavaScript outdoors of the browser. You want to put in this utility in your laptop to put in packages required in React improvement.
You can obtain and set up Node.js from https://nodejs.org. Pick the advisable LTS model as a result of it has long-term assist. The set up course of is fairly simple.
To verify if Node has been correctly put in, kind the command under in your command line (Command Prompt on Windows or Terminal on Mac):
node -v
The command line ought to reply with the model of the Node.js you may have in your laptop.
Your First React Application
It’s time to run your first React utility. First, create a folder in your laptop that can be used to retailer all information associated to this e book. You can title the folder ‘beginning_react’.
The subsequent step is to open your terminal and run the npm command to create a brand new React utility utilizing Vite.
Vite (pronounced ‘veet’) is a construct software that you should utilize to bootstrap a brand new React venture. Inside the ‘beginning_react’ folder, it is advisable to run the next command to create a brand new React venture with Vite:
npm create [email protected] my-react-app -- --template react
You ought to see npm asking to put in a brand new bundle (create-vite) as proven under. Proceed by typing ‘y’ and urgent Enter:
Need to put in the next packages:
  [email protected]
Ok to proceed? (y) y
Then Vite will create a brand new React venture named ‘my-react-app’ as follows:
Scaffolding venture in /dev/beginning_react/my-react-app...

Done. Now run:

  cd my-react-app
  npm set up
  npm run dev
When you are achieved, observe the following steps you see within the output above. Use the cd command to vary the working listing to the applying you have simply created, after which run npm set up to put in the packages required by the applying.
Then, it is advisable to run the npm run dev command to begin your utility:
$ npm run dev

> [email protected] dev
> vite


  VITE v5.0.10  prepared in 509 ms

  ➜  Local:   http://localhost:5173/
  ➜  Network: use --host to show
  ➜  press h + enter to indicate assist
Now you possibly can view the working utility from the browser, on the designated localhost tackle:

This means you may have efficiently created your first React app. Congratulations!
Explaining the Source Code
Now that you have efficiently run a React utility, let’s check out the supply code generated by Vite to grasp how issues work.
Run the Visual Studio Code you have put in within the earlier part, and open the ‘my-react-app’ folder inside VSCode.
Here, it is best to see a number of folders and information that make up the React utility as follows:
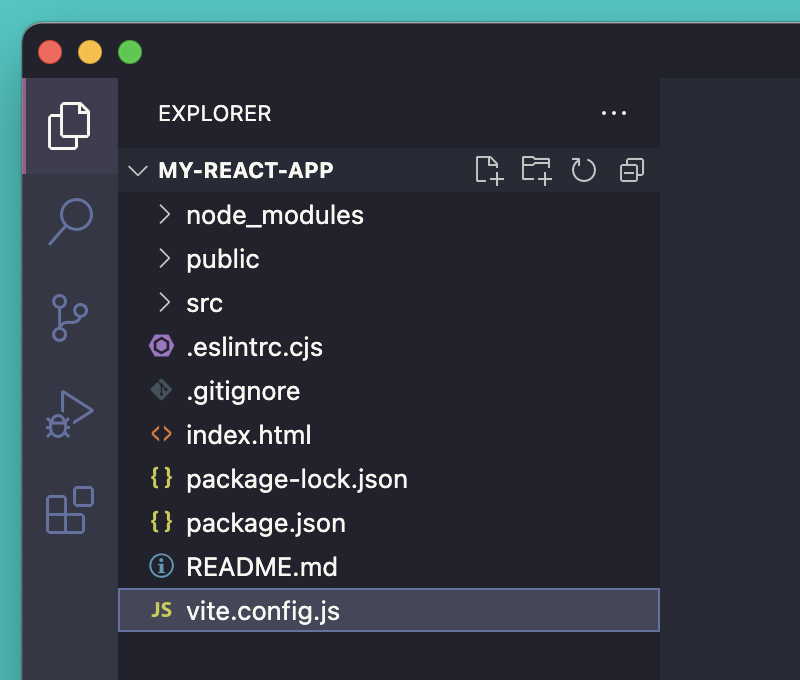
The vite.config.js is a configuration file that instructs Vite on easy methods to run the applying. Because we have now a React utility, you may see the React plugin imported inside:
import { defineConfig } from 'vite'
import react from '@vitejs/plugin-react'

// https://vitejs.dev/config/
export default defineConfig({
  plugins: [react()],
})
When you run the npm run dev command, Vite will look into this file to know easy methods to run this system.
The bundle.json file shops the details about the venture, together with the packages required to run the venture with none points. The package-lock.json file retains observe of the put in bundle variations.
The .eslintrc.cjs file comprises ESLint guidelines. ESLint is a code evaluation software that may determine problematic code in your venture without having to run the venture. It will report any errors and warnings in VSCode.
The index.html file is a static HTML doc that is going for use when working the React utility, and the README.md file comprises an introduction to the venture.
You needn’t modify any of those information. Instead, let’s go to the src/ folder the place the React utility code is written.
src
├── App.css
├── App.jsx
├── belongings
│   └── react.svg
├── index.css
└── most important.jsx
First, the App.css file comprises the CSS guidelines utilized to the App.jsx file, which is the principle React utility code.
The belongings/ folder comprises the belongings required for this venture. In this case, it is the React icon, which you had seen within the browser.
The index.css file is the basis CSS file utilized globally to the applying, and the most important.jsx file is the basis file that entry the index.html file to render the React utility. Here’s the content material of most important.jsx file:
import React from 'react'
import ReactDOM from 'react-dom/consumer'
import App from './App.jsx'
import './index.css'

ReactDOM.createRoot(doc.getElementById('root')).render(
  <React.StrictMode>
    <App />
  </React.StrictMode>,
)
Here, you possibly can see that the ReactDOM library creates a root on the <div> ingredient that comprises the root ID, then renders the entire React utility to that ingredient.
You can open the App.jsx file to view the React code:
import { useState } from 'react'
import reactLogo from './belongings/react.svg'
import viteLogo from '/vite.svg'
import './App.css'

operate App() {
  const [count, setCount] = useState(0)

  return (
    <>
      <div>
        <a href="https://vitejs.dev" goal="_blank">
          <img src={viteLogo} className="emblem" alt="Vite emblem" />
        </a>
        <a href="https://react.dev" goal="_blank">
          <img src={reactLogo} className="emblem react" alt="React emblem" />
        </a>
      </div>
      <h1>Vite + React</h1>
      <div className="card">
        <button onClick={() => setCount((rely) => rely + 1)}>
          rely is {rely}
        </button>
        <p>
          Edit <code>src/App.jsx</code> and save to check HMR
        </p>
      </div>
      <p className="read-the-docs">
        Click on the Vite and React logos to study extra
      </p>
    </>
  )
}

export default App
In this file, a single part named App is outlined. The Vite and React logos are rendered with a hyperlink to the respective library, and there is a counter button that can increment the counter by 1 once you click on on it.
This file is the place we can be exploring the basics of React. Let’s delete all the things on this file, and write a easy App part that renders a <h1> ingredient:
operate App() {
  return <h1>Hello World</h1>
}

export default App
Next, delete the index.css, app.css, and belongings/ folder. You additionally must delete the import './index.css' assertion in your most important.jsx file.
If you open the browser once more, it is best to see a single heading rendered as follows:

Alright! Now you are able to study the basics of React. We’ll begin your first lesson within the subsequent chapter.
Chapter 2: How to Create React Components
In React, a part is a single impartial unit of a person interface (UI). What you write inside a part will decide what ought to seem on the browser display at a given time.
In the earlier chapter, we created an App part that returns a heading ingredient:
operate App() {
  return <h1>Hello World</h1>
}

export default App
A part is made up of a operate that returns a single UI ingredient.
When you desire a part to render nothing, you possibly can return a null or false as an alternative of a component.
operate App() {
  return null
}
All React elements are saved beneath the .jsx file extension. As you possibly can see on this venture, you may have most important.jsx and App.jsx.
What is JSX? It’s an extension of JavaScript that produces JavaScript-powered HTML components. We’re going to study it later.
How to Return Multiple Elements With Fragments
A part should at all times return a single ingredient. When it is advisable to return a number of components, it is advisable to wrap all of them in a single ingredient like a <div>:
operate App() {
  return (
    <div>
      <h1>Hello World!</h1>
      <h2>Learning to code with React</h2>
    </div>
  )
}

export default App
But it will make your utility render one additional <div> ingredient within the browser. To keep away from cluttering your utility, you possibly can render an empty tag <> like this:
operate App() {
  return (
    <>
      <h1>Hello World!</h1>
      <h2>Learning to code with React</h2>
    </>
  )
}

export default App
The empty tag above is a React characteristic known as a Fragment. By utilizing a Fragment, your part will not render an additional ingredient to the display.
You can even import the Fragment module from React to make it express as follows:
import { Fragment } from 'react';

operate App() {
  return (
    <Fragment>
      <h1>Hello World!</h1>
      <h2>Learning to code with React</h2>
    </Fragment>
  )
}

export default App
But you needn’t explicitly state the Fragment tag. Using an empty tag <> is sufficient.
How to Render to the Screen
To render a React part into the browser, it is advisable to create a root React part utilizing the ReactDOM library, which you have seen beforehand when viewing the most important.jsx file.
You must have an HTML file because the supply from which your React part is rendered.
Usually, a really fundamental HTML doc with a <div> is sufficient, as you possibly can see within the index.html file:
<physique>
  <div id="root"></div>
  <script kind="module" src="https://www.freecodecamp.org/src/most important.jsx"></script>
</physique>
Next, you render the part into the <div> ingredient.
Notice how ReactDOM is imported from react-dom bundle, and the doc.getElementById('root') is used to pick out the <div> ingredient under:
import React from 'react'
import ReactDOM from 'react-dom/consumer'

operate App() {
  return <h1>Hello World!</h1>
}

ReactDOM.createRoot(doc.getElementById('root')).render(
  <React.StrictMode>
    <App />
  </React.StrictMode>,
)
Here, you possibly can see that the App part is positioned in the identical file because the ReactDOM library. You can do that if you wish to take away the App.jsx file, so you may have solely a single most important.jsx file because the supply on your React utility.
But it is complicated to have a number of elements in a single file, so let’s not do that.
Writing feedback in React elements is much like the way you remark in common JavaScript code. You can use the double ahead slash syntax // to remark any code.
The following instance reveals easy methods to remark the export assertion:
operate App() {
  return (
    <>
      <h1>Hello World!</h1>
      <h2>Learning to code with React</h2>
    </>
  )
}

// export default App
When you need to remark the code contained in the return assertion, it is advisable to use the curly brackets, ahead slash, and asterisk format {/* remark right here */} as proven under:
operate App() {
  return (
    <>
      <h1>Hello World!</h1>
      {/* <h2>Learning to code with React</h2> */}
    </>
  )
}
It could seem very annoying that it is advisable to bear in mind two alternative ways of commenting when writing React functions. But don’t be concerned, as a result of a contemporary software like VSCode is aware of easy methods to generate the appropriate remark syntax.
You solely must press the remark shortcut, which is CTRL + / for Windows/ Linux or Command + / for macOS.
How to Compose Multiple Components as One
Up till this level, you have solely rendered a single App part to the browser. But functions constructed utilizing React might be composed of tens or a whole lot of elements.
Composing elements is the method of forming the person interface through the use of loosely coupled elements. It’s type of like making a home out of Lego blocks, as I’ll present you within the following instance:
export default operate Dad or mumComponent() {
  return (
    <>
      <UserComponent />
      <ProfileComponent />
      <FeedComponent />
    </>
  );
}

operate UserComponent() {
  return <h1> User Component </h1>;
}

operate ProfileComponent() {
  return <h1> Profile Component </h1>;
}

operate FeedComponent() {
  return <h1> Feed Component</h1>;
}
From the instance above, you possibly can see how the <Dad or mumComponent> renders three youngsters elements:
<UserComponent><ProfileComponent><FeedComponent>
The composition of many elements will kind a single tree of React elements in a top-down method.
The tree will then be rendered into the DOM by the ReactDOM.render() technique:
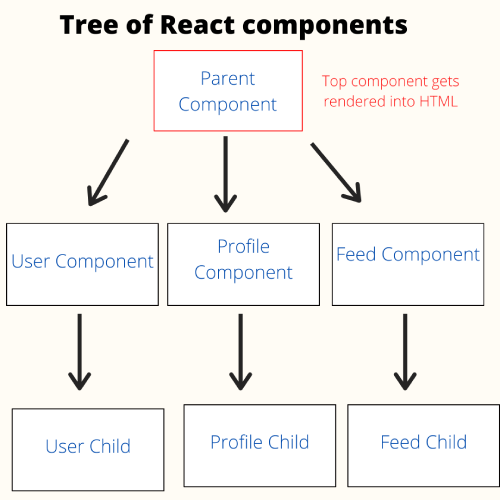
By composing a number of elements, you possibly can break up the person interface into impartial, reusable items, and develop every bit in isolation.
Chapter 3: Making Sense of JSX
In the earlier chapter, you realized {that a} part should at all times have a return assertion that comprises components to render on the display:
operate App() {
  return <h1>Hello World</h1>
}
The tag <h1> seems like an everyday HTML tag, but it surely’s really a particular template language included in React known as JSX.
JSX is a syntax extension that produces JavaScript powered HTML components. It might be assigned to JavaScript variables and might be returned from operate calls. For instance:
operate App() {
  const myElement = <h1>Hello World</h1>
  return myElement
}
Because of JSX, you too can embed JavaScript expressions inside a component through the use of curly brackets {}:
const lowercaseClass="text-lowercase";
const textual content="Hello World!";
const App = <h1 className={lowercaseClass}>{textual content}</h1>;
This is what makes React components completely different from HTML components. You cannot embed JavaScript immediately through the use of curly braces in HTML.
Instead of making an entire new templating language, you simply want to make use of JavaScript capabilities to regulate what’s being displayed on the display.
How to Render a List Using JSX
For instance, to illustrate you may have an array of customers that you just’d like to indicate:
const customers = [
  { id: 1, name: 'Nathan', role: 'Web Developer' },
  { id: 2, name: 'John', role: 'Web Designer' },
  { id: 3, name: 'Jane', role: 'Team Leader' },
]
You can use the map() operate to loop over the array:
operate App() {
  const customers = [
    { id: 1, name: 'Nathan', role: 'Web Developer' },
    { id: 2, name: 'John', role: 'Web Designer' },
    { id: 3, name: 'Jane', role: 'Team Leader' },
  ]

  return (
    <>
      <p>The at present energetic customers checklist:</p>
      <ul>
      {
        customers.map(operate(person){
          // returns Nathan, then John, then Jane
          return (
            <li> {person.title} because the {person.position} </li>
          )
        })
      }
      </ul>
    </>
  )
}
Inside React, you needn’t retailer the return worth of the map() operate in a variable. The instance above will return a <li> ingredient for every array worth into the part.
While the above code is already full, React will set off an error within the console, saying that it is advisable to put a “key” prop in every baby of a listing (the ingredient that you just return from map() operate):
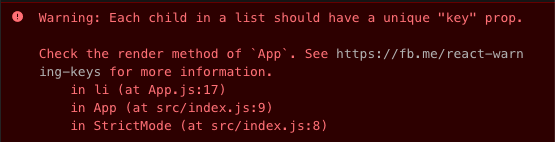
A prop (brief for property) is an enter that you may cross to a part when rendering that part. The key prop is a particular prop that React will use to find out which baby ingredient has been modified, added, or faraway from the checklist.
You will not use it actively in any a part of your array rendering code, however React will ask for one once you render a listing.
It is advisable that you just put the distinctive identifier of your information as the important thing worth. In the instance above, you should utilize the person.id information. Here’s the way you cross a key prop for every <li> ingredient:
return (
  <li key={person.id}>
    {person.title} because the {person.position}
  </li>
)
When you have no distinctive identifiers on your checklist, you should utilize the array index worth because the final resort:
customers.map(operate(person, index){
  return (
    <li key={index}>
      {person.title} because the {person.position}
    </li>
  )
})
Props are one of many substances that make a React part highly effective. You’re going to study extra about it within the subsequent chapter.
How to Add the Class Attribute
You can add the class attribute to your components through the use of the className key phrase:
operate App() {
  return <h1 className="text-lowercase">Hello World!</h1>
}
The key phrase class is reserved for JavaScript lessons, so it is advisable to use className as an alternative.
Chapter 4: Props and States
Props and states are used to cross information inside React elements. Props (or properties) are inputs handed down from a father or mother part to its baby part.
On the opposite hand, states are variables outlined and managed contained in the elements.
Let’s begin by understanding props. Suppose you may have a Dad or mumComponent that renders a ChildComponent like this:
operate Dad or mumComponent() {
  return <ChildComponent />
}
You can cross a prop from Dad or mumComponent into ChildComponent by including a brand new attribute after the part title.
In the code under, the title prop with the worth ‘John’ is handed to the ChildComponent:
operate Dad or mumComponent() {
  return <ChildComponent title="John" />
}
When the part is rendered on the browser, the ChildComponent will obtain the title prop into the part.
You can entry the props object by defining it within the operate part’s argument:
operate ChildComponent(props){
  return <p>Hello World! my title is {props.title}</p>
}
The props parameter will at all times be an object, and any prop you outline when rendering the part can be handed as a property to the item.
How to Pass Down Multiple Props
You can cross as many props as you need right into a single baby part. Just add the props when utilizing the part as proven under:
operate Dad or mumComponent() {
  return (
    <ChildComponent
      title="John"
      age={29}
      hobbies={["read books", "drink coffee"]}
      occupation="Software Engineer"
    />
  )
}
All the props above can be handed to the ChildComponent’s props parameter.
You may even cross a operate into props like this:
operate Dad or mumComponent() {
  operate greetings() {
    return 'Hello World'
  }

  return <ChildComponent greetings={greetings} />
}
In the kid part, you possibly can name the operate as follows:
operate ChildComponent(props) {
  return <p>{props.greetings()}</p>
}
Note that for those who cross something apart from a string as a prop worth, it is advisable to put the worth in curly brackets (numbers, capabilities, arrays, objects, and so forth)
This is as a result of JavaScript expressions cannot be processed by JSX until you place the expression inside curly brackets.
Props are Immutable
Immutable signifies that a prop’s worth cannot be modified it doesn’t matter what occurs.
In the code under, the ChildComponent tries to vary the worth of props.title property:
operate ChildComponent(props){
  props.title="Mark";
  return <p>Hello World! my title is {props.title}</p>
}

operate Dad or mumComponent() {
  return <ChildComponent title="John"/>
}

export default Dad or mumComponent
But you may get an error within the console as follows:
Uncaught KindError: Cannot assign to learn solely property 'title' of object '#<Object>'
As you possibly can see, React props cannot be modified when you declare them. But what in case your information wants to vary as a person interacts together with your utility? This is the place state involves the rescue.
State in React
In React, states are arbitrary information that you may declare and handle in your elements. To create a state in React, it is advisable to name the useState hook as proven under:
import { useState } from 'react'

operate Dad or mumComponent() {
  const [name, setName] = useState('John')

}

export default Dad or mumComponent
In React, hooks are capabilities that mean you can faucet into the options supplied by React. The useState hook is a operate that lets you put worth into the state mechanism.
When calling the useState() operate, you possibly can cross an argument that can function the preliminary worth of the state. The operate then returns an array with two components.
The first ingredient holds the state worth, and the second ingredient is a operate that means that you can change the state worth. You want to make use of the destructuring array syntax to obtain each components as proven above
You may give any names to the variables returned by useState, but it surely’s advisable to make use of [something, setSomething].
To render the state worth, you possibly can embed it into JSX as follows:
operate Dad or mumComponent() {
  const [name, setName] = useState('John')

  return <h1>Hello {title}</h1>
}
If you need to change the worth of the title variable, it is advisable to use the supplied setName() operate.
But you possibly can’t name setName() within the part’s physique, as a result of React will refresh itself anytime you alter the state worth.
Instead, you possibly can create a button that can change the worth of title once you click on it:
operate Dad or mumComponent() {
  const [name, setName] = useState('John')

  return (
    <>
      <h1>Hello {title}</h1>
      <button onClick={() => setName('Mark')}>Change Name</button>
    </>
  )
}
In the code above, we create a <button> ingredient and add the onClick prop, which will get executed anytime we click on on the button.
Inside the prop, we cross a operate that merely calls the setName() operate, altering the state worth.
How to Pass State to a Child Component
You can cross the state into any baby part. When it is advisable to replace the state from a toddler part, it is advisable to cross the setSomething operate acquired from the useState hook.
Here’s an instance of passing a state from Dad or mumComponent to ChildComponent:
operate Dad or mumComponent() {
  const [name, setName] = useState('John')

  return <ChildComponent title={title} setName={setName} />
}
In the ChildComponent, you possibly can name the setName() operate from props like this:
operate ChildComponent(props) {
  return (
    <>
      <h1>Hello {props.title}</h1>
      <button onClick={() => props.setName('Mark')}>Change Name</button>
    </>
  )
}
When the button on the ChildComponent is clicked, the worth of the title state will change. Internally, React will refresh the applying and mirror the adjustments within the person interface.
How to Use React DevTools to Inspect States and Props
To assist ease your improvement, you possibly can set up the React Developer Tools (DevTools for brief) to examine the present state and props worth of your elements.
You can set up React DevTool for Chrome right here.
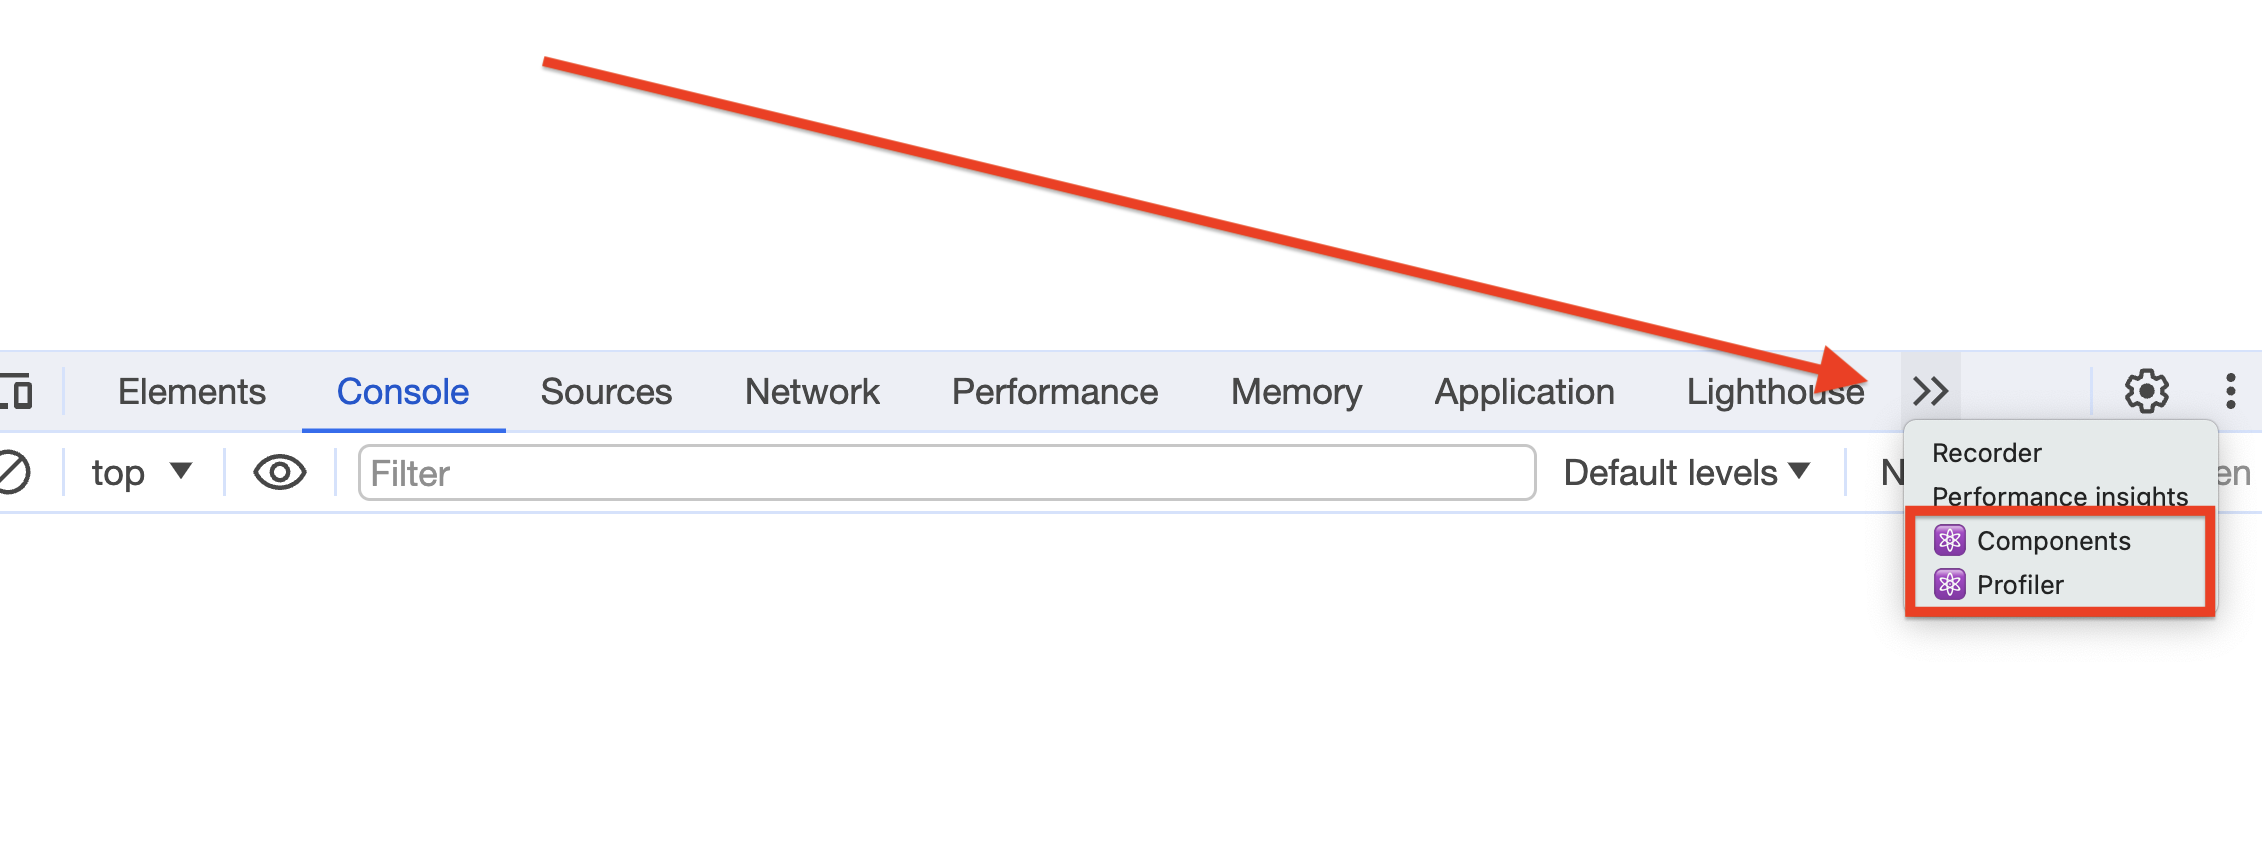
Once put in, open the developer software and it is best to have two additional tabs known as Components and Profiler as proven under:
Similar to how one can examine CSS guidelines utilized to HTML components, you possibly can examine the state and props of React elements utilizing the developer instruments. Click the Components tab, and examine one of many two elements we created earlier.
Below, you possibly can see the props and state of the Dad or mumComponent, in addition to different particulars:
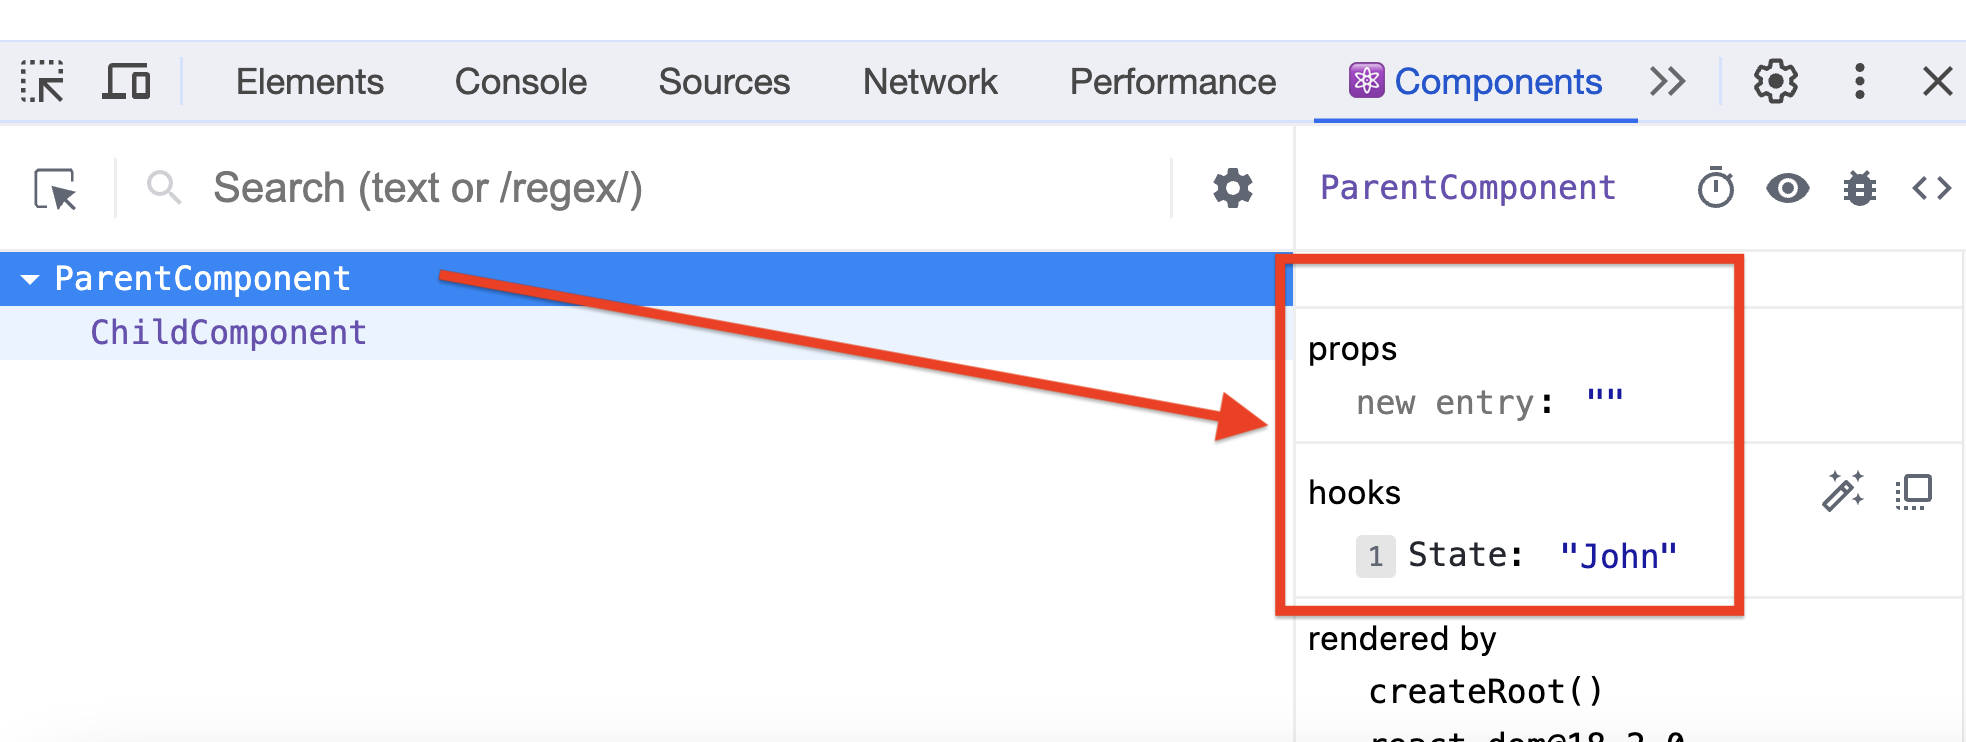
When you click on on the button, the state worth will change accordingly. You can examine the ChildComponent to view its particulars. These DevTools will come in useful once you develop React functions.
Chapter 5: React Conditional Rendering
You can management what output is being rendered by a part by implementing conditional rendering in your JSX code.
For instance, to illustrate you need to swap between rendering the login and logout buttons, relying on the provision of the person state:
operate App(props) {
  const { person } = props

  if (person) {
    return <button>Logout</button>
  }
  return <button>Login</button>
}

export default App
You needn’t add an else assertion within the part as a result of React will cease additional processes as soon as it reaches a return assertion.
In the instance above, React will render the logout button when the person worth is truthy, and the login button when person is falsy.
Partial Rendering with a Regular Variable
When creating with React, there can be circumstances the place you need to render part of your UI dynamically in a part.
In the instance under, the JSX ingredient is saved in a variable known as button, and that variable is used once more within the return assertion:
operate App(props) {
  const { person } = props

  let button = <button>Login</button>

  if (person) {
    button = <button>Logout</button>
  }

  return (
    <>
      <h1>Hello there!</h1>
      {button}
    </>
  )
}
Instead of writing two return statements, you retailer the dynamic UI ingredient inside a variable and use that variable within the return assertion.
This means, you possibly can have a part that has static and dynamic components.
Inline Rendering with the && Operator
It’s attainable to render a part provided that a sure situation is met and render null in any other case.
For instance, to illustrate you need to render a dynamic message for customers after they have new emails of their inbox:
operate App() {
  const newEmails = 2

  return (
    <>
      <h1>Hello there!</h1>
      {newEmails > 0 &&
        <h2>
          You have {newEmails} new emails in your inbox.
        </h2>
      }
    </>
  )
}
In this instance, the <h2> ingredient solely will get rendered when the newEmails rely is larger than 0.
Inline Rendering with the Conditional (Ternary) Operator
It’s additionally attainable to make use of a ternary operator to be able to render the UI dynamically.
Take a take a look at the next instance:
operate App(props) {
  const { person } = props

  return (
    <>
      <h1>Hello there!</h1>
      { person? <button>Logout</button> : <button>Login</button> }
    </>
  )
}
Instead of utilizing a variable to carry the <button> ingredient, you possibly can merely use the ternary operator on the person worth and render ‘Logout’ or ‘Login’ button in accordance with the variable’s worth.
Chapter 6: How to Handle User Events
Under the hood, React has an inner occasion handler that connects to the native DOM occasion.
This is why we are able to add the onClick prop to buttons within the earlier chapters, which will get executed in response to a click on occasion.
When you name a operate in response to occasions, the occasion object can be handed to the callback operate as follows:
operate App() {
  const deal withClick = (occasion) => {
    console.log("Hello World!");
    console.log(occasion);
  }
  return (
    <button onClick={deal withClick}>
      Click me
    </button>
  )
}
When you click on on the button above, the occasion variable can be logged as a SyntheticBaseEvent object in your console:

The SyntheticBaseEvent object is a built-in React object used to work together with the native DOM occasions. Different browsers have completely different implementations of the DOM occasion object, so the SyntheticBaseEvent makes React suitable with these browsers.
Whenever a DOM occasion is triggered, that artificial occasion can be dealt with by React in an effort to determine what to do with that occasion.
The use case for this Synthetic occasion is similar because the native DOM occasion. Three of the most typical occasion handlers you are going to use are:
You can reply to person interactions like clicking, hovering, focusing or typing on a kind enter, submitting a kind, and so forth.
How to Change the UI By Handling Events
In the earlier chapter, you noticed how conditional logic can be utilized to render completely different outputs.
By combining conditional logic with state, props, and occasion handlers, you possibly can create a dynamic part that renders completely different outputs primarily based on the info it at present holds.
For instance, suppose you need to present or conceal a <div> ingredient with a button click on. Here’s the way you do it:
import { useState } from 'react';

operate App() {
  // State to carry the visibility standing of the paragraph
  const [isParagraphVisible, setIsParagraphVisible] = useState(true);

  // Function to toggle the visibility standing of the paragraph
  const toggleStatus = () => {
    setIsParagraphSeen(!isParagraphSeen);
  };

  return (
    <>
      <h1>Change UI primarily based on click on</h1>
      {isParagraphSeen && (
        <p>This paragraph can be proven/hidden on click on</p>
      )}
      <button onClick={toggleStatus}>
        {isParagraphSeen ? 'Hide' : 'Show'} Paragraph
      </button>
    </>
  );
}

export default App;
First, you create a state to carry the visibility standing of the paragraph utilizing the useState hook. The default worth of the state is true.
Next, a operate named toogleStatus() is outlined. This operate will change the standing worth from true to false and vice versa.
Finally, a return assertion is added to render the weather to the display. When the button is clicked, the toogleStatus() operate can be executed. This will present or conceal the paragraph relying on the present standing.
By utilizing states, props, and occasion handlers, the code you write turns into an outline of what the person interface ought to seem like. React then takes that description and renders it on the browser.
Chapter 7: CSS in React
There are 4 widespread methods you possibly can add CSS in a React utility:
- Inline styling
- CSS information
- CSS modules
- Tailwind CSS
This chapter will discover these 4 alternative ways to jot down CSS in React elements, and which one it is best to use when beginning a React utility.
React Inline Styling
React elements are composed of JSX components. But simply since you’re not writing common HTML components does not imply you possibly can’t use the outdated inline fashion technique.
The solely distinction with JSX is that inline types have to be written as an object as an alternative of a string. See the instance under:
operate App() {
  return (
    <h1 fashion={{ coloration: 'purple' }}>Hello World</h1>
  );
}
In the fashion attribute above, the primary set of curly brackets is used to jot down JavaScript expressions. The second set of curly brackets initializes a JavaScript object.
Style property names which have multiple phrase are written in camelCase as an alternative of utilizing the standard hyphenated fashion. For instance, the same old text-align property is written as textAlign in JSX:
operate App() {
  return (
    <h1 fashion={{ textAlign: 'heart' }}>Hello World</h1>
  );
}
Because the fashion attribute is an object, you too can separate the fashion by writing it as a continuing. This means, you possibly can reuse the fashion in different components as wanted:
const pStyle = {
  fontSize: '16px',
  coloration: 'blue'
}

export default operate App() {
  return (
    <>
      <p fashion={pStyle}>Hello World!</p>
      <p fashion={pStyle}>The climate is sunny immediately.</p>
    </>
  )
}
If it is advisable to prolong your paragraph fashion additional down the road, you should utilize the unfold operator.
This will allow you to add inline types to your already declared fashion object. See the <p> ingredient under:
const pStyle = {
  fontSize: '16px',
  coloration: 'blue'
}

export default operate App() {
  return (
    <p fashion={{ ...pStyle, coloration: 'inexperienced', textAlign: 'proper' }}>
      When you go to work, convey your umbrella with you!
    </p>
  )
}
JSX inline types mean you can write CSS immediately into your part.
One of the advantages of utilizing the inline fashion method is that you’ll have a easy component-focused styling method. When utilizing an object for styling, you possibly can prolong your fashion by spreading the item.
But in an enormous and complicated venture the place you may have a whole lot of React elements to handle, this won’t be the only option for you.
You cannot specify pseudo lessons utilizing inline types. That means you possibly can’t outline guidelines like :hover, :focus, :energetic, and so forth.
Also, you possibly can’t specify media queries for responsive styling. Let’s contemplate one other technique to fashion your React app.
CSS Files
Another means so as to add CSS in React is to make use of .css information. Vite already is aware of easy methods to deal with a .css file, so all it is advisable to do is import the CSS file into your JSX file and add the appropriate className prop to your part.
Let’s create a fashion.css file in your venture folder with the next content material:
/* fashion.css */
.paragraph-text {
  font-size: 16px;
  coloration: #ff0000;
}
Now, let’s import the CSS file into the App.jsx file and add the category prop to the part:
import './fashion.css';

operate App() {
  return (
      <p className="paragraph-text">
        The climate is sunny immediately.
      </p>
  );
}
This means, the CSS can be separated out of your JavaScript information, and you may simply write CSS syntax as regular.
You may even embody a CSS framework reminiscent of Bootstrap in React with this method. All it is advisable to do is import the CSS file in your root part.
This technique will allow you to make use of all CSS options, together with pseudo lessons and media queries.
CSS Modules
A CSS module is an everyday CSS file with all of its class and animation names scoped regionally by default.
When making use of this technique, every React part can have its personal CSS file, and it is advisable to import that CSS file into your part.
To let React know you are utilizing CSS modules, title your CSS file utilizing the [name].module.css conference.
Here’s an instance:
/* App.module.css */
.BlueParagraph {
  coloration: blue;
  text-align: left;
}
.InexperiencedParagraph {
  coloration: inexperienced;
  text-align: proper;
}
Then import it to your part file:
import types from "./App.module.css";

operate App() {
  return (
    <>
      <p className={types.BlueParagraph}>
        The climate is sunny immediately.
      </p>
      <p className={types.InexperiencedParagraph}>
        Still, do not forget to convey your umbrella!
      </p>
    </>
  )
}
When you construct your app, Vite will routinely search for CSS information which have the .module.css title and course of the category names to a brand new localized title.
Using CSS Modules ensures that your CSS lessons are scoped regionally, stopping CSS guidelines from colliding with one another.
Another benefit of utilizing CSS Modules is that you may compose a brand new class by inheriting from different lessons that you have written. This means, you’ll reuse CSS code that you have written beforehand, like this:
.MediumParagraph {
  font-size: 20px;
}
.BlueParagraph {
  composes: MediumParagraph;
  coloration: blue;
  text-align: left;
}
.InexperiencedParagraph {
  composes: MediumParagraph;
  coloration: inexperienced;
  text-align: proper;
}
But we’re not going to discover each single characteristic of CSS modules right here, solely sufficient to get you aware of them.
Tailwind CSS
Tailwind CSS is a contemporary utility-first CSS framework that means that you can fashion components by combining a bunch of lessons collectively.
CSS frameworks like Bootstrap and Bulma give you high-level elements that you may instantly use in your venture. When it is advisable to fashion a button, you simply want to use the lessons that include the specified CSS properties:
<button className="btn btn-primary">Subscribe</button>
When utilizing Bootstrap, the btn class offers a mix of CSS properties reminiscent of padding, coloration, opacity, font weight, and so forth.
On the opposite hand, Tailwind offers you utility lessons the place every class has just one or two properties:
<button className="px-5 py-2 text-white bg-blue-500 border-2">
  Subscribe
</button>
In the instance above, the px-5 is brief for padding padding-left and padding-right, whereas 5 is a selected dimension for the paddings. The text-white applies coloration: white, the bg-blue-500 applies the background-color property, and border applies border-width.
Which One Should You Use?
It will depend on the strategy you’re feeling snug with essentially the most. If you are working with a group, it is advisable to talk about and agree on the strategy you need to apply, as a result of mixing the types makes it arduous to develop and preserve the applying.
Remember: Always use just one technique to fashion React elements in a selected venture to keep away from confusion.
Chapter 8: How to Build Forms in React
One of the most typical interfaces you are going to construct as an internet developer is a kind. In React, you possibly can create a kind through the use of state as the only supply of that kind’s information.
In this chapter, I’ll present you easy methods to deal with kind enter, kind submission, and kind validation utilizing React.
How to Handle Form Input
For instance, suppose you need to create a kind with a single textual content enter and a button.
You can first arrange the state that can function the enter worth:
import { useState } from 'react';

operate Form() {
  const [username, setUsername] = useState();
}
Next, add the return assertion and outline the shape. On the <enter> ingredient, assign the username state because the worth prop:
import { useState } from 'react';

operate Form() {
  const [username, setUsername] = useState();
  return (
    <kind>
      Username:
      <enter kind="textual content" title="username" worth={username} />
    </kind>
  );
}
Next, add the onChange prop to the <enter> ingredient. In that prop, assign the worth of the textual content enter as the worth of the username state:
import { useState } from 'react';

operate Form() {
  const [username, setUsername] = useState();
  return (
    <kind>
      Username:
      <enter
        kind="textual content"
        worth={username}
        onChange={e => setUsername(e.goal.worth)}
      />
    </kind>
  );
}
The e or occasion object is handed by the onChange prop to the callback operate. From that object, we are able to get the worth of the textual content enter at occasion.goal.worth property.
Now at any time when the enter worth adjustments, the state can be up to date to mirror the adjustments.
How to Handle Form Submission
The subsequent step is to submit the shape. Let’s create a operate that handles the submit occasion known as deal withSubmit() as follows:
import { useState } from 'react';

operate Form() {
  const [username, setUsername] = useState();

  const deal withSubmit = (e) => {
    e.preventDefault();
    alert(username);
  }

  return (
    <kind onSubmit={deal withSubmit}>
      Username:
      <enter
        kind="textual content"
        worth={username}
        onChange={(e) => setUsername(e.goal.worth)}
      />
      <button>Submit</button>
    </kind>
  );
}
Here, the deal withSubmit() operate will cease the default kind submission conduct, which can set off a refresh, after which create an alert field to show the username worth.
The operate then will get handed to the onSubmit prop of the <kind> ingredient. A <button> can also be added in order that the person can submit the shape.
How to Handle Form Validation
To deal with kind validation, it is advisable to create one other state that can retailer the error message. You can title this state usernameError as follows:
const [usernameError, setUsernameError] = useState();
Next, create a deal withUsername() operate that can run when the username enter adjustments.
Inside this operate, you possibly can name the setUsername() operate to replace the state, after which write logic to validate the enter worth.
For instance, suppose the username size have to be longer than 6. Here’s the way you do it:
const deal withUsername = e => {
  const { worth } = e.goal;
  setUsername(worth);

  // Validate username worth:
  if (worth.size <= 6) {
    setUsernameError('Username size have to be greater than 6 characters');
  } else {
    setUsernameError();
  }
};
Now that you’ve some validation logic, it is advisable to set the deal withUsername() operate because the onChange prop handler.
Also, add a paragraph under the <enter> ingredient that can present the error message as follows:
return (
  <kind onSubmit={deal withSubmit}>
    Username:
    <enter kind="textual content" worth={username} onChange={deal withUsername} />
    <p>{usernameError}</p>
    <button>Submit</button>
  </kind>
);
Inside the deal withSubmit() operate, you possibly can verify if there’s an error on the shape by checking the usernameError state, then stop the shape from being submitted when there’s an error:
const deal withSubmit = (e) => {
  e.preventDefault();
  if(usernameError){
    alert('Unable to submit: Form include errors');
  } else {
    alert(username);
  }
}
This means, the shape will not be submitted till the error is mounted.
Here’s the total supply code of the shape if you wish to strive it:
import { useState } from 'react';

operate App() {
  const [username, setUsername] = useState();
  const [usernameError, setUsernameError] = useState();

  const deal withSubmit = (e) => {
    e.preventDefault();
    if(usernameError){
      alert('Unable to submit: Form include errors');
    } else {
      alert(username);
    }
  }

  const deal withUsername = e => {
    const { worth } = e.goal;
    setUsername(worth);

    // Validate username worth:
    if (worth.size <= 6) {
      setUsernameError('Username size have to be greater than 6 characters');
    } else {
      setUsernameError();
    }
  };

  return (
    <kind onSubmit={deal withSubmit}>
      Username:
      <enter
        kind="textual content"
        worth={username}
        onChange={deal withUsername}
      />
      <p>{usernameError}</p>
      <button>Submit</button>
    </kind>
  );
}

export default App;
A kind might be as complicated or so simple as required, however you may use the sample you see right here it doesn’t matter what kind you construct:
- State values are used because the supply of kind information and validation
onChangeprop as a technique to replace the state- Validations are triggered by person inputs
- A
deal withSubmit()operate is executed when the shape is submitted
Using these constructing blocks, you possibly can construct any kind required by your utility.
Chapter 9: Network Requests in React
Modern net functions are likely to have a modular structure, the place the again finish is separated from the entrance finish. The entrance finish app might want to ship an HTTP community request to a distant endpoint.
React does not inform you how it is best to ship community requests. The library solely focuses on rendering UI with information administration utilizing props and states.
To fetch information utilizing React, you should utilize any legitimate JavaScript library like Axios, Superagent, and even the native Fetch API.
In this chapter, we’ll see easy methods to do community requests utilizing Fetch in React.
The useEffect Hook
When you create a React utility that should synchronize with a system outdoors of React, it is advisable to use the useEffect hook.
This hook means that you can run some code after rendering in an effort to synchronize your part with some system outdoors of React.
When the hook has completed performing the info request, you possibly can set the response into your part states and render the suitable elements primarily based on the state values.
To present you an instance, let’s fetch information from https://jsonplaceholder.typicode.com/todos/1 which is a dummy finish level:
operate App() {
  const [title, setTitle] = useState('');

  useEffect(() => {
    getData();
  }, []);

  const getData = async () => {
    const response = await fetch('https://jsonplaceholder.typicode.com/todos/1');
    const activity = await response.json();
    console.log(activity)
    setTitle(activity.title);
  };

  return <h1>{title}</h1>;
}
In the code above, we create an App part that has a state known as title, and we run the Fetch API to get a todo activity from the API.
When a response is acquired, we parse the JSON string right into a JavaScript object, log the item, after which set the title state to the activity.title property worth.
The response is as follows:
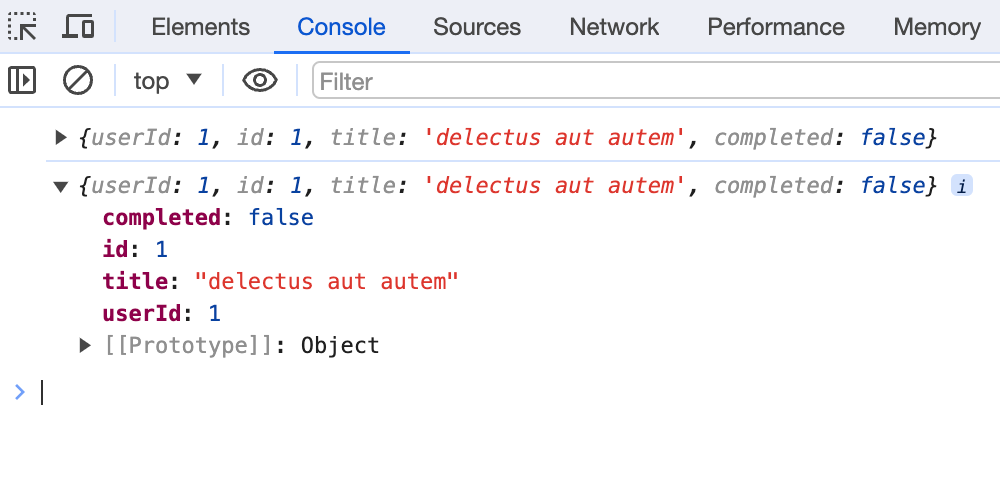
Here, you possibly can see that the console.log() is known as twice. This is as a result of the <React.StrictMode> wrapper at all times runs a useEffect hook twice that will help you in improvement.
If you take away the <React.StrictMode> wrapper in most important.jsx, the useEffect hook will run solely as soon as.
The useEffect hook itself is a operate that accepts two arguments:
- A callback operate to run on each render
- An array of state variables to observe for adjustments.
useEffectcan be skipped if not one of the variables are up to date.
When you need to run useEffect solely as soon as, you possibly can cross an empty array because the second argument to the operate, as proven within the instance above.
By utilizing the useEffect hook, React can ship HTTP requests and fetch information from any exterior system, then retailer that information within the part state.
Wrapping Up
Congratulations on ending this handbook! I hope you discovered it helpful and now really feel that studying React is just not inconceivable or complicated in any respect. All you want is a step-by-step information that reveals the important thing ideas of React one after the other.
If you are desperate to dive deeper into React and increase your abilities, I encourage you to take a look at my new e book known as Beginning React right here:

The aim of this e book is that will help you see easy methods to construct an utility utilizing React. There are two tasks included on this e book that gives you the “expertise” of constructing an internet utility utilizing React.
You will see how React ideas like elements, JSX, props, states, hooks, and Context API are used to create a dynamic front-end utility.
Here’s my promise: You will really really feel assured constructing net functions from scratch utilizing React.
Thanks for studying!