In this tutorial, you may discover ways to create a recreation that is impressed by Stick Hero – utilizing pure JavaScript and HTML canvas.
We are going to recreate Stick Hero, a cellular recreation revealed by KetchApp. We’ll undergo how the sport works usually, the best way to use JavaScript to attract on a <canvas> ingredient, the best way to add recreation logic and animate the sport, and the way occasion dealing with works.
By the tip of this information, you should have constructed all the recreation utilizing pure JavaScript.
Throughout the tutorial, we might be utilizing JavaScript to control the sport state and the HTML canvas ingredient to render the sport scene. To get probably the most out of this tutorial, it is best to have a fundamental understanding of JavaScript. But even if you’re a newbie, you’ll be able to nonetheless comply with alongside and study as we go.
Let’s get began and construct our personal Stick Hero recreation utilizing JavaScript and HTML canvas!
If you like video format, you may also watch this tutorial on YouTube.
Table of Contents
- The Stick Hero Game
- Game Phases
- The Main Parts of the Game
- How to Initialize the Game
- The Draw Function
- Event Handling
- The Main Animation Loop
- Summary
In this recreation, you management a hero who walks from platform to platform by stretching a stick that serves as a bridge. If the stick is the precise measurement, then the hero can safely cross to the subsequent platform. But if the stick is simply too quick or too lengthy, then the hero will fall down.
You can discover a playable model of the sport we’re about to create on CodePen the place you may also see the ultimate supply code. Give it a strive earlier than we get into the small print.
You also can try the unique recreation each on iOS and Android.
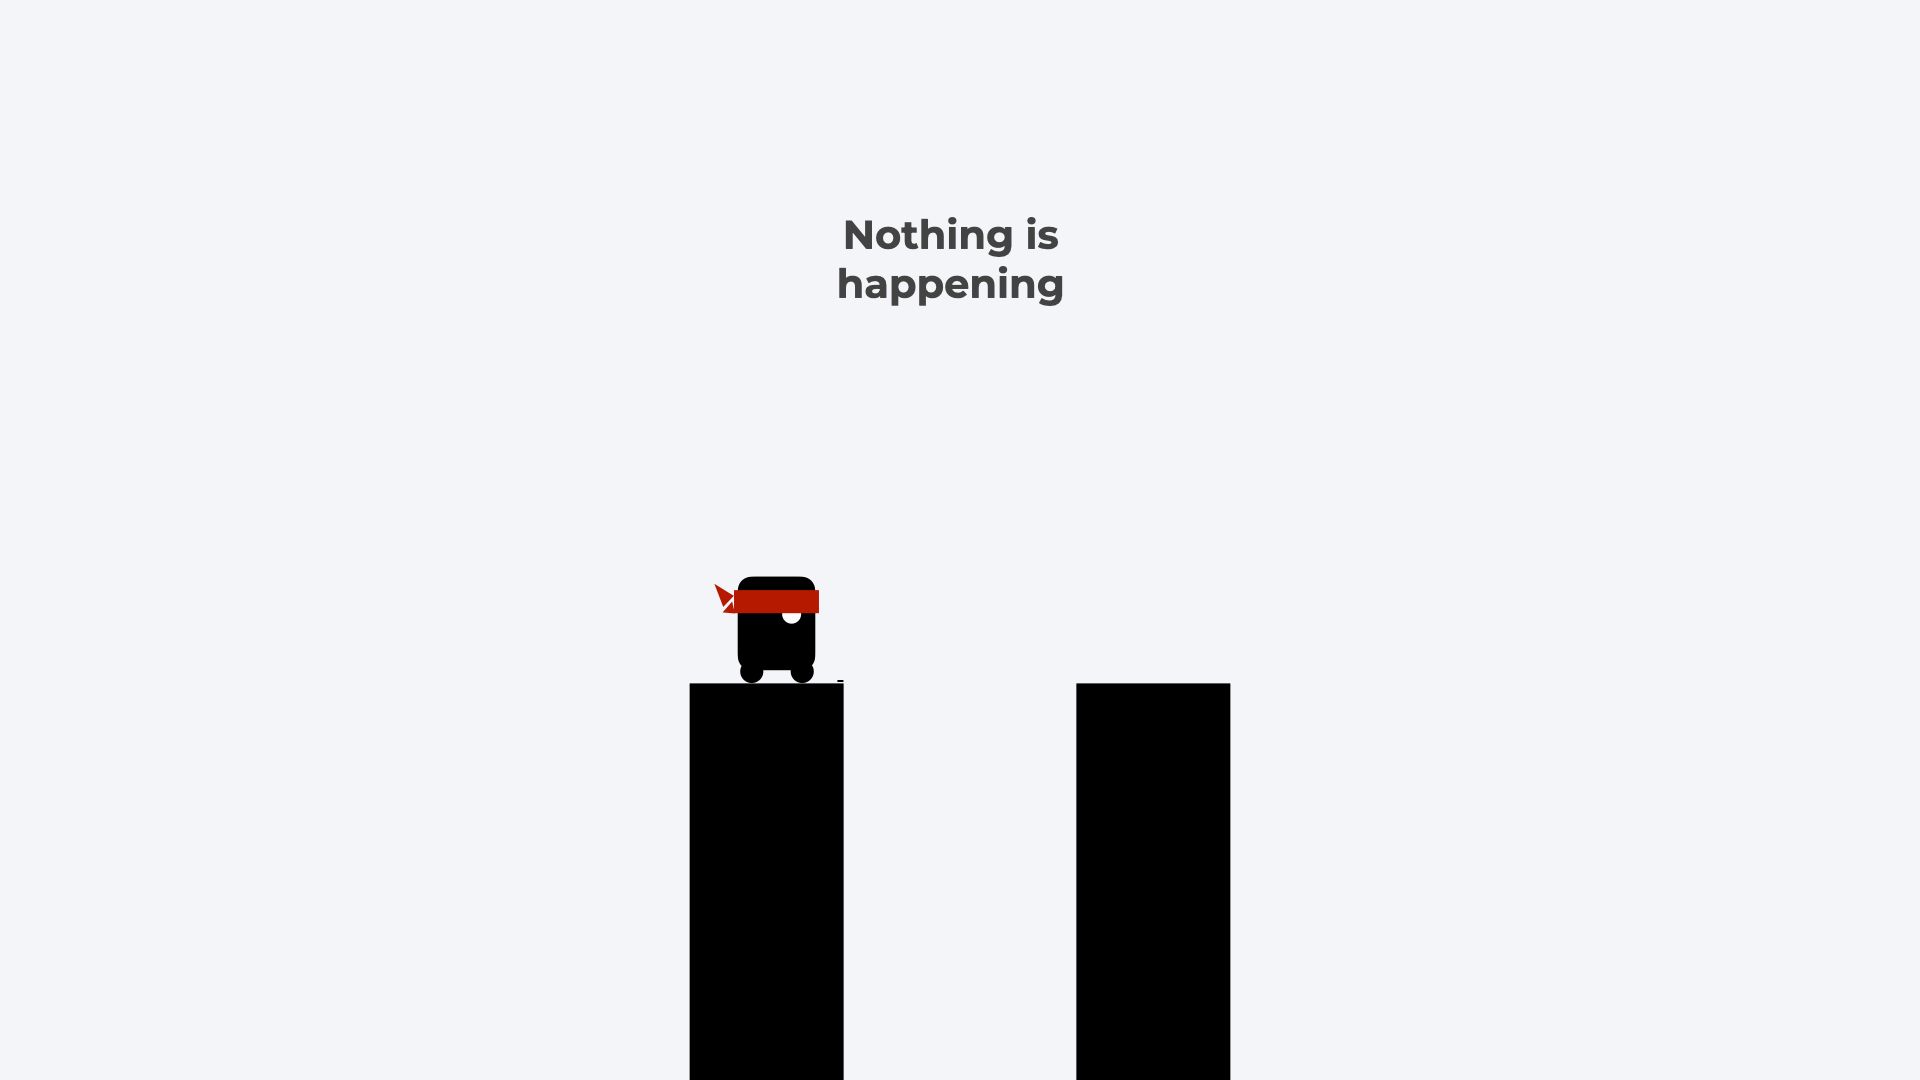
The recreation has 5 completely different phases that loop over and over untilo the hero falls.
- Initially, the sport is ready for person enter, and nothing is occurring.
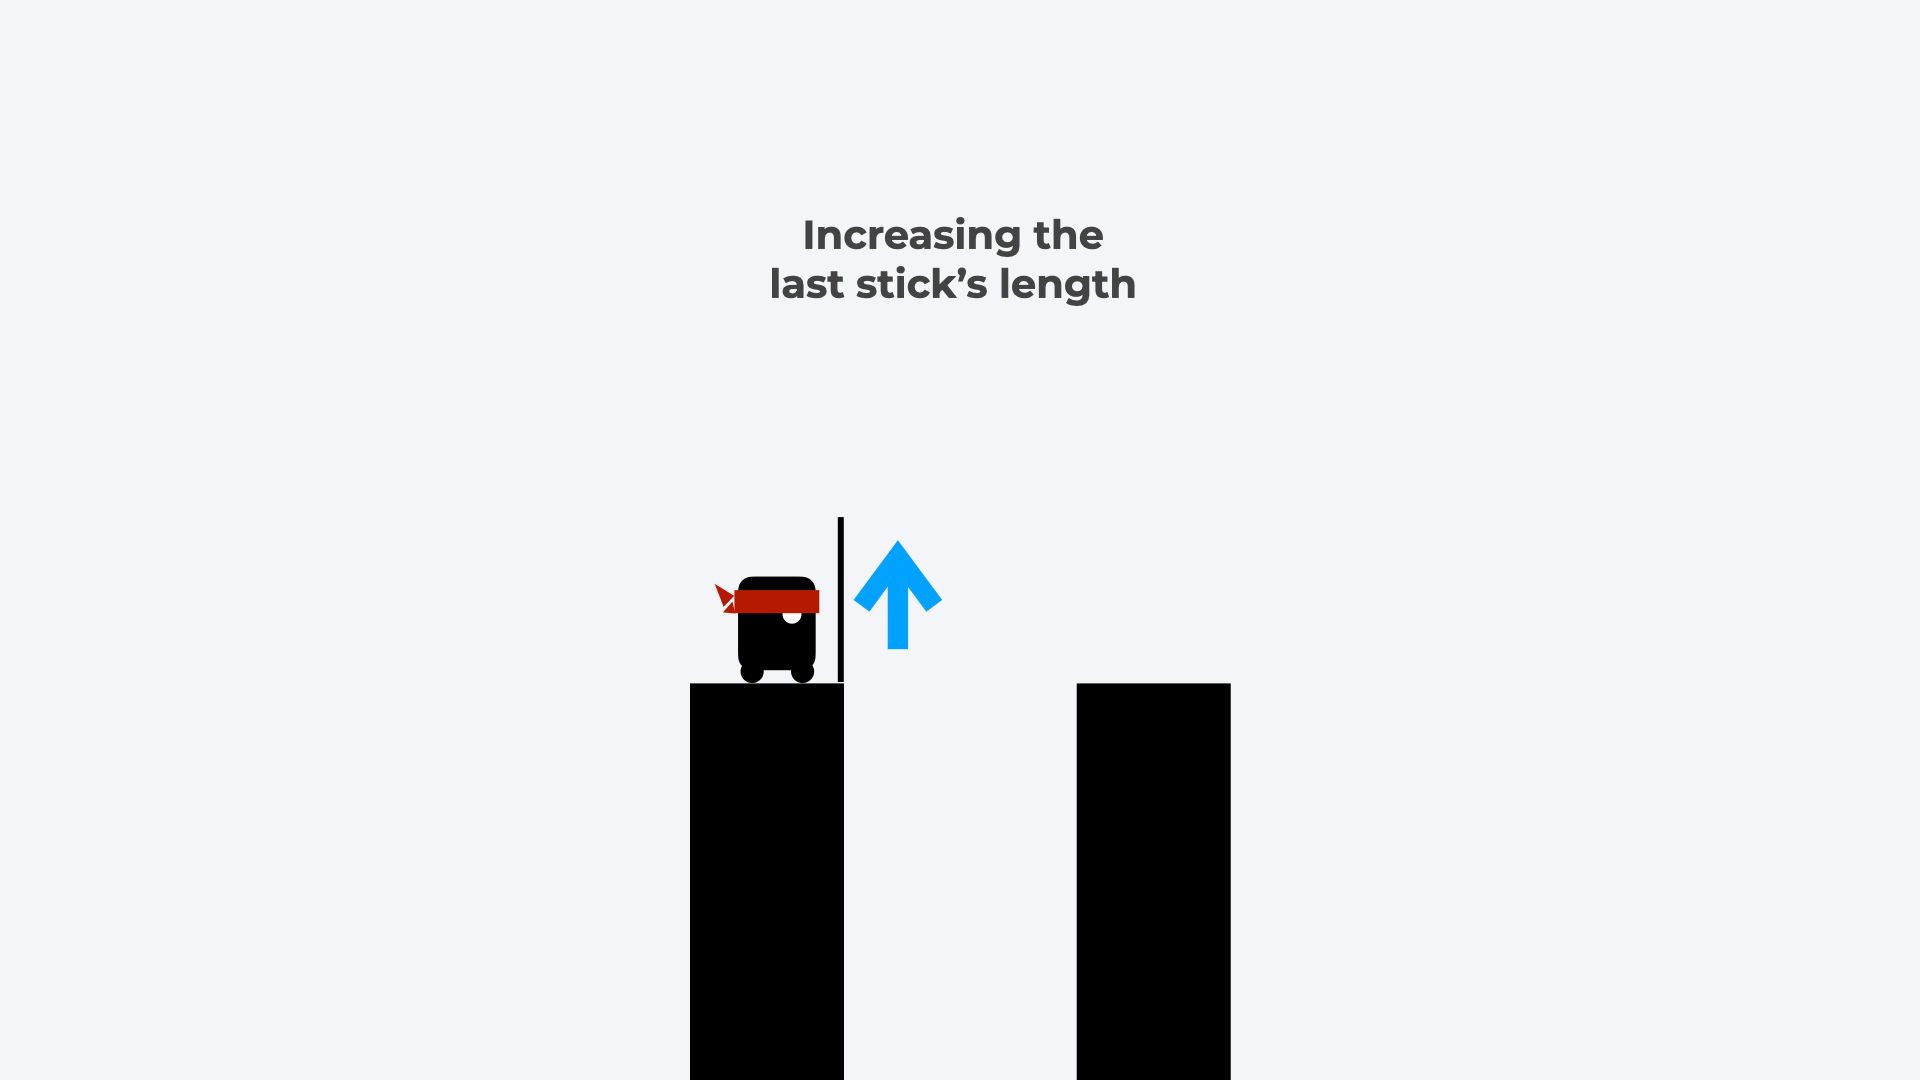
- Then as soon as the participant holds the mouse down, the sport is stretching a stick upwards till the mouse is launched.
- Then as soon as the mouse is launched the stick begins turning and it falls down, hopefully on the subsequent platform.
- If that’s the case, then the hero walks alongside the follow the subsequent platform.
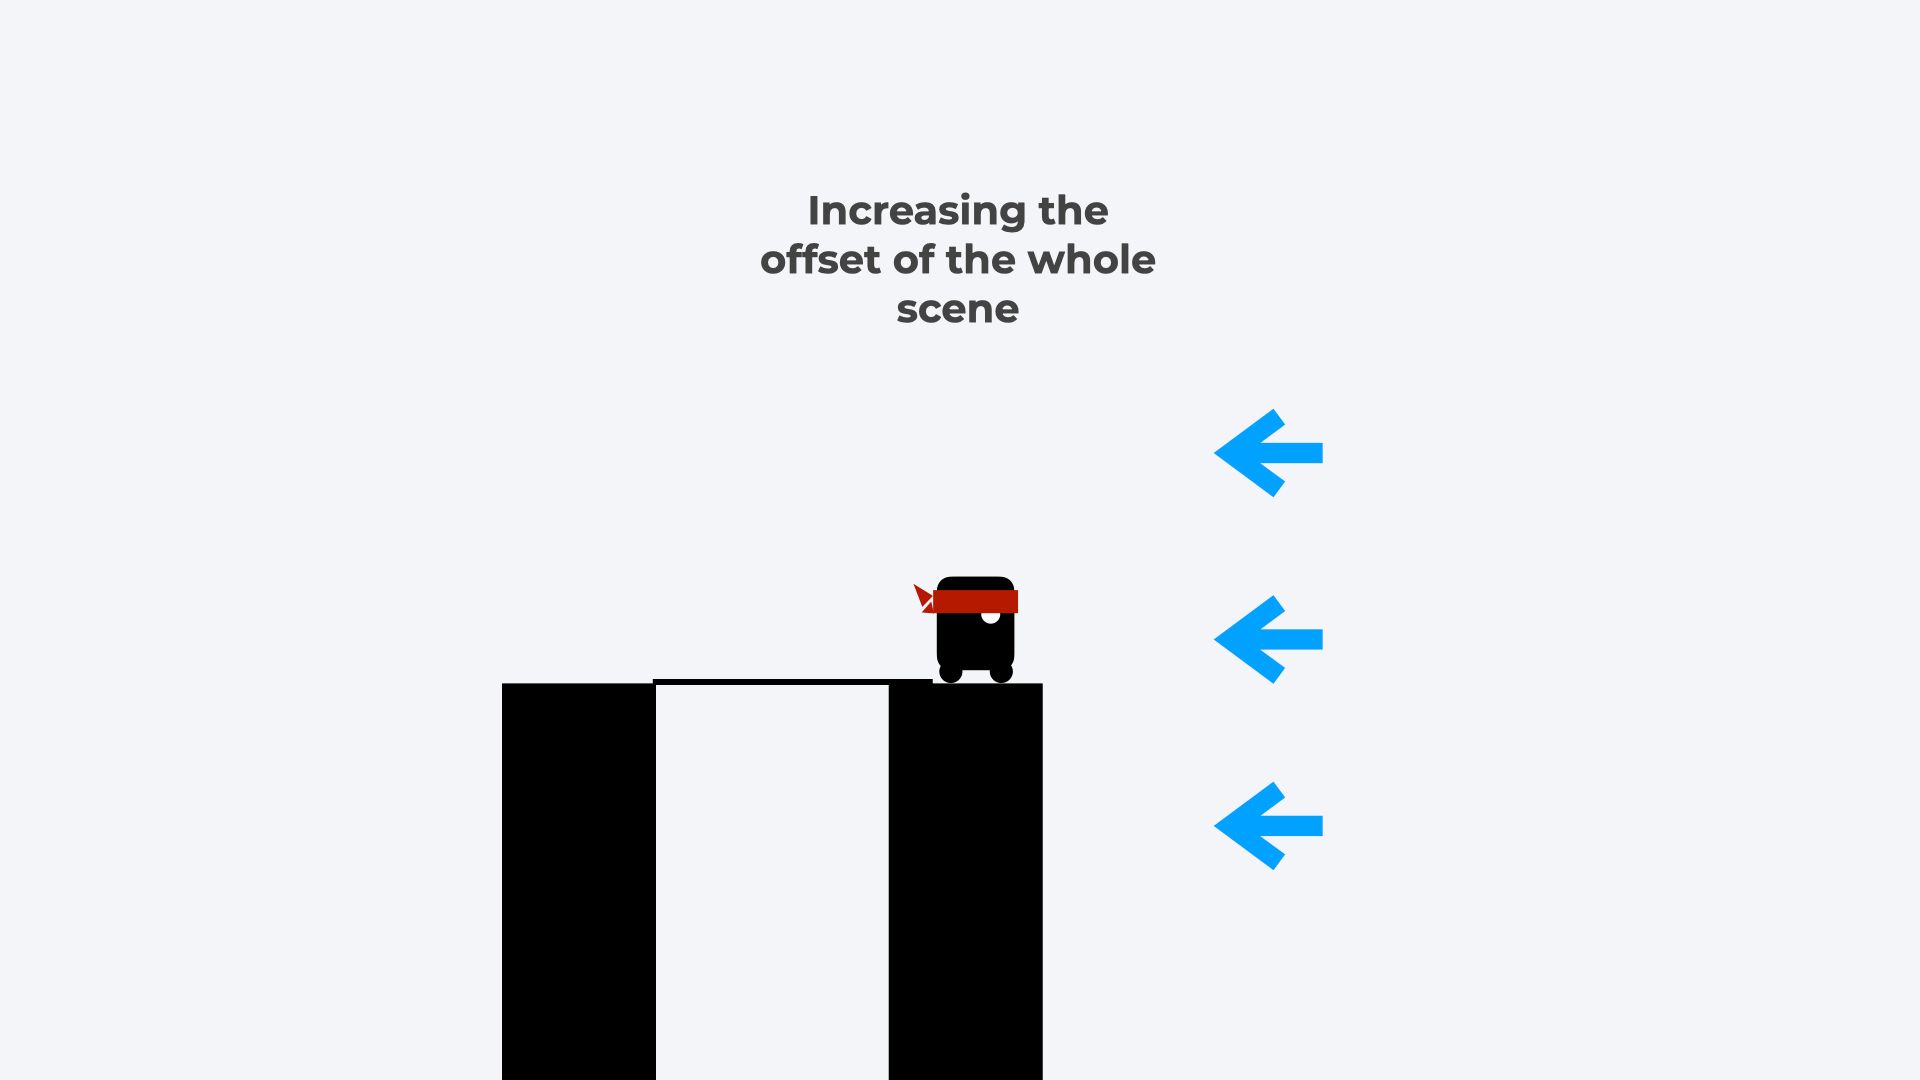
- Finally, as soon as the hero reaches the subsequent platform, the entire scene transitions to the left to middle the hero and the subsequent platform forward. Then the entire loop restarts from the start. The recreation waits for person enter, and as soon as the participant holds down the mouse a brand new stick is drawn.
In a much less favorable situation, the identical phases comply with one another, however within the strolling part if the opposite finish of the stick doesn’t fall on the subsequent platform, then the hero will solely stroll till the sting of the stick, after which fall down.
How can we notice this in code? This recreation has primarily three elements. Game state, the draw perform, and the animate perform.
We have a recreation state that could be a assortment of variables defining each little bit of the sport. It contains the present part, the place of the hero, the coordinates of the platforms, the dimensions and rotation of the sticks, and so forth.
let part = "ready"; // ready | stretching | turning | strolling | transitioning | falling
let finalTimestamp; // The timestamp of the earlier animation cycle

let heroX; // Changes when transferring ahead
let heroY; // Only modifications when falling
let sceneOffset; // Moves the entire recreation

let platforms = [];
let sticks = [];

let rating = 0;

...
Then we could have two fundamental capabilities: one which paints the scene on the display screen based mostly on this state (this would be the draw perform), and one that can change this state regularly in order that it appears to be like like an animation (this would be the animate perform). Finally, we’re additionally going to have occasion dealing with that can kick off the animation loop.
To begin, let’s initialize the venture with a easy HTML, CSS, and JavaScript file. We’ll set up the define of the code after which initialize the state of the sport.
The HTML
The HTML a part of this recreation may be very easy. Most of the sport will stay contained in the <canvas> ingredient. We are going to make use of JavaScript to attract on this canvas. We even have a div ingredient that can show the rating and a restart button.
In the header, we additionally load our CSS and JavaScript information. Note the defer tag when loading the script. This will execute the script solely after the remainder of the HTML is loaded, so we will entry elements of the HTML (just like the canvas ingredient) instantly in our script.
<!DOCTYPE html>
<html>
  <head>
    <title>Stick Hero</title>
    <hyperlink rel="stylesheet" href="https://www.freecodecamp.org/information/javascript-game-tutorial-stick-hero-with-html-canvas/index.css" />
    <script src="index.js" defer></script>
  </head>

  <physique>
    <div class="container">
      <canvas id="recreation" width="375" peak="375"></canvas>
      <div id="rating"></div>
      <button id="restart">RESTART</button>
    </div>
  </physique>
</html>
The CSS
The CSS received’t include too many issues both. We paint the sport on the canvas ingredient and the content material of the canvas ingredient can’t be styled with CSS. Here we solely fashion the place of our canvas, our rating ingredient and the reset button.
Note, that the reset button by default is invisible. We are going to make it seen utilizing JavaScript as soon as the sport ends.
html,
physique {
  peak: 100%;
}

physique,
.container {
  show: flex;
  justify-content: middle;
  align-items: middle;
}

.container {
  place: relative;
  font-family: Helvetica;
}

canvas {
  border: 1px strong;
}

#rating {
  place: absolute;
  high: 30px;
  proper: 30px;
  font-size: 2em;
  font-weight: 900;
}

#restart {
  place: absolute;
  show: none;
}
The Outline of Our JavaScript File
And lastly, the JavaScript half is the place all of the magic lives. For simplicity, I’ve put the whole lot in a single file, however be at liberty to interrupt it down into a number of information.
We are going to introduce a number of extra variables and some extra capabilities, however that is the define of this file. The following issues are included:
- We outline varied variables that collectively make up the
recreation state. More on their values within the part on the best way to initialize state. - We are going to outline a number of variables as
configuration, like the dimensions of the platforms and how briskly the hero ought to transfer. We cowl them within the drawing part and on the fundamental loop. - A reference to the
<canvas>ingredient in HTML, and getting the drawing context of it. This might be utilized by thedrawperform. - A reference to the
ratingingredient and therestartbutton in HTML. We will replace the rating every time the hero traverses to a brand new platform. And we present the reset button as soon as the sport is over. - We initialize the sport state and paint the scene by calling the
resetGameperform. This is the one top-level perform name. - We outline the
drawperform that can draw the scene on the canvas ingredient based mostly on the state. - We arrange occasion handlers for the
mousedownandmouseupoccasions. - We outline the
animateperform that can manipulate the state. - And we could have a number of utility capabilities that we are going to focus on later.
// Game state
let part = "ready"; // ready | stretching | turning | strolling | transitioning | falling
let finalTimestamp; // The timestamp of the earlier animation cycle

let heroX; // Changes when transferring ahead
let heroY; // Only modifications when falling
let sceneOffset; // Moves the entire recreation

let platforms = [];
let sticks = [];

let rating = 0;

// Configuration
...

// Getting the canvas ingredient
const canvas = doc.getElementById("recreation");

// Getting the drawing context
const ctx = canvas.getContext("second");

// Further UI parts
const scoreElement = doc.getElementById("rating");
const restartButton = doc.getElementById("restart");

// Start recreation
resetGame();

// Resets recreation state and format
perform resetGame() {
  ...

  draw();
}

perform draw() {
  ...
}

window.addEventListener("mousedown", perform (occasion) {
  ...
});

window.addEventListener("mouseup", perform (occasion) {
  ...
});

perform animate(timestamp) {
  ...
}

...
How to Initialize the State
To begin the sport, we name the identical perform as we use for resetting it – the resetGame perform. It initializes/resets the state of the sport and calls the draw perform to color the scene.
The recreation state contains the next variables:
part: The present part of the sport. Its preliminary worth is ready.finalTimestamp: Used by theanimateperform to find out how a lot time has handed because the final animation cycle. We’ll cowl it later in additional element.platforms: An array containing the metadata of every platform. Each platform is represented by an object with anxand awproperty representing their X place and width. The first platform is at all times the identical – as outlined right here – to verify it has an affordable measurement and place. The following platforms are generated by a utility perform. As the sport progresses, increasingly more platforms are generated on the fly.heroX: The X place of the hero. By default, the hero stands near the sting of the primary platform. This worth will change throughout the strolling part.heroY: The Y place of the hero. By default, it’s zero. It solely modifications if the hero is falling.sceneOffset: As the hero strikes ahead, we have to shift all the display screen backwards to maintain the hero centered on the display screen. Otherwise the hero will stroll off the display screen. In this variable, we hold observe of by how a lot ought to we shift again all the display screen. We will replace this worth throughout the transitioning part. By default its worth is 0.sticks: Metadata of the sticks. While the hero can solely stretch one stick at a time, we additionally must retailer the earlier sticks so as to have the ability to render them. Therefore thesticksvariable can be an array.Each stick is represented by an object with the
x,size, androtationproperties. Thexproperty represents the beginning place of the stick that at all times matches the corresponding platform’s top-right nook. Itssizeproperty will develop within the stretching part, and itsrotationproperty will go from 0 to 90 within the turning part. Or from 90 to 180 within the falling part.Initially, the
sticksarray has one ‘invisible’ stick to 0 size. Every time the hero reaches a brand new platform, a brand new stick is added to the array.rating: The rating of the sport. It exhibits what number of platforms the hero reached. By default it’s 0.
perform resetGame() {
  // Reset recreation state
  part = "ready";
  finalTimestamp = undefined;

  // The first platform is at all times the identical
  platforms = [{ x: 50, w: 50 }];
  generatePlatform();
  generatePlatform();
  generatePlatform();
  generatePlatform();

  // Initialize hero place
  heroX = platforms[0].x + platforms[0].w - 30; // Hero stands a bit earlier than the sting
  heroY = 0;

  // By how a lot ought to we shift the display screen again
  sceneOffset = 0;

  // There's at all times a stick, even when it seems to be invisible (size: 0)
  sticks = [{ x: platforms[0].x + platforms[0].w, size: 0, rotation: 0 }];

  //Score
  rating = 0;

  // Reset UI
  restartButton.fashion.show = "none"; // Hide reset button
  scoreElement.innerText = rating; // Reset rating show

  draw();
}
At the tip of this perform, we additionally reset the UI by ensuring the reset button is hidden and the rating is displayed as 0.
Once we have initialized the state of the sport and reset the UI, the resetGame perform calls the draw perform to color the display screen for the primary time.
The resetGame perform calls a utility perform that generates a random platform. In this perform, we outline what’s the minimal distance between two platforms (minumumGap) and what’s the most distance (maximumGap). We additionally outline what’s the minimal width of a platform and what’s the most width.
Based on these ranges and the present platformsk, we generate the metadata of a brand new platform.
perform generatePlatform() {
  const minimumGap = 40;
  const maximumGap = 200;
  const minimumWidth = 20;
  const maximumWidth = 100;

  // X coordinate of the precise fringe of the furthest platform
  const lastPlatform = platforms[platforms.length - 1];
  let furthestX = lastPlatform.x + lastPlatform.w;

  const x =
    furthestX +
    minimumGap +
    Math.flooring(Math.random() * (maximumGap - minimumGap));
  const w =
    minimumWidth + Math.flooring(Math.random() * (maximumWidth - minimumWidth));

  platforms.push({ x, w });
}
The draw perform paints the entire canvas based mostly on the state. It shifts the entire UI by the offset, places the hero in place, and paints the platforms and the sticks.
Compared to the working demo linked at first of the article, right here we are going to solely undergo a simplified model of the draw perform. We will not cowl portray a background, and we’ll simplify the hero’s look.
We will use this perform each for portray the preliminary scene and all through our fundamental animation loop.
For the preliminary paint, among the options we cowl right here will not be essential. For occasion, we don’t have any sticks on the scene but. We’ll nonetheless cowl them, as a result of this manner we received’t must rewrite this perform as soon as we begin animating the state.
Everything we draw on this perform relies on the state, and it would not matter if the state is in an preliminary state, or if we’re additional into the sport.
We outlined a <canvas> ingredient in HTML. But how can we paint issues on it? In JavaScript first, we get the canvas ingredient after which get its context someplace at first of our file. Then we will use this context to execute drawing instructions.
We additionally outline a number of variables upfront as configuration. We do that as a result of we have to use these values at completely different elements of our recreation and we need to keep consistency.
canvasWidthandcanvasHeightcharacterize the dimensions of the canvas ingredient in HTML. They must match with what we set in HTML. We use these values at varied locations.platformHeightrepresents the peak of the platforms. We use these values when drawing the platforms themselves, but in addition when positioning the hero and the sticks.
The draw perform repaints the entire display screen from scratch each time. First, let’s ensure that it’s empty. Calling the clearRect perform on the drawing context with the right arguments makes positive we erase the whole lot from it.
...

<div class="container">
  <canvas id="recreation" width="375" peak="375"></canvas>
  <div id="rating"></div>
  <button id="restart">RESTART</button>
</div>

...
...

// Getting the canvas ingredient
const canvas = doc.getElementById("recreation");

// Getting the drawing context
const ctx = canvas.getContext("second");

...

// Configuration
const canvasWidth = 375;
const canvasHeight = 375;
const platformHeight = 100;

...

perform draw() {
  ctx.clearRect(0, 0, canvasWidth, canvasHeight);

  ...
}

...
How to Frame the Scene
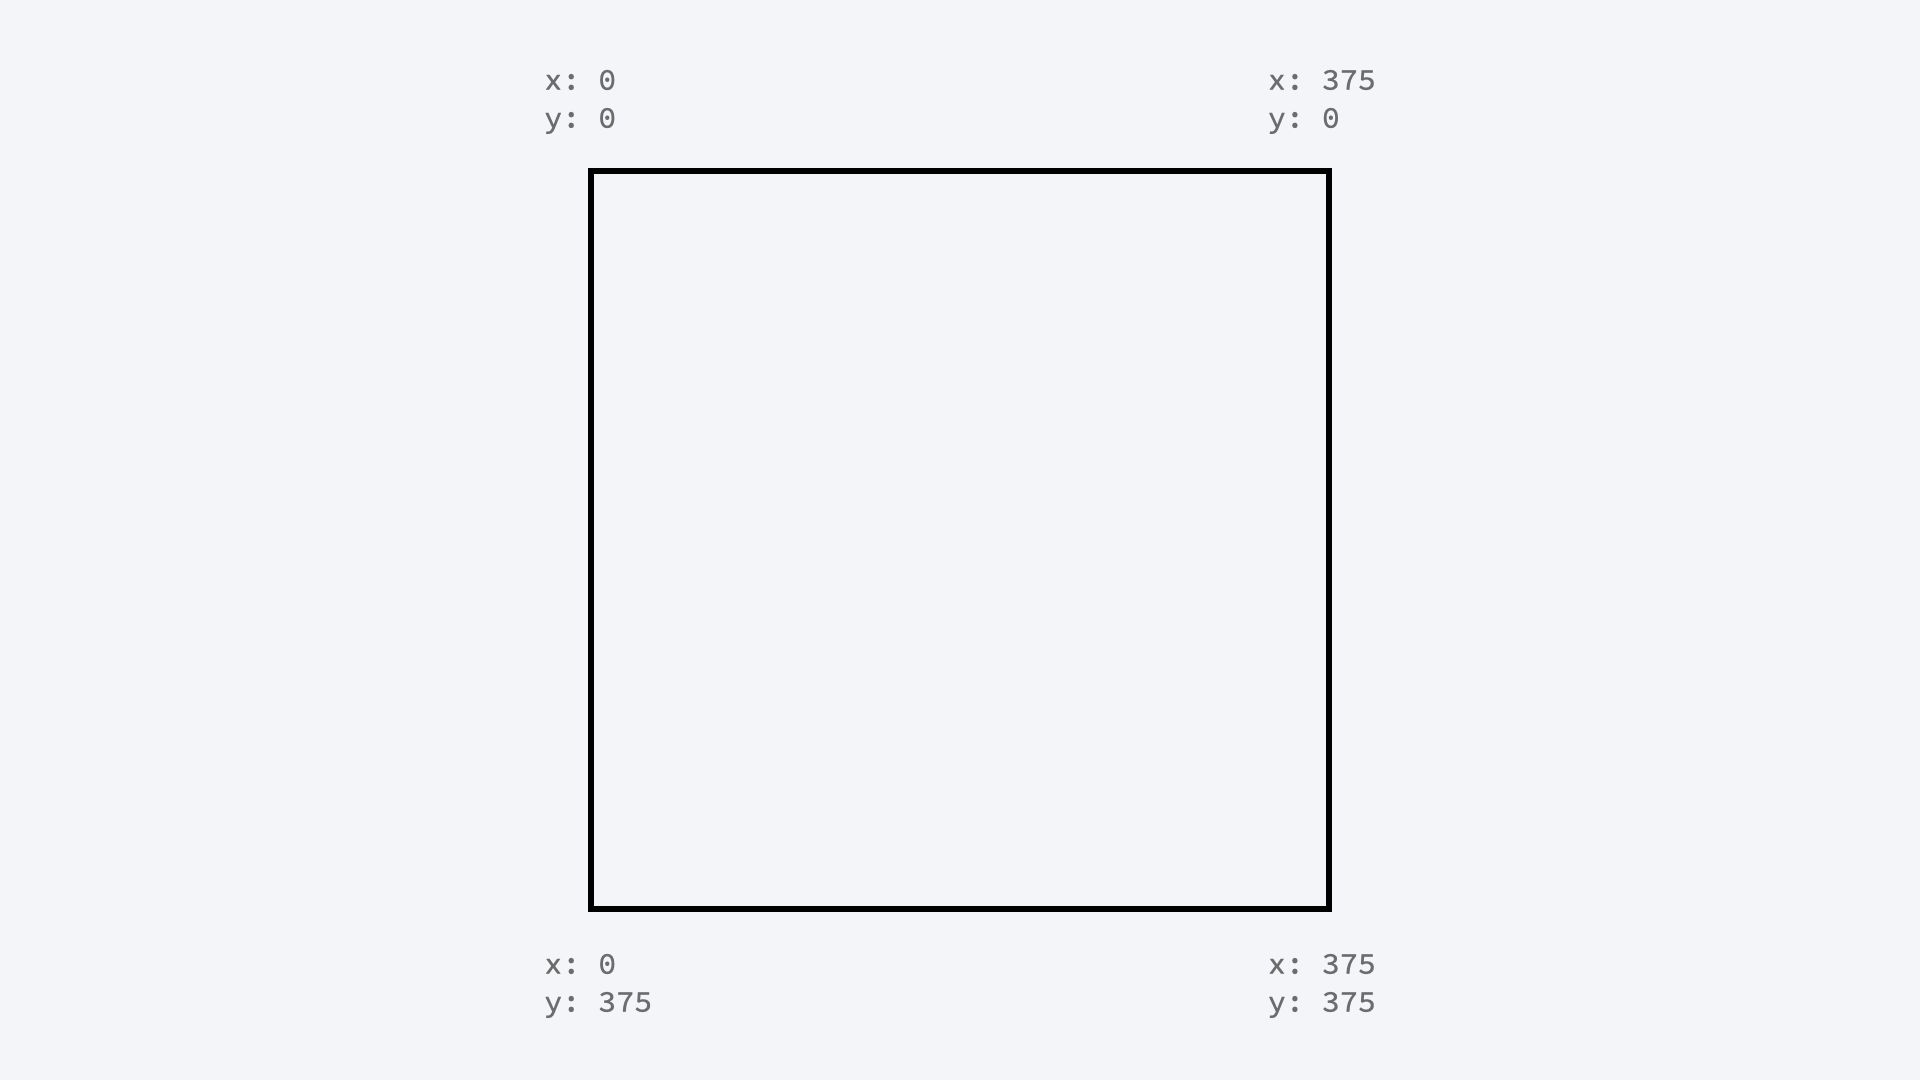
We additionally need to ensure that the scene has the right framing. When we use canvas, we have now a coordinate system with the middle on the high left nook of the display screen that grows to the precise and downwards. In HTML we set the width and peak attributes each to 375 pixels.
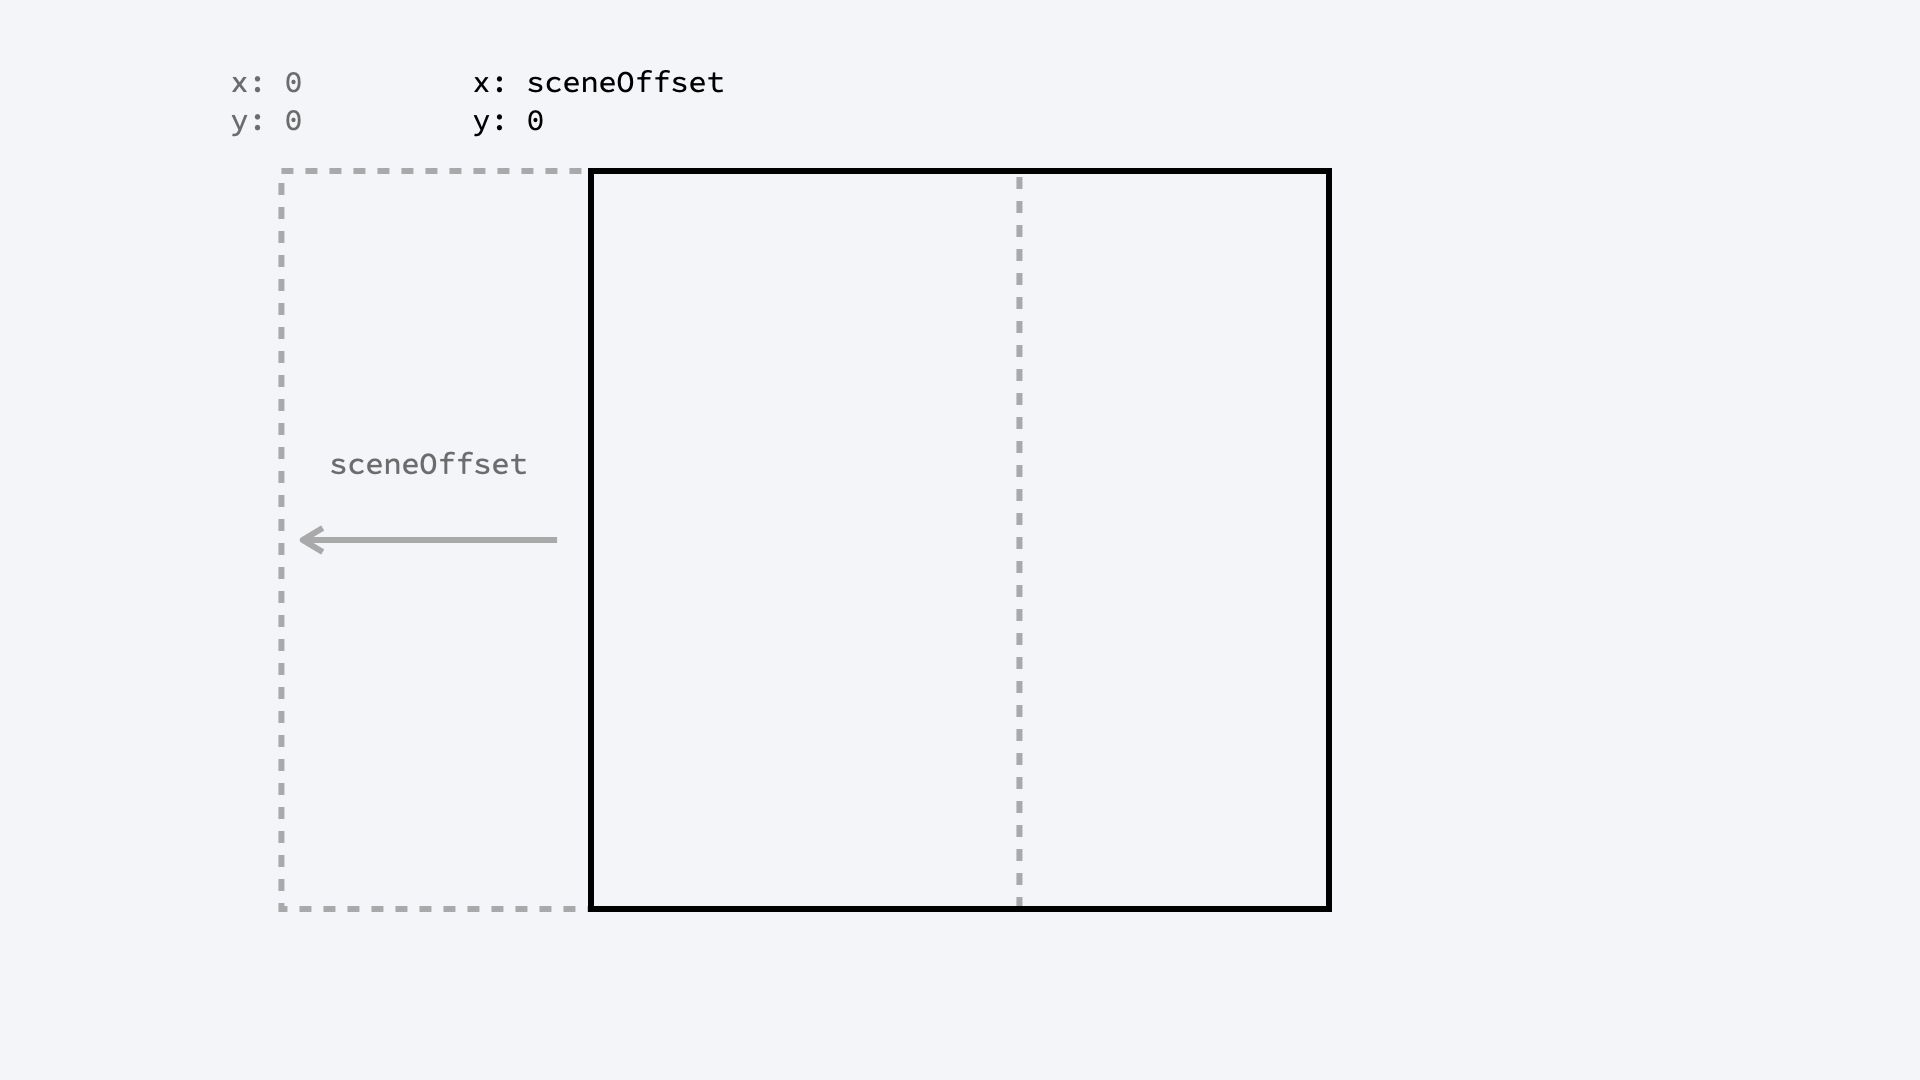
Initially, the 0, 0 coordinate is on the top-left nook of the display screen, however because the hero strikes ahead the entire scene ought to shift to the left. Otherwise, we might run out of the display screen.
As the sport progresses, we replace the sceneOffset worth to maintain observe of this shift in the principle loop. We can use this variable to translate the entire format. We name the translate command to shift the scene on the X-axis.
perform draw() {
  ctx.clearRect(0, 0, canvasWidth, canvasHeight);

  // Save the present transformation
  ctx.save();

  // Shifting the view
  ctx.translate(-sceneOffset, 0);

  // Draw scene
  drawPlatforms();
  drawHero();
  drawSticks();

  // Restore transformation to the final save
  ctx.restore();
}
It’s necessary that we do that earlier than we paint something on the canvas, as a result of the translate command doesn’t truly transfer something on the canvas. Anything we painted earlier than on the canvas will keep because it was.
Instead, the translate command shifts the coordinate system. The 0, 0 coordinate received’t be on the high left nook anymore, however it will likely be out of the display screen on the left. Anything we paint after might be painted in accordance with this new coordinate system.
This is precisely what we would like. As we progress within the recreation, the hero will improve its X coordinate. By transferring the coordinate system backwards, we ensure that it will likely be painted inside the display screen.
translate command, the middle of the coordinate system will shift to the leftThe translate instructions accumulate. This implies that if we name the translate command twice, the second doesn’t simply override the primary one, however will add a shift on high of the primary command.
We are going to name the draw perform in a loop, so it’s necessary that we reset this transformation each time we draw. Also, we at all times begin with the 0, 0 coordinate within the high left nook. Otherwise, the coordinate system might be shifted to the left infinitely.
We can restore transformations by calling the restore command as soon as we don’t need to be on this shifter coordinate system anymore. The restore command resets transitions and lots of different settings to the state the canvas was on the final save command. That’s why we frequently begin a portray block by saving the context and finish it by restoring it.
How to Draw the Platforms
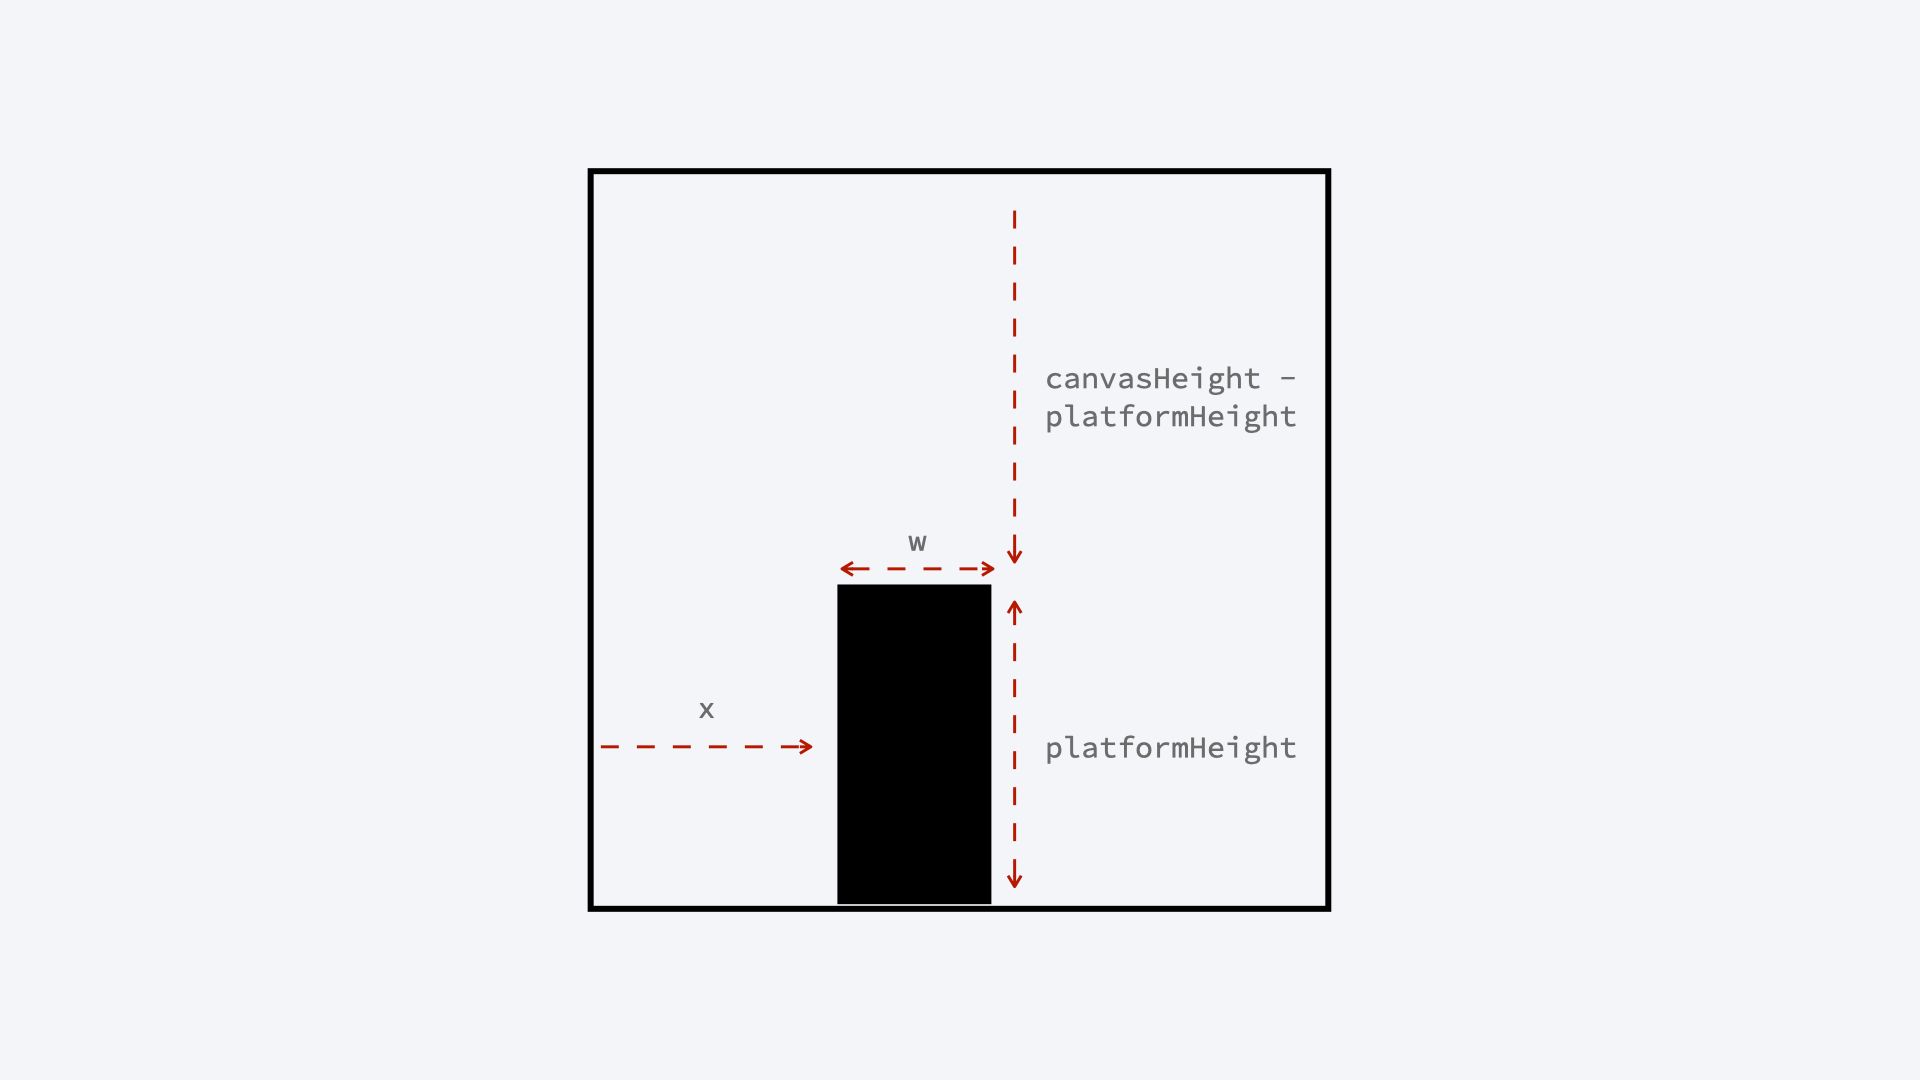
So that was simply the framing, however we haven’t painted something but. Let’s begin with a easy one, drawing platforms. The metadata of the platforms is saved within the platforms array. It incorporates the beginning place of the platform and its width.
We can iterate over this array and fill a rectangle by setting the beginning place, and the width and the peak of the platform. We do that by calling the fillRect perform with the X, Y coordinates and the width and the peak of the rectangle to fill. Note that the Y coordinate is the wrong way up – it is rising from high to backside.
// Example state of platforms
let platforms = [
  { x: 50, w: 50 },
  { x: 90, w: 30 },
];

...

perform drawPlatforms() {
  platforms.forEach(({ x, w }) => {
    // Draw platform
    ctx.fillStyle = "black";
    ctx.fillRect(x, canvasHeight - platformHeight, w, platformHeight);
  });
}
What is fascinating about canvas, or not less than it was shocking to me, is that when you paint one thing on the canvas you’ll be able to’t modify it. It’s not such as you paint a rectangle, after which you’ll be able to change its coloration. Once one thing is on the canvas it stays as it’s.
Like with an actual canvas, as soon as you have painted one thing you’ll be able to both cowl it, by portray one thing over it, or you’ll be able to attempt to clear the canvas. But you’ll be able to’t change current elements actually. That’s why we set the colour right here up entrance and never afterward (with the fillStyle property).
How to Draw the Hero
We will not cowl the hero half intimately on this tutorial, however you’ll find the supply code of the demo above on CodePen. Drawing extra superior shapes is a little more difficult with the canvas ingredient, and I’m going to cowl drawing in additional element in a future tutorial.
For now, let’s merely use a pink rectangle as a placeholder for the hero. Again, we use the fillRect perform and cross on a X, Y coordinate and the width and the peak of the hero.
The X and Y positions might be based mostly on the heroX and heroY state. The hero’s X place is relative to the coordinate system, however its Y place is relative to the highest of the platform (it has a worth of 0 as soon as on high of a platform). We want to regulate the Y place to be on the highest of the platform.
perform drawHero() {
  const heroWidth = 20;
  const heroHeight = 30;

  ctx.fillStyle = "pink";
  ctx.fillRect(
    heroX,
    heroY + canvasHeight - platformHeight - heroHeight,
    heroWidth,
    heroHeight
  );
}
How to Draw the Sticks
Then let’s see the best way to paint the sticks. Sticks are a bit trickier as a result of they are often rotated.
The sticks are saved in an array in a similar way because the platforms however have completely different attributes. They all have a beginning place, a size, and a rotation. The final two modifications in the principle recreation loop, and the primary one – the place – ought to match the top-right nook of a platform.
Based on the size and rotation, we might use some trigonometry and calculate the tip place of the stick. But it’s way more fascinating if we remodel the coordinate system once more.
We can use the translate command once more, to set the middle of the coordinate system to the sting of the platform. Then we will use the rotate command to rotate the coordinate system round this new middle.
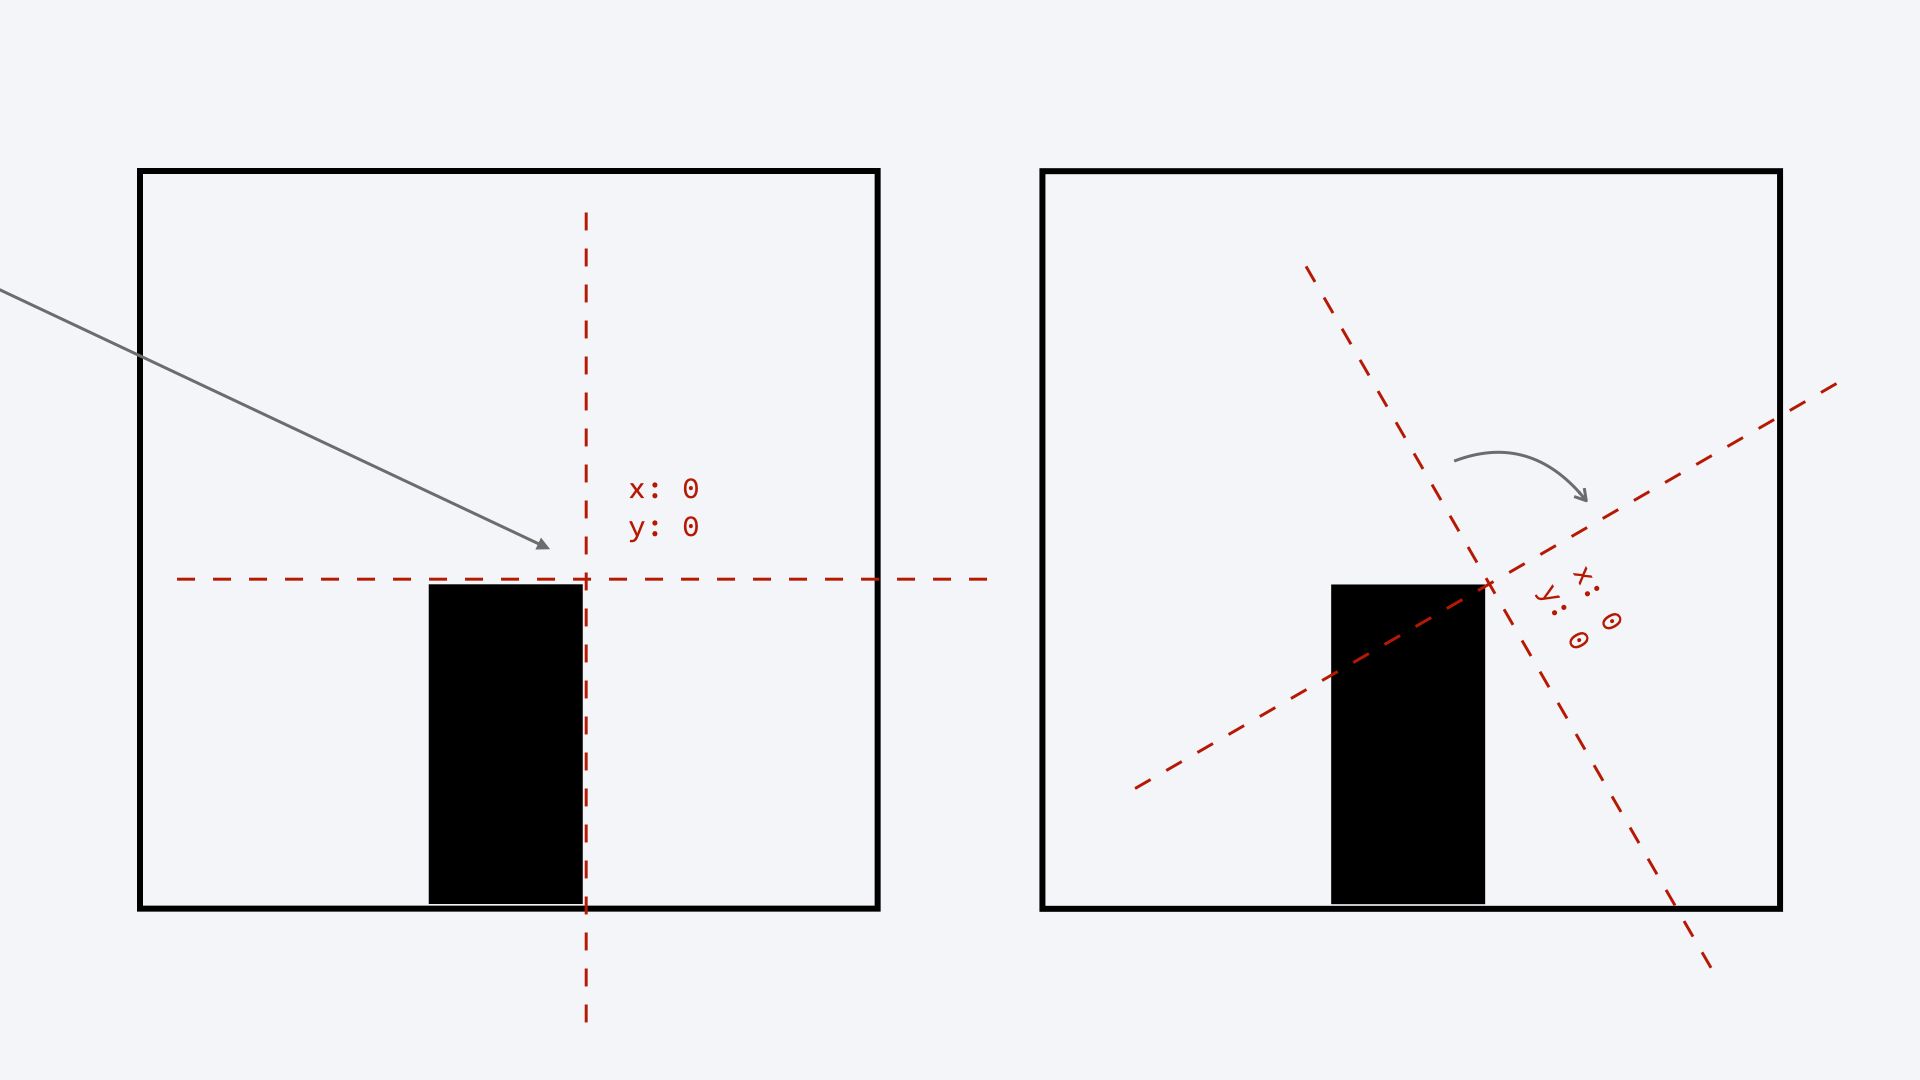
translate and rotate instructions, the coordinate system might be twisted round a brand new middle// Example state of sticks
let sticks = [
{ x: 100, length: 50, rotation: 60 }
];
...
perform drawSticks() {
sticks.forEach((stick) => {
ctx.save();
// Move the anchor level to the beginning of the stick and rotate
ctx.translate(stick.x, canvasHeight - platformHeight);
ctx.rotate((Math.PI / 180) * stick.rotation);
// Draw stick
ctx.lineWidth = 2;
ctx.beginPath();
ctx.transferTo(0, 0);
ctx.lineTo(0, -stick.size);
ctx.stroke();
// Restore transformations
ctx.restore();
});
}
After the translate and rotate instructions, the start line of the stick might be on the 0, 0 coordinate and the coordinate system might be rotated.
In this instance, we draw a line upwards – each its starting and its finish have the identical X coordinate. Only the Y coordinate is altering. Yet the road is heading to the precise as a result of the entire coordinate system has turned. Now upwards is in a diagonal route. It’s a bit mind-twisting, however you will get used to it.
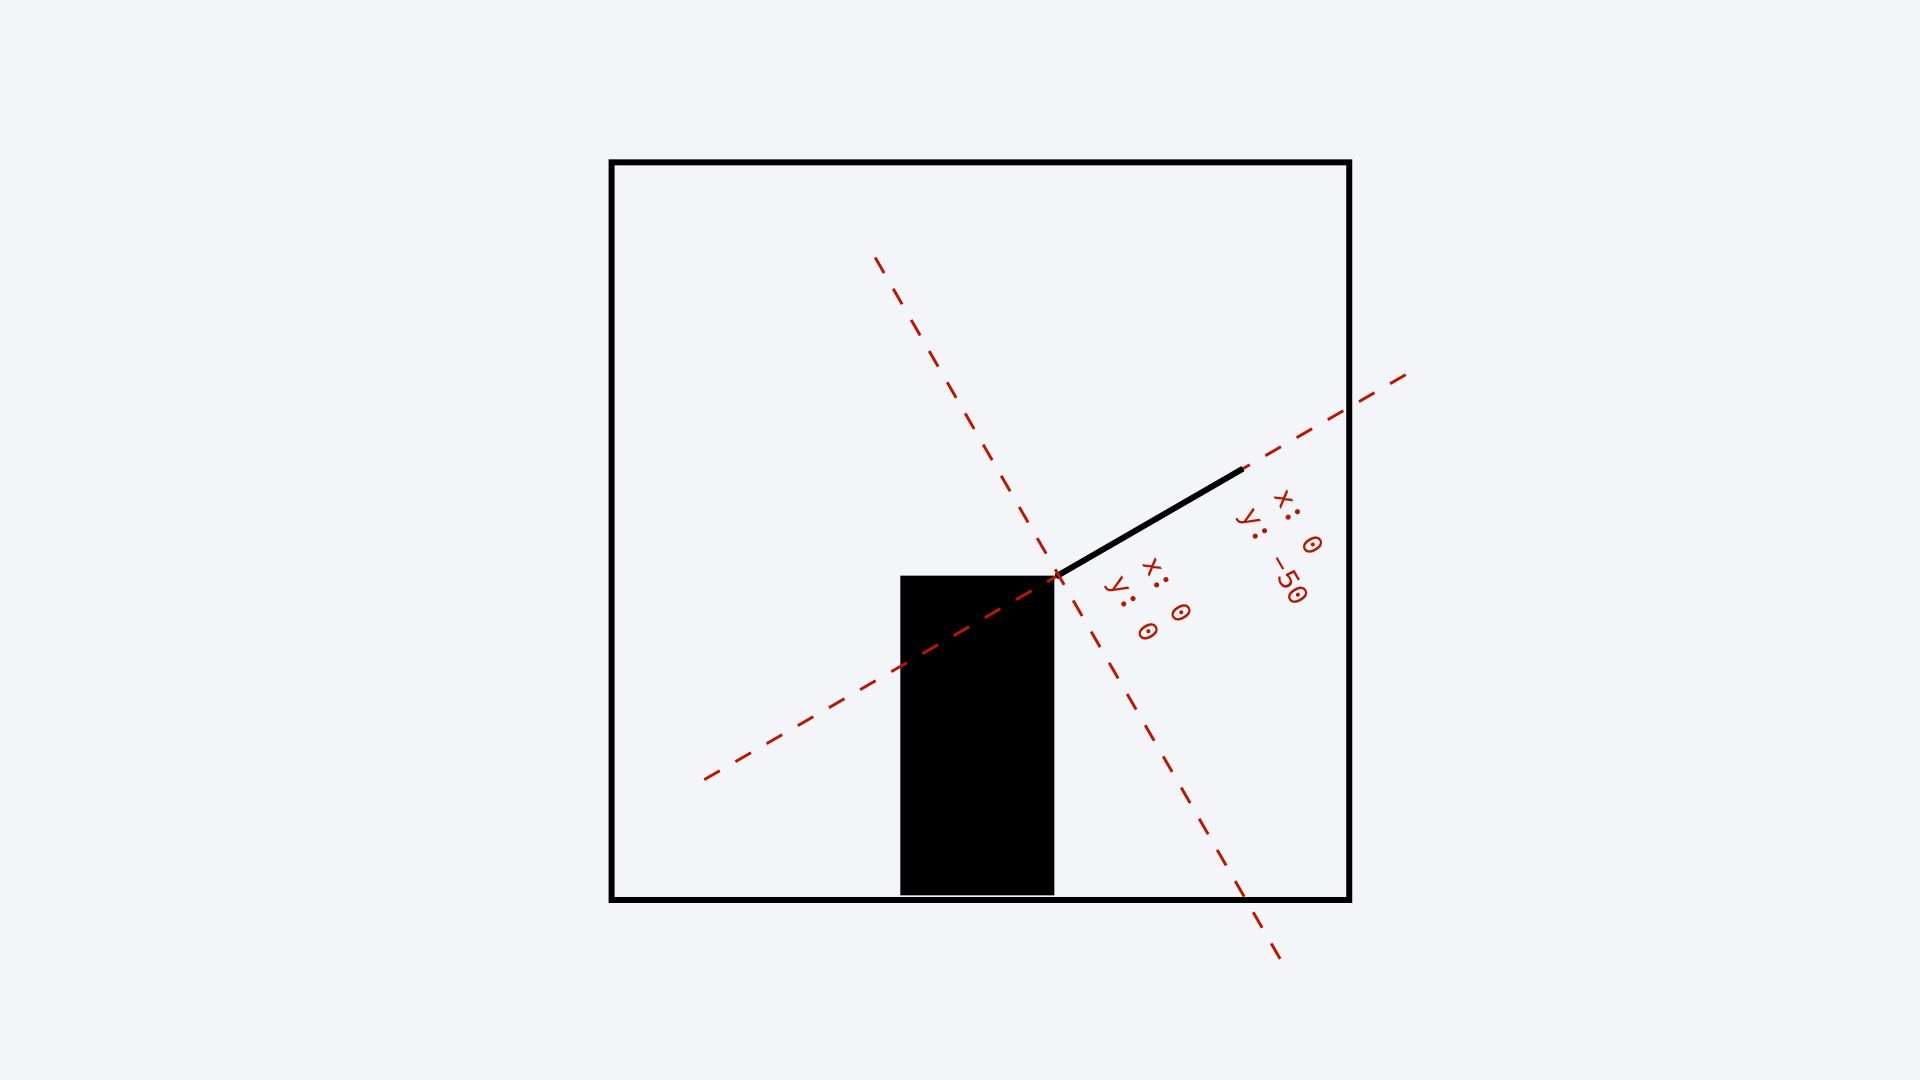
The precise drawing of the road can be fascinating. There’s no easy line-drawing command so we have now to attract a path.
We get a path by connecting a number of factors. We can join them with arcs, curves, and straight traces. In this case, we have now a quite simple one. We simply start a path (beginPath), transfer to a coordinate (transferTo), then draw a straight line to the subsequent coordinate (lineTo). Then we end it with the stroke command.
We also can end the trail with the fill command, however that solely is sensible with shapes.
Note that as a result of we shift and switch the coordinate system right here once more, on the finish of this perform we have to restore transformations (and save the transformation matrix at first of this perform). Otherwise, all upcoming drawing instructions can be twisted like this.
Now that we have now drawn the scene, let’s kick off the sport by dealing with person interactions. Handling occasions is the best a part of the sport. We are listening to the mousedown and the mouseup occasion, and we deal with the click on occasion of the restart button.
Once the person holds the mouse down, we provoke the stretching part by setting the part variable to stretching. We reset the timestamp that the principle occasion loop goes to make use of (we get again to this later), and we set off the principle occasion loop by requesting an animation body for the animate perform.
All these are solely occurring if the present state of the sport is ready. In every other case, we ignore the mousedown occasion.
let part = "ready";
let finalTimestamp;

...

const restartButton = doc.getElementById("restart");

...

window.addEventListener("mousedown", perform () {
  if (part == "ready") {
    part = "stretching";
    finalTimestamp = undefined;
    window.requestAnimationFrame(animate);
  }
});

window.addEventListener("mouseup", perform () {
  if (part == "stretching") {
    part = "turning";
  }
});

restartButton.addEventListener("click on", perform (occasion) {
  resetGame();
  restartButton.fashion.show = "none";
});

...
Handling the mouseup occasion is even less complicated. If we’re at present stretching a stick, then we cease that and transfer to the subsequent part when the stick falls down.
Finally, we additionally add an occasion handler for the restart button. The reset button is hidden by default and might be solely seen as soon as the hero has fallen. But we will already outline its conduct, and as soon as it seems it should work. If we click on reset, we name the resetGame perform to reset the sport and conceal the button.
That’s all of the occasion dealing with we have now. The relaxation now will depend on the principle animation loop that we simply invoked with a requestAnimationFrame.
The fundamental loop is probably the most difficult a part of the sport. This is a perform that can hold altering the state of the sport and calling the draw perform to repaint the entire display screen based mostly on this state.
As it’s going to be referred to as 60 occasions each second, the fixed repainting of the display screen will make it seem like a steady animation. Because this perform is working so steadily, we solely change the sport state little by little every time.
This animate perform will get triggered as a requestAnimationFrame name by the mousedown occasion (see above). With its final line, it retains invoking itself till we don’t cease it by coming back from the perform.
There are solely two circumstances once we would cease the loop: when moved to the ready part and there’s nothing to animate, or when the hero falls down and the sport is over.
This perform retains observe of how a lot time has handed since its final name. We are going to make use of this data to exactly calculate how the state ought to change. Like when the hero is strolling, we have to calculate precisely what number of pixels it strikes based mostly on its pace and the time handed because the final animation cycle.
let finalTimestamp;

...

perform animate(timestamp) {
  if (!finalTimestamp) {
    // First cycle
    finalTimestamp = timestamp;
    window.requestAnimationFrame(animate);
    return;
  }

  let timePassed = timestamp - finalTimestamp;

  change (part) {
    case "ready":
      return; // Stop the loop
    case "stretching": {
      sticks[sticks.length - 1].size += timePassed / stretchingSpeed;
      break;
    }
    case "turning": {
      sticks[sticks.length - 1].rotation += timePassed / turningSpeed;
      ...
      break;
    }
    case "strolling": {
      heroX += timePassed / walkingSpeed;
      ...
      break;
    }
    case "transitioning": {
      sceneOffset += timePassed / transitioningSpeed;
      ...
      break;
    }
    case "falling": {
      heroY += timePassed / fallingSpeed;
      ...
      break;
    }
  }

  draw();
  finalTimestamp = timestamp;

  window.requestAnimationFrame(animate);
}
How to Calculate the Time Passed Between Two Renders
Functions invoked with the requestAnimationFrame perform obtain the present timestamp as an attribute. At the tip of each cycle, we save this timestamp worth into the finalTimestamp attribute, in order that within the subsequent cycle we will calculate how a lot time handed between two cycles. In the code above, that is the timePassed variable.
The first cycle is an exception as a result of at that time, we didn’t have a earlier cycle but. Initially, the worth of finalTimestamp is undefined. In this case, we skip a render and we solely render the scene on the second cycle, the place we have already got all of the values we want. This is the half on the very starting of the animate perform.
How to Animate Part of the State
In every part, we animate a distinct a part of the state. The solely exception is the ready part as a result of then we have now nothing to animate. In that case, we return from the perform. This will break the loop, and the animation will cease.
In the stretching part – when the participant is holding the mouse down – we have to develop the stick because the time passes. We calculate how for much longer it needs to be based mostly on the time handed and a pace worth that defines how a lot time it takes for the follow develop one pixel.
A really related factor is occurring in each different part as effectively. In the turning part, we alter the rotation of the stick based mostly on the time handed. In the strolling part, we alter the horizontal place of the hero based mostly on time. In the transitioning part, we alter the offset worth of the entire scene. In the falling part, we alter the vertical place of the hero.
Each of those phases has its personal pace configuration. These values inform what number of milliseconds it takes to develop the stick by one pixel, flip the stick by one diploma, stroll one pixel, and so forth.
// Configuration
const stretchingSpeed = 4; // Milliseconds it takes to attract a pixel
const turningSpeed = 4; // Milliseconds it takes to show a level
const walkingSpeed = 4;
const transitioningSpeed = 2;
const fallingSpeed = 2;

...
How to Move On to the Next Phase
In most of those phases, we even have a threshold worth that ends the part and triggers the subsequent one. The ready and stretching phases are the exceptions as a result of their finish relies on person interplay. |The ready part ends with the mousedown occasion and the stretching part ends with the mouseup occasion.
The turning part stops when the stick falls flat and its rotation reaches 90 levels. The strolling part ends when the hero reaches the sting of the subsequent platform or the tip of the stick. And so on.
If these thresholds are reached, the principle recreation loop units the sport to the subsequent part and within the subsequent loop, it should act accordingly. Let’s see these in additional element.
The ready part
If we’re within the ready part and nothing is occurring, we return from the perform. This return assertion implies that we by no means attain the tip of the perform and there received’t be one other request for an animation body. The loop stops. We want the person enter handler to set off one other loop.
perform animate(timestamp) {
	...

  change (part) {
    case "ready":
      return; // Stop the loop

    ...

  }

	...
}
The stretching part
In the stretching part, we improve the size of the final stick based mostly on the time handed and wait till the person releases the mouse. The final stick is at all times the one in entrance of the hero. After each view transition, a brand new stick is added to the present platform.
perform animate(timestamp) {
	...

  change (part) {
		...
    case "stretching": {
      sticks[sticks.length - 1].size += timePassed / stretchingSpeed;
			break;
    }
		...
  }

  ...
}
The turning part
In the turning part, we alter the rotation of the final stick. We solely do it till the stick reaches 90 levels as a result of which means the stick has reached a flat place. Then we set the part to strolling, so the subsequent requestAnimationFrame will modify the hero and never the stick.

Once the stick reaches 90 levels, then if the stick falls on the subsequent platform, we additionally improve the rating worth. We improve the rating state and replace the innerText attribute of the scoreElement (see the define of the JavaScript file chapter). Then we generate a brand new platform to ensure that we by no means run out of them.
If the stick didn’t fall on the subsequent platform, we don’t improve the rating and we don’t generate a brand new platform. We additionally don’t set off the falling part but both, as a result of first the hero nonetheless tries to stroll alongside the stick.
perform animate(timestamp) {
  ...

  change (part) {
    ...
    case "turning": {
      sticks[sticks.length - 1].rotation += timePassed / turningSpeed;

      if (sticks[sticks.length - 1].rotation >= 90) {
        sticks[sticks.length - 1].rotation = 90;

        const nextPlatform = thePlatformTheStickHits();
        if (nextPlatform) {
          rating++;
          scoreElement.innerText = rating;

          generatePlatform();
        }

        part = "strolling";
      }
      break;
    }
    ...
  }

  ...
}
This part makes use of a utility perform to determine whether or not the stick will land on the platform or not. It calculates the precise finish place of the final stick and checks if this place falls between the left and proper fringe of a platform. If it does, it returns the platform, if not then it returns undefined.
perform thePlatformTheStickHits() {
  const finalStick = sticks[sticks.length - 1];
  const stickFarX = finalStick.x + finalStick.size;

  const platformTheStickHits = platforms.discover(
    (platform) => platform.x < stickFarX && stickFarX < platform.x + platform.w
  );

  return platformTheStickHits;
}
The strolling part
In the strolling part, we transfer the hero ahead. The finish of this part will depend on whether or not the stick reaches the subsequent platform or not. To decide this, we use the identical utility perform we simply outlined above.

If the tip of the stick falls on a platform, then we restrict the hero’s place to the sting of that platform. Then as soon as it’s reached, we go to the transitioning part. If the tip of the stick didn’t fall on a platform, although, we restrict the hero’s ahead motion till the tip of the stick after which we begin the falling part.
perform animate(timestamp) {
  ...

  change (part) {
    ...
    case "strolling": {
      heroX += timePassed / walkingSpeed;

      const nextPlatform = thePlatformTheStickHits();
      if (nextPlatform) {
        // If the hero will attain one other platform then restrict its place at its edge
        const maxHeroX = nextPlatform.x + nextPlatform.w - 30;
        if (heroX > maxHeroX) {
          heroX = maxHeroX;
          part = "transitioning";
        }
      } else {
        // If the hero will not attain one other platform then restrict its place on the finish of the pole
        const maxHeroX =
          sticks[sticks.length - 1].x +
          sticks[sticks.length - 1].size;
        if (heroX > maxHeroX) {
          heroX = maxHeroX;
          part = "falling";
        }
      }
      break;
    }
    ...
  }

  ...
}
The transitioning part
In the transitioning part, we transfer the entire scene. We need to hero to face on the identical place on the display screen the place it initially stood, however now it’s standing on a distinct platform. This implies that we have now to calculate by how a lot we should always shift the entire scene again to attain the identical place. Then simply set the part to ready and we wait for an additional mouse occasion.
perform animate(timestamp) {
	...

  change (part) {
		...
    case "transitioning": {
      sceneOffset += timePassed / transitioningSpeed;

      const nextPlatform = thePlatformTheStickHits();
      if (nextPlatform.x + nextPlatform.w - sceneOffset < 100) {
        sticks.push({
          x: nextPlatform.x + nextPlatform.w,
          size: 0,
          rotation: 0,
        });
        part = "ready";
      }
      break;
    }
		...
  }

  ...
}
We know we have reached the precise place when the precise facet of the platform – shifted by the offset – reaches the primary platform’s authentic right-side place. If we glance again at initializing the platform, we see that the primary platform at all times has an X place of fifty and its width can be at all times 50. This implies that its proper finish might be at 100.
At the tip of this part, we additionally added a brand new follow the sticks array with preliminary values.
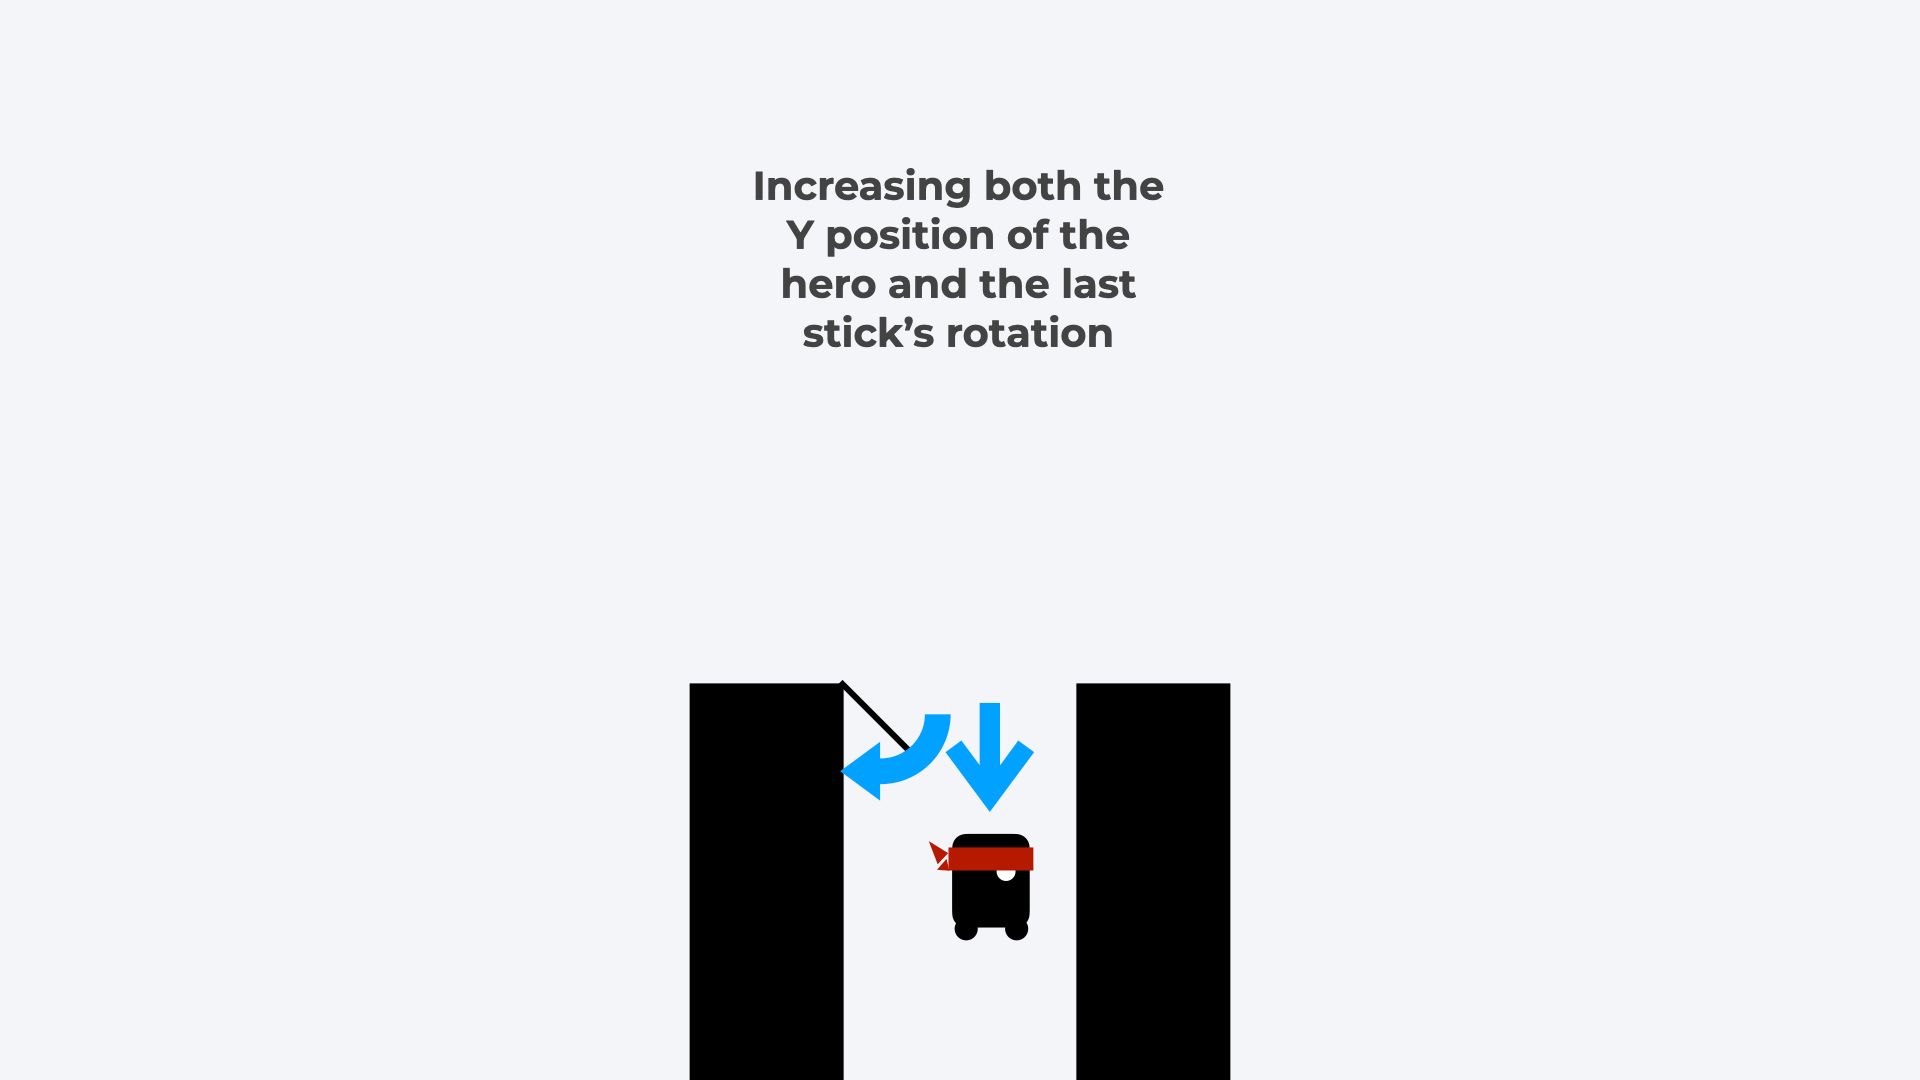
The falling part
In the failing situation, two issues are altering: the hero’s place and the final stick’s rotation. Then as soon as the hero has fallen out of the display screen, we cease the sport loop once more by coming back from the perform.
perform animate(timestamp) {
	...

  change (part) {
		...
    case "falling": {
      heroY += timePassed / fallingSpeed;

      if (sticks[sticks.length - 1].rotation < 180) {
        sticks[sticks.length - 1].rotation += timePassed / turningSpeed;
      }

      const maxHeroY = platformHeight + 100;
      if (heroY > maxHeroY) {
        restartButton.fashion.show = "block";
        return;
      }
      break;
    }
		...
  }

  ...
}
So that’s the principle loop – how the sport strikes from part to part, altering a variety of variables. At the tip of each cycle the perform calls the draw perform to replace the scene and requests one other recreation. If you probably did the whole lot proper, it is best to have a working recreation now!
In this tutorial, we coated so much. We discovered the best way to paint fundamental shapes on a canvas ingredient with JavaScript and we carried out a complete recreation.
Despite the size of this text, there are nonetheless a number of issues we didn’t cowl right here. You can try the supply code of this recreation for extra options on CodePen. These embrace:
- How to make the sport match the entire browser window and translate the display screen accordingly.
- How to attract a background to the scene and the way to attract a extra detailed model of our hero.
- We add a double rating zone to the center of every platform. If the tip of the stick falls into this very small area, the hero scores two factors.
I hope you loved this tutorial. Stay tuned for extra right here on freeCodeCamp and on my YouTube channel.
Subscribe for extra tutorials on Web Development:
Hunor Márton Borbély
Game growth with JavaScript, artistic coding tutorials, HTML canvas, SVG, Three.js, and a few React and Vue https://twitter.com/HunorBorbelyhttps://codepen.io/HunorMarton…