
This information demonstrates the simple strategy of incorporating authentication into your Next.js app utilizing the next-auth.js library. While the library gives quite a few choices (suppliers), this tutorial focuses on the implementation utilizing the Google Provider.
You’ll additionally acquire perception into effortlessly establishing protected routes inside your software, a activity made straightforward by the next-auth.js library.
When you might be prepared, let’s dive in.
How to Set Up the next-auth.js Library
Once your Next.js software is up and working, we’re able to dive in.
Quick observe: I’ll be referencing the “app” listing persistently on this information. If this time period is new to you, take a second to seek the advice of the Next.js documentation for readability. If you are using the “pages” listing, concern not, because the implementation is nearly equivalent.
Install the next-auth.js library with the next command:
npm set up next-auth
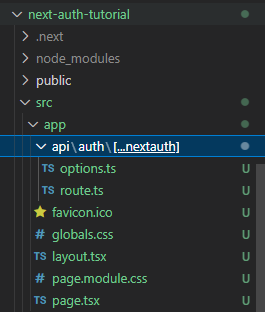
Having accomplished the set up, create an api folder in your root app folder, and inside it create an auth folder. Finally, create a [...nextauth] folder contained in the auth folder.
Inside the [...nextauth] folder, create two recordsdata named route.ts and choices.ts.
Your folder construction up up to now ought to appear like this:
Afterwards, within the choices.ts file, insert the next code:
import kind { NextAuthOptions } from 'next-auth'
import GoogleProvider from "next-auth/suppliers/google";

export const choices: NextAuthOptions = {
    suppliers: [
  GoogleProvider({
    clientId: process.env.GOOGLE_CLIENT_ID as string,
    clientSecret: process.env.GOOGLE_CLIENT_SECRET as string,
  })
]
}
We imported the NextAuthOptions kind to make sure the choices variable is type-safe.
In order to make use of Google Provider, we imported GoogleProvider from next-auth as illustrated above.
The choices variable is the place we embed whichever supplier we intend to make use of from next-auth.js.
Notice that we exported the choices variable, enabling us to make use of it all through the applying (though we principally want it the route.ts file). As we delve into the implementation within the route.ts file, we’ll discover how it’s utilized.
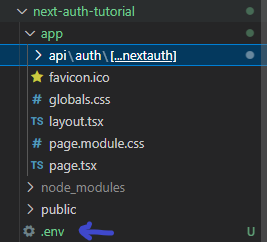
To use the Google Provider successfully, you must get your clientId and shopperSecret properties. Rest assured, we’ll delve into this shortly. First, create an .env file the place you will assign values to each properties.
env recordsdata are at all times on the root folder of your software:
Now, we’ll see how one can now get your clientId and shopperSecret.
Assuming you have already got a Google account, observe these straightforward steps:
- Visit Google Cloud Platform, and click on the console button on the prime proper nook of the navbar.

- You’ll be directed to your console dashboard. On the highest left, proper after the Google Cloud brand, click on the dropdown menu to create a brand new mission:

Assign your mission any identify you like, after which click on the “Create” button. Mine will likely be “Next-auth Tutorial”.
You will return to your console dashboard, and the identical dropdown menu ought to now show the mission you lately created. If it would not, click on on it and choose the mission.
Assuming all the things is so as, scroll right down to the “Quick Access” part and select the “API & Services” card. This motion will lead you to the “API & Services” web page. In the sidebar of this web page, choose the “Credentials” choice:

- You will likely be directed to the “Credentials” web page. Here, click on the “CONFIGURE CONSENT SCREEN” button:

- This will take you to the consent display screen configuration web page, the place you’ll decide the way you need to configure and register your app. Opt for the “External” choice and proceed by clicking the “Create” button:

- Following this, you will end up on the “OAuth Consent Screen” web page. Proceed by finishing these 4 steps:
Beginning with the “OAuth Consent Screen” tab, you will be prompted to switch your app info. The key sections to concentrate on are “App Information” and “Developer Contact Information.” After filling these fields, click on the “SAVE AND CONTINUE” button.
You will then transition to the “Scopes” tab. Here, as soon as once more, click on the “SAVE AND CONTINUE” button.
Next up is the “Test Users” tab. Likewise, proceed by clicking the “SAVE AND CONTINUE” button.
And lastly, you will attain the final tab, the abstract tab. Scroll down and choose the “BACK TO DASHBOARD” button.
Upon finishing these steps, your dashboard ought to resemble the next:

- Return to the “Credentials” web page, and there, click on the “Create Credentials” button. A dropdown menu will seem. Choose the “OAuth Client ID” choice:
- This motion will take you to the web page the place you will craft your
shopper ID. On this web page, you will see a single dropdown subject in your software kind, which can reveal further fields primarily based in your choice. Select the “Web Application” choice from this dropdown:
Scroll right down to the “Authorized redirect URI” part and paste the next URI: http://localhost:3000/api/auth/callback/google. Afterwards, hit the “CREATE” button.
- Lastly, a modal will emerge, displaying your distinctive
Client IDandClient Secret. Keep in thoughts that each values are confidential, particular to every person, and have to be saved safe. For privateness causes, each values are blurred within the picture under:

Once you’ve got accomplished these steps, return to your code editor and paste the suitable values of every variable within the .env file:
GOOGLE_CLIENT_ID = shopper ID worth
GOOGLE_CLIENT_SECRET = shopper secret worth
You’ll additionally must generate a NEXT_AUTH_SECRET key to boost the safety of the authentication course of in next-auth.js. Generate your secret key by executing the next command in your terminal:
openssl rand -base64 32
This command will generate a 32-character string. Copy this string and paste it as the worth for the NEXTAUTH_SECRET variable in your .env file. Your remaining .env file ought to resemble the next:
GOOGLE_CLIENT_ID = shopper ID worth
GOOGLE_CLIENT_SECRET = shopper secret worth
NEXT_AUTH_SECRET = subsequent auth secret
To conclude, restart your software. It’s vital to notice that the next-auth.js library will not be actively engaged at this level. The purpose is that you have not but carried out protected routes for it to safeguard your pages. We’ll discover this facet subsequent.
How to Implement Protected Routes with next-auth.js
With the usage of Next.js‘s middleware, defending routes may be very straightforward.
Begin by making a middleware.ts file within the root src folder.

To defend all of your pages uniformly, insert the next code snippet:
export { default } from 'next-auth/middleware'
Alternatively, you possibly can selectively safe particular pages by using a matcher. For occasion, defending solely dwelling and about web page could be carried out as follows:
export { default } from 'next-auth/middleware'

export const config = { matcher: ['/', '/about'] }
Now, whenever you go to each pages in your localhost, they are going to current an authentication immediate inviting you to “Sign in with Google,” as a substitute of displaying the common content material:

Conclusion
In this tutorial, we have coated the important steps to implement authentication and guarded routes in your Next.js software utilizing the next-auth.js library with the Google Provider.
By following these steps, you’ve got laid a strong basis for integrating authentication into your Next.js software, bolstering its safety and enhancing the person expertise.
With the data gained right here, now you can confidently develop purposes that provide safe entry management and personalised content material primarily based on person authentication.
It’s additionally value noting that next-auth.js gives a number of suppliers you possibly can make use of to implement authentication, not simply Google Provider.