There are some ways to code graphics for the net. You can create artwork with CSS. You can code an SVG picture as a part of an HTML file. Or you possibly can generate graphics from JavaScript utilizing the Canvas API.
In this text, we’ll discover how one can use JavaScript to attract some fundamental shapes. You needn’t have any conditions for this tutorial. We are solely going to have a easy HTML and a plain JavaScript file which you can run instantly within the browser.
You is likely to be questioning – would anybody code a picture from JavaScript? For one, you possibly can generate graphics dynamically primarily based on some variables. For occasion, you possibly can create a diagram. Or even higher, we will create a complete recreation with JavaScript as we cowl it in this tutorial.
JavaScript Game Dev Tutorial – Build Gorillas with HTML Canvas + JavaScript
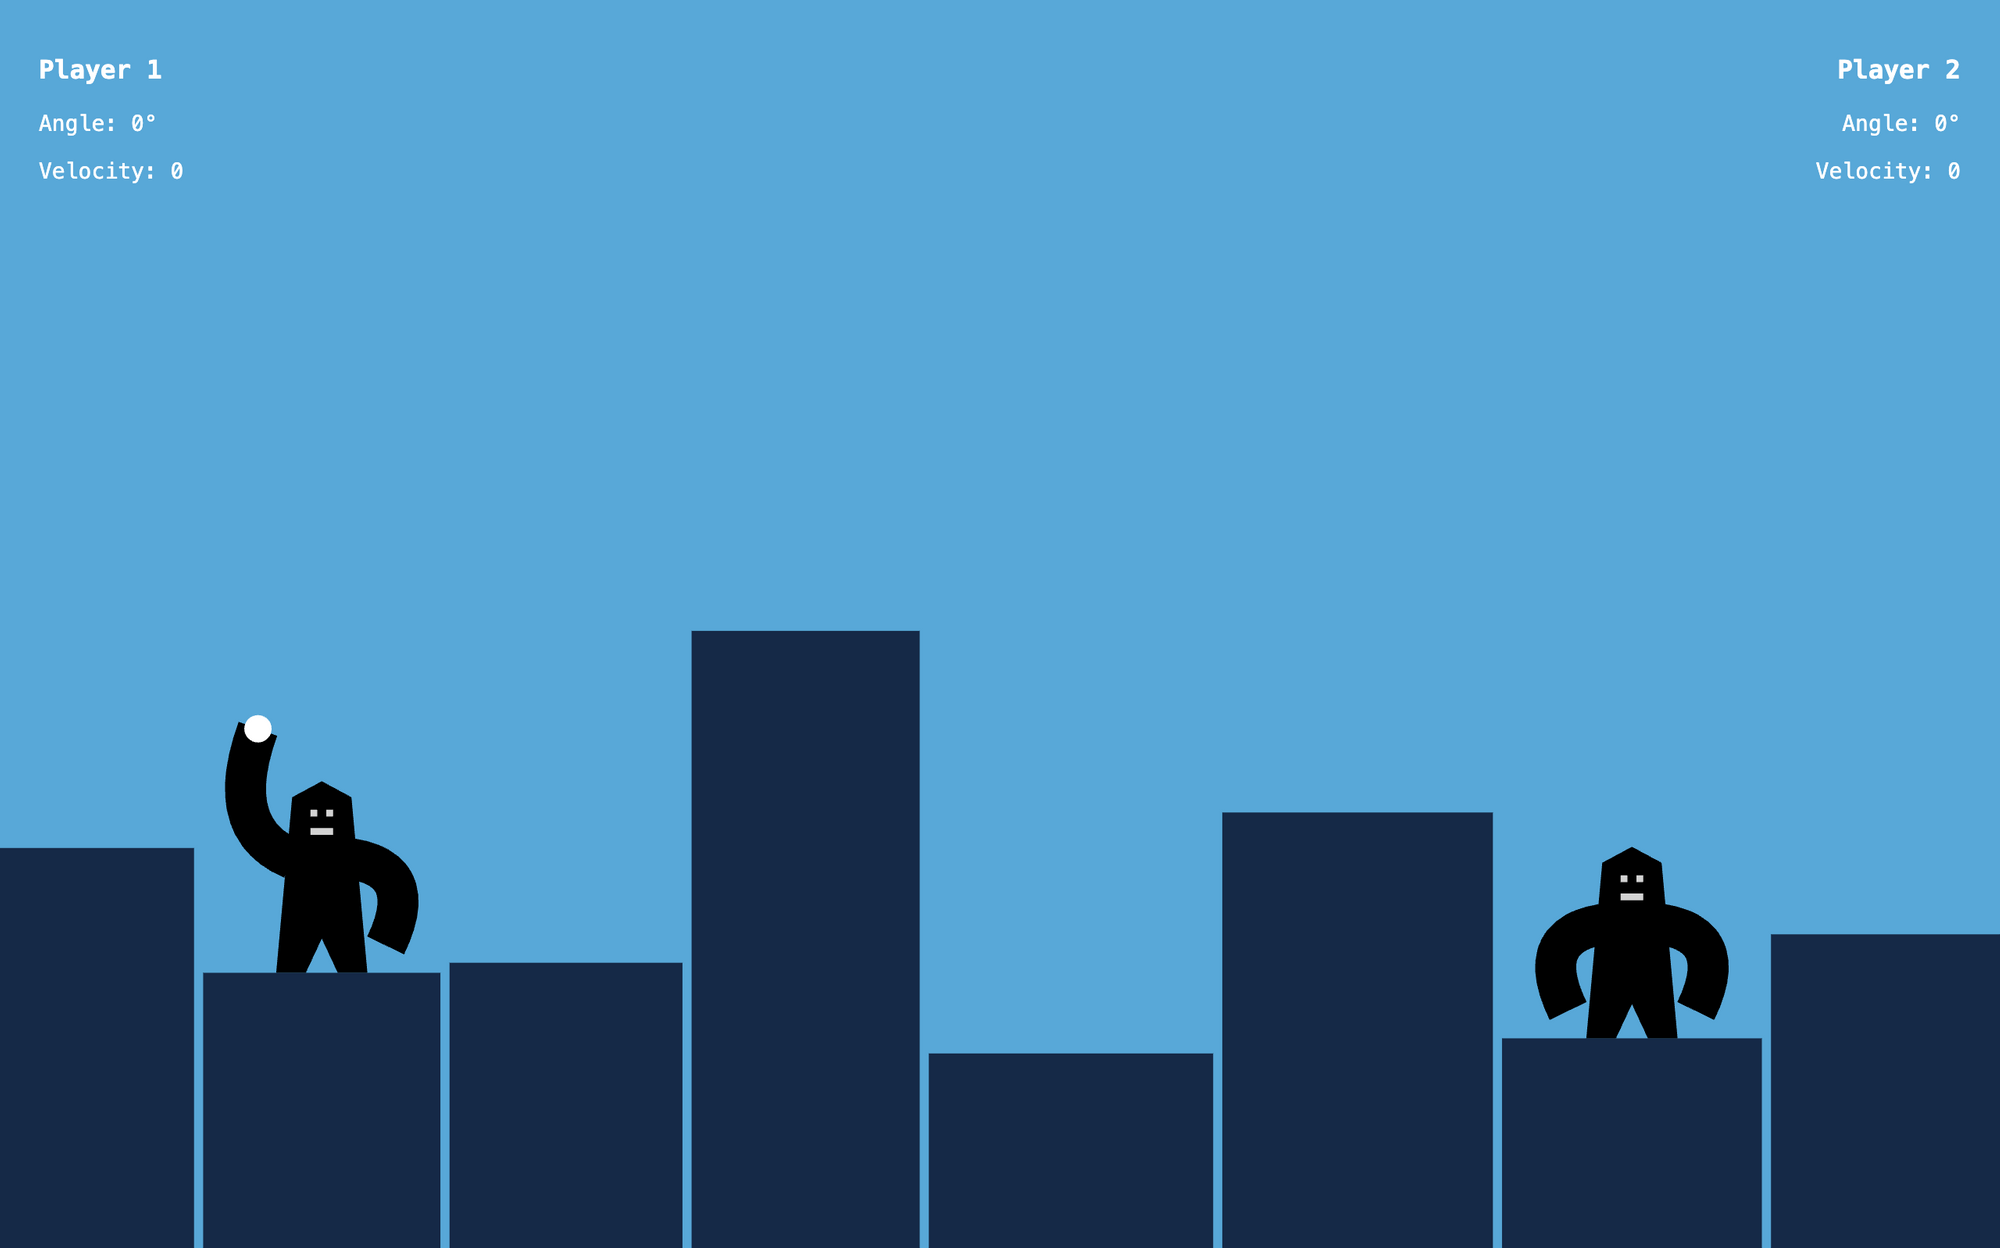
In this JavaScript recreation tutorial, you’ll discover ways to create a contemporary model ofthe 1991 traditional recreation Gorillas utilizing plain JavaScript and the HTML canvaselement. In this recreation, two gorillas throw explosive bananas at one another, and the firstone to hit the opposite one wins the sport. We’ll construct ou…
The following article focuses on a part of the tutorial above, and teaches you the fundamentals of drawing with JS.
The Canvas Element
To draw on the display, first we have to outline a canvas ingredient in HTML.
<!DOCTYPE html>
<html lang="en">
  <head>
    <meta charset="utf-8" />
    <title>Canvas</title>
    <script src="https://www.freecodecamp.org/information/drawing-on-a-canvas-element-with-javascript/index.js" defer></script>
  </head>

  <physique>
    <canvas id="myCanvas" width="1000" peak="1000"></canvas>
  </physique>
</html>This ingredient has an ID, in order that we will entry it in JavaScript. Here we additionally set its measurement. If the scale is dynamic, we will additionally set this measurement in JavaScript as we do within the tutorial above.
We outlined a <canvas> ingredient in HTML. How can we paint issues on it?
Let’s create a separate JavaScript file, the place we’ll add the remainder of the code. We’ll load this file with the script ingredient above. Then in index.js, first, we’ll get the canvas ingredient by ID and get its rendering context.
const canvas = doc.getElementById("myCanvas");
const ctx = canvas.getContext("2nd");

. . . This is a built-in API with many strategies and properties that we will use to attract on the canvas. In the following few sections, we’ll proceed with this file and see a number of examples of how one can use this API.
How to Draw a Rectangle
Let’s take a look at a number of fast examples. The most simple factor we will do is to fill a rectangle.
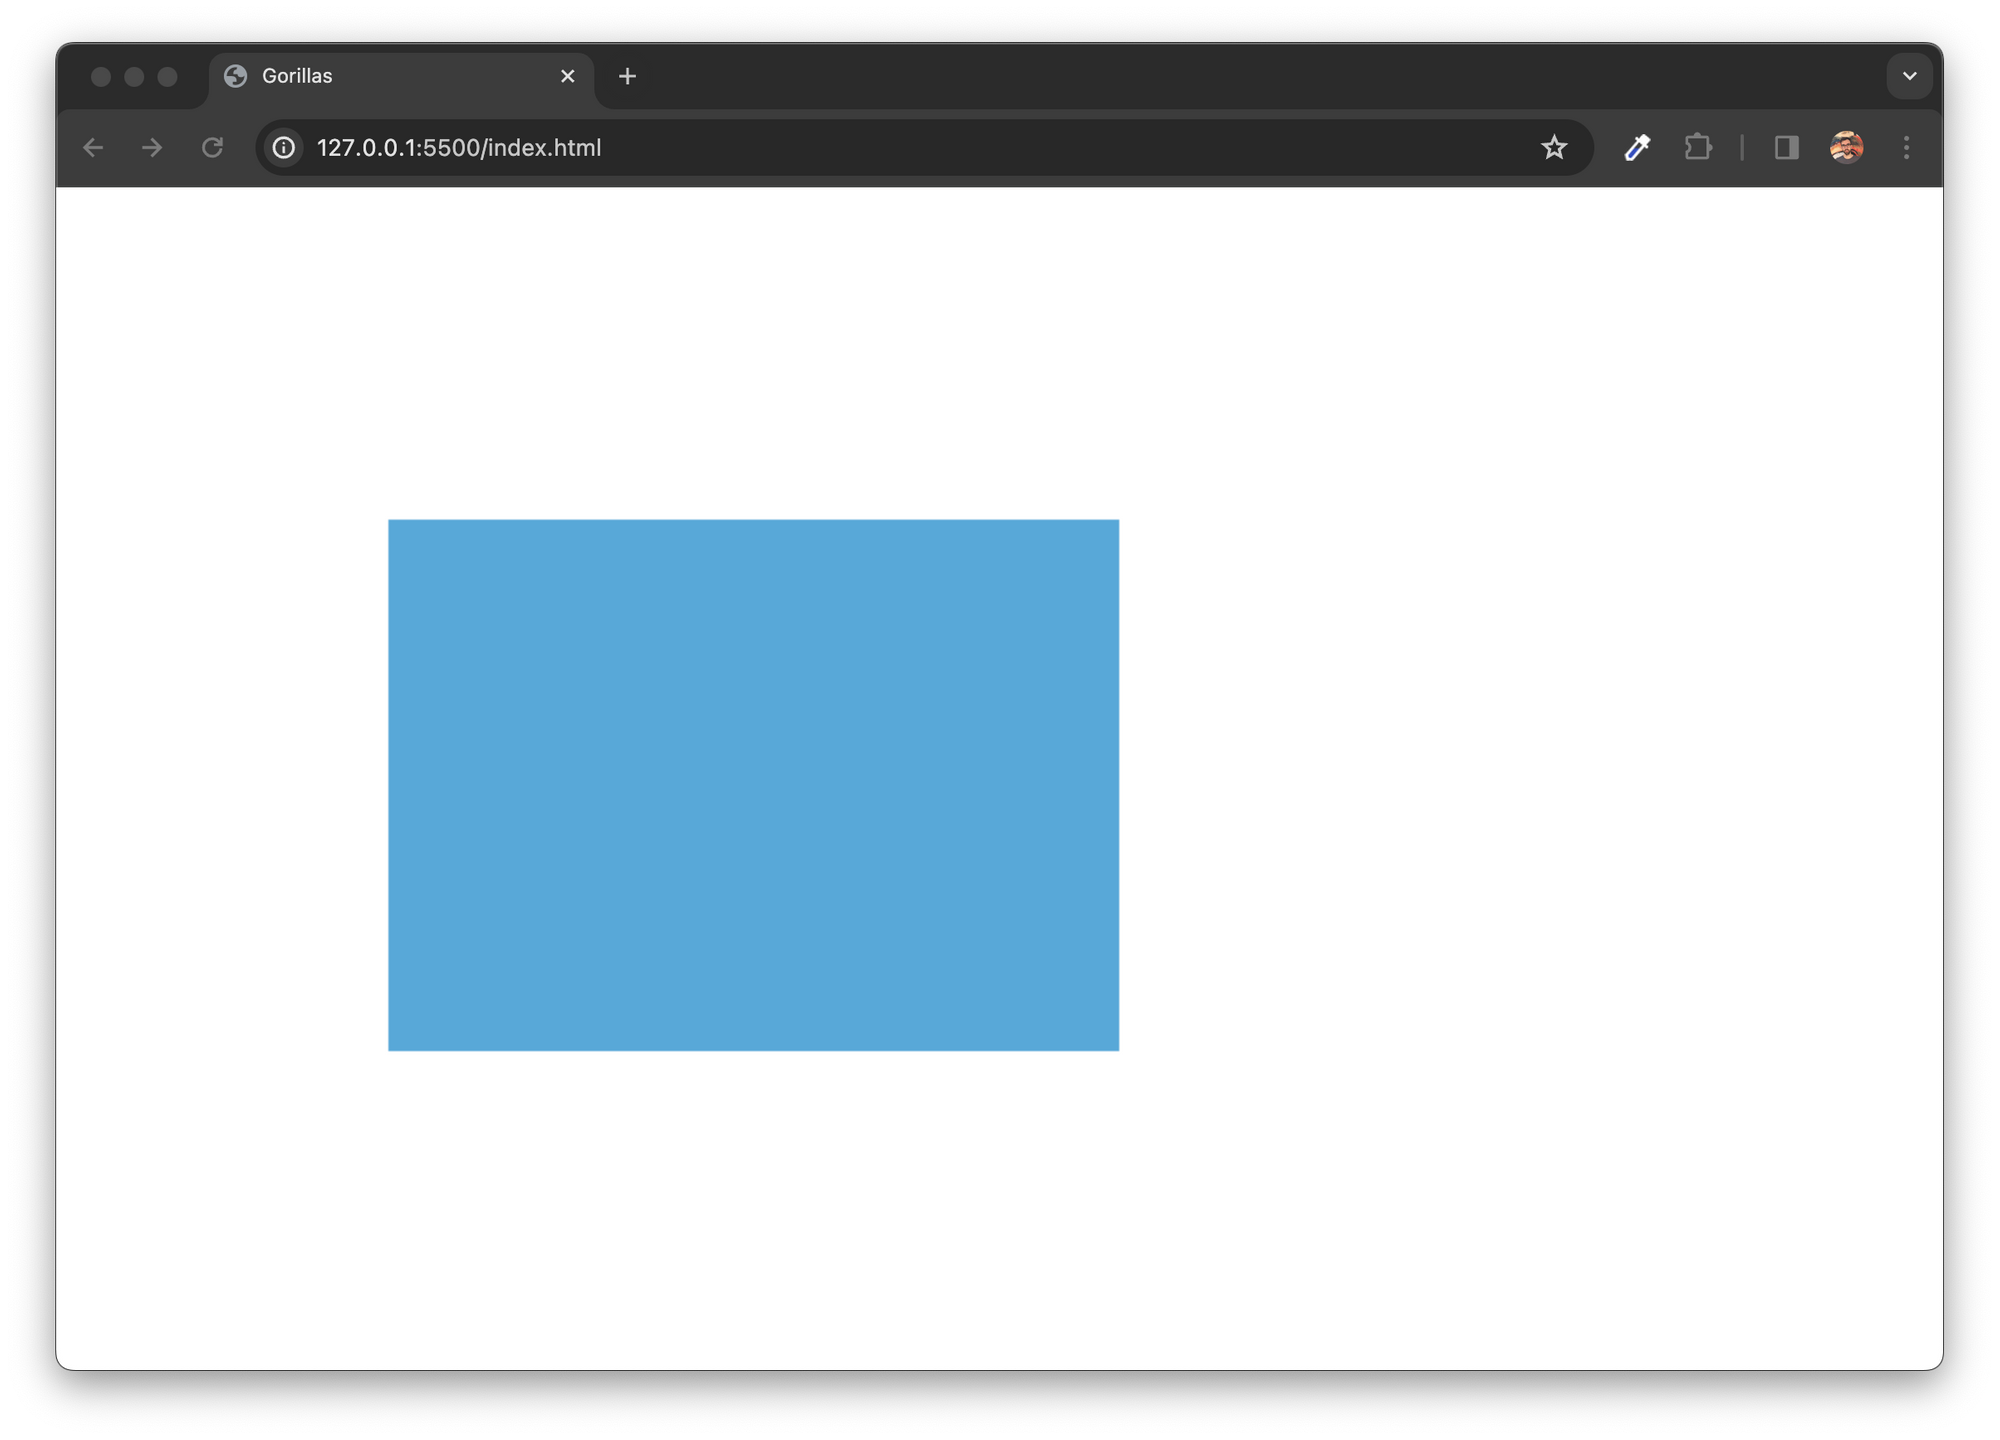
fillRect methodology to fill a rectangleconst canvas = doc.getElementById("myCanvas");
const ctx = canvas.getContext("2nd");
ctx.fillStyle = "#58A8D8";
ctx.fillRect(200, 200, 440, 320);With the fillRect methodology, we specify the highest left coordinate of our rectangle (200, 200), and we set its width and peak (440, 320).
By default, the fill coloration goes to be black. We can change it by setting the fillStyle property.
The approach canvas works is that we’ve got to arrange drawing parameters earlier than we paint, and never the opposite approach round. It’s not like we paint a rectangle, after which we will change its coloration. Once one thing is on the canvas, it stays as it’s.
You can consider it like an actual canvas, the place you additionally decide the colour together with your brush earlier than you begin portray with it. Then as soon as you have painted one thing you possibly can both cowl it, by portray one thing over it, or you possibly can attempt to clear the canvas. But you possibly can’t change current elements, actually. That’s why we set the colour right here up entrance and never afterward.
How to Fill a Path
We can after all draw extra difficult shapes as properly. We can outline a path, like this:
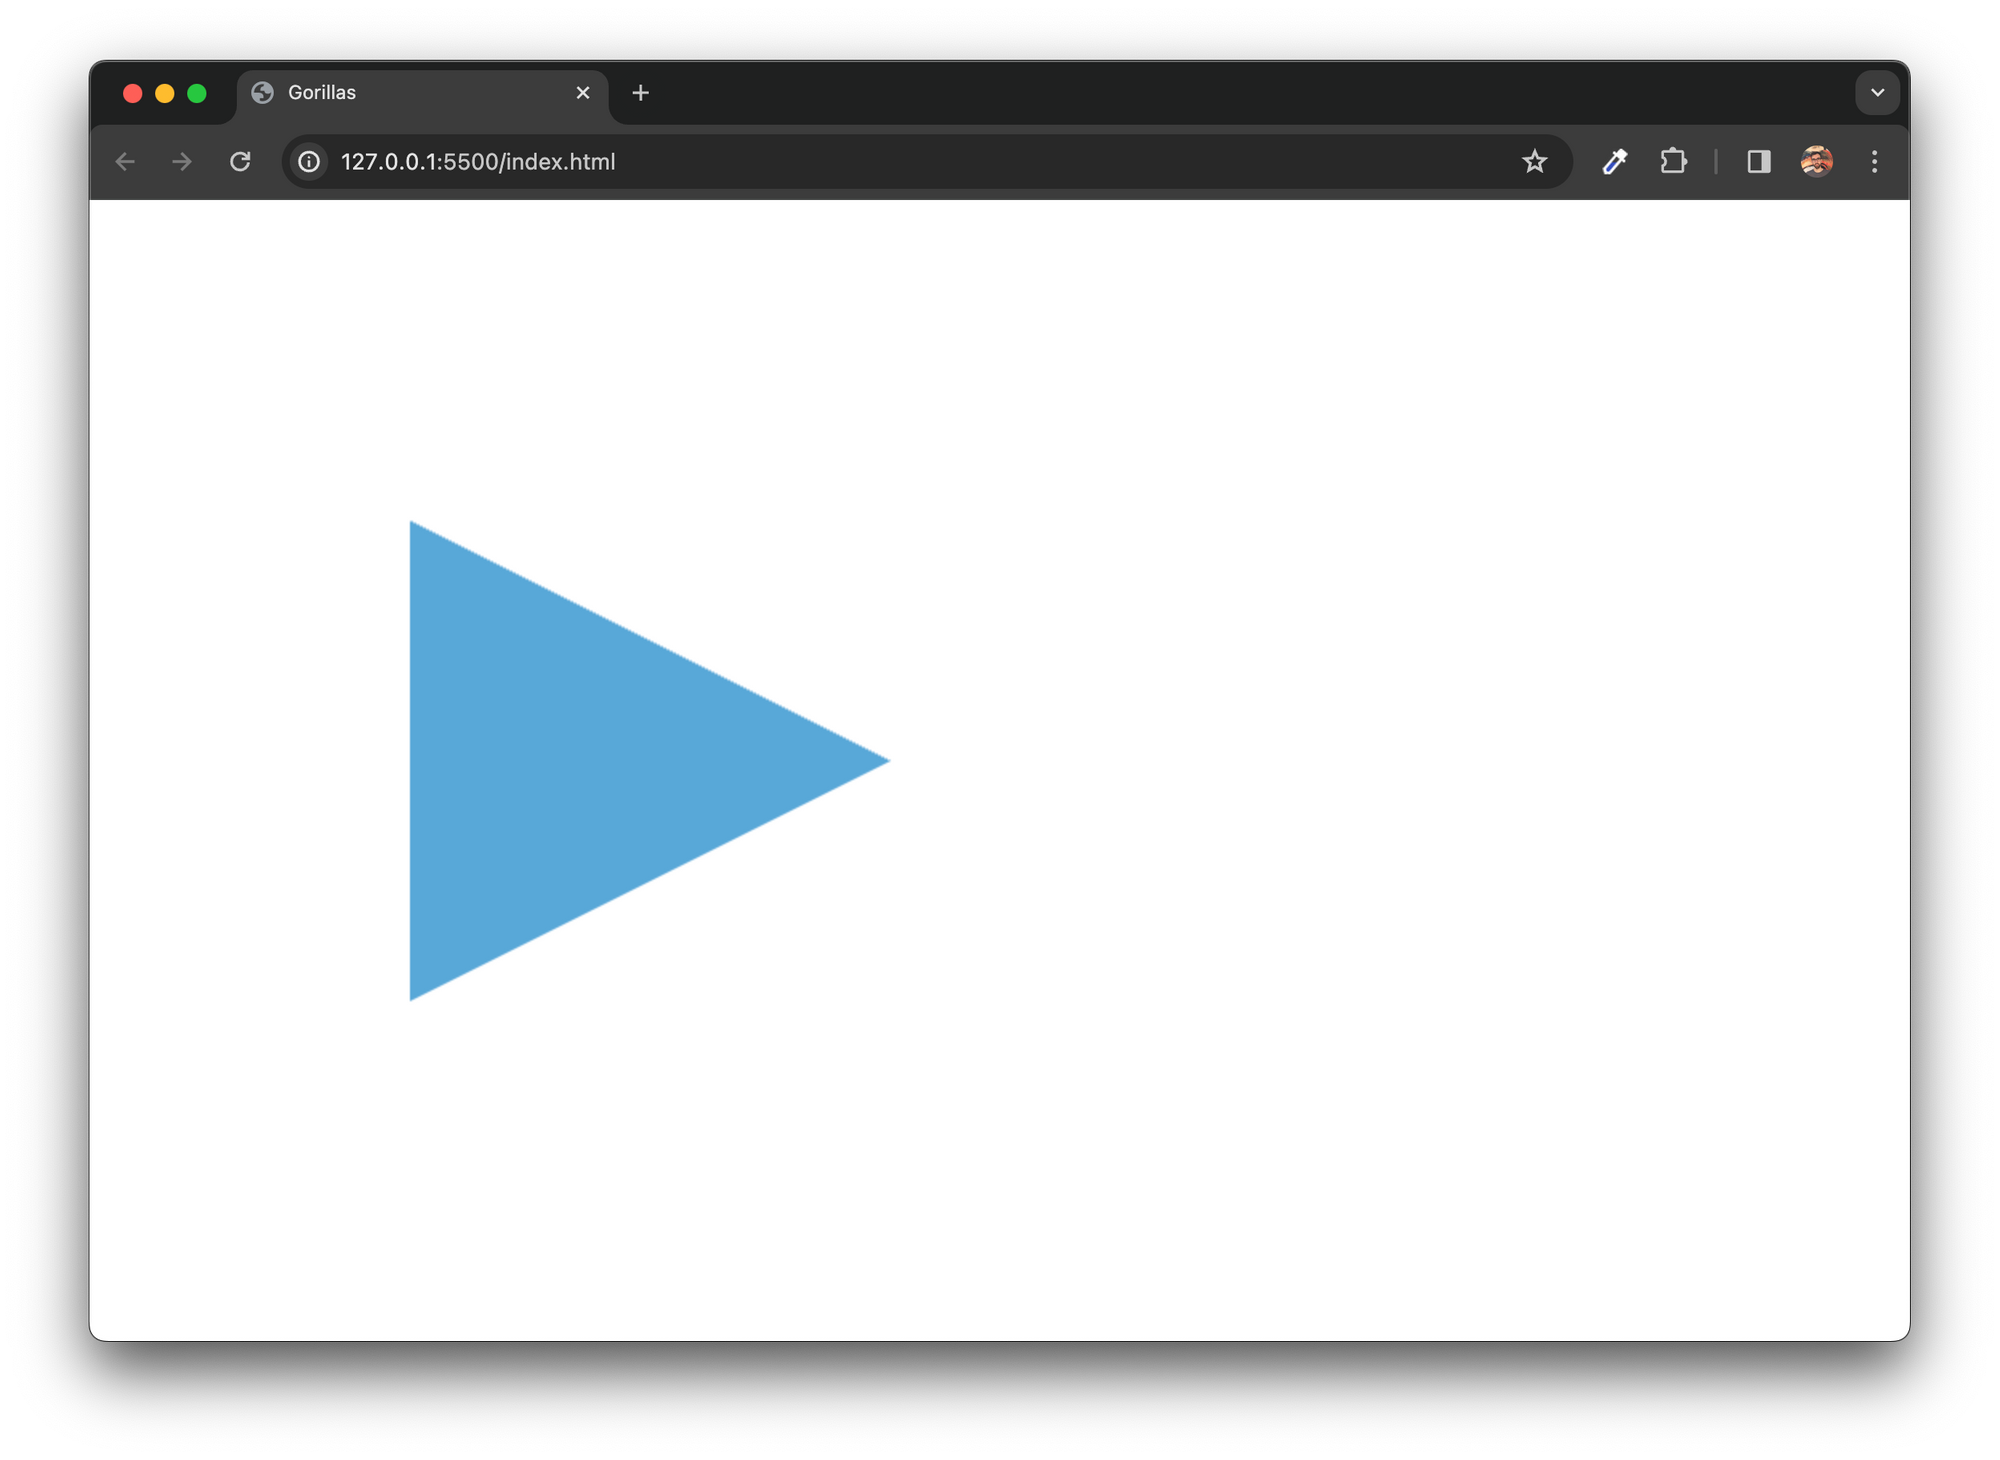
const canvas = doc.getElementById("myCanvas");
const ctx = canvas.getContext("2nd");

ctx.fillStyle = "#58A8D8";

ctx.startPath();
ctx.transferTo(200, 200);
ctx.lineTo(500, 350);
ctx.lineTo(200, 500);
ctx.fill();
Paths begin with the startPath methodology and finish with both calling the fill or the stroke methodology – or each. In between, we construct the trail by calling path-building strategies.
In this instance, we draw a triangle. We transfer to the 200,200 coordinate with the transferTo methodology. Then we name the lineTo methodology to maneuver to the correct facet of our form. And then we proceed the trail, by calling the lineTo methodology once more to 200,500.
None of this could be seen if we didn’t finish with the fill methodology to fill the trail we simply constructed.
How to Draw a Stroke
In a really related approach, we will additionally draw a line. Here, we’ll begin with the startPath methodology once more. We’ll additionally construct up the form with a transferTo and two lineTo strategies. The coordinates listed below are the identical. But ultimately, we don’t name the fill however the stroke methodology. This, as a substitute of filling the form, will draw the road we constructed.
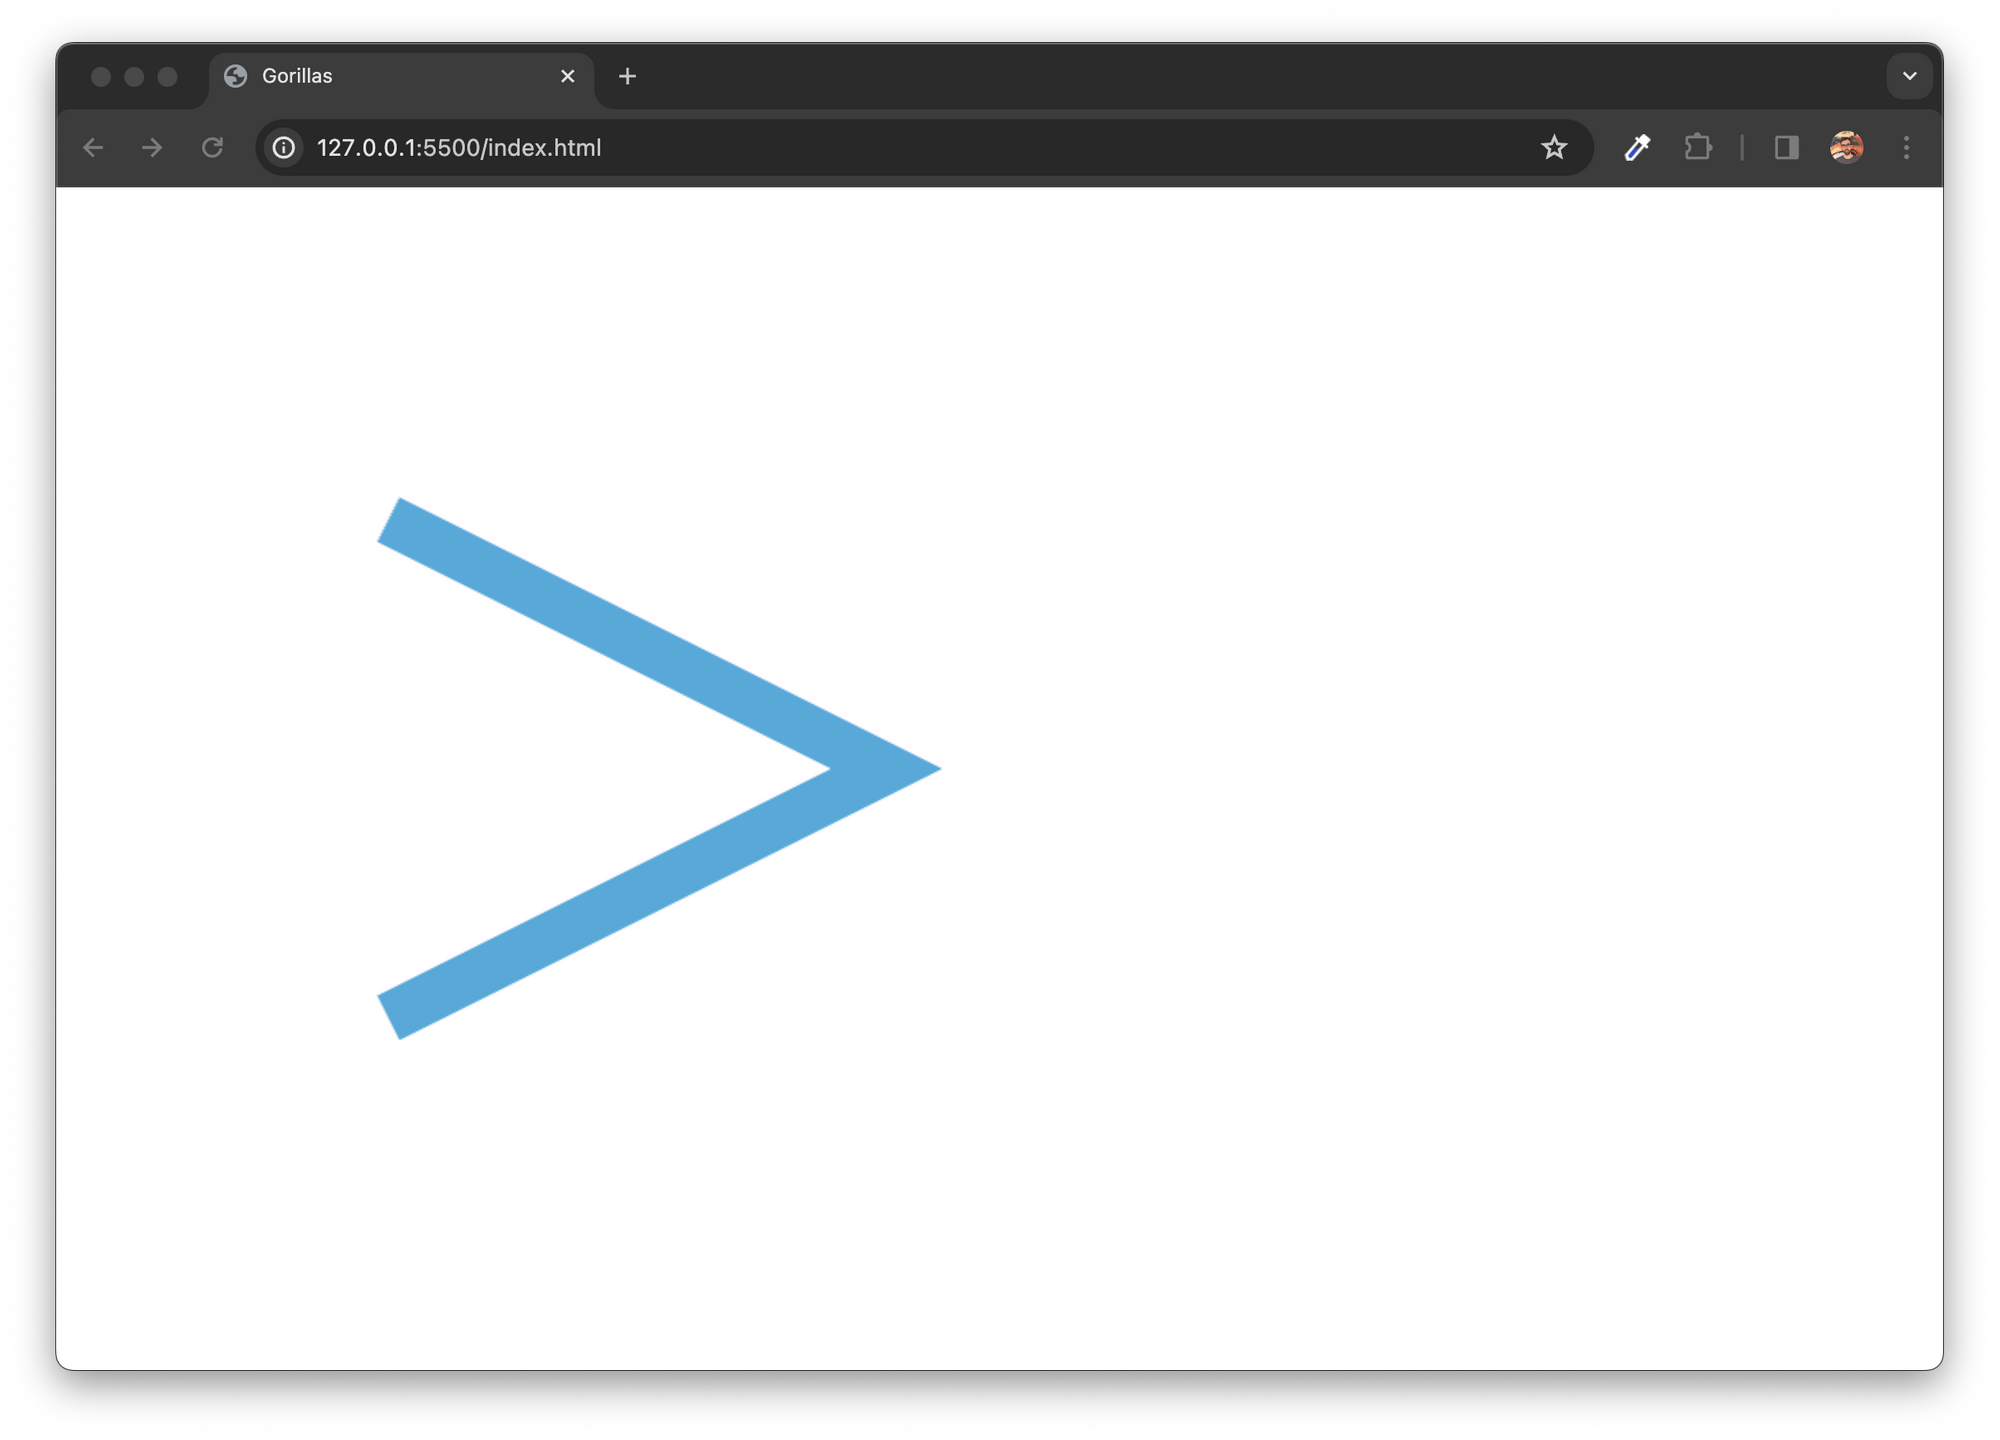
const canvas = doc.getElementById("myCanvas");
const ctx = canvas.getContext("2nd");

ctx.strokeStyle = "#58A8D8";
ctx.lineWidth = 30;

ctx.startPath();
ctx.transferTo(200, 200);
ctx.lineTo(500, 350);
ctx.lineTo(200, 500);
ctx.stroke();
Strokes have totally different styling properties. Instead of the fillStyle property, we set strokeStyle. To this property – and likewise to fillStyle – we will assign any coloration worth that’s legitimate in CSS. To set the road width we use the lineWidth property.
We also can construct extra complicated paths. In the instance beneath, we draw a curve.
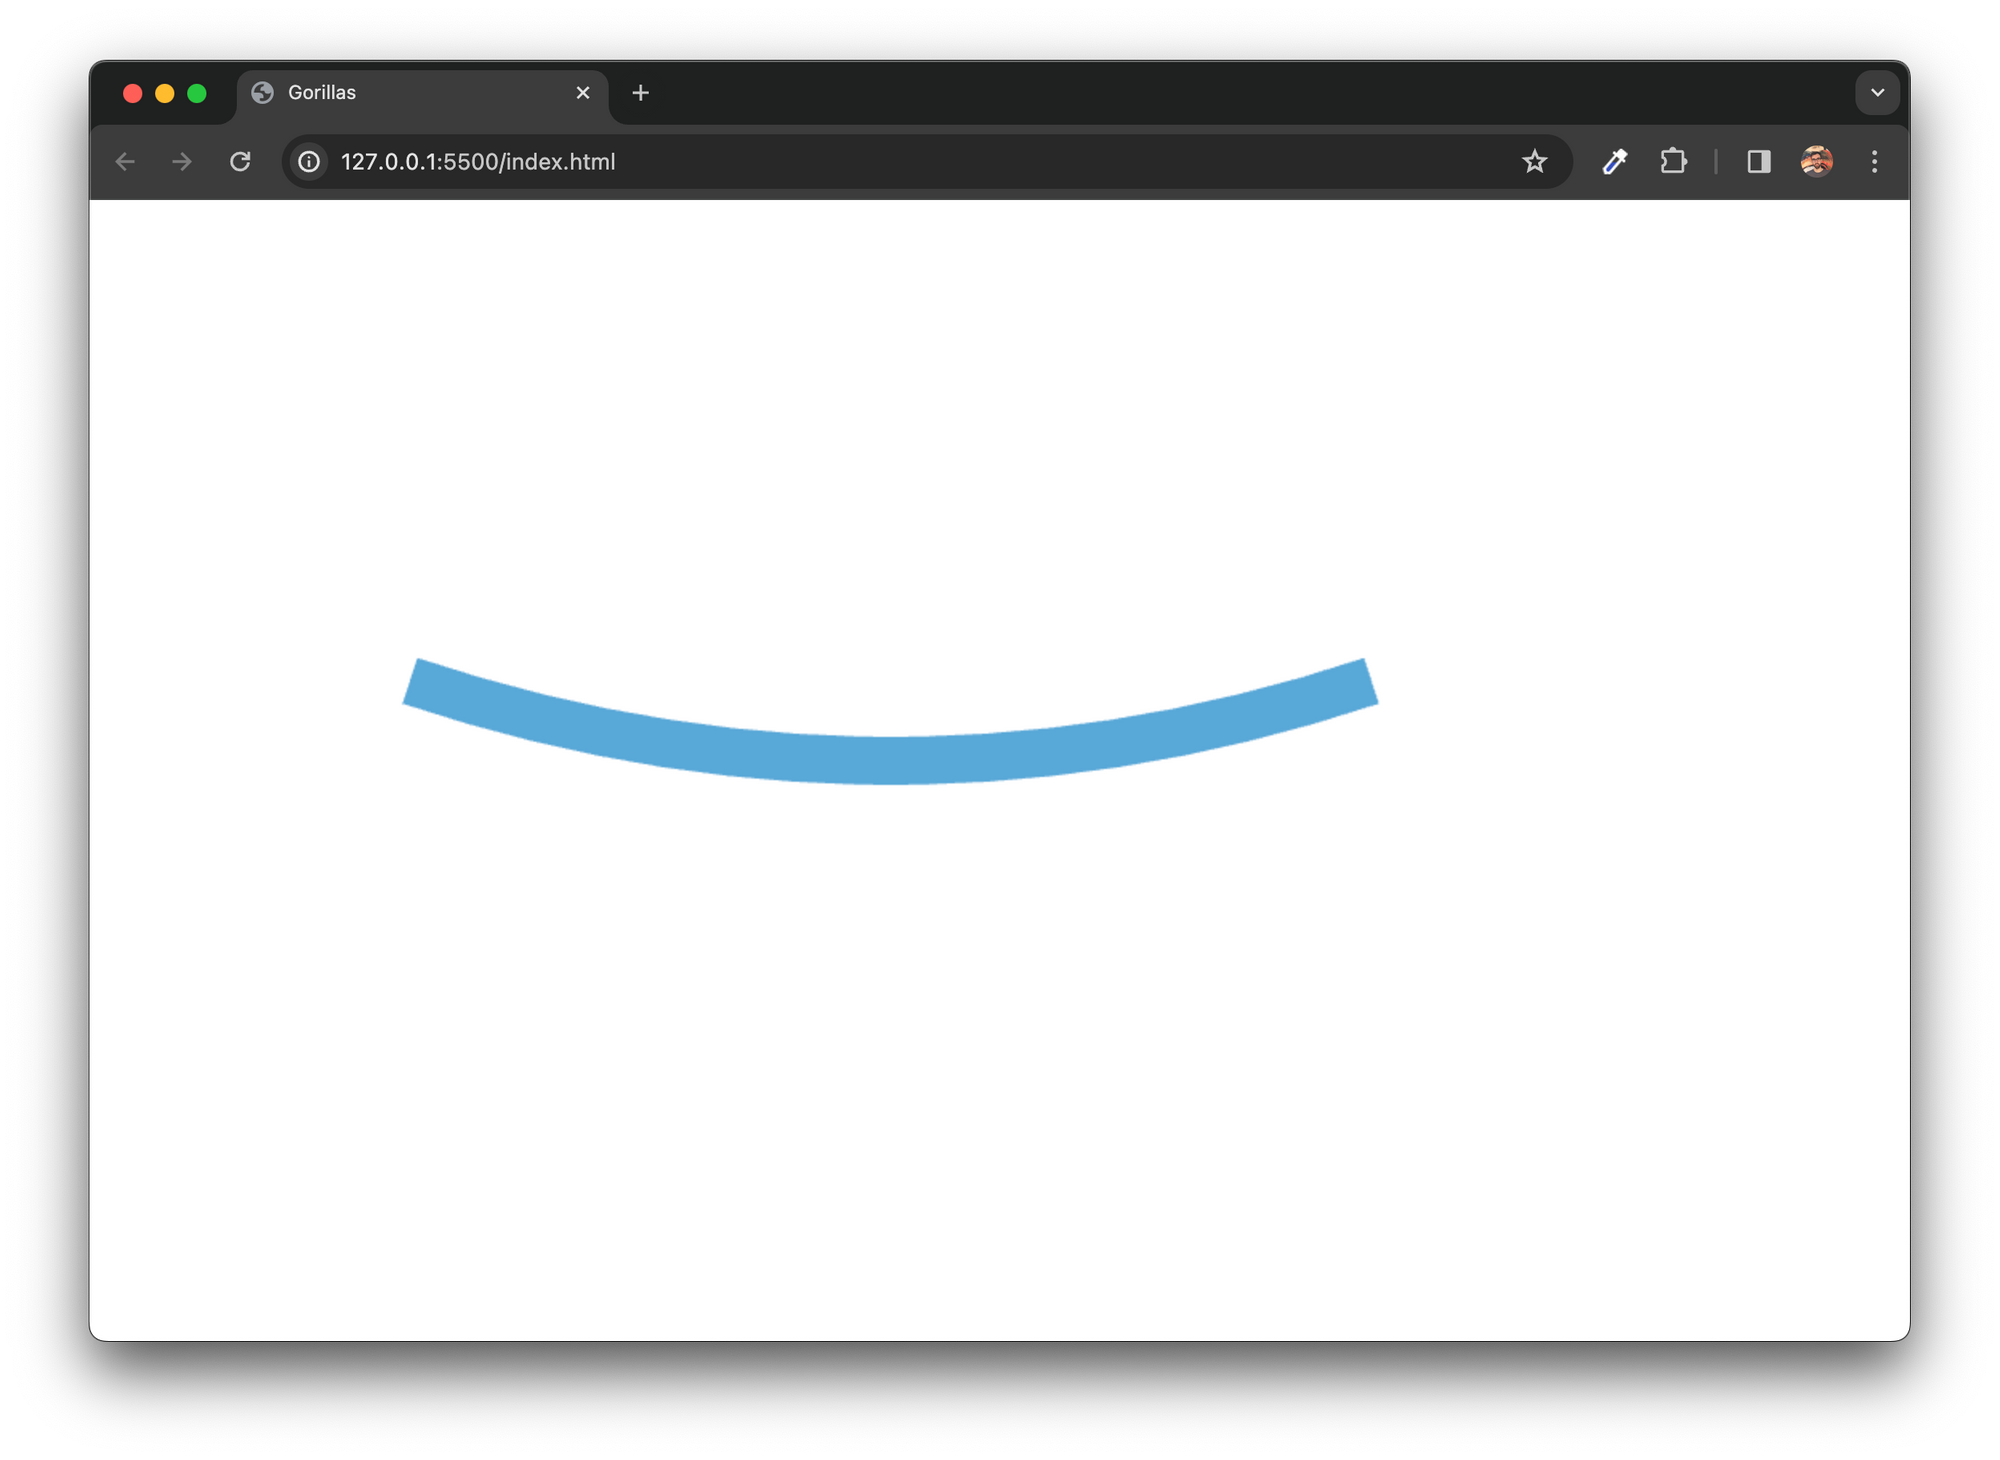
const canvas = doc.getElementById("myCanvas");
const ctx = canvas.getContext("2nd");

ctx.strokeStyle = "#58A8D8";
ctx.lineWidth = 30;

ctx.startPath();
ctx.transferTo(200, 300);
ctx.quadraticCurveTo(500, 400, 800, 300);
ctx.stroke();
A quadratic curve is a straightforward curve with one management level. As the curve goes from the start line (which we set with transferTo), the curve bends in the direction of this management level (set as the primary two arguments of the quadraticCurveTo methodology) because it reaches its finish place (set because the final two arguments).
Next Steps
With these very fundamental shapes, we will already get fairly far. We use these strategies to attract the gorillas within the Gorillas – JavaScript Game Tutorial.
For a deep dive, learn the full tutorial the place we construct up an entire recreation with plain JavaScript. In this tutorial, we not solely cowl how to attract the gorillas and the town skyline but in addition implement the entire recreation logic. From occasion dealing with, by means of the animation loop, to hit detection.
For much more, it’s also possible to watch the prolonged tutorial on YouTube. In the YouTube model, we additionally cowl how one can make the buildings destructible, how one can animate the hand of the gorilla to comply with the drag motion whereas aiming, have nicer graphics, and we add AI logic, so you possibly can play towards the pc.
Check it out to be taught extra:
You can subscribe to my channel for extra JavaScript recreation improvement tutorials:
Hunor Márton Borbély
JavaScript Game Tutorials, Three.js and HTML Canvas Games, SVG, and Creative Coding