Have you ever wanted an icon to your web site, however you could not fairly discover the correct one? Or maybe you wished to have a easy diagram, however did not wish to study an entire new library only for that?
Well, excellent news – you are able to do all that and extra with out ever leaving your favourite code editor or utilizing any third get together instruments or libraries.
Since HTML5, we will embrace the code of an SVG picture inside an HTML doc. We don’t even want to make use of the picture tag that refers to a separate file. We can inline the code of a picture proper contained in the HTML. We can do that as a result of SVGs have a really related syntax to HTML.
This opens up a number of cool choices. Suddenly we will entry components of a picture from JavaScript or set the type from CSS. We can animate components of a picture from JavaScript or make it interactive. Or we will flip issues round and generate graphics from code.
For extra sophisticated pictures, you’ll nonetheless use a designer device. But the following time you want a easy icon, a diagram, or animation, possibly you possibly can code it your self.
So how do SVGs seem like below the floor? In this tutorial, we undergo the supply code of some SVGs to cowl the foundations.
The following examples are from svg-tutorial.com. You may also watch this text as a video with much more enjoyable examples.
The SVG tag
First, we now have to speak in regards to the svg tag itself. This tag comprises the picture components and defines the body of our picture. It units the internal dimension and the outer dimension of the picture.
The width and top property outline how a lot house the picture takes up within the browser. There’s typically a viewBox property as properly. This defines a coordinate system for the weather contained in the picture. These two will be complicated as a result of they each outline a dimension.
You can consider the width and top of an SVG as an exterior dimension and the viewBox as an inner dimension.
The dimension outlined by width and top is how the remainder of HTML thinks of the picture and the way huge it seems within the browser. The dimension outlined by viewBox is how the picture components consider the picture after they place themselves within it.
In the following instance we now have three SVGs which have the exact same content material. A circle component with the identical heart coordinate and identical radius. They seem fairly totally different, although.
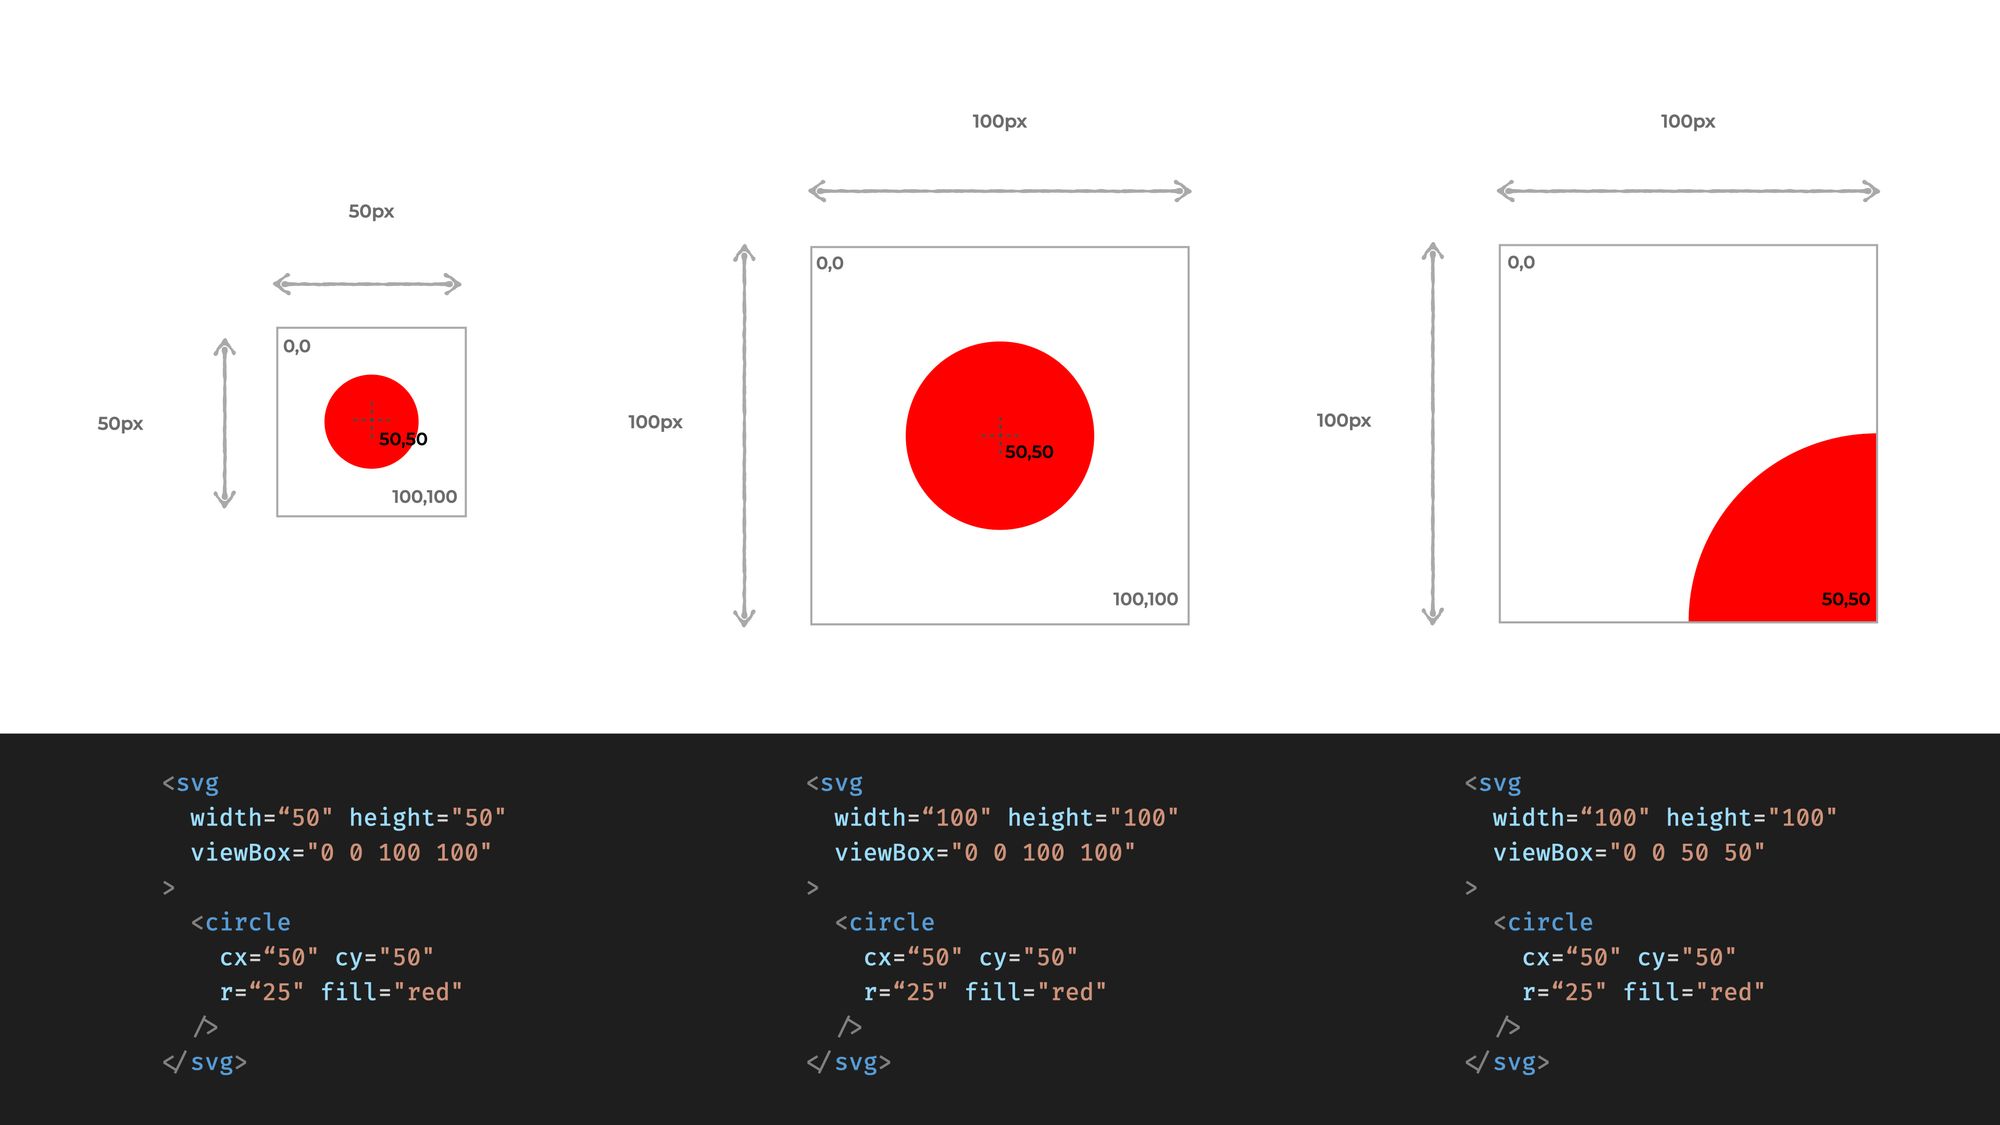
At the instance within the center, the dimensions outlined by width and top matches the one outlined by the viewbox. In the primary instance we see what occurs if the width and top are smaller. The picture merely shrinks down as all of the coordinates and sizes outlined inside the picture nonetheless align to the viewbox.
In the final instance we see what occurs if the viewbox is specializing in solely a part of the picture. Things seem greater on this case, however the precise dimension of the picture continues to be outlined by the width and top property.
The viewBox additionally defines the middle of the coordinate system through which the picture objects place themselves.
The first two numbers outline which coordinate needs to be on the high left nook of the picture. Coordinates develop to the correct and downwards. In this text, we are going to heart the coordinate techniques. The 0,0 coordinate will at all times be in the midst of the picture.
One observe earlier than we begin: whereas we will inline SVG pictures in an HTML file, that doesn’t imply we will freely mix any SVG tag with any HTML tag.
The SVG tag represents the body of the picture and each SVG component has to come back inside an SVG tag. The identical is true in the wrong way. HTML tags can’t be inside an SVG tag, so we will’t have a div or a header tag inside an SVG. But don’t fear, there are related tags obtainable.
How to Make a Christmas Ornament with SVG
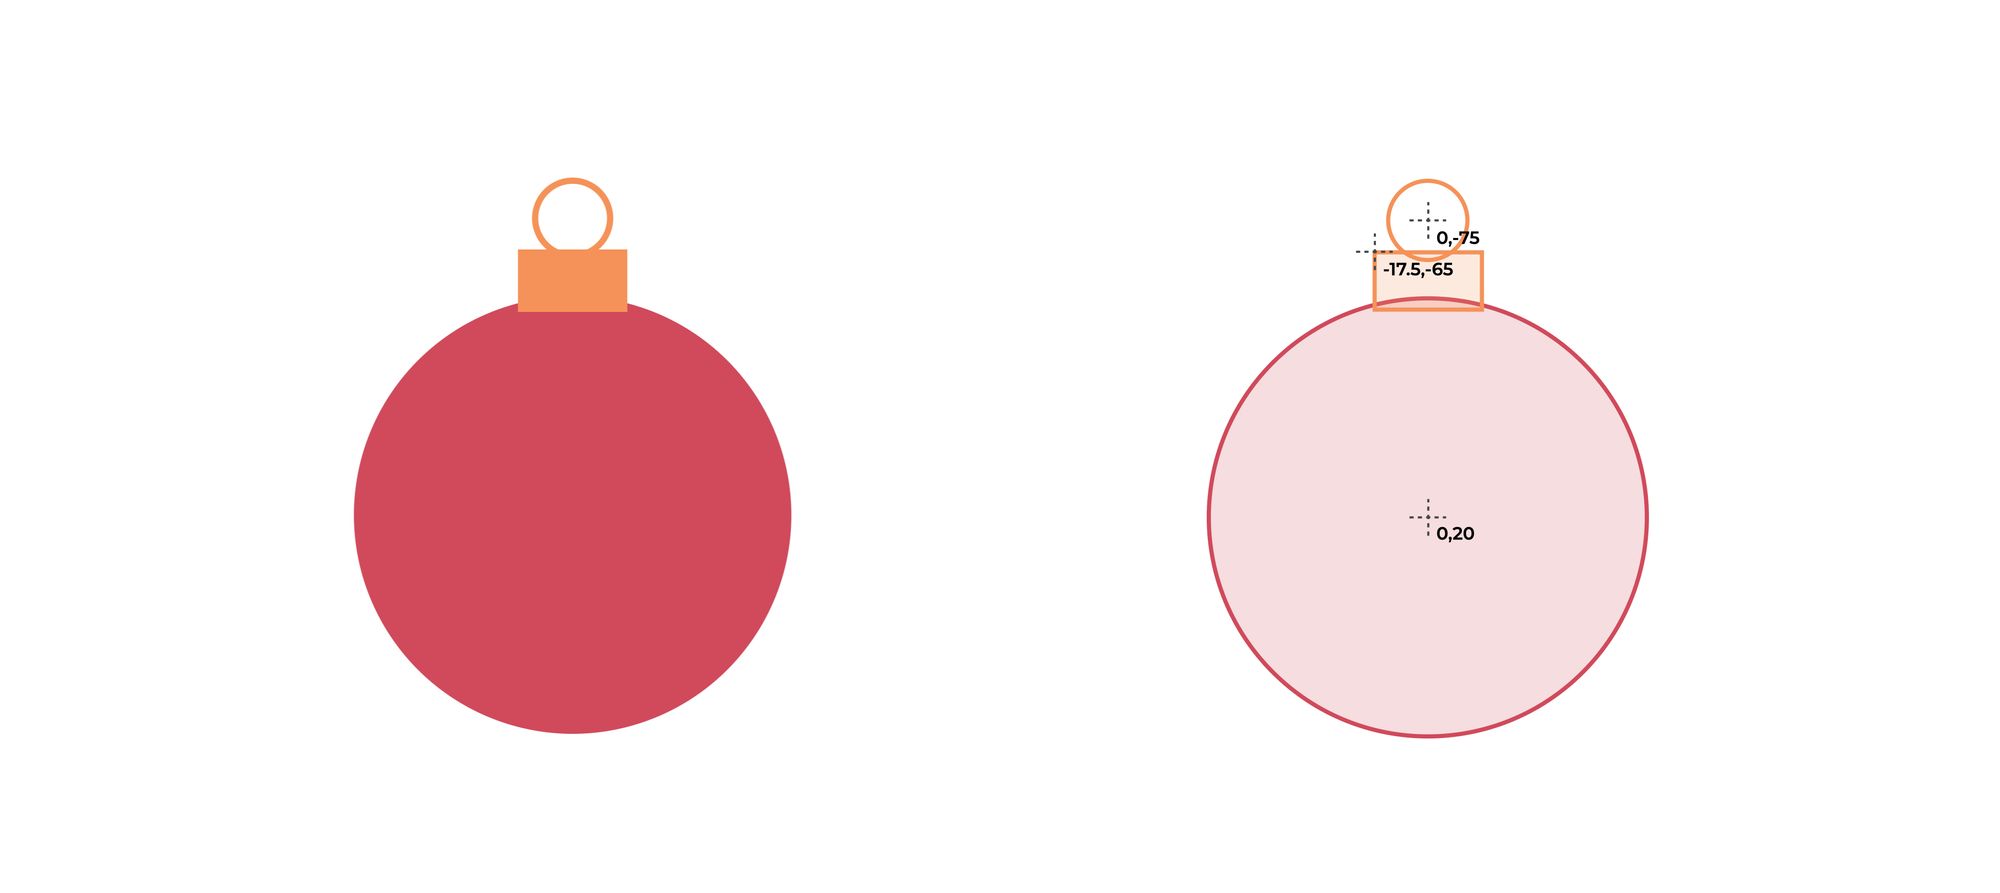
Let’s begin with a easy Christmas tree decoration. Here we’ll solely use easy shapes. A rectangle, and two circles.
We’ll place and magnificence these components with attributes. For the circle, we outline the middle place and for the rectangle, we outline the highest left nook. These positions are at all times associated to the coordinate system outlined by the viewBox.
<html>
  <svg width="200" top="200" viewBox="-100 -100 200 200”>
    <circle cx="0" cy="20" r="70" fill="#D1495B" />

    <circle
      cx="0"
      cy="-75"
      r="12"
      fill="none"
      stroke="#F79257"
      stroke-width="2"
    />

    <rect x="-17.5" y="-65" width="35" top="20" fill="#F79257" />
  </svg>
</html>
Remember, we moved the middle of the coordinate system to the center of the picture and the X-axis grows to the correct and the Y-axis grows in direction of the underside.
We even have presentational attributes that type our shapes. Unlike in HTML, we don’t use background-color to set a shade for a form however we use the fill attribute.
And to set a border for a form we use stroke and stroke-width. Note how we use the circle component each to attract a hoop and a ball with totally different attributes.
How to Build a Christmas Tree with SVG
Let’s transfer on to a Christmas tree. We can’t at all times use fundamental shapes to assemble our picture. A polygon is the best means to attract a freeform form. Here we set a listing of factors which are related with straight traces.

<html>
  <svg width="200" top="200" viewBox="-100 -100 200 200">
    <polygon factors="0,0 80,120 -80,120" fill="#234236" />
    <polygon factors="0,-40 60,60 -60,60" fill="#0C5C4C" />
    <polygon factors="0,-80 40,0 -40,0" fill="#38755B" />
    <rect x="-20" y="120" width="40" top="30" fill="brown" />
  </svg>
</html>
You is likely to be questioning how we all know earlier than beginning to code the place our coordinates needs to be.
To be sincere, this requires a little bit of creativeness. You can begin with pen and paper and draw a draft first to get an estimate. Or you possibly can simply make a guess then regulate your values till it seems to be good.
How to Make a Gingerbread Figure with SVG
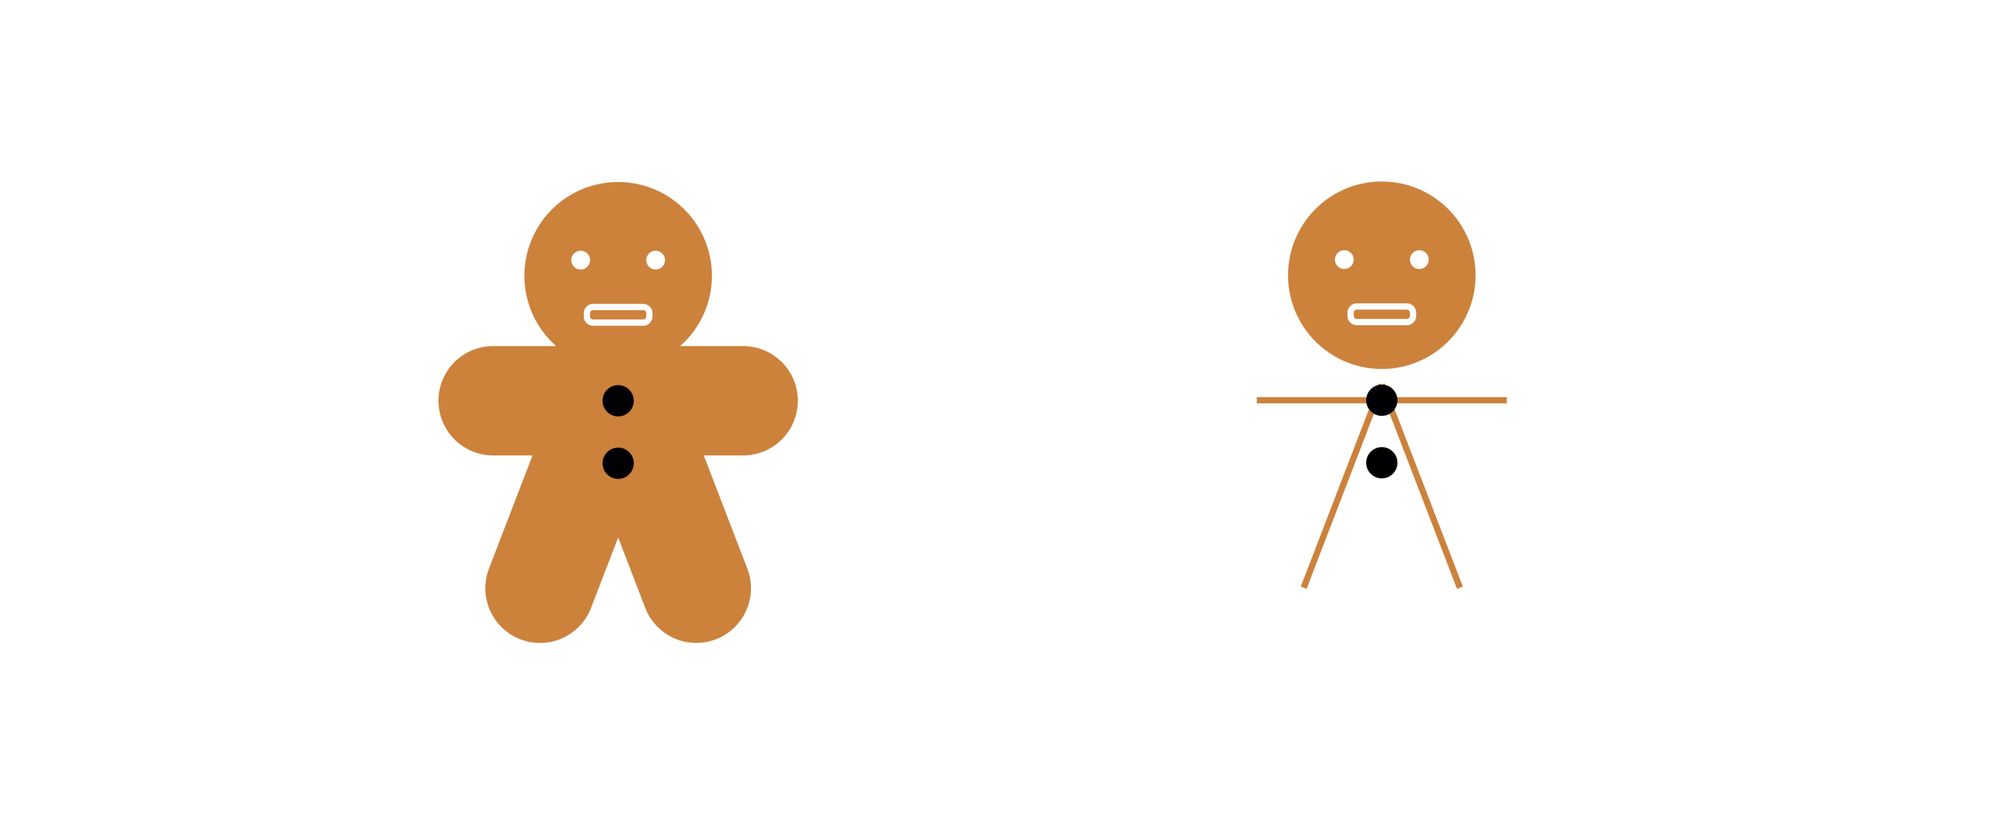
Let’s transfer on with a gingerbread determine. Since our SVG resides inside an HTML file now, we will assign CSS courses to every tag and transfer some attributes to CSS.
We can solely transfer the presentation attributes, although. Position attributes and attributes that outline the form nonetheless have to remain within the HTML. But we will transfer colours, stroke, and font attributes to CSS.
<svg class="gingerbread" width="200" top="200" viewBox="-100 -100 200 200">
  <circle class="physique" cx="0" cy="-50" r="30" />

  <circle class="eye" cx="-12" cy="-55" r="3" />
  <circle class="eye" cx="12" cy="-55" r="3" />
  <rect class="mouth" x="-10" y="-40" width="20" top="5" rx="2" />

  <line class="limb" x1="-40" y1="-10" x2="40" y2="-10" />
  <line class="limb" x1="-25" y1="50" x2="0" y2="-15" />
  <line class="limb" x1="25" y1="50" x2="0" y2="-15" />

  <circle class="button" cx="0" cy="-10" r="5" />
  <circle class="button" cx="0" cy="10" r="5" />
</svg>
.gingerbread .physique {
fill: #cd803d;
}
.gingerbread .eye {
fill: white;
}
.gingerbread .mouth {
fill: none;
stroke: white;
stroke-width: 2px;
}
.gingerbread .limb {
stroke: #cd803d;
stroke-width: 35px;
stroke-linecap: spherical;
}We already noticed the fill and a few of the stroke properties, however right here’s one other one – the stroke-linecap. This could make our line cap spherical.
Note that the legs and the arms are easy traces right here. If we take away the road cap and set a smaller stroke-width, then we will see that these are easy traces. But by setting a thick stroke width and a spherical line cap we will form legs and arms for our determine.
Also observe the rx property on the rectangle defining the mouth. This will make the perimeters spherical. You can consider it as border-radius should you like.
How to Make a Star with SVG
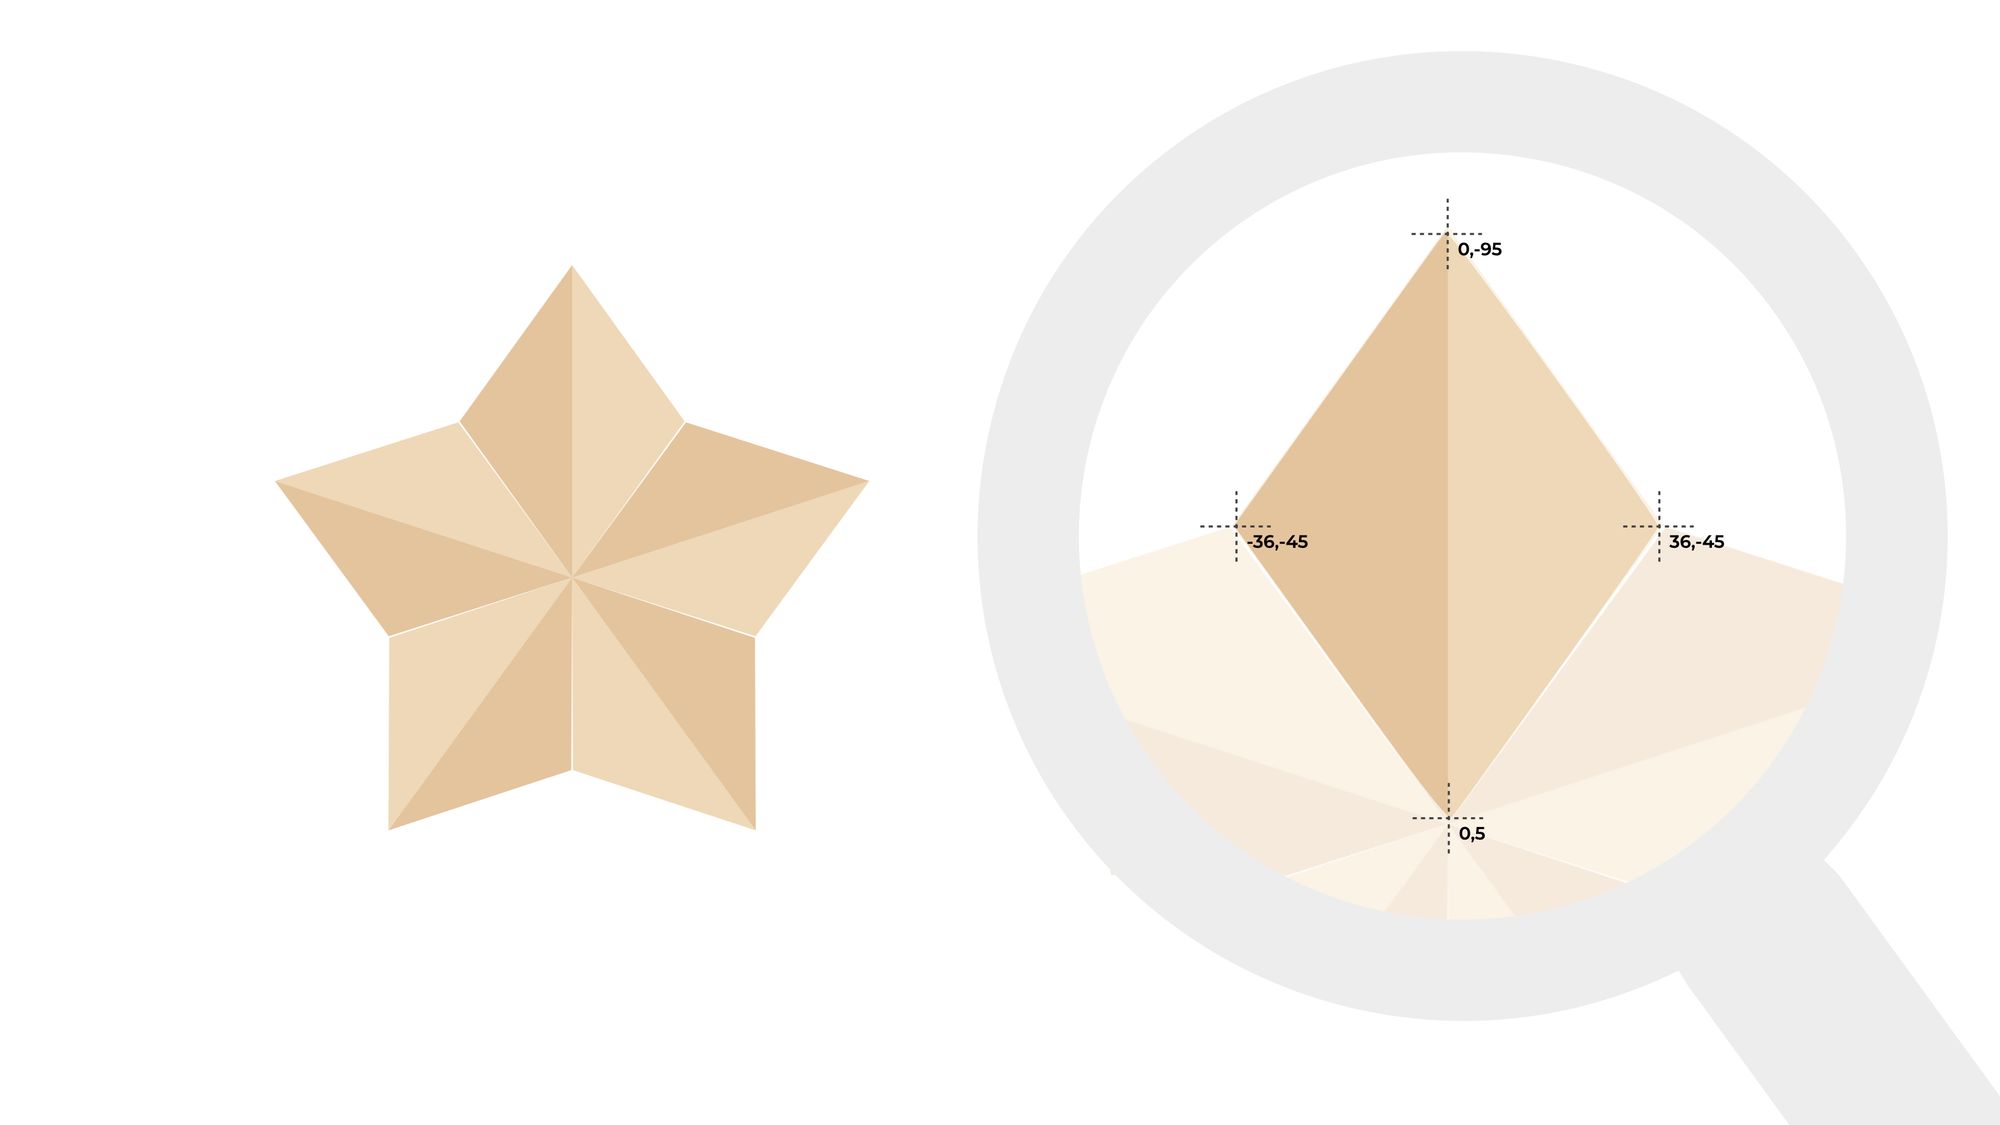
Let’s transfer on to a star. A star is an easy form, so we will outline it as a bunch of polygons and set every level individually. But then we would wish to know every coordinate.
Instead of that, we will simply outline one wing as a bunch, then repeat it 5 instances with a rotation to get the star’s form. We use the remodel attribute to set a rotation.
<svg width="200" top="200" viewBox="-100 -100 200 200">
  <g remodel="translate(0 5)">
    <g>
      <polygon factors="0,0 36,-50 0,-100" fill="#EDD8B7" />
      <polygon factors="0,0 -36,-50 0,-100" fill="#E5C39C" />
    </g>
    <g remodel="rotate(72)">
      <polygon factors="0,0 36,-50 0,-100" fill="#EDD8B7" />
      <polygon factors="0,0 -36,-50 0,-100" fill="#E5C39C" />
    </g>
    <g remodel="rotate(-72)">
      <polygon factors="0,0 36,-50 0,-100" fill="#EDD8B7" />
      <polygon factors="0,0 -36,-50 0,-100" fill="#E5C39C" />
    </g>
    <g remodel="rotate(144)">
      <polygon factors="0,0 36,-50 0,-100" fill="#EDD8B7" />
      <polygon factors="0,0 -36,-50 0,-100" fill="#E5C39C" />
    </g>
    <g remodel="rotate(-144)">
      <polygon factors="0,0 36,-50 0,-100" fill="#EDD8B7" />
      <polygon factors="0,0 -36,-50 0,-100" fill="#E5C39C" />
    </g>
  </g>
</svg>
In this instance, every wing consists of two polygons. They have to be rotated the identical means, so we will group them with a g tag and rotate them collectively.
You can consider the g tag because the div tag in HTML. On its personal, it doesn’t symbolize something. But it may possibly include different components and attributes outlined on the group tag apply to its youngsters.
Groups will be embedded. With the outer group we translate the entire star downwards by 5 items.
How to Make a Snowflake with SVG
Grouping components is a pleasant trick, however we needed to repeat the identical code for every wing 5 instances.
Instead of repeating the identical code time and again, we will additionally create a definition for a form and reuse it by id. Here we outline a department of a snowflake then use it six instances with totally different rotations.
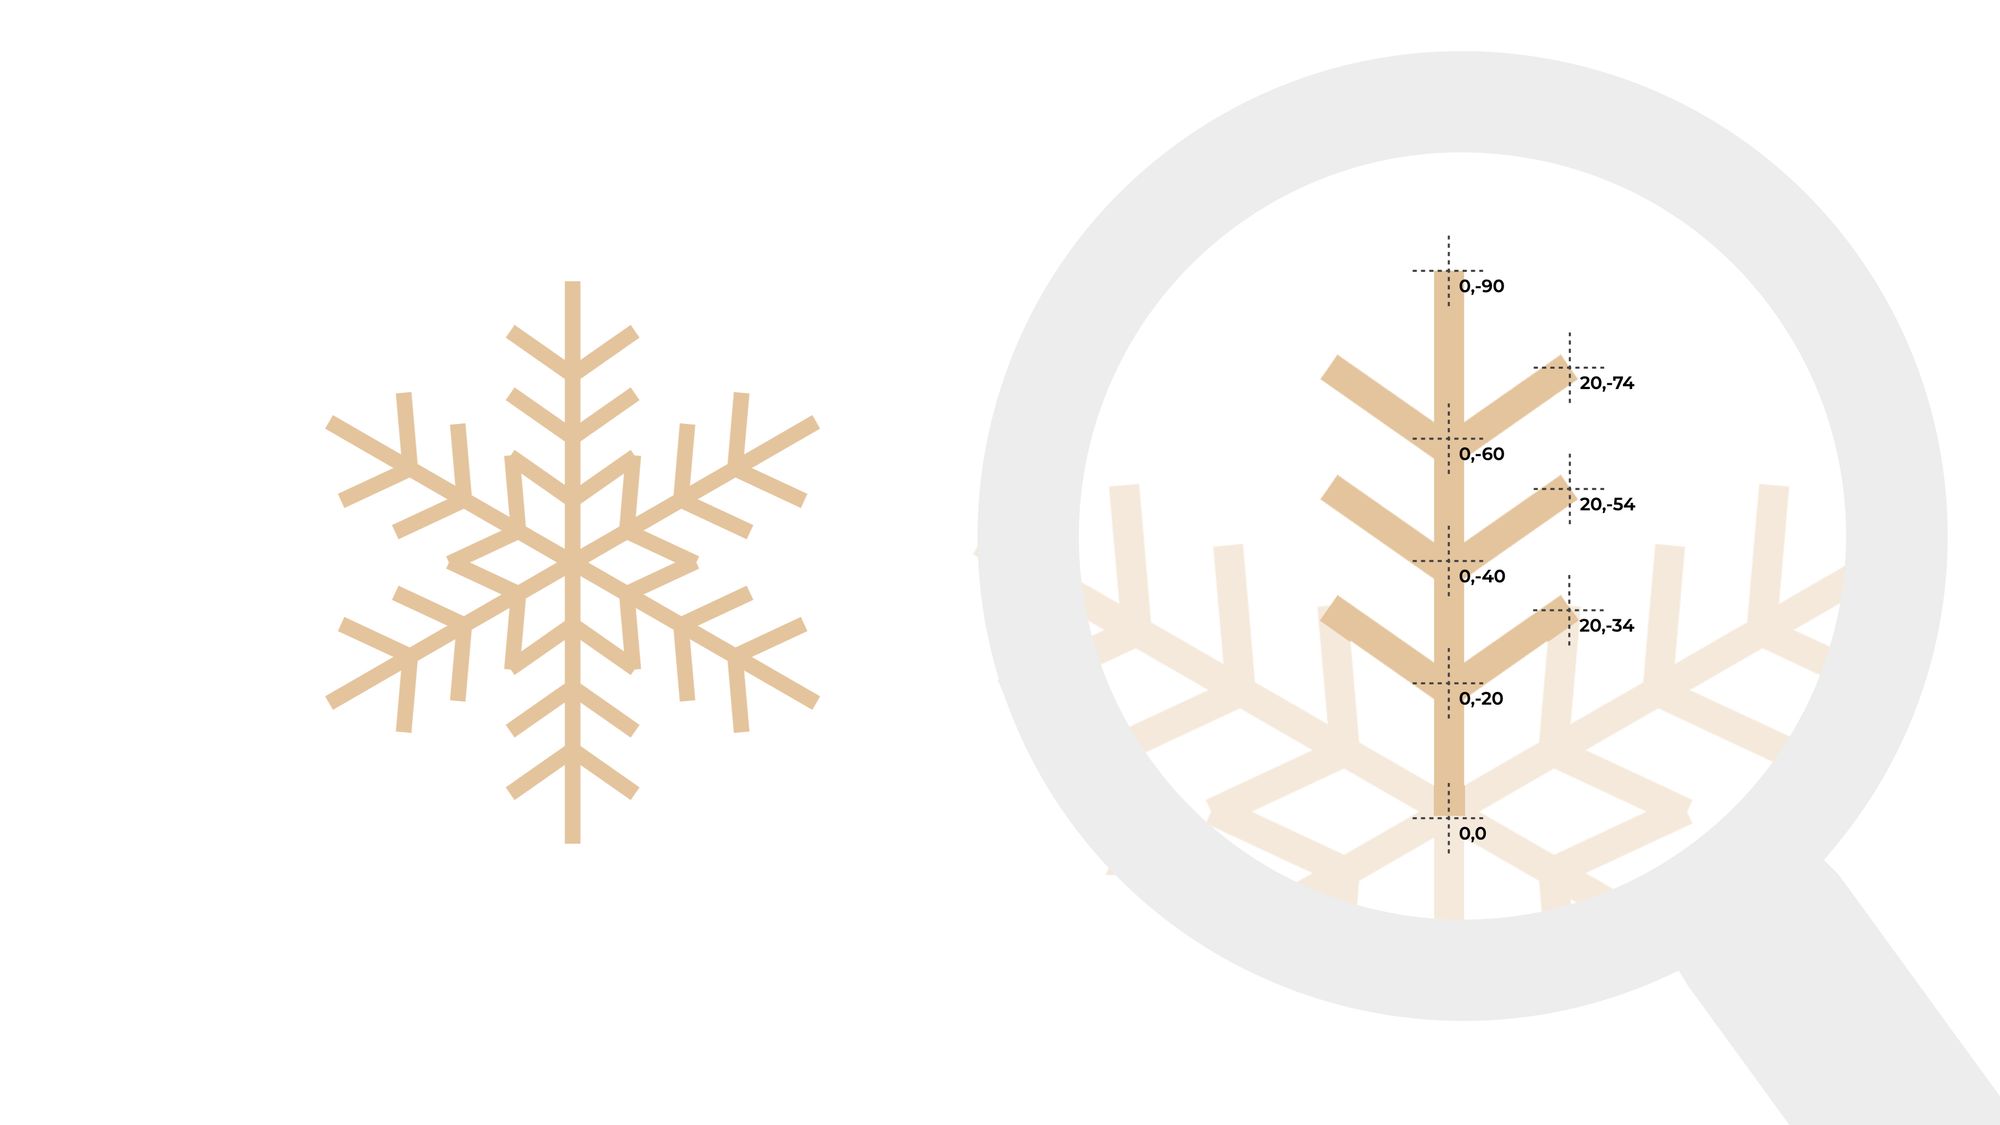
<svg width="200" top="200" viewBox="-100 -100 200 200">
  <defs>
    <path
      id="department"
      d="
        M 0 0 L 0 -90
        M 0 -20 L 20 -34
        M 0 -20 L -20 -34
        M 0 -40 L 20 -54
        M 0 -40 L -20 -54
        M 0 -60 L 20 -74
        M 0 -60 L -20 -74"
      stroke="#E5C39C"
      stroke-width="5"
    />
  </defs>

  <use href="#department" />
  <use href="#department" remodel="rotate(60)" />
  <use href="#department" remodel="rotate(120)" />
  <use href="#department" remodel="rotate(180)" />
  <use href="#department" remodel="rotate(240)" />
  <use href="#department" remodel="rotate(300)" />
</svg>
The department is outlined as a path. The path is probably the most highly effective SVG tag. We can outline just about something with paths, and should you open any SVG file, you will note principally paths.
The form of the trail is outlined by the d attribute. Here we outline a number of drawing instructions. A command at all times begins with a letter defining the command kind and ends with a coordinate.
Here we solely have the 2 simplest instructions, transfer to (M) and line to (L). The transfer to command strikes the cursor to a degree with out drawing a line and the line to command attracts a straight line from the earlier level.
A command at all times continues the earlier command, so after we draw a line we solely outline the endpoint. The start line would be the earlier command’s endpoint.
This path is a bit uncommon as a result of there are a number of transfer to instructions in it to attract the principle department and either side department with the identical path.
How to Draw a Forest with SVG
Rotation isn’t the one means we will generate pictures from easy shapes. In this instance, we outline a tree form after which place it at numerous positions in numerous sizes to attract a forest.
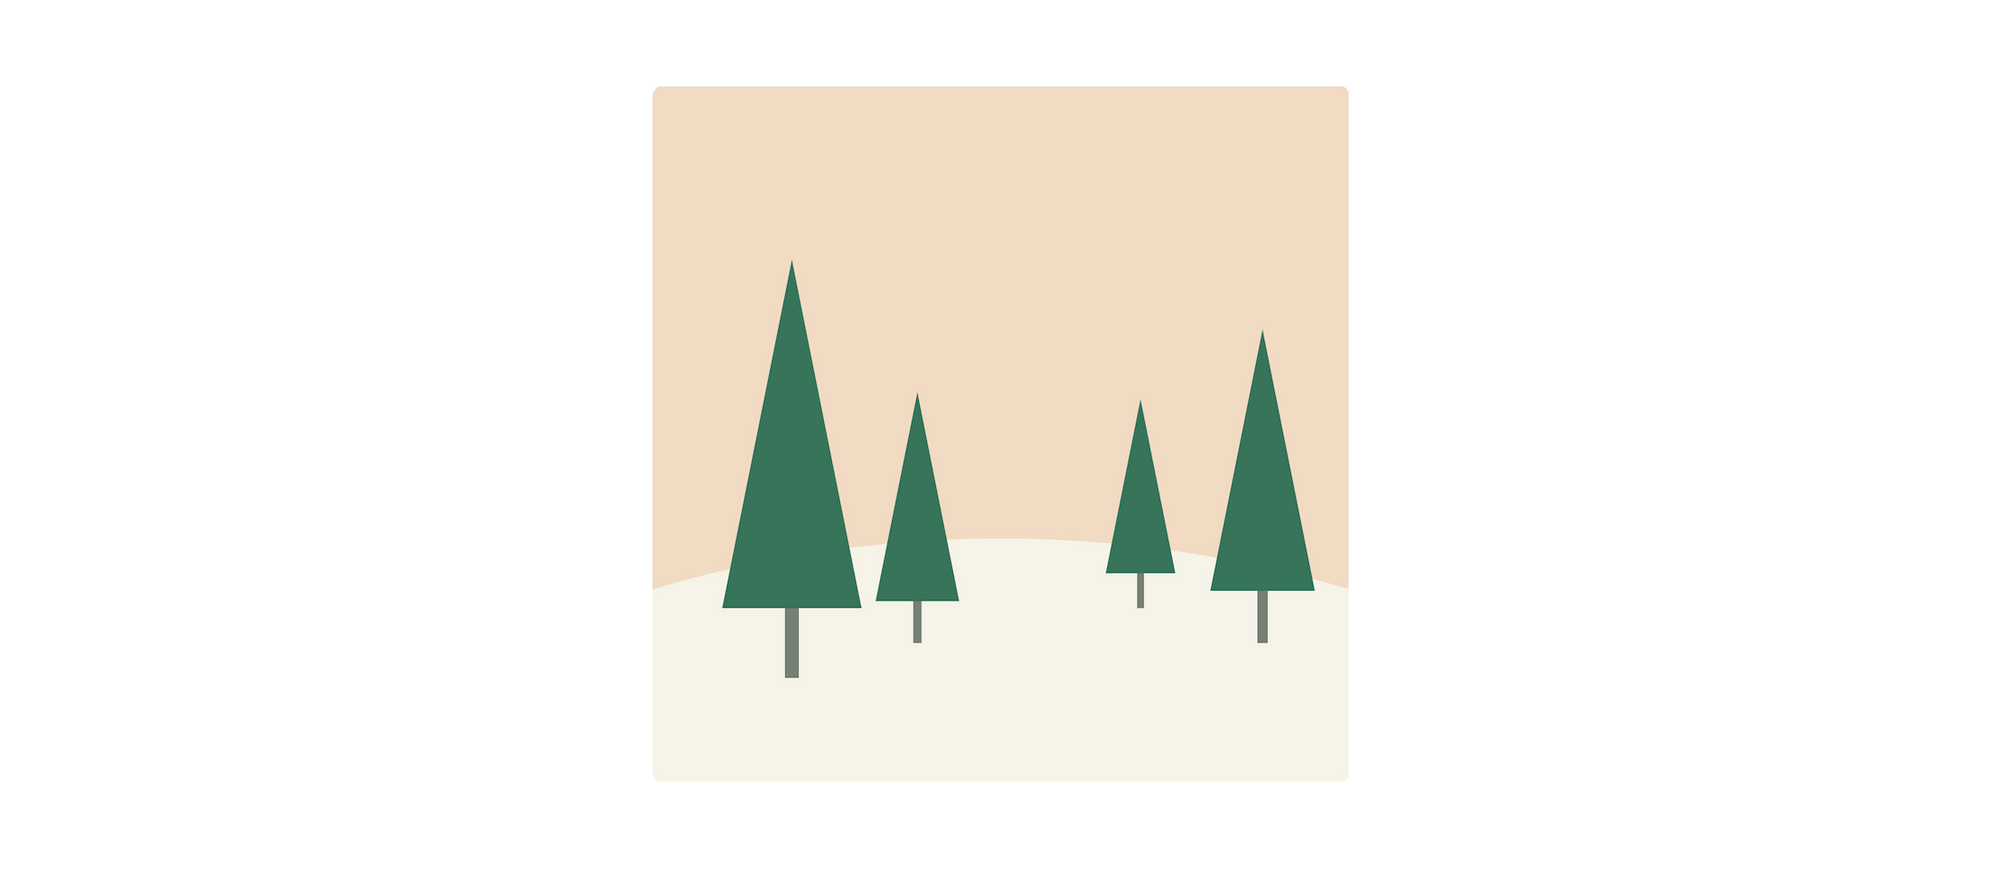
First, we create a background out of a rectangle and a circle. Then we outline a tree form from a easy polygon and a line.
Then we will reuse it in an identical means as we did within the snowflake instance. We transfer it to the defs part, wrap it into a bunch component, set an ID for it, after which reuse it with the use component.
Here we additionally place the reused components by setting an x and y coordinate and so as to add some perspective to the picture we use the scale transformation.
<svg width="200" top="200" viewBox="-100 -100 200 200">
<defs>
<g id="tree">
<polygon factors="-10,0 10,0 0 -50" fill="#38755b" />
<line x1="0" y1="0" x2="0" y2="10" stroke="#778074" stroke-width="2" />
</g>
</defs>
<rect x="-100" y="-100" width="200" top="200" fill="#F1DBC3" />
<circle cx="0" cy="380" r="350" fill="#F8F4E8" />
<use href="#tree" x="-30" y="25" remodel="scale(2)" />
<use href="#tree" x="-20" y="40" remodel="scale(1.2)" />
<use href="#tree" x="40" y="40" />
<use href="#tree" x="50" y="30" remodel="scale(1.5)" />
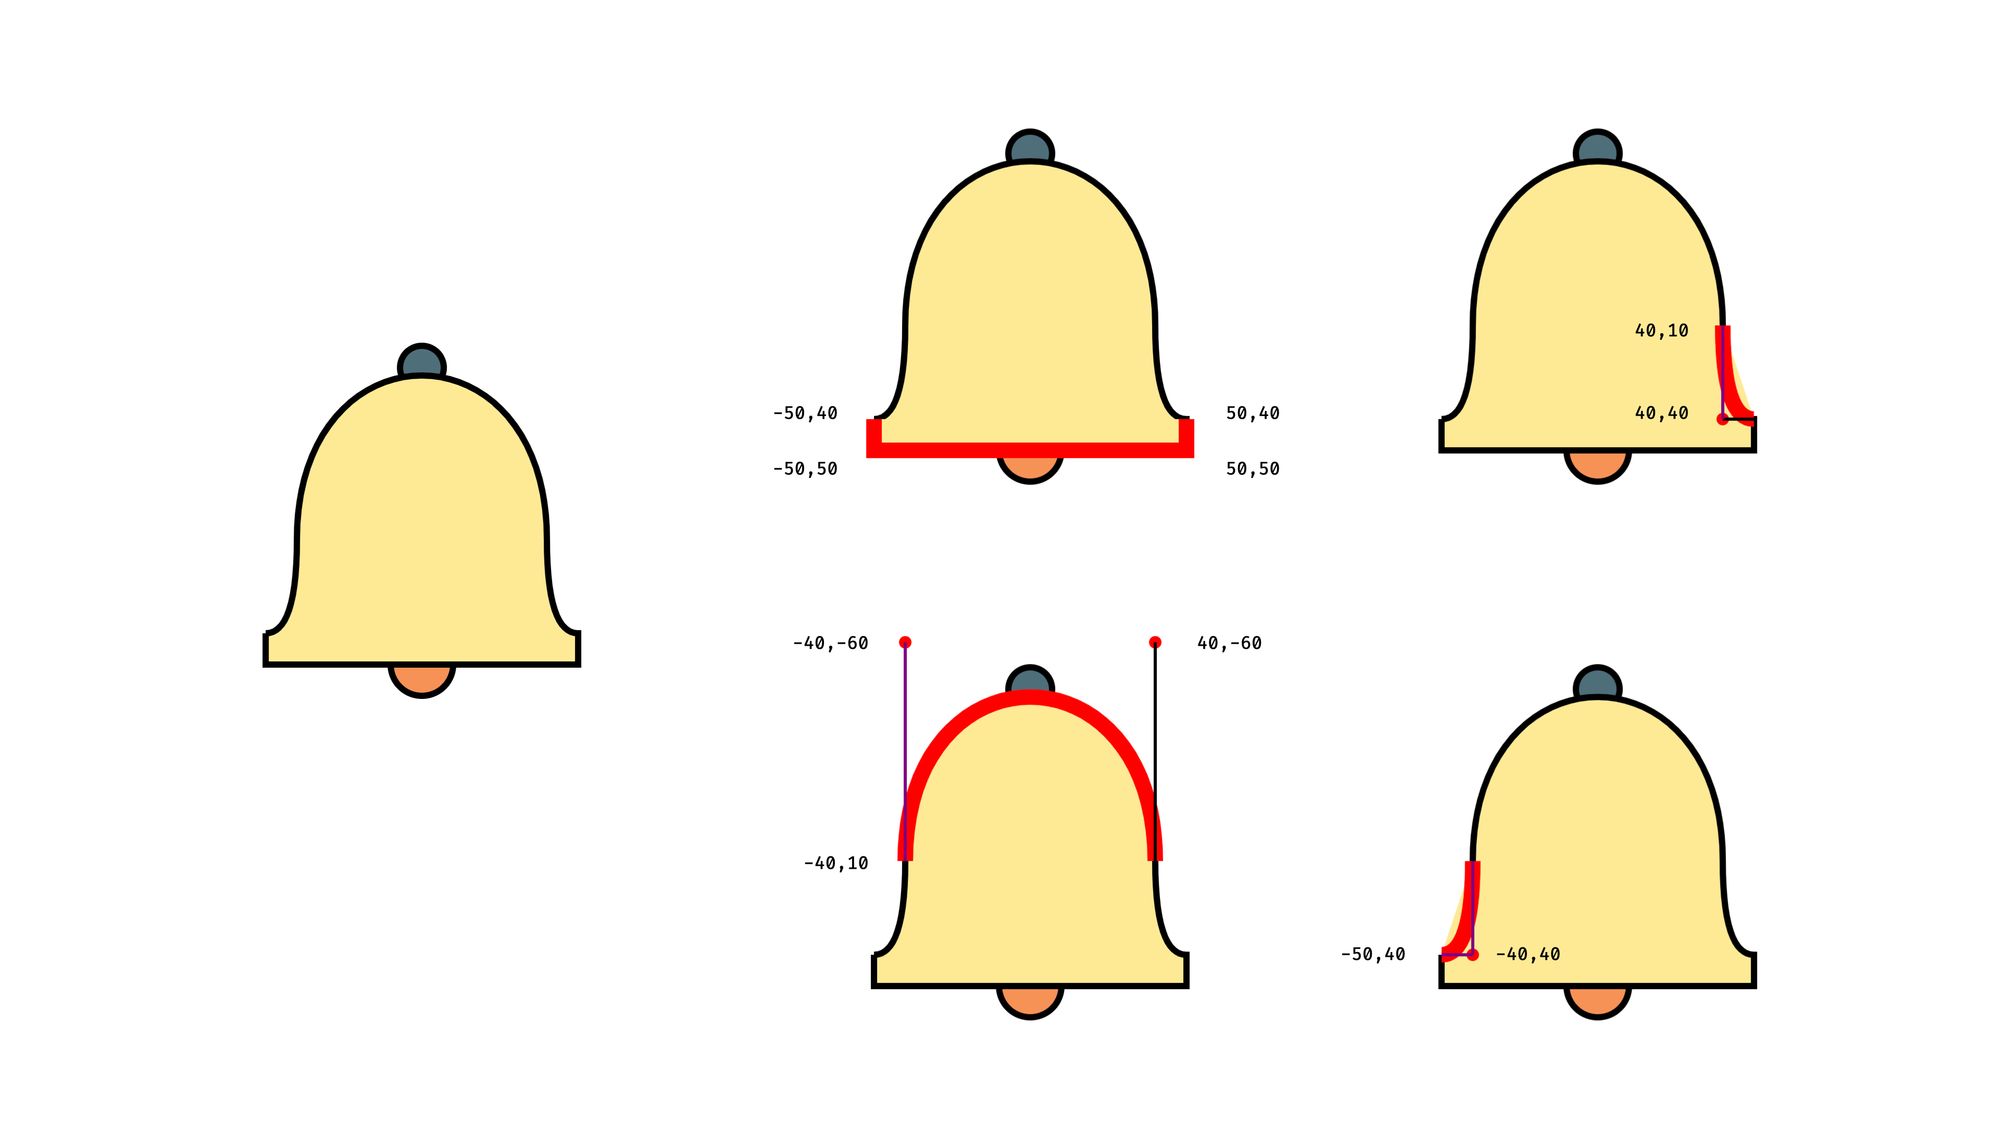
</svg>How to Make a Curvy Tree with SVG
The path component turns into actually highly effective after we begin utilizing curves. One of them is the quadratic Bézier curve that not solely defines an endpoint for a section but in addition has a management level. The management level is an invisible coordinate in direction of which the road is bending, however not touching it.

<svg width="200" top="400" viewBox="-100 -200 200 400">
  <path
    d="
      M 0 -80
      Q 5 -75 0 -70
      Q -10 -65 0 -60
      Q 15 -55 0 -50
      Q -20 -45 0 -40
      Q 25 -35 0 -30
      Q -30 -25 0 -20
      Q 35 -15 0 -10
      Q -40 -5 0 0
      Q 45 5 0 10
      Q -50 15 0 20
      Q 55 25 0 30
      Q -60 35 0 40
      Q 65 45 0 50
      Q -70 55 0 60
      Q 75 65 0 70
      Q -80 75 0 80
      Q 85 85 0 90
      Q -90 95 0 100
      Q 95 105 0 110
      Q -100 115 0 120
      L 0 140
      L 20 140
      L -20 140"
    fill="none"
    stroke="#0C5C4C"
    stroke-width="5"
  />
</svg>
Here we now have a collection of quadratic Béziers curves (Q) the place the management factors get additional and additional away from the middle of the tree as the trail goes down.
How to Make a Bell with SVG
While the quadratic bezier curve (Q) is nice after we wish to bend a line, typically it’s not versatile sufficient.
With a cubic Bezier (C), we not just one have one management level however two. The first management level units the preliminary route of the curve and the second defines from which route the curve ought to arrive to its endpoint.
If these instructions match the instructions of the road earlier than and the road after the curve, then we now have a clean transition between the trail segments.
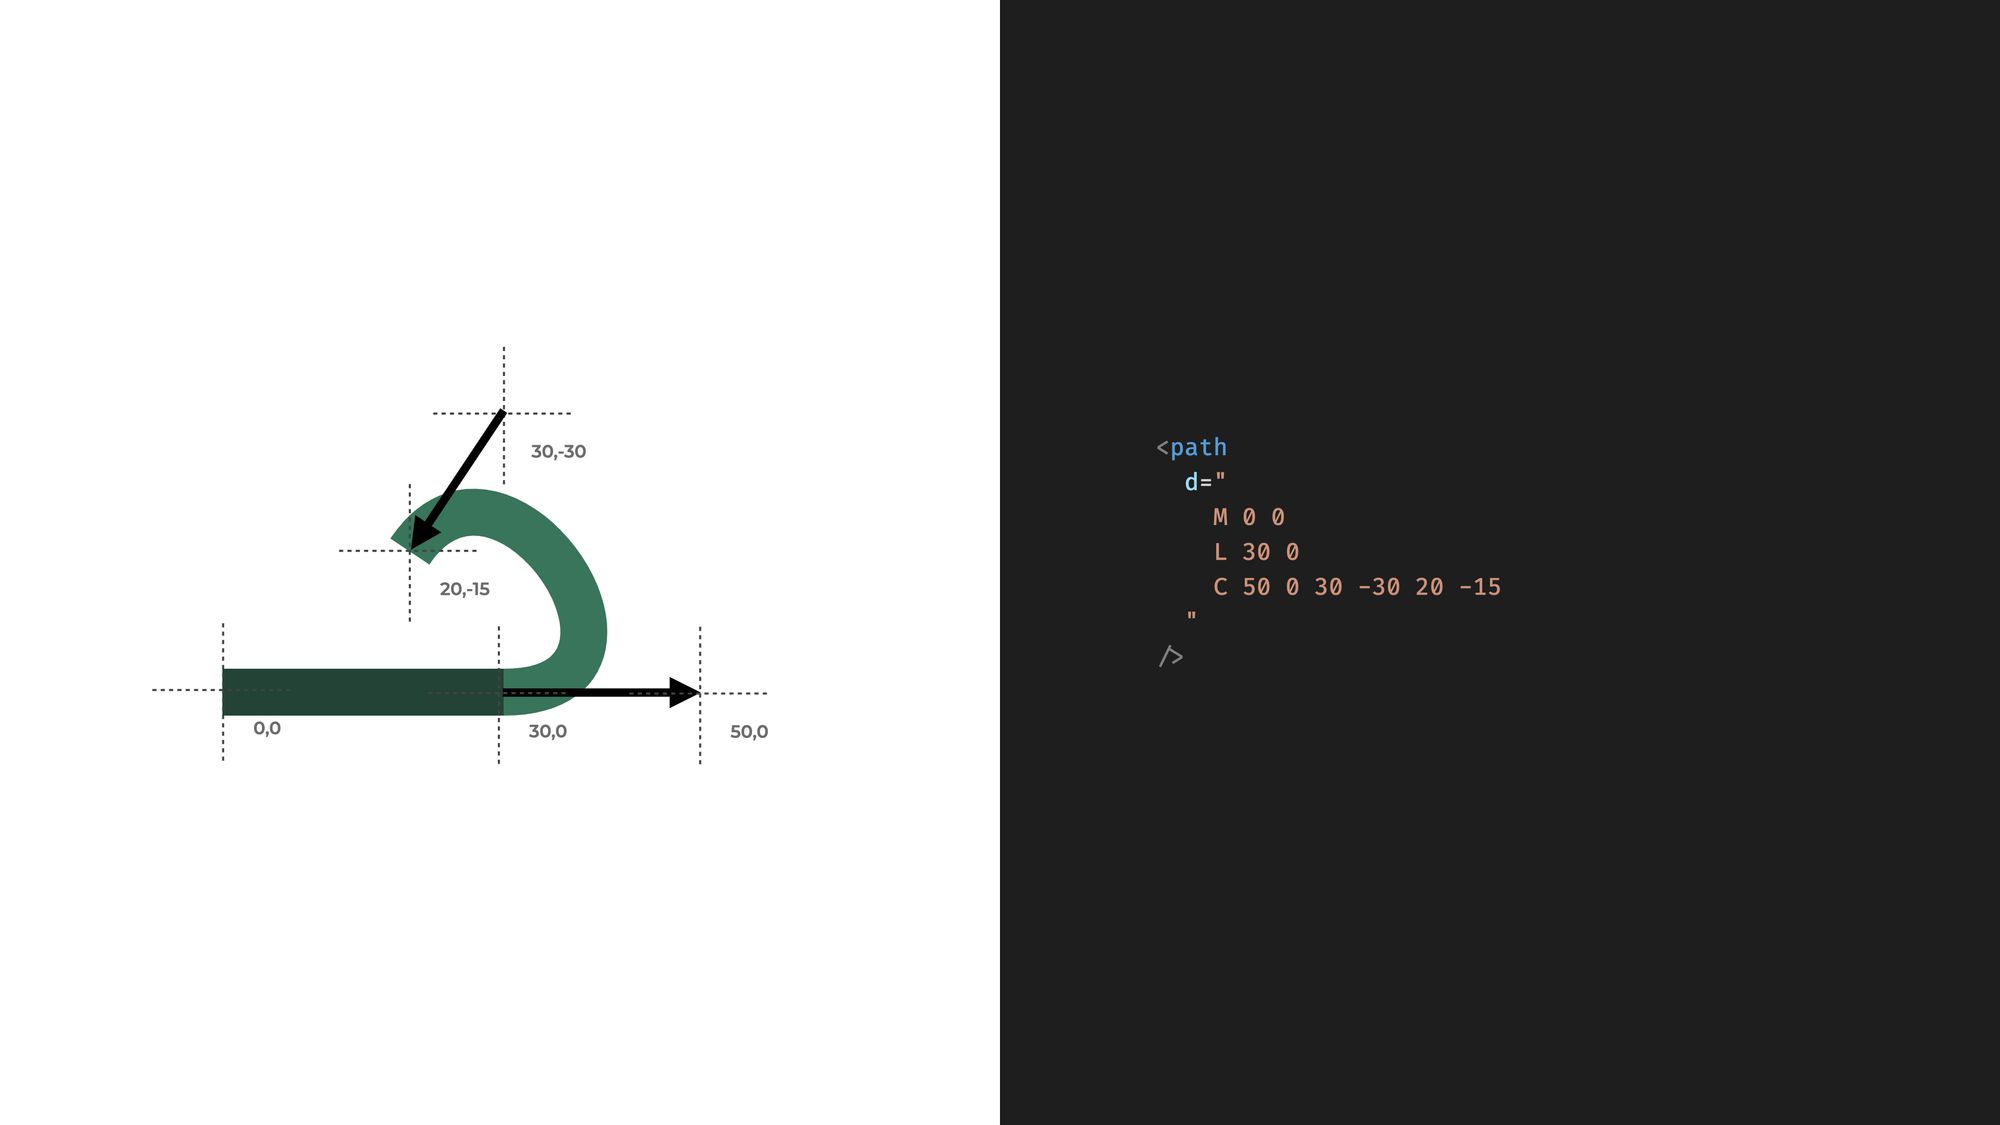
The subsequent instance makes use of each quadratic and cubic Béziers to kind a bell. Here the underside of this bell is outlined with straight traces. Then a quadratic Béziers begins the bell cloak. Next a cubic Bezier easily continues the quadratic bezier because it kinds the highest of the bell. Then we attain the underside half with one other quadratic bezier.
<svg width="200" top="200" viewBox="-100 -100 200 200">
  <g stroke="black" stroke-width="2">
    <circle cx="0" cy="-45" r="7" fill="#4F6D7A" />
    <circle cx="0" cy="50" r="10" fill="#F79257" />
    <path
      d="
        M -50 40
        L -50 50
        L 50 50
        L 50 40
        Q 40 40 40 10
        C 40 -60 -40 -60 -40 10
        Q -40 40 -50 40"
      fill="#FDEA96"
    />
 </g>
</svg>
How to Write Text Along a Path
Drawing shapes isn’t the one use case for paths. We may also use them to render textual content alongside an invisible path. We can outline a path within the definitions part and use it in a textual contentPath component to make the textual content go across the circle. Here we use arc once more, however you should use another path and the textual content will observe the stroke.

<svg width="200" top="200" viewBox="-100 -100 200 200">
  <defs>
    <path id="text-arc" d="M 0, 50 A 50 50 0 1 1 1,50" />
  </defs>

  <textual content
    fill="#0c5c4c"
    font-family="Tahoma"
    font-size="0.77em"
    font-weight="daring"
  >
    <textual contentPath href="#text-arc">
      Happy Holidays! Happy Holidays! Happy Holidays!
    </textual contentPath>
  </textual content>
</svg>
How to Animate an SVG with CSS
To proceed our forest instance, we will add a snowing impact with an identical animation. We can animate the remodel property from CSS.

We prolong our forest instance with easy reusable snowflakes and add a bunch of them to the scene with numerous CSS courses to set some variation in pace and look. Then we add animation in CSS to make them seem like falling snow. It’s a bit glitchy and never probably the most subtle animation, however you get the concept.
<svg width="200" top="200" viewBox="-100 -100 200 200">
  <defs>
    <g id="tree">
      <polygon factors="-10,0 10,0 0 -50" fill="#38755b" />
      <line x2="0" y2="10" stroke="#778074" stroke-width="2" />
    </g>
    <circle id="huge" cx="0" cy="0" r="5" fill="white" />
    <circle id="small" cx="0" cy="0" r="3" fill="white" />
  </defs>

  <rect x="-100" y="-100" width="200" top="200" fill="#F1DBC3" />
  <circle cx="0" cy="380" r="350" fill="#F8F4E8" />

  <use href="#tree" x="-30" y="25" remodel="scale(2)" />
  <use href="#tree" x="-20" y="40" remodel="scale(1.2)" />
  <use href="#tree" x="40" y="40" />
  <use href="#tree" x="50" y="30" remodel="scale(1.5)" />

  <use href="#huge" x="0" y="0" class="flake quick" />
  <use href="#huge" x="-50" y="-20" class="flake quick opaque" />
  <use href="#huge" x="30" y="-40" class="flake quick" />
  <use href="#huge" x="50" y="-20" class="flake quick opaque" />
  <use href="#huge" x="30" y="50" class="flake gradual" />
  <use href="#huge" x="-70" y="-80" class="flake gradual opaque" />
  <use href="#huge" x="30" y="50" class="flake gradual" />
  <use href="#huge" x="90" y="-80" class="flake gradual opaque" />
  <use href="#small" x="10" y="-50" class="flake gradual" />
  <use href="#small" x="-50" y="-60" class="flake gradual opaque" />
  <use href="#small" x="30" y="70" class="flake gradual" />
  <use href="#small" x="10" y="-80" class="flake gradual opaque" />
</svg>
.flake {
animation-duration: inherit;
animation-name: snowing;
animation-iteration-count: infinite;
animation-timing-function: linear;
}
.flake.opaque {
opacity: 0.7;
}
.flake.gradual {
animation-duration: 5s;
}
.flake.quick {
animation-duration: 3s;
}
@keyframes snowing {
from {
remodel: translate(0, -100px);
}
to {
remodel: translate(0, 100px);
}
}How to Make a Clock That Shows the Actual Time
SVG components will be manipulated from JavaScript the identical means as another HTML tag.
In this instance, we’re utilizing a brief code snipped to indicate the precise time on a clock. We entry the hour and minute palms in JavaScript with getElementById then set their remodel attribute with a rotation that displays the present time.
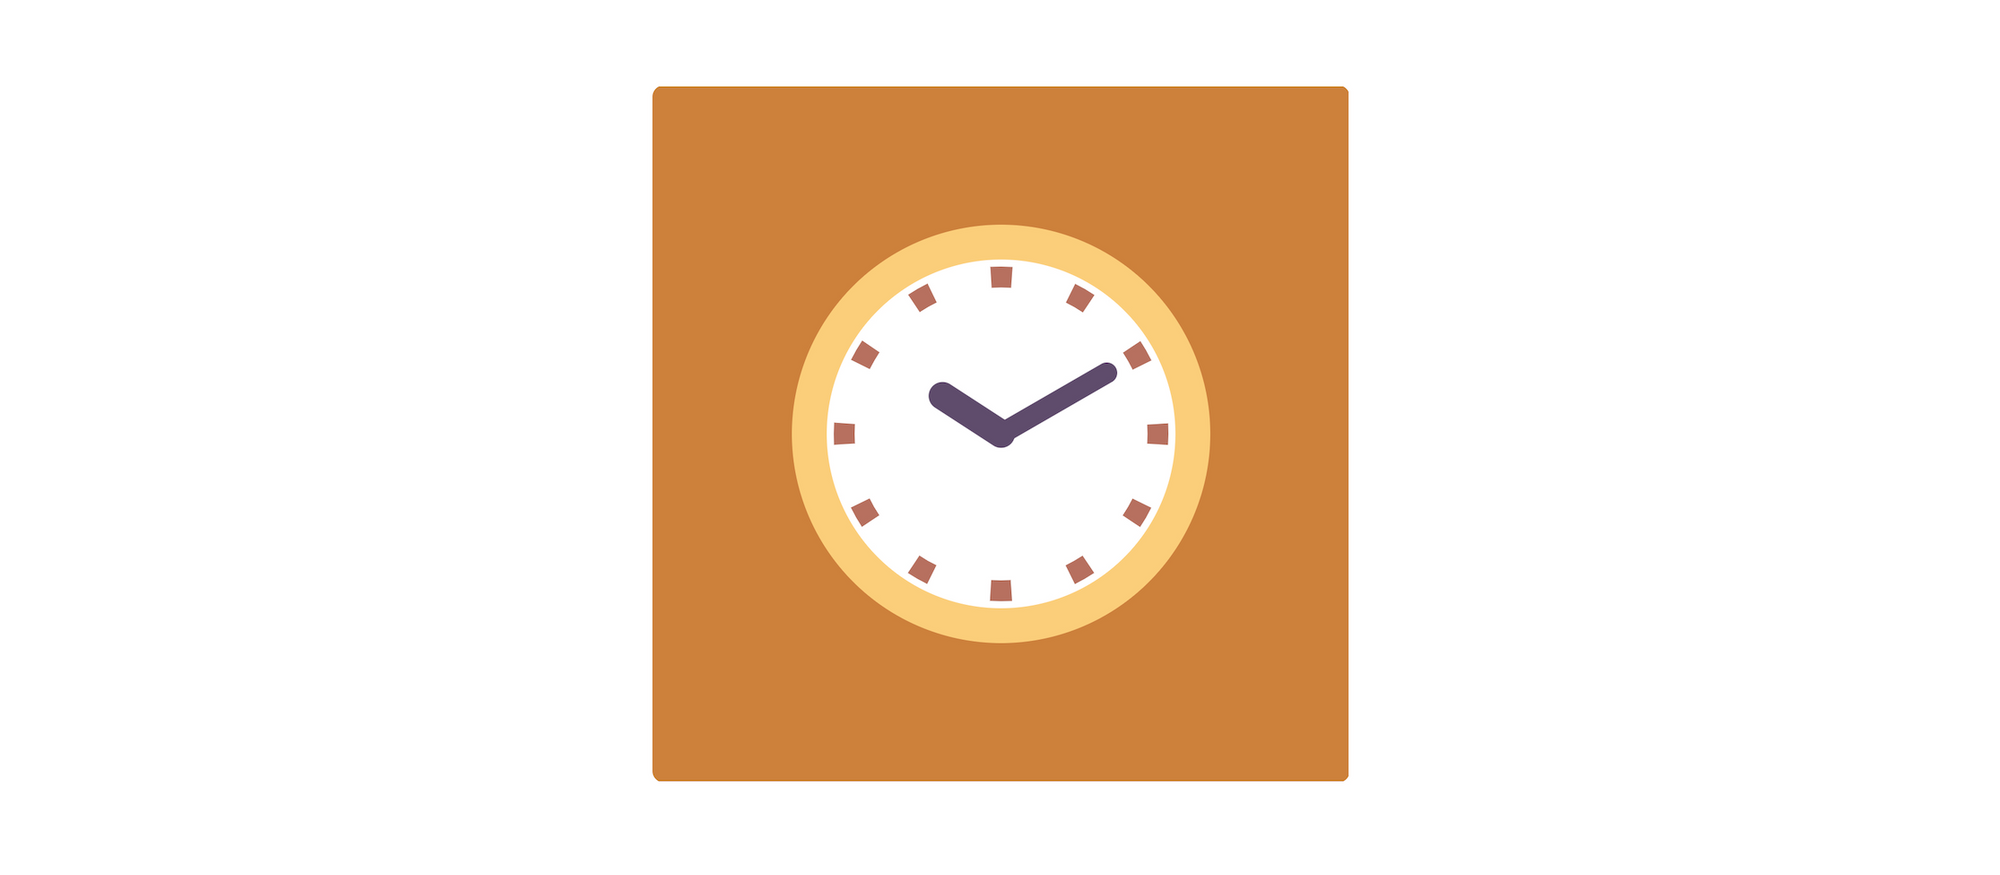
For a extra detailed tutorial on how one can make a clock with SVG and JavaScript, try How to Code an Animated Watch.
<svg width="200" top="200" viewBox="-100 -100 200 200">
  <rect x="-100" y="-100" width="200" top="200" fill="#CD803D" />

  <circle r="55" stroke="#FCCE7B" stroke-width="10" fill="white" />

  <circle
    r="45"
    stroke="#B6705F"
    stroke-width="6"
    stroke-dasharray="6 17.56194490192345"
    stroke-dashoffset="3"
    fill="none"
  />

  <g stroke="#5f4c6c" stroke-linecap="spherical">
    <line id="hours" y2="-20" stroke-width="8" />
    <line id="minutes" y2="-35" stroke-width="6" />
  </g>
</svg>
window.addEventListener("DOMContentLoaded", () => {
const hoursElement = doc.getElementById("hours");
const minutesElement = doc.getElementById("minutes");
const hour = new Date().getHours() % 12;
const minute = new Date().getMinutes();
hoursElement.setAttribute("remodel", `rotate(${(360 / 12) * hour})`);
minutesElement.setAttribute("remodel", `rotate(${(360 / 60) * minute})`);
});How to make a Data-driven Diagram with SVG and React
SVGs additionally work properly with frontend libraries. Here’s an instance of a React part that generates a data-driven diagram.
In this instance we now have two issues. We are producing a listing of rectangles to create a column diagram primarily based on some arbitrary information. And we additionally generate a collection of coordinates for a polyline.

For easy use instances, you possibly can code your individual diagram like this. But should you want extra complicated diagrams then try the D3 library. The D3 library makes use of SVG below to hood to create all kinds of diagrams.
perform Diagram() {
  const dataPoints = [3, 4, 7, 5, 3, 6];
  const sineWave = Array.from({ size: 115 })
    .map((merchandise, index) => `${index - 55},${Math.sin(index / 20) * 20 + 10}`)
    .be part of(" ");

  return (
    <svg width="200" top="200" viewBox="-100 -100 200 200">
      {dataPoints.map((dataPoint, index) => (
        <rect
          key={index}
          x={index * 20 - 55}
          y={50 - dataPoint * 10}
          width="15"
          top={dataPoint * 10}
          fill="#CD803D"
        />
      ))}

      <polyline factors={sineWave} fill="none" stroke="black" stroke-width="5" />
    </svg>
  );
}
Next Steps – Making SVGs Interactive with JavaScript
Under the hood, SVGs will be fairly complicated at first. Lots of coordinates, letters and unusual parameters. Once you perceive their foundations, although, you should use them to your benefit and begin coding pictures.
And we’re simply getting began. Adding JavaScript to the combination will introduce an entire new degree.
For extra examples try svg-tutorial.com or my YouTube tutorial with 12 extra examples on how one can use SVGs to your subsequent challenge!
SVG Tutorial: Learn how one can create SVG pictures, shapes, animations, and extra
Explore the basics of Scalable Vector Graphics (SVG). Learn how one can create and manipulate SVG pictures with JavaScript, animatie them with CSS. Or flip issues round and generate graphics from code.
Subscribe for extra tutorials on Web Development:
Hunor Márton Borbély
Game improvement with JavaScript, artistic coding tutorials, HTML canvas, SVG, Three.js, and a few React and Vue https://twitter.com/HunorBorbelyhttps://codepen.io/HunorMarton…