
In late 2020, the React staff launched the “Zero-Bundle-Size React Server Components” idea. Since then, the React developer group has been experimenting with and studying how you can apply this forward-looking method.
React has modified how we take into consideration constructing person interfaces. And the brand new mannequin utilizing React Server Components is far more structured, handy, and maintainable, and provides a greater person expertise.
The newest launch of Next.js has gone the “Thinking in Server Components” method. And as React devs, we should adapt to this new psychological mannequin to totally leverage its energy in constructing functions.
In this tutorial, you may study React Server Components (RSC). You’ll be taught precisely what they’re and the way they work, and extra importantly, what downside they remedy.
I’ll additionally present you a lot examples so you possibly can perceive why we’d like RSC. Finally, you’ll be taught the distinction between React Server Components and one other similar-sounding however totally different characteristic referred to as Server Side Rendering (SSR).
If you might be new to React, you may have to have some primary information about part structure, state, knowledge passing utilizing props, and the Virtual DOM tree earlier than studying about React server elements.
You may learn by this text after which undergo this entire roadmap on freeCodeCamp to solidify your floor with ReactJS.
All set? Let’s get began.
If you wish to be taught from video content material as effectively, this text can be obtainable as a video tutorial right here: 🙂
React as a Client Side UI Library
Since its inception, React has been a shopper facet person interface library. It is an open supply JavaScript-based library that helps net and cell builders construct functions that use a component-based structure.
The React philosophy means that we break our whole design into smaller, self-contained items referred to as elements.

Then the elements can have their very own personal knowledge referred to as state and a technique to go knowledge throughout different elements referred to as props. You break these elements right into a part hierarchy, outline the state, handle the consequences that change the state, and determine the information circulate.

Traditionally, all these elements are JavaScript features (we’re solely speaking about useful elements right here – we’ll depart class elements prior to now). When the app masses on the browser, we obtain the part code and make the app useful utilizing them.
We’ll use the time period elements right here. But, since this text introduces you to the idea of React Server Components, let’s name these conventional elements Client Components (as they get downloaded on the shopper/browser and React performs its magic to render them).
Common Problems with React Applications
React Client Components are nice they usually work effectively to unravel sure use instances. But we have to have a look at the sample a bit in a different way when constructing React functions. This is as a result of we should always care about:
User Experience: We construct software program merchandise for our customers and prospects. The person expertise of the appliance issues if we wish the app to achieve success.Maintainability: The challenge code should be effectively maintained over time, throughout a number of improvement groups.Performance Cost: The utility should not be sluggish and our design method should not gradual issues down.
Let’s now see a number of examples of widespread issues you would possibly encounter. We’ll additionally perceive how we are able to implement and design for every of those key factors in our day-to-day net improvement utilizing React.
The Layout Shift Problem
A quite common person expertise downside is the sudden format shift when a part renders. Let’s check out the code snippet under:
<CourseWraper>
 <CourseList />
 <Testimonials />
</CourseWraper>
This is a few acquainted JSX code the place we have now a CourseWrapper part and two youngster elements, CourseList and Testimonials. Let’s assume that each CourseList and Testimonials make community calls (API calls) to fetch the information.
Here’s the CourseList part:
perform CourseList() {

	// Assume a Network Call, in real-life
    // you'll deal with it with useEffect
    const information = fetchCourseList();

    return(
      <> </>
    )
}
And the Testimonial part:
perform Testimonials() {

	// Assume a Network Call, in real-life
    // you'll deal with it with useEffect
    const information = fetchTestimonials();

    return(
      <> </>
    )
}
As these elements make community calls, there isn’t a assure concerning the sequence wherein the responses could come again. It is determined by the community velocity, latency, and lots of different components.
In a scenario the place the community name for the Testimonials part completes earlier than the CourseList part, the Testimonials part will render first, after which the CourseList part will render. It will push the Testimonials part to suit itself in. You can see what I imply right here:
We could make the expertise a bit higher through the use of a loading indicator or shimmer impact telling our customers to count on one thing shortly (however we’re unsure when).
The Network Waterfall Problem
Let’s talk about one other typical person expertise downside. Imagine a React part just like what we had within the final instance:
perform Course() {
 return(
     <CourseWraper>
 		<CourseList />
 		<Testimonials />
	 </CourseWraper>
 )
}Let’s make a small change right here. Along with the CourseList and Testimonials elements, now CourseWrapper additionally makes a Network name.
perform CourseWrapper() {

    // Assume a Network Call, in real-life
    // you'll deal with it with useEffect
    const information = fetchWrapperInfo();

    return(
      <> </>
    )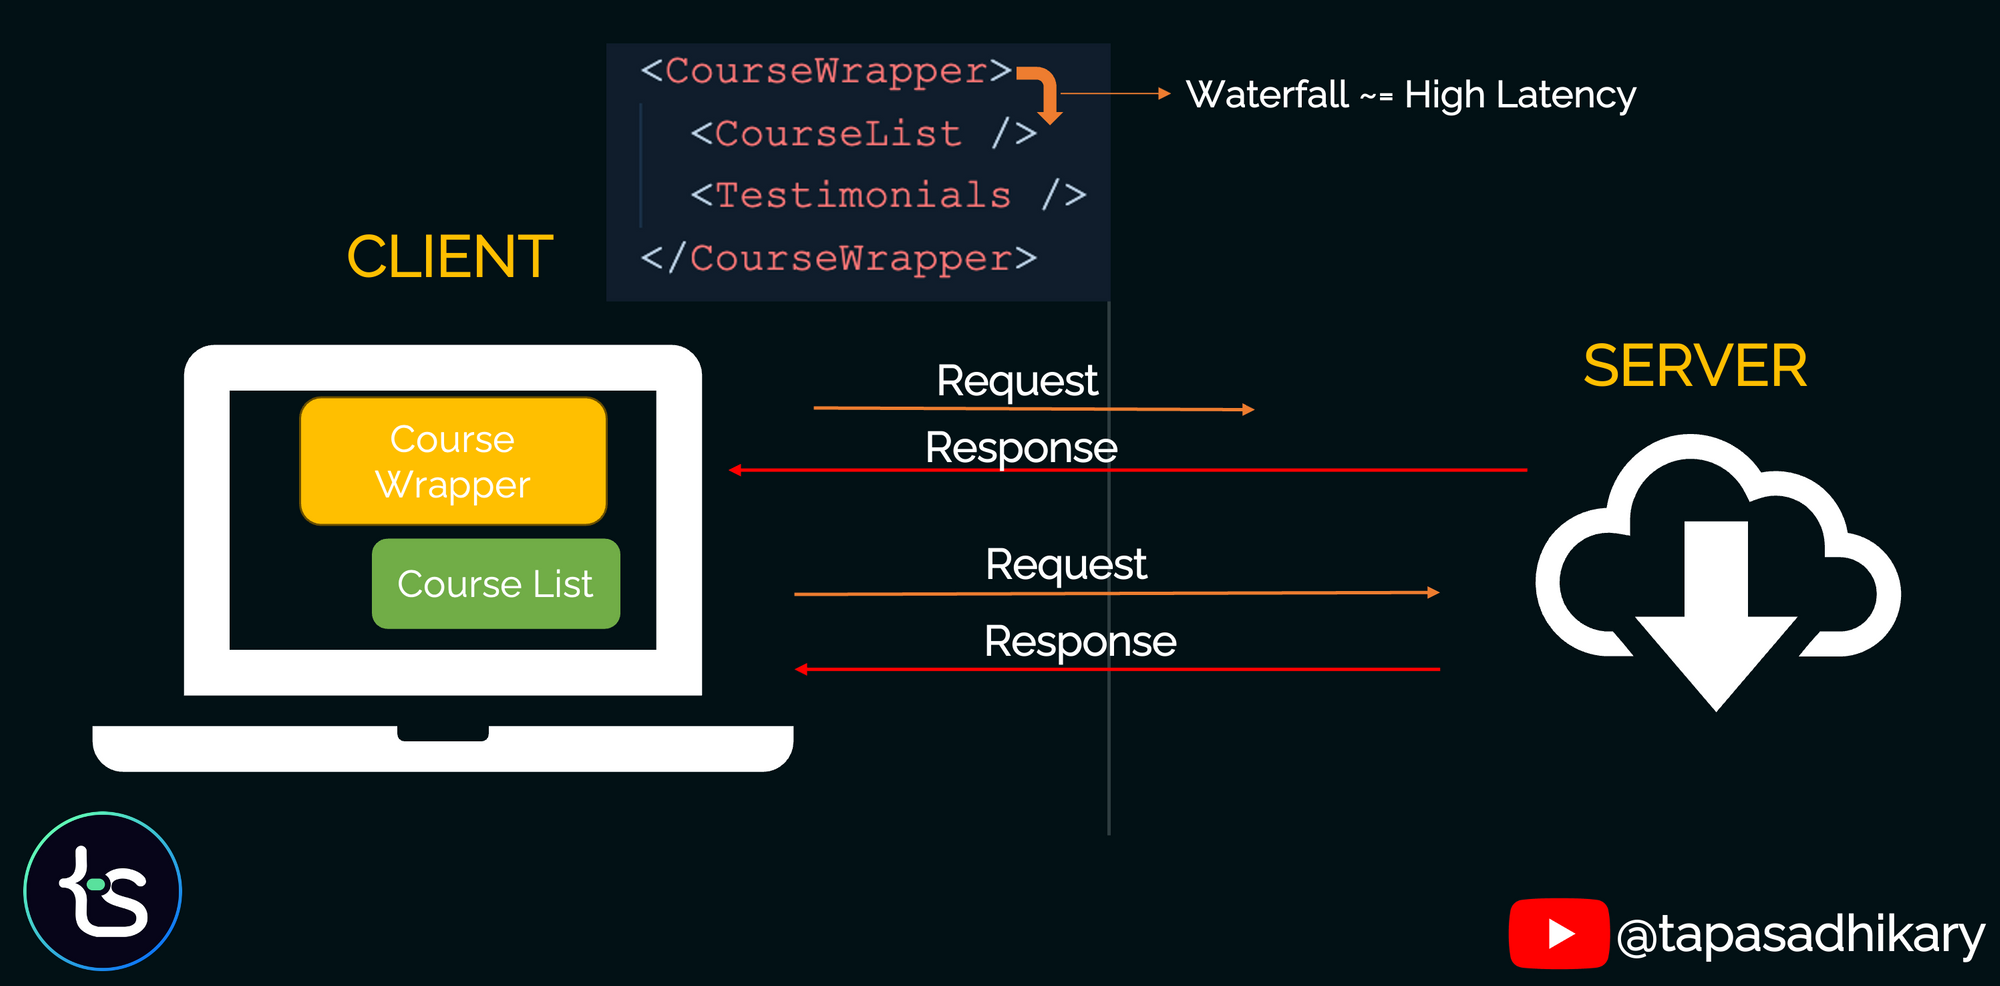
}So, the mother or father part makes a community name to fetch knowledge and each of its youngster elements are additionally making the community calls.
Now the fascinating factor is, the mother or father part is not going to render till its community name is full. It will maintain the rendering of its youngster elements as effectively.
This phenomenon the place we watch for the response of the earlier factor to finish to begin on the present factor is called a Waterfall. In this case we have now each Network Waterfall and Component Rendering Waterfall issues.
Now, it’s possible you’ll consider eradicating all these community calls from every elements and elevate it up as a single name in order that particular person elements is not going to wait on the response. That’s a wise transfer however it could trigger a maintainability downside. Let’s study that within the subsequent part.
Maintainability Issues
Now that we have checked out a few person expertise issues coping with server facet interactions, let’s think about a maintainability downside.
Now assume that none of our elements make any community calls. We fetch all the small print for all of the elements (sure, together with the mother or father part) without delay utilizing a single API name fetchAllParticulars().
After that we go the required data to every of the elements as props. This is best than the “Waterfall” downside we noticed above, proper?
perform Course() {

	// Assume a Network Call, in real-life
    // you'll deal with it with useEffect
    const information = fetchAllParticulars();

    return(
    	<CourseWrapper
        	ino={information.wrapperInfo} >
            <CourseList
        		ino={information.recordInfo} />
            <Testimonials
        		ino={information.testimonials} />
        </CourseWrapper>
    )
}But this would possibly trigger some maintainability points for us.
Assume, one advantageous day, that the product decides to drop the Testimonials characteristic. So we are able to merely go and take away the Testimonials part from the above code. That works! But, we could overlook to scrub up the information that we get utilizing the fetchAllParticulars() name. It could unnecessarily be there with out getting used.
To mitigate this, it’s possible you’ll find yourself altering your code in a method we have now already mentioned within the earlier sections whereas explaining the doable person expertise issues. So, we have to discover a higher resolution. But earlier than that, let’s discuss yet one more consideration, the Performance Cost.
Performance Costs
The final problematic space we can be discussing is efficiency prices.

Traditionally, React elements are shopper facet JavaScript features. They are the constructing blocks on your React utility. When we load the appliance on the shopper, the elements get downloaded on the shopper and React performs what’s essential to render them for you.
But this comes with two vital issues:
First, when person sends the request, the app downloads HTML together with linked JavaScript, CSS, and different belongings like photographs.
At the shopper website (on the browser), React begins its magic and hydrates the HTML construction. It parses the HTML, attaches the occasion listeners to the DOM, and fetches the information from the shop. Thus the positioning turns into a totally operational React app.
But, the purpose is, there’s lot occurring on the shopper. We find yourself downloading all this code on the shopper.
Most usually we’d like exterior libraries (Node modules) as dependencies for our challenge. All these dependencies can be downloaded on the shopper facet, making it even bulkier.
Now that you simply perceive the issues, I believe you may positively respect what React Server Components supply and the way they will tackle these issues.
But earlier than we discuss this, let’s perceive a bit extra concerning the shopper and server.
The Client-Server Model
We have used the phrases shopper and server many occasions on this article. So let’s give a proper definition of them and clarify their relationship at a excessive stage.

Client: A shopper with respect to an utility is a system that executes the duties on the end-user’s facet. Examples of shoppers are your PC, laptop computer, cell, browser, and so forth.Server: A server, because the title suggests, offers providers to the shoppers. It could also be colocated to a knowledge retailer or database for fast knowledge entry.Request: A request is a communication mode a shopper makes use of to ask for a service from a server.Response: A response can be a communication mode a server makes use of to ship again the service (knowledge/data) to the shopper.
React Client Components
As I discussed above, historically React elements stay on the shopper facet. When they work together with a server, they ship a request and watch for the response to return again. On receiving a response, the shopper triggers the subsequent set of actions.
If the requested service efficiently completes, the shopper part acts on the UI accordingly and reveals successful message. In case of an error, the shopper part experiences that to the customers.
When it causes a Network Waterfall, the response of the shopper part will get delayed and causes a foul person expertise. So how can we mitigate this?
How React Server Components (RSCs) Help
How about we transfer our React elements to the server? And maybe we colocate them with the information sore…however is that this even doable?
Yes! Let’s now get to know React Server Components. These new elements can fetch knowledge quicker as they’re on the server. They have the entry to your server infrastructure like file techniques and knowledge retailer with out making any roundtrips over the community.

It is an entire paradigm shift for React builders, as we now should suppose by way of server elements.
With RSCs, you possibly can transfer your knowledge fetching logic to the server (in order that your part fetches the information and not using a community name) and get it prepared on the server itself. The knowledge that comes again to the shopper is a effectively constructed part together with all the information match into it. How superb is that?
This implies that utilizing React server elements, you possibly can write code like this:
import { dbConnect } from '@/providers/mongo'

import { addCourseToDB } from './actions/add-course'

import CourseList from './elements/CourseList'

export default async perform Home() {

  // Get a MongoDB connection
  await dbConnect();

  // Get all programs from the db utilizing mannequin
  const allCourses = await programs.discover();

  // This will get printed on the server console
  console.log({allCourses})

  return (
    <major>
      <div>
        <CourseList allCourses={allCourses} />
      </div>
    </major>
  )
}Look at that! You can spot a number of the adjustments instantly:
- The part is of kind
asyncas it’ll deal with asynchronous calls. - We connect with the database (MongoDB) from the part itself. Wow! Usually we see this sort of code with
Node.jsorExpress, proper? - Then we question the database and fetch the information to go to our JSX for rendering.
Notice that the console log will log the knowledge on the server console, not in your browser console.
Also, we removed the state administration (useState) and impact administration (useEffect) altogether. It’s neat and easy.
With React server elements, it’s possible you’ll not want to make use of useEffect (ever!).
Limitations of React Server Components
With all these benefits, RSCs have some limitations as effectively that you need to have in mind:
- RSCs keep on the server and get rendered on the server. They do not have something that’s associated to the client-side. This means that you may’t add any person interactivity to the server elements. For instance, you possibly can’t use any occasion handlers or React hooks like useState, useReducer, useEffect in your server elements.
- You can’t use Browser Web APIs like localstorage, bluetooth, net USB, and so forth in server elements.
- For every little thing that is associated to shopper interactions, you need to proceed to make use of shopper elements.
Make sense? Then how finest are you able to organize your elements on your utility?
How to Use Client and Server Components Together
Your app generally is a mixture of server and shopper elements. You will see an instance quickly, however let’s perceive the idea first.
Server elements can import and render shopper elements, however shopper elements cannot render the server elements in it. If you wish to use a server part in a shopper part, you possibly can go it as props and use it that method.
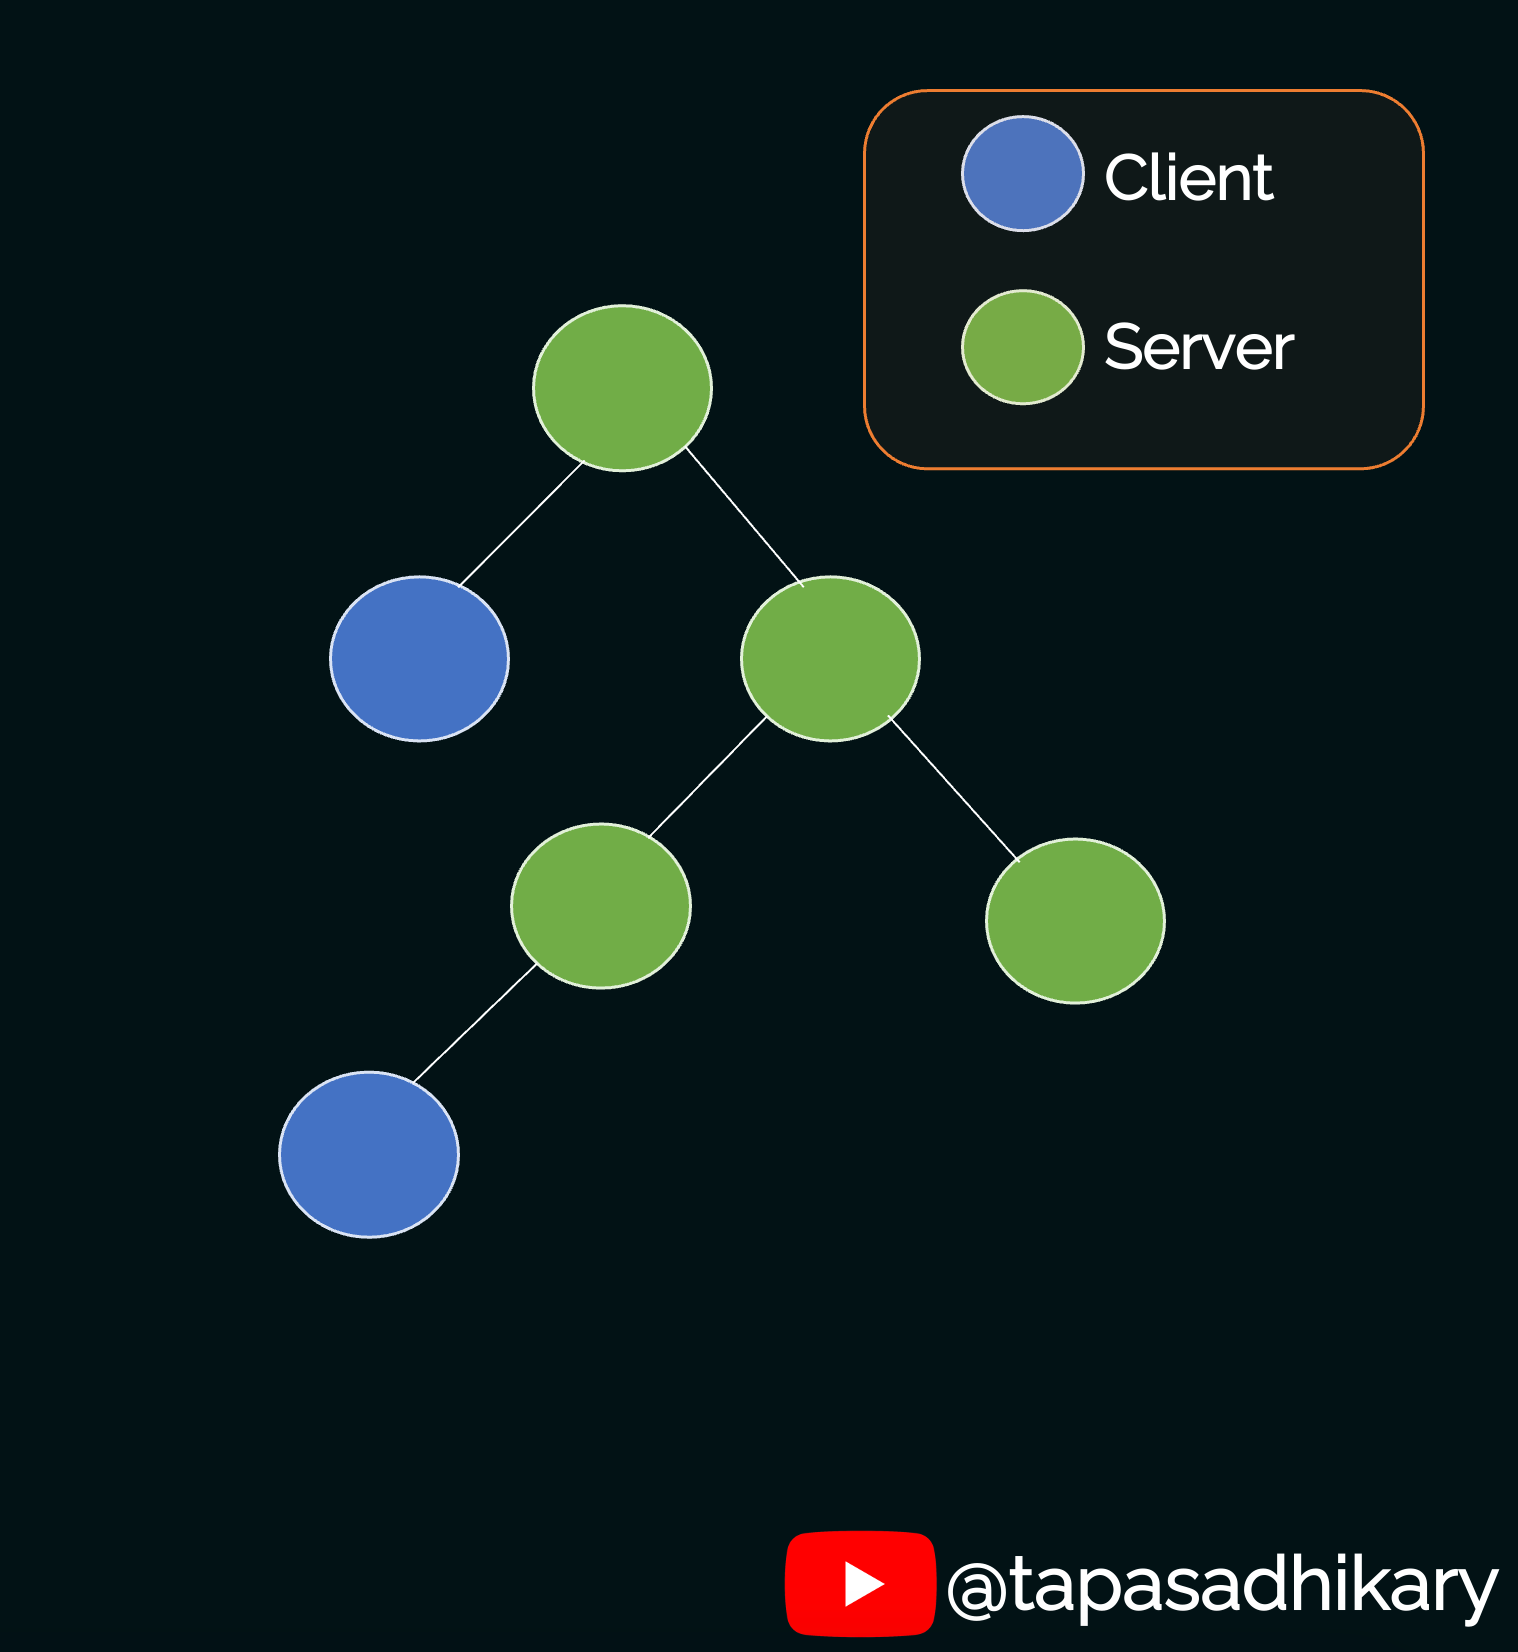
It is best to have the server elements on the root of your part hierarchy and push the shopper elements in direction of the leaves of the part tree.
The knowledge fetching can occur on the prime within the server elements and you’ll go them how React permits. User interactions (occasion handlers) and accessing browser APIs might be dealt with within the shopper part on the leaf stage.
Wait, Aren’t RSCs the Same as Server Side Rendering (SSR)?
No they don’t seem to be. Both RSC and SSR have the phrase “server” of their names and the similarity ends there.
With Server Side Rendering, we ship the uncooked HTML from the server to the shopper, then all of the shopper facet JavaScript will get downloaded. React begins the Hydration course of to remodel the HTML to an interactive React part. In SSR the part does not keep on the server.
We know by now that, with React server elements, the elements keep on the server and have entry to the server infrastructure with out making any community roundtrips.
SSR is beneficial for quicker loading of the preliminary web page of your utility. You can use SSR and RSCs collectively in your utility with none issues.
How to Build a Course List Page Using Next.js (with React Server Components) and MongoDB
Let’s now construct an utility that makes use of React server elements. Next.js is the main net framework that has adopted RSCs in its latest launch.
So now we are going to construct a course record web page to showcase how we are able to create server elements in Next.js and the way totally different it’s from the shopper elements.
Note that you simply will not be taught Next.js or MongoDB in depth right here. We’re simply utilizing this utility for example to show you ways React server elements work and the way they differ from shopper elements.
First, let’s add the course knowledge in an information retailer. For this app, I’ve used MongoDB. The picture under reveals that there are three paperwork added for 3 programs.

Next, we’ll create a utility perform to determine a connection to MongoDB. This is generic code you need to use for any JavaScript-based challenge to connect with MongoDB utilizing Mongoose and MongoDB URI.
import mongoose from "mongoose";

export async perform dbConnect(): Promise<any> {
  attempt {
    const conn = await mongoose.join(String(course of.env.MONGO_DB_URI));
    console.log(`Database linked : ${conn.connection.host}`);
    return conn;
  } catch (err) {
    console.error(err);
  }
}Now, we have to create the mannequin that maps to the doc in MongoDB. As we’re coping with course knowledge, this is the mannequin corresponding with it:
import mongoose, { Schema } from "mongoose";

const schema = new Schema({
  title: {
      required: true,
      kind: String
  },
  description: {
      required: true,
      kind: String
  },
  cowl: {
    required: true,
    kind: String
  },
  score: {
    required: true,
    kind: Number
  },
  worth: {
    required: true,
    kind: Number
  },
  createdOn: {
    kind: { kind: Date, default: Date.now }
  },
  hyperlink: {
    required: true,
    kind: String
  },
  kind: {
    required: true,
    kind: String
  },
  feedback: {
    required: false,
    kind: [{ body: String, date: Date }]
  }
});

export const programs = mongoose.fashions.course ?? mongoose.mannequin("course", schema);Now the magic begins! With Next.js App Router, all of the elements are by default server elements. This implies that they’re situated close to to the server and have entry to your server ecosystem.
The code under is an everyday Next.js part however with a particular characteristic: we are able to immediately get a database connection within the part and question the information immediately with out going by any state and impact administration. Cool, huh?
Anything you log from this part won’t ever get logged to your browser console as a result of this can be a server part. You can view the log in your server console (perhaps a terminal the place you began the server utilizing yarn dev command).
As the interplay to the database is asynchronous, we use the await key phrase whereas making the calls and use the async key phrase for the part. On receiving the response we go it as a prop to the kid elements.
import { dbConnect } from '@/providers/mongo'
import { programs } from '@/fashions/courseModel'
import { addCourseToDB } from './actions/add-course'

import AddCourse from './elements/AddCourse'
import CourseList from './elements/CourseList'

export default async perform Home() {

  // Get a MongoDB connection
  await dbConnect();

  // Get all programs from the db utilizing mannequin
  const allCourses = await programs.discover().choose(
  						["name", "cover", "rating"]);

  // This will get printed on the server console
  console.log({allCourses})

  return (
    <major>
      <div>
        <h1>Courses</h1>
        <AddCourse addCourseToDB={addCourseToDB} />
        <CourseList allCourses={allCourses} />
      </div>
    </major>
  )
}
The Home part has:
- A heading
- A part (AddCourse) that wraps a button so as to add a course
- A part (CourseList) to indicate the programs as a listing.
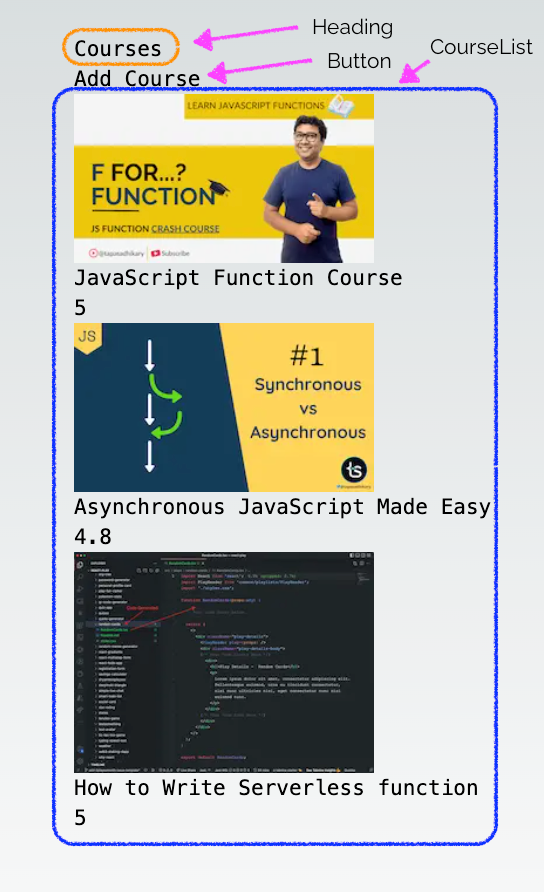
We know {that a} server part can render each shopper and server elements. The AddCourse part wants a person interplay, as in customers have to click on on a button so as to add a course. So this can’t be a server part (bear in mind the restrictions of server elements that you simply learn above)!
So let’s create a shopper part for AddCourse. With Next.js App Router, all elements are server elements by default. If you wish to create a shopper part, you must explicitly make one utilizing the directive referred to as 'use shopper' on the prime of the part (even earlier than any import statements).
'use shopper'

import { useState } from 'react';
import Modal from './Modal';
import AddCourseForm from "./AddCourseForm";

export default perform AddCourse({
  addCourseToDB,
}: {
  addCourseToDB: (knowledge: any) => Promise<void>
}) {
  const [showAddModal, setShowAddModal] = useState(false);
  const add = async(knowledge: any) => {
    await addCourseToDB(knowledge);
    setShowAddModal(false);
  }

  return (
    <>
    <button
      onClick={() => setShowAddModal(true)}
    >
      Add Course
    </button>
    <Modal
      shouldShow={presentAddModal}
      physique={
        <AddCourseForm
          saveAction={add}
          cancelAction={() => setShowAddModal(false)} />} />
    </>
  )
}The CourseList part does not want any occasion handlers so we are able to preserve it as a server part.
import Image from 'subsequent/picture'
import Link from 'subsequent/hyperlink'

export default perform CourseList(courseList: any) {
  const allCourses = courseList.allCourses;
  return(
    <div>
      {
        allCourses.map((course: any) =>
        <Link key={course['_id']} href={`/programs/${course['_id']}`}>
          <div>
            <Image
              src={course.cowl}
              width={200}
              peak={200}
              alt={course.title}
            />
            <h2>{course.title}</h2>
            <p>{course.score}</p>
          </div>
        </Link>
      )}
    </div>
  )
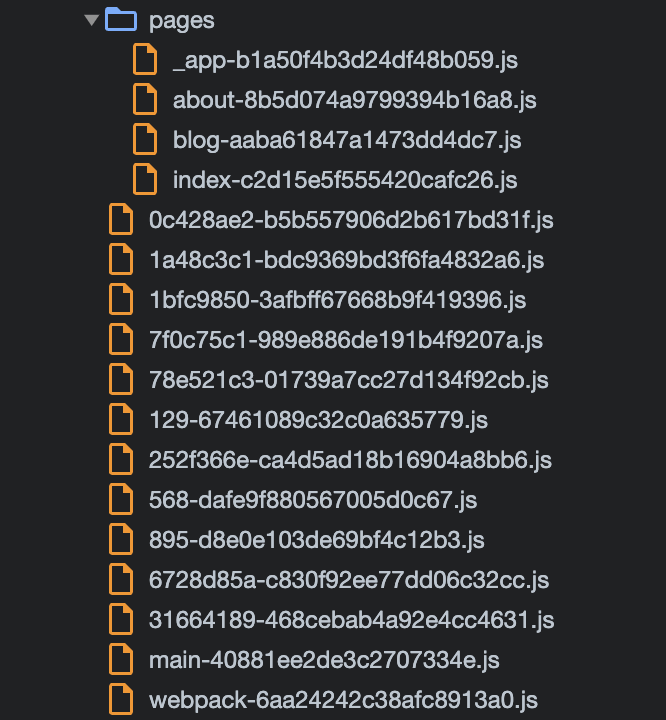
}Also discover the borowser DevTools’s Sources tab to establish what will get downloaded on the shopper and what stays on the server. Do you see web page.tsx file or CourseList.tsx file right here? Nope. Because these are server elements and they’re by no means a part of your shopper bundles.
We solely see the elements that we have now explicitly marked as shopper elements in our utility.

I hope this utility circulate has reveals you ways all the idea connects to the follow. You ought to now understood how you can use server elements in your React apps.
In Summary
To Summarize,
- React Server Components have backend entry with none community roundtrips.
- We can keep away from community waterfalls utilizing React Server Components
- React server elements assist computerized code splitting and enhance your app’s efficiency with zero bundle dimension.
- As these elements are on the server facet, they don’t have entry to shopper facet occasion handlers, state, and results. This means you can’t use any occasion handlers, or React hooks like useState, useReducer, and useEffect.
- A React server part can import and render a shopper part however the reverse will not be true. But you possibly can go a server part as props to a shopper part.
Before We End…
That’s all for now. I hope you discovered this text informative and insightful.
Let’s join.
- I’m an educator on my YouTube channel,
tapaScript. Please SUBSCRIBE to the channel if you wish to be taught JavaScript, ReactJS, Node.js, Git, and all about Web Development within the basic method. - Follow on Twitter or LinkedIn in case you do not wish to miss the every day dose of Web Development and Programming Tips.
- Check out my Open Source work on GitHub.
See you quickly with my subsequent article. Until then, please deal with your self, and keep blissful.