
In this tutorial, you’ll study all the things you should learn about utilizing guarantees and async/await in JavaScript.
So let’s get began.
If you’d prefer to study together with a video model of this tutorial, you can too try my YouTube playlist.
Why Use Promises in JavaScript?
ES6 launched guarantees as a local implementation. Before ES6 we have been utilizing callbacks to deal with asynchronous operations.
Let’s perceive what callbacks are and what downside associated to callbacks is solved by guarantees.
Let’s say we have now an inventory of posts and their respective feedback, like this:
const posts = [
  { post_id: 1, post_title: 'First Post' },
  { post_id: 2, post_title: 'Second Post' },
  { post_id: 3, post_title: 'Third Post' },
];

const feedback = [
  { post_id: 2, comment: 'Great!'},
  { post_id: 2, comment: 'Nice Post!'},
  { post_id: 3, comment: 'Awesome Post!'},
];
Now, we are going to write a perform to get a submit by passing the submit id. If the submit is discovered, we are going to retrieve the feedback associated to that submit.
const getPost = (id, callback) => {
 const submit = posts.discover( submit => submit.post_id === id);
 if(submit) {
   callback(null, submit);
 } else {
   callback("No such submit discovered", undefined);
 }
};

const getComments = (post_id, callback) => {
 const end result = feedback.filter( remark => remark.post_id === post_id);
 if(end result) {
   callback(null, end result);
 } else {
   callback("No feedback discovered", undefined);
 }
}
In the above getPost and getComments features, if there’s an error we are going to go it as the primary argument. But if we get the end result, we are going to name the callback perform and go the end result because the second argument to it.
If you might be acquainted with Node.js, then you’ll know that this can be a quite common sample utilized in each Node.js callback perform.
Now let’s use these features:
getPost(2, (error, submit) => {
    if(error) {
     return console.log(error);
    }
    console.log('Post:', submit);
    getComments(submit.post_id, (error, feedback) => {
        if(error) {
          return console.log(error);
        }
        console.log('Comments:', feedback);
    });
});
After executing the above code, you will note the next output:

Here’s a CodePen Demo.
As you may see, we have now the getComments perform nested contained in the getPost callback.
Now think about if we additionally wished to search out the likes of these feedback. That would additionally get nested inside getComments callback, creating extra nesting. This will ultimately make the code obscure.
This nesting of the callbacks is called callback hell.
You can see that the error dealing with situation additionally will get repeated within the code, which creates duplicate code – this isn’t good.
So to repair this downside and permit asynchronous operations, guarantees have been launched.
What are Promises in JavaScript?
Promises are probably the most necessary elements of JavaScript – however they are often complicated and obscure. Many new devs, in addition to skilled ones, wrestle to completely grasp them.
So what’s a promise? A promise represents an asynchronous operation whose end result will come sooner or later.
Before ES6, there was no option to await one thing to carry out some operation. For instance, after we wished to make an API name, there was no option to wait till the outcomes got here again.
For that, we used to make use of exterior libraries like JQuery or Ajax which had their very own implementation of guarantees. But there was no JavaScript implementation of guarantees.
But then guarantees have been added in ES6 as a local implementation. And now, utilizing guarantees in ES6, we will make an API name ourselves and wait till it is completed to carry out some operation.
How to Create a Promise
To create a promise we have to use the Promise constructor perform like this:
const promise = new Promise(perform(resolve, reject) {

});
The Promise constructor takes a perform as an argument and that perform internally receives resolve and reject as parameters.
The resolve and reject parameters are literally features that we will name relying on the end result of the asynchronous operation.
A Promise can undergo three states:
When we create a promise, it’s in a pending state. When we name the resolve perform, it goes in a fulfilled state, and if we name reject it’ll go into the rejected state.
To simulate the long-running or asynchronous operation, we are going to use the setTimeout perform.
const promise = new Promise(perform(resolve, reject) {
 setTimeout(perform() {
  const sum = 4 + 5;
  resolve(sum);
 }, 2000);
});
Here, we have created a promise which is able to resolve to the sum of 4 and 5 after a 2000ms (2 second) timeout is over.
To get the results of the profitable promise execution, we have to register a callback handler utilizing .then like this:
const promise = new Promise(perform(resolve, reject) {
 setTimeout(perform() {
  const sum = 4 + 5;
  resolve(sum);
 }, 2000);
});

promise.then(perform(end result) {
 console.log(end result); // 9
});
So at any time when we name resolve, the promise will return again the worth handed to the resolve perform which we will gather utilizing the .then handler.
If the operation shouldn’t be profitable, then we name the reject perform like this:
const promise = new Promise(perform(resolve, reject) {
 setTimeout(perform() {
  const sum = 4 + 5 + 'a';
  if(isNaN(sum)) {
    reject('Error whereas calculating sum.');
  } else {
    resolve(sum);
  }
 }, 2000);
});

promise.then(perform(end result) {
 console.log(end result);
});
Here, if the sum shouldn’t be a quantity, then we name the reject perform with the error message. Otherwise, we name the resolve perform.
If you execute the above code, you will note the next output:
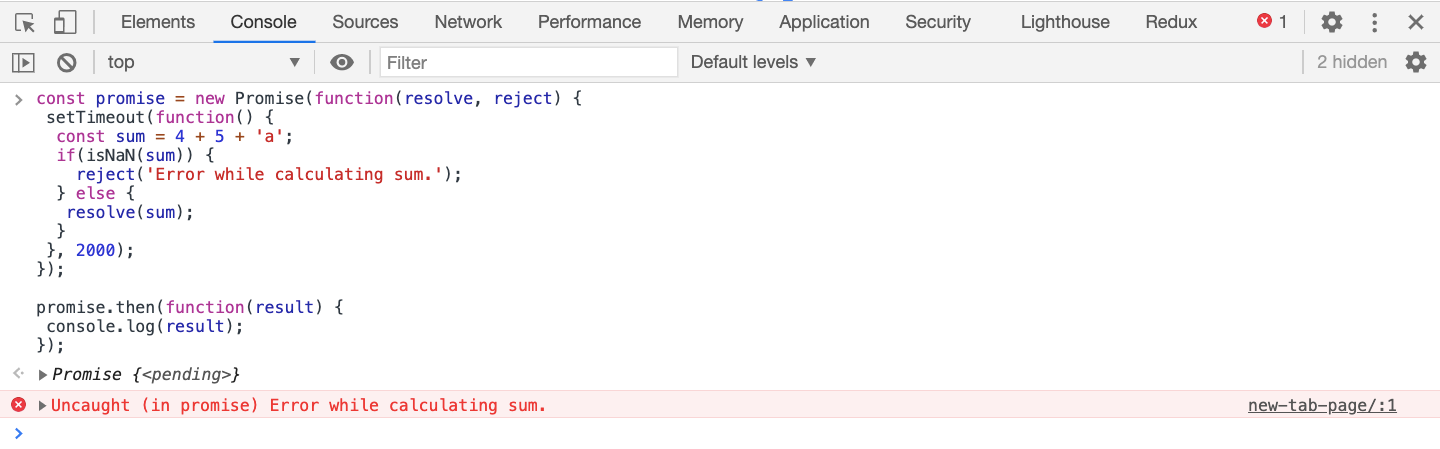
As you may see, we’re getting an uncaught error message together with the message we have specified as a result of calling the reject perform throws an error. But we have now not added an error handler for catching that error.
To catch the error, we have to register one other callback utilizing .catch like this:
promise.then(perform(end result) {
 console.log(end result);
}).catch(perform(error) {
 console.log(error);
});
You will see the next output:
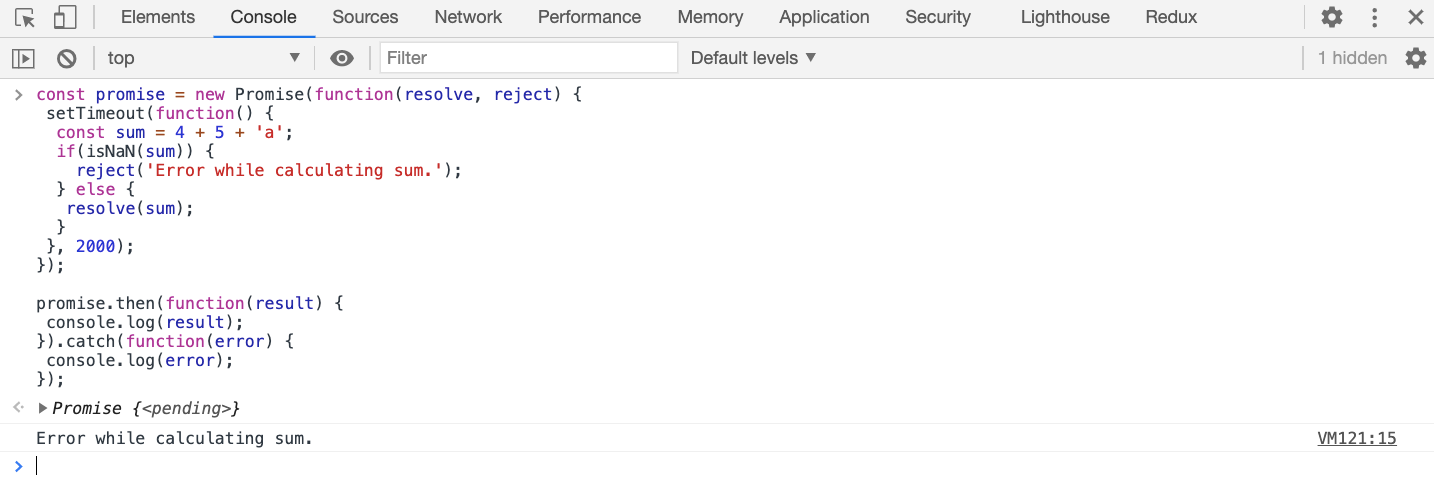
As you may see, we have now added the .catch handler, so we’re not getting any uncaught error – we’re simply logging the error to the console.
This additionally avoids stopping your utility abruptly.
So it is all the time advisable so as to add the .catch handler to each promise so your utility is not going to cease operating due to the error.
When to Use resolve and reject
Let’s take an instance of an API name.
If you make an API name and the API name is profitable, then you definately name the resolve perform by passing the results of the API as an argument to it.
And if the API is unsuccessful, then you definately name the reject perform by passing any message as an argument to it.
So to point that the operation is profitable, we name the resolve perform and for indicating an unsuccessful operation, we name the reject perform.
What is Promise Chaining and Why is it Useful?
Promise chaining is a method used to handle asynchronous operations in a extra organized and readable means.
In promise chaining, we will connect a number of .then handlers wherein results of earlier .then handler is routinely handed to the following .then handler.
Using promise chaining helps to keep away from the issue of callback hell which we have now seen beforehand.
Promise chaining additionally permits us to write down asynchronous code in a extra linear and sequential method, which is simpler to learn and perceive.
Also, when utilizing promise chaining, we will connect just one.catch handler on the finish of all of the .then handlers. If any of the in-between guarantees fail, the final .catch handler will probably be routinely executed.
So we needn’t add a number of .catch handlers. This eliminates a number of error test as we did within the callback hell instance beforehand.
How Promise Chaining Works
We can add a number of .then handlers to a single promise like this:
promise.then(perform(end result) {
 console.log('first .then handler');
 return end result;
}).then(perform(end result) {
 console.log('second .then handler');
 console.log(end result);
}).catch(perform(error) {
 console.log(error);
});
When we have now a number of .then handlers added, the return worth of the earlier .then handler is routinely handed to the following .then handler.
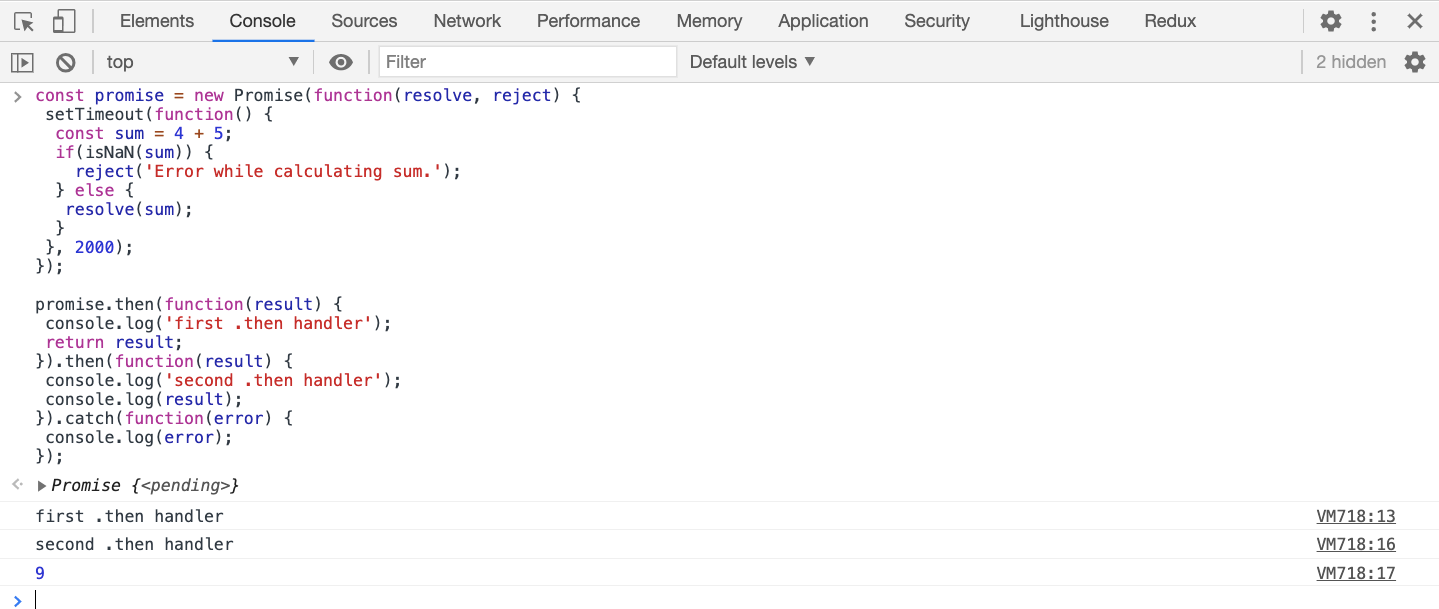
As you may see, including 4 + 5 resolves a promise and we get that sum within the first .then handler. There we’re printing a log assertion and return that sum to the following .then handler.
And inside the following .then handler, we’re including a log assertion after which we’re printing the end result we acquired from the earlier .then handler.
This means of including a number of .then handlers is called promise chaining.
How to Delay a Promise’s Execution in JavaScript
Many occasions we do not need the promise to execute instantly. Rather, we would like it to delay till after some operation is accomplished.
To obtain this, we will wrap the promise in a perform and return that promise from that perform like this:
perform createPromise() {
 return new Promise(perform(resolve, reject) {
  setTimeout(perform() {
   const sum = 4 + 5;
   if(isNaN(sum)) {
     reject('Error whereas calculating sum.');
   } else {
    resolve(sum);
   }
  }, 2000);
 });
}
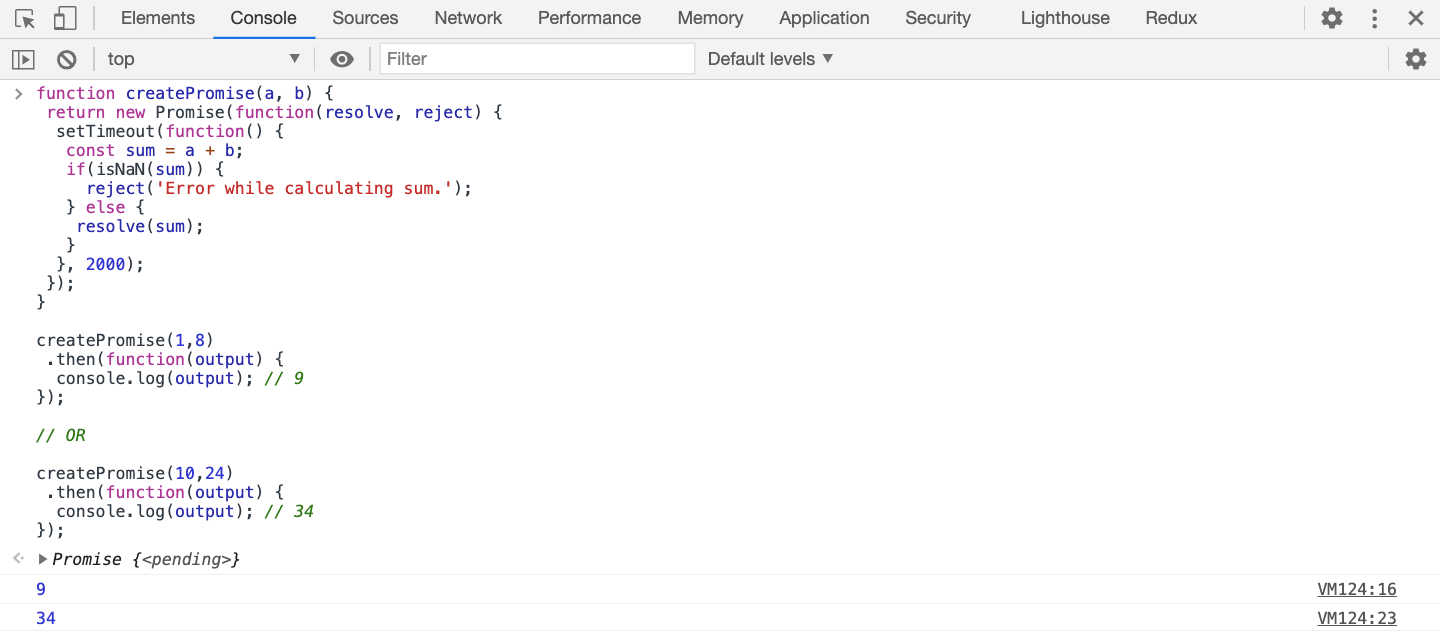
This means, we will use the perform parameters contained in the promise, making the perform really dynamic.
perform createPromise(a, b) {
 return new Promise(perform(resolve, reject) {
  setTimeout(perform() {
   const sum = a + b;
   if(isNaN(sum)) {
     reject('Error whereas calculating sum.');
   } else {
    resolve(sum);
   }
  }, 2000);
 });
}

createPromise(1,8)
 .then(perform(output) {
  console.log(output); // 9
});

// OR

createPromise(10,24)
 .then(perform(output) {
  console.log(output); // 34
});
Note: When we create a promise, it will likely be both resolved or rejected however not each on the identical time. So we can not add two resolve or reject perform calls in the identical promise.
Also, we will go solely a single worth to the resolve or reject perform.
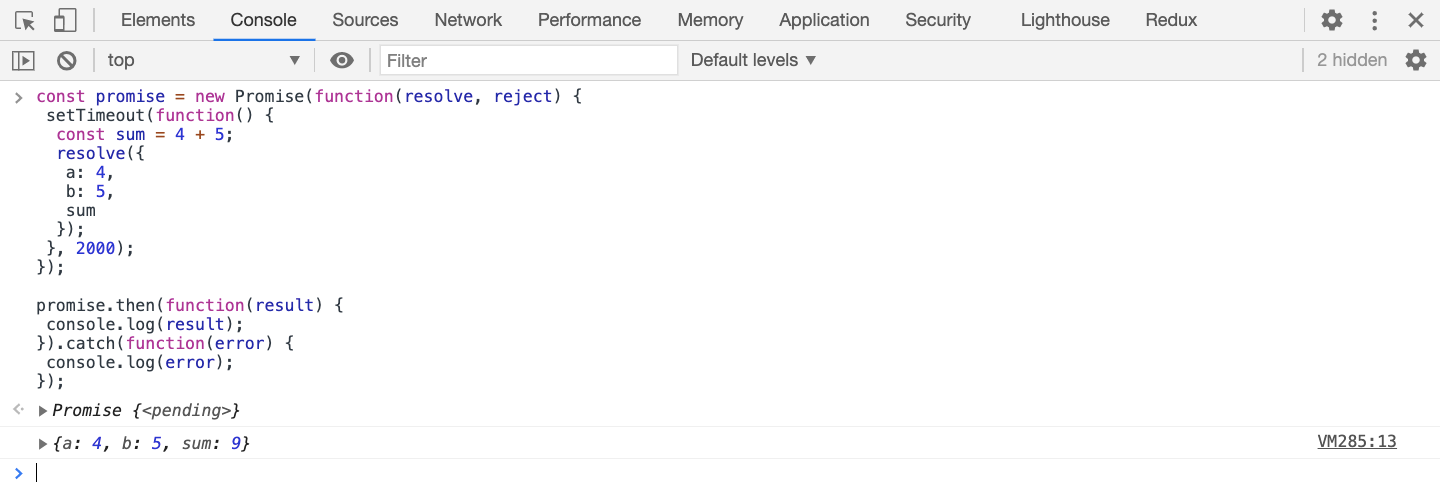
If you wish to go a number of values to a resolve perform, go it as an object like this:
const promise = new Promise(perform(resolve, reject) {
 setTimeout(perform() {
  const sum = 4 + 5;
  resolve({
   a: 4,
   b: 5,
   sum
  });
 }, 2000);
});

promise.then(perform(end result) {
 console.log(end result);
}).catch(perform(error) {
 console.log(error);
});
How to Use Arrow Functions in JavaScript
In all of the above code examples, we have used common ES5 perform syntax whereas creating guarantees.
But it is a widespread observe to make use of arrow perform syntax as a substitute of ES5 perform syntax.
So let’s first perceive what’s an arrow perform and learn how to use it.
What are arrow features?
Before ES6, there have been two essential methods of declaring features.
1. Function Declaration Syntax:
perform add(a, b) {
 return a + b;
}
2. Function Expression Syntax:
const add = perform(a, b) {
 return a + b;
};
The essential seen distinction between the common perform and arrow perform is the syntax of writing the perform.
Using arrow perform syntax, we will write the above including perform like this:
const add = (a, b) => {
 return a + b;
};
You won’t see a lot distinction right here, aside from the arrow. But if we have now a single line of code within the perform physique we will simplify the above arrow perform like this:
const add = (a, b) => a + b;Here we’re implicitly returning the results of a + b, so there isn’t any want for a return key phrase if there’s a single assertion.
So utilizing the arrow features will make your code a lot shorter.
If you wish to study different options of arrow features, you may try this video.
Using an arrow perform, we will write the earlier code as proven under:
const promise = new Promise((resolve, reject) => {
 setTimeout(() => {
  const sum = 4 + 5 + 'a';
  if(isNaN(sum)) {
    reject('Error whereas calculating sum.');
  } else {
    resolve(sum);
  }
 }, 2000);
});

promise.then((end result) => {
 console.log(end result);
});
You can both use ES5 or ES6 perform syntax relying in your preferences and wishes.
How to Use Async/Await in JavaScript
In this part, we’ll discover all the things you should learn about async/await.
Async/await provides builders a greater means to make use of guarantees.
To use async/await, you should create a perform and add the async key phrase earlier than the perform title utilizing ES5 perform declaration syntax like this:
async perform someFunction() {
  // perform physique
}
or utilizing perform expression syntax like this:
const someFunction = async perform () {
  // perform physique
};
or utilizing an arrow perform like this:
const someFunction = async () => {
  // perform physique
};
Always keep in mind that, once you add the async key phrase to the perform, it all the time returns a promise.
Take a take a look at the under code:
const sayHello = async perform () {
  return 'Hello';
};

sayHello();
What do you assume the output of the above code will probably be?

The output is a promise fulfilled with the string Hello.
So the under code:
const sayHello = async perform () {
  return 'Hello';
};
is identical as this:
const sayHello = perform() {
 return new Promise((resolve, reject) => {
  resolve('Hello');
 });
}
which is identical as this:
const sayHello = perform () {
  return Promise.resolve('Hello');
};
Promise.resolve('Hello') is only a shorter means of making a promise which resolves to the string Hello.
So to get the precise string Hello, we have to add the .then handler like this:
sayHello().then(perform (end result) {
  console.log(end result); // Hello
});
Now, the place can we use the await key phrase?
It’s used contained in the perform which is said as async. So the await key phrase ought to solely be used contained in the async perform.
You will get an error if you happen to attempt to use it in non-async features.
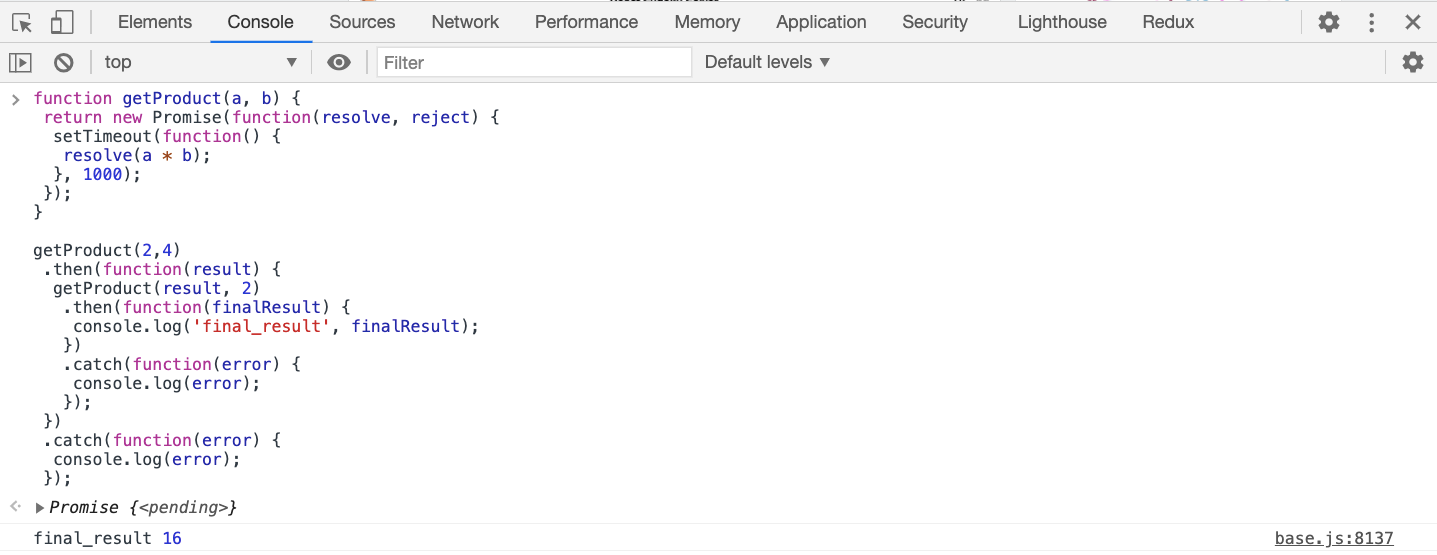
Suppose, we have now a promise which returns the product of two numbers like this:
perform getProduct(a, b) {
  return new Promise(perform (resolve, reject) {
    setTimeout(perform () {
      resolve(a * b);
    }, 1000);
  });
}
and we’re utilizing it like this:
getProduct(2, 4)
  .then(perform (end result) {
    getProduct(end result, 2)
      .then(perform (closingResult) {
        console.log('final_result', closingResult);
      })
      .catch(perform (error) {
        console.log(error);
      });
  })
  .catch(perform (error) {
    console.log(error);
  });
In the above code, we’re first getting the product of 2 and 4. Then we’re utilizing that end result to multiply it by 2 once more, after which lastly printing the product.
If you execute the above code, you will note the ultimate end result as 16 which is 2 * 4 = 8 and eight * 2 = 16.
The above code of .then and .catch appears fairly sophisticated and obscure at one look.
So utilizing async/await we will simplify the above code to this:
const printResult = async () => {
  strive {
    const end result = await getProduct(2, 4); // line 1
    const closingResult = await getProduct(end result, 2); // line 2
    console.log('final_result', closingResult); // line 3
  } catch (error) {
    console.log(error);
  }
};

printResult();
This appears a lot cleaner and simple to know.
Here, to make use of the await key phrase, we’re declaring a perform with the async key phrase. Then to get the results of every promise, we’re including the await key phrase in entrance of it.
Also, be aware that we have added strive/catch contained in the perform. You all the time want so as to add a strive block across the code which makes use of await so the catch block will probably be executed if the promise will get rejected.
There is a vital factor you should bear in mind: The above async/await code will work precisely the identical as after we use .then – so the following await line (line 2) is not going to be executed till the earlier await name (line 1) is profitable.
Therefore, because the getProduct perform is taking 1 second to execute due to the setTimeout name, line 2 should await 1 second earlier than executing the getProduct perform once more.
But there’s one exception to this habits, which you’ll be able to try in this text.
Also, if there’s an error whereas executing line 1 (due to some error that occurred within the getProduct perform), the following code after line 1 is not going to be executed. Instead, the catch block will probably be executed.
Now, if you happen to examine the code of promise chaining and async/await, you will note the distinction.
// code utilizing async/await

const printResult = async () => {
  strive {
    const product = await getProduct(2, 4); // line 1
    const closingResult = await getProduct(product, 2); // line 2
    console.log('final_result', closingResult); // line 3
  } catch (error) {
    console.log(error);
  }
};

printResult();
// code utilizing .then and .catch
getProduct(2, 4)
.then(perform (end result) {
getProduct(end result, 2)
.then(perform (closingResult) {
console.log('final_result', closingResult);
})
.catch(perform (error) {
console.log(error);
});
})
.catch(perform (error) {
console.log(error);
});As you may see, the code utilizing async/await is way cleaner and simple to know as in comparison with the promise chaining.
As the nesting will get deeper, the code utilizing promise chaining will get extra sophisticated. So async/await simply offers a option to write the identical code however with higher readability.
Using async/await additionally reduces the necessity of including a number of .catch handlers to deal with the errors.
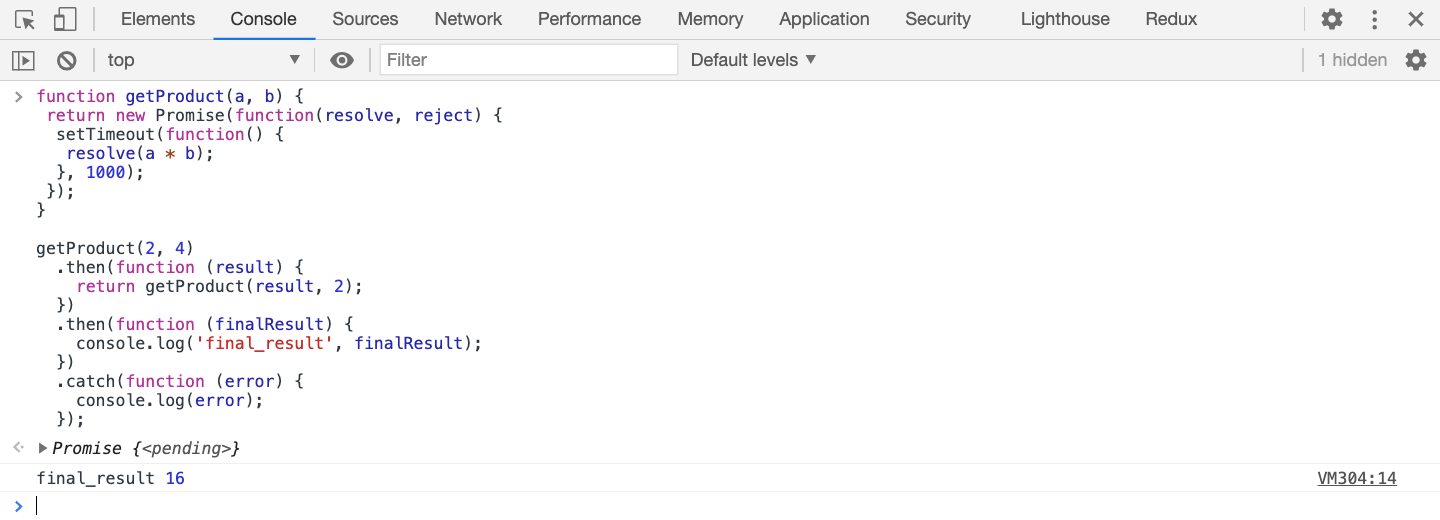
We can keep away from the nesting within the above promise chaining by writing the earlier code like this:
getProduct(2, 4)
  .then(perform (end result) {
    return getProduct(end result, 2);
  })
  .then(perform (closingResult) {
    console.log('final_result', closingResult);
  })
  .catch(perform (error) {
    console.log(error);
  });
Here, from the primary .then handler, we’re returning the results of getProduct(end result, 2).
Whatever returned from the earlier .then handler will probably be handed to the following .then handler.
As the getProduct perform returns a promise so we will connect .then once more to it and keep away from the necessity for a nested .catch handler.
But nonetheless async/await syntax appears cleaner and simpler to know than the promise chaining syntax.
Promise Methods
In this part, we’ll discover the assorted strategies supplied by the Promise API.
All these strategies are helpful once you wish to execute a number of asynchronous duties on the identical time when these duties usually are not depending on one another (which saves numerous time).
Because if you happen to execute every job one after the opposite, then it’s a must to await the earlier job to complete earlier than you can begin with the following job.
And if the duties usually are not associated to one another, there isn’t any level in ready for the earlier job to complete earlier than executing the following job.
The Promise.all technique
This technique is used to execute a number of asynchronous duties concurrently with out having to attend for an additional job to complete.
Suppose we have now three guarantees and all are resolved efficiently:
const promise1 = new Promise((resolve, reject) => resolve('promise1 success'));
const promise2 = new Promise((resolve, reject) => resolve('promise2 success'));
const promise3 = new Promise((resolve, reject) => resolve('promise3 success'));
Now, let’s use the Promise.all technique.
Promise.all wants an array of guarantees as its argument.
Promise.all([promise1, promise2, promise3])
  .then((end result) => {
    console.log('resolved', end result); // resolved ["promise1 success", "promise2 success", "promise3 success"]
  })
  .catch((error) => {
    console.log('rejected', error);
  });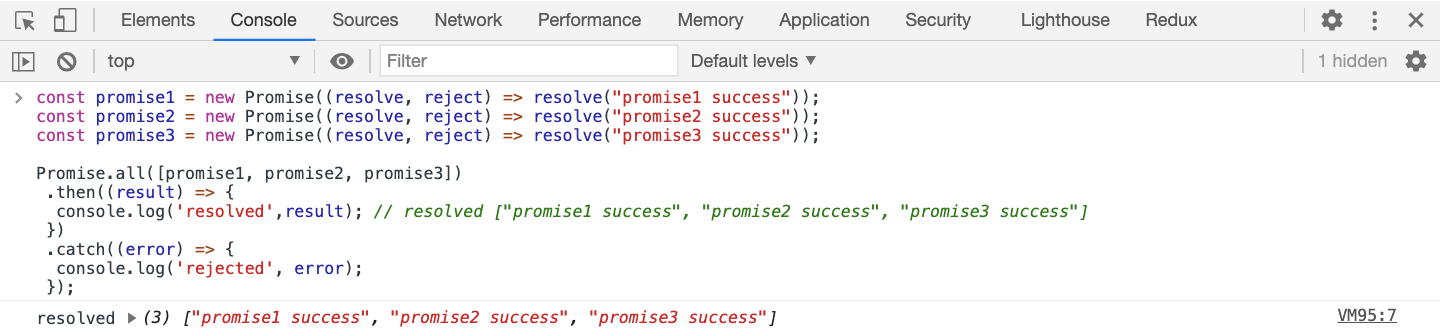
As all the guarantees are resolved, end result will probably be an array containing the outcomes of the resolved guarantees.
Now, what if any of the guarantees get rejected?
const promise1 = new Promise((resolve, reject) => resolve('promise1 success'));
const promise2 = new Promise((resolve, reject) => reject('promise2 failure'));
const promise3 = new Promise((resolve, reject) => resolve('promise3 success'));

Promise.all([promise1, promise2, promise3])
  .then((end result) => {
    console.log('resolved', end result);
  })
  .catch((error) => {
    console.log('rejected', error); // rejected promise2 failure
  });
In the above code, promise2 is rejected so the catch handler will probably be executed, and within the case of Promise.all:
- If one of many guarantees is rejected, the
errorwill include the error message of the failed promise (as in our case above) - If a number of guarantees are rejected, the
errorwould be the error message of the primary failed promise.
Note: Even although the intermediate promise will get rejected, all subsequent guarantees is not going to be stopped from executing. They will all be executed – however solely the primary rejected promise worth will probably be obtainable within the error parameter of the catch block.
The Promise.race technique
Consider once more the three resolved guarantees:
const promise1 = new Promise((resolve, reject) => resolve('promise1 success'));
const promise2 = new Promise((resolve, reject) => resolve('promise2 success'));
const promise3 = new Promise((resolve, reject) => resolve('promise3 success'));

Promise.race([promise1, promise2, promise3])
  .then((end result) => {
    console.log('resolved', end result); // resolved promise1 success
  })
  .catch((error) => {
    console.log('rejected', error);
  });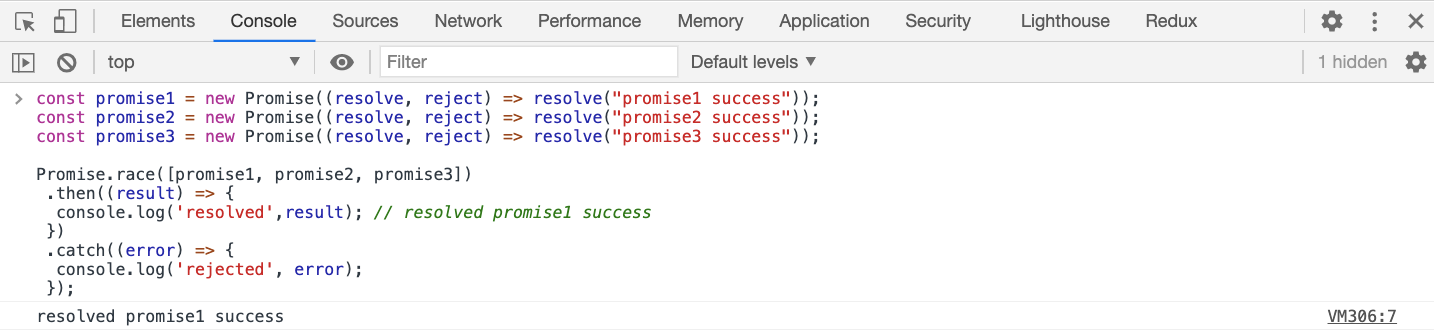
As you may see right here, as quickly as the primary promise will get resolved, the Promise.race technique will return the results of that resolved promise.
Now, check out the under code:
const promise1 = new Promise((resolve, reject) => reject('promise1 failure'));
const promise2 = new Promise((resolve, reject) => resolve('promise2 success'));
const promise3 = new Promise((resolve, reject) => resolve('promise3 success'));

Promise.race([promise1, promise2, promise3])
  .then((end result) => {
    console.log('resolved', end result);
  })
  .catch((error) => {
    console.log('rejected', error); // rejected promise1 failure
  });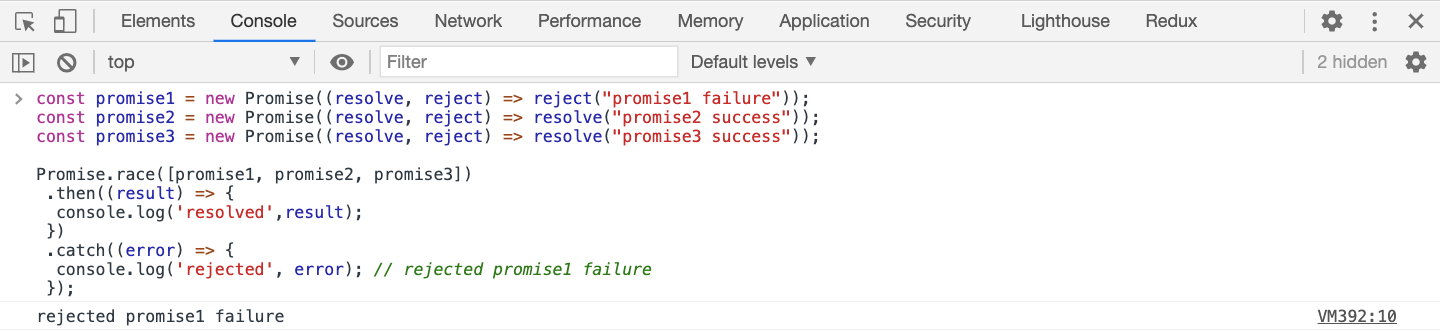
As you may see right here, the primary promise itself is rejected so the .catch handler will probably be executed.
So after we use the Promise.race technique, it’ll wait till the primary promise will get resolved or rejected after which:
- If the primary promise within the promise chain will get resolved, the
.thenhandler will probably be executed and the end result would be the results of the primary resolved promise. - If the primary promise within the promise chain will get rejected, the
.catchhandler will probably be executed and the end result would be the results of the primary failed promise. - If a number of guarantees are rejected, the
.catchhandler will probably be executed and the end result would be the results of the primary failed promise.
The Promise.allSettled technique
This technique is helpful once you wish to know the results of every job although they’re rejected.
Because in Promise.all and Promise.race, we get solely the results of the primary rejected promise and there’s no option to get the results of different profitable or failed guarantees.
So utilizing Promise.allSettled we will get the results of all the guarantees, even when they failed.
Take a take a look at the under code:
const promise1 = new Promise((resolve, reject) => resolve('promise1 success'));
const promise2 = new Promise((resolve, reject) => resolve('promise2 success'));
const promise3 = new Promise((resolve, reject) => resolve('promise3 success'));

Promise.allSettled([promise1, promise2, promise3]).then((end result) => {
  console.log('resolved', end result);
});

/* output from `.then`:
resolved [
  {
    "status": "fulfilled",
    "value": "promise1 success"
  },
  {
    "status": "fulfilled",
    "value": "promise2 success"
  },
  {
    "status": "fulfilled",
    "value": "promise3 success"
  }
]
*/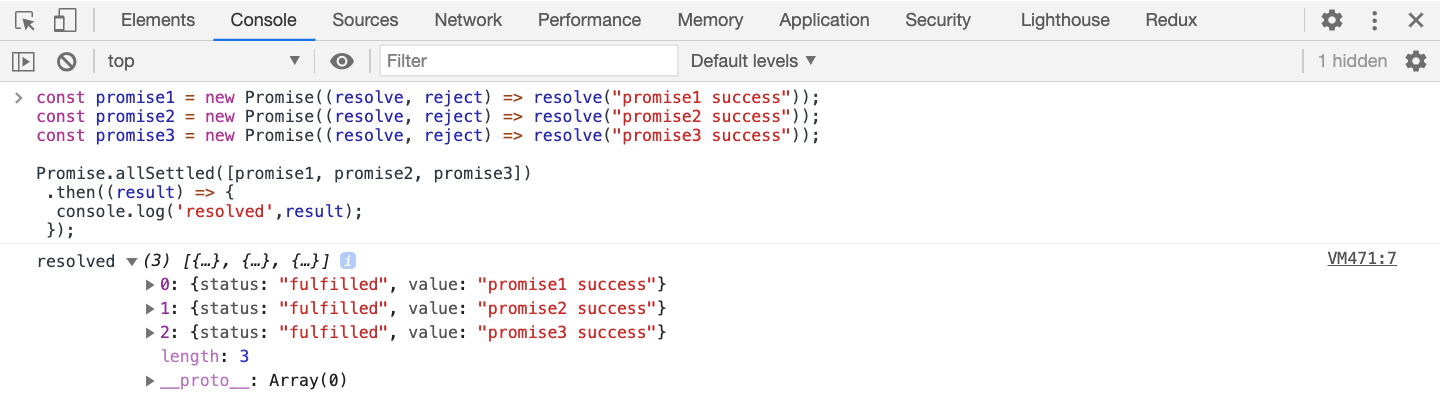
As you may see, the Promise.allSettled technique waits till all the guarantees are resolved or rejected and the end result will include the results of every promise.
const promise1 = new Promise((resolve, reject) => reject('promise1 failure'));
const promise2 = new Promise((resolve, reject) => resolve('promise2 success'));
const promise3 = new Promise((resolve, reject) => resolve('promise3 success'));

Promise.allSettled([promise1, promise2, promise3]).then((end result) => {
  console.log('resolved', end result);
});

/* output from `.then`:
resolved [
  {
    "status": "rejected",
    "reason": "promise1 failure"
  },
  {
    "status": "fulfilled",
    "value": "promise2 success"
  },
  {
    "status": "fulfilled",
    "value": "promise3 success"
  }
]
*/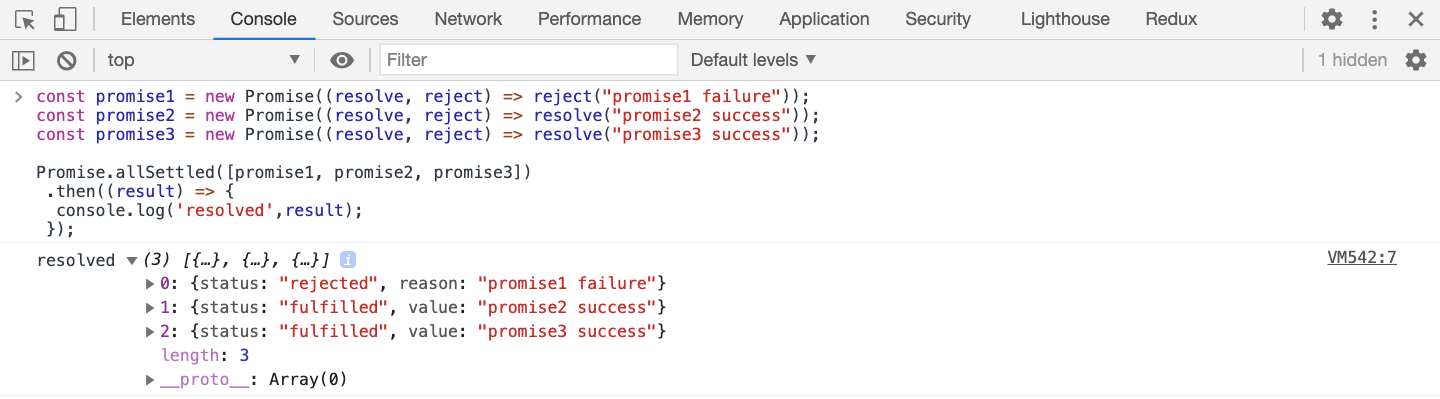
In the above case, although the primary promise is rejected, we get the results of all the guarantees contained in the .then handler.
const promise1 = new Promise((resolve, reject) => reject('promise1 failure'));
const promise2 = new Promise((resolve, reject) => reject('promise2 failure'));
const promise3 = new Promise((resolve, reject) => reject('promise3 failure'));

Promise.allSettled([promise1, promise2, promise3]).then((end result) => {
  console.log('resolved', end result);
});

/* output from `.then`:
 resolved [
  {
    "status": "rejected",
    "reason": "promise1 failure"
  },
  {
    "status": "rejected",
    "reason": "promise2 failure"
  },
  {
    "status": "rejected",
    "reason": "promise3 failure"
  }
]
*/
Here, although all the guarantees are rejected, nonetheless the .then handler will probably be executed and we get the results of every promise.
Want to discover ways to use these promise strategies in an precise React utility? Check out my earlier article.
Thanks for Reading!
That’s it for this tutorial. I hope you discovered quite a bit from it.
Want a video model of this tutorial, try my YouTube playlist.
If you wish to grasp JavaScript, ES6+, React and Node.js with easy-to-understand content material, do try my YouTube channel and remember to subscribe.
Want to remain updated with common content material concerning JavaScript, React, Node.js? Follow me on LinkedIn.