On Windows 11, it is doable to view and handle wi-fi networks by way of Command Prompt, and on this information, you’ll learn the way. While you need to use the Settings app to configure community settings fairly simply by way of a user-friend interface, you may carry out extra superior duties utilizing instructions. For occasion, you may get well the password of any profile saved on the system. You can view wealthy particulars a couple of particular profile or adapter and create reviews to troubleshoot and resolve frequent connectivity issues.
Regardless of the explanation, Windows 11 (just like earlier variations) contains the “Network Shell” (netsh) command instrument that options the “wlan” choice to view, configure, and troubleshoot wi-fi networks.
This how-to information will stroll you thru probably the most fascinating instructions to handle wi-fi with “netsh” on Windows 11.
How to view wi-fi profiles on Windows 11
To create a listing of the wi-fi profiles saved on Windows 11, use these steps:
- Open Start.
- Search for Command Prompt, right-click the highest outcome, and choose the Run as administrator choice.
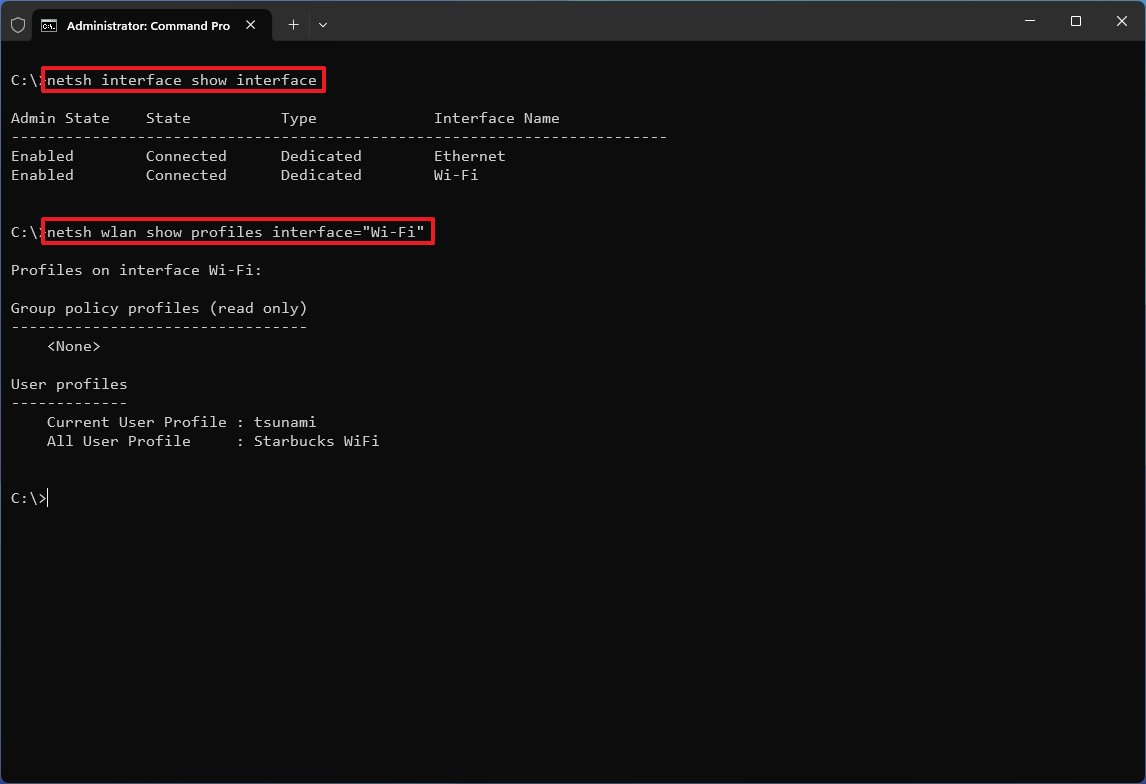
- Type the next command to view the Wi-Fi community profiles saved in your laptop and press Enter: netsh wlan present profiles

- Type the next command to point out the accessible community interfaces on the pc and press Enter: netsh interface present interface
- Type the next command to view the profiles for a selected interface and press Enter: netsh wlan present profiles interface=”WLAN-NAME”
In the command, substitute the “WLAN-NAME” with the adapter’s title. You can use the “netsh interface present interface” command to seek out the precise title. For occasion, this command exhibits the profile for the “Wi-Fi” interface: netsh wlan present profiles interface=”Wi-Fi”
Once you full the steps, the command will print the profiles saved on Windows 11.
How to view wi-fi driver particulars on Windows 11
To generate a listing of the motive force data for the wi-fi adapter on Windows 11, use these steps:
- Open Start.
- Search for Command Prompt, right-click the highest outcome, and choose the Run as administrator choice.
- Type the next command to view the wi-fi profiles saved on the pc and press Enter: netsh wlan present drivers
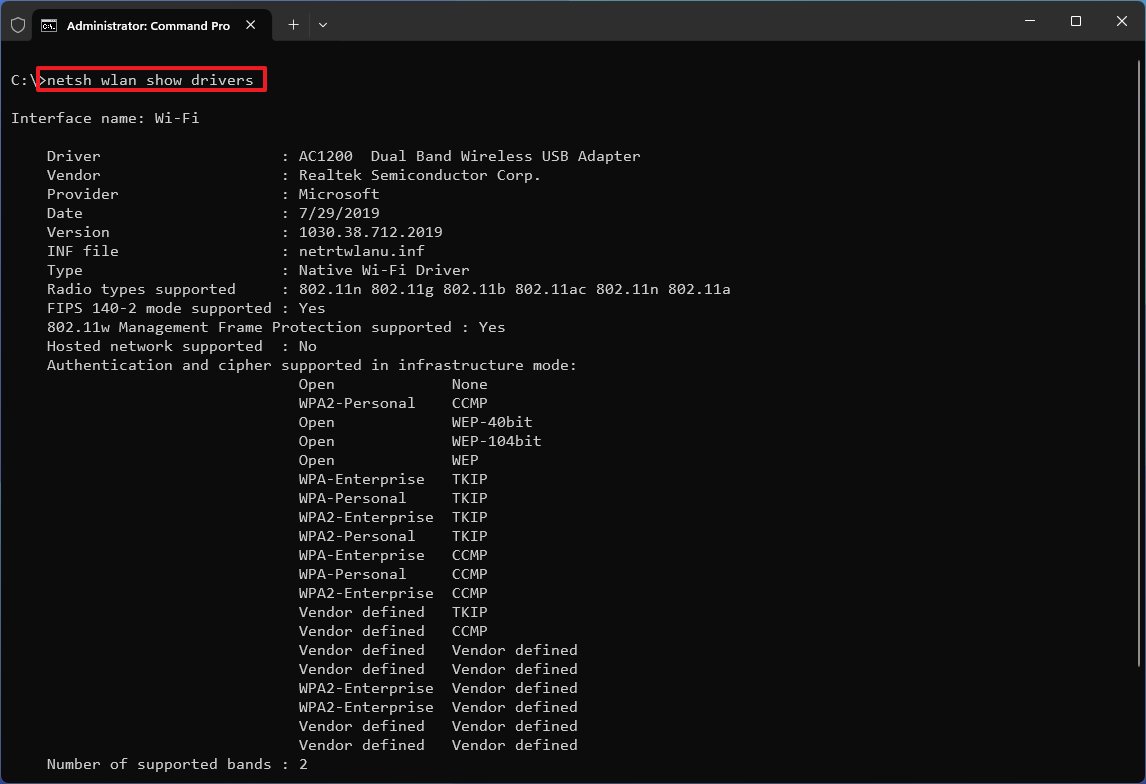
After you full the steps, the netsh command will print the motive force particulars, together with vendor, model, radio kind (802.11ax, 802.11a, 802.11n, and so on.), wi-fi authentication help, and different related data.
How to view wi-fi adapter options on Windows 11
To perceive the capabilities of the wi-fi adapter, use these steps:
- Open Start.
- Search for Command Prompt, right-click the highest outcome, and choose the Run as administrator choice.
- Type the next command to view the adapter capabilities and press Enter: netsh wlan present wirelesscapabilities
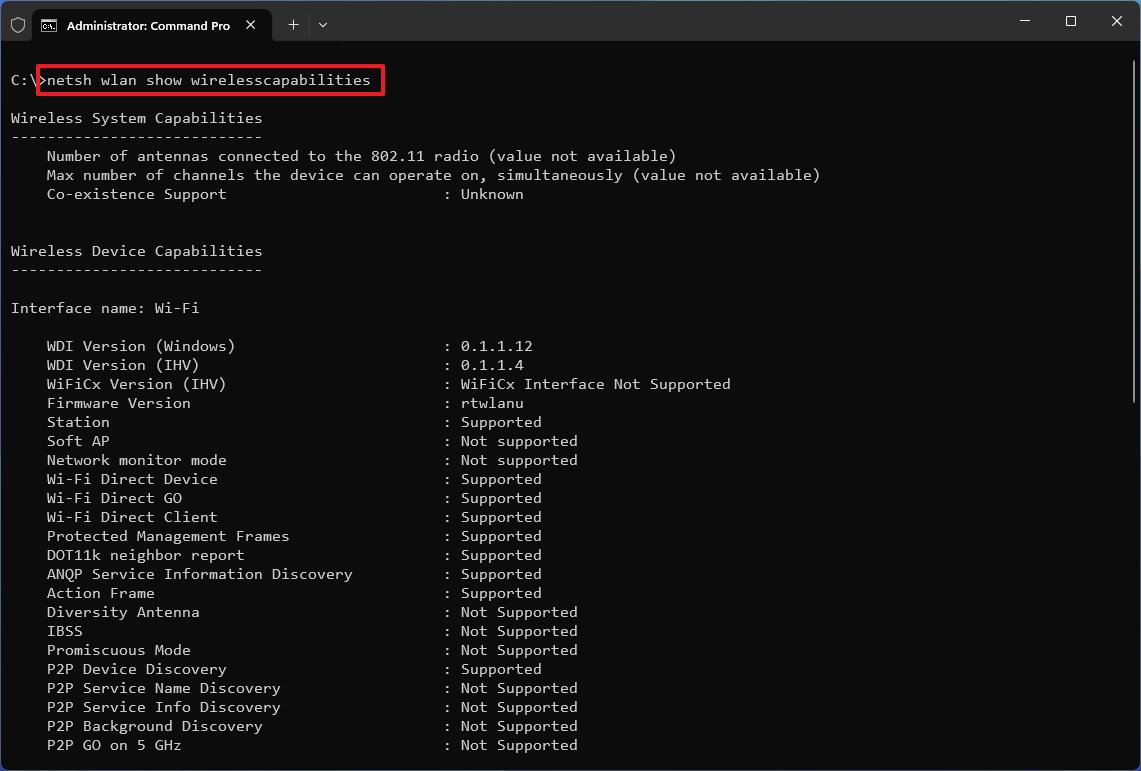
Once you full the steps, you should have a greater understanding of the options supported by the adapter.
How to view wi-fi adapter configuration on Windows 11
To perceive the present configuration of the community adapter, use these steps:
- Open Start.
- Search for Command Prompt, right-click the highest outcome, and choose the Run as administrator choice.
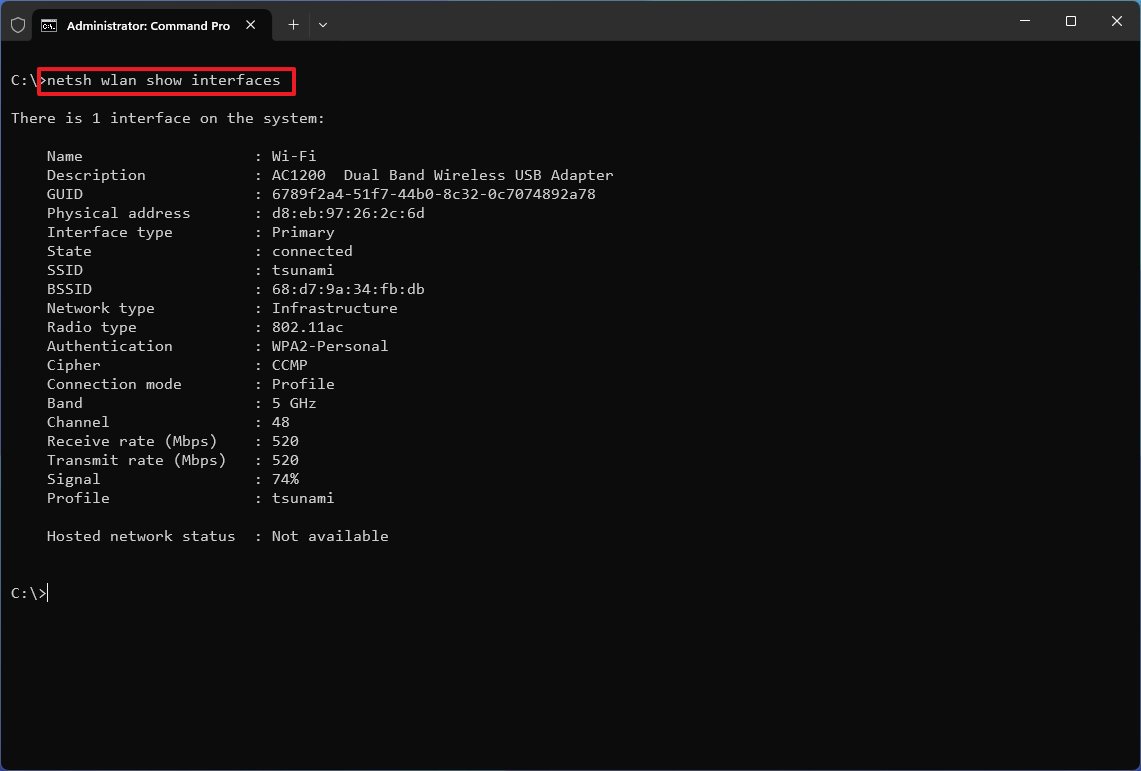
- Type the next command to view Wi-Fi settings and press Enter: netsh wlan present interfaces
- (Optional) Type the next command to point out the accessible community interfaces on the pc and press Enter: netsh interface present interface
- Type the next command to view the settings for a selected interface and press Enter: netsh wlan present interface title=”WLAN-NAME”
In the command, substitute the “WLAN-NAME” with the adapter’s title. You can use the “netsh interface present interface” command to seek out the precise title. For occasion, this command exhibits the profiles saved for the “Wi-Fi” interface: netsh wlan present interface title=”Wi-Fi”
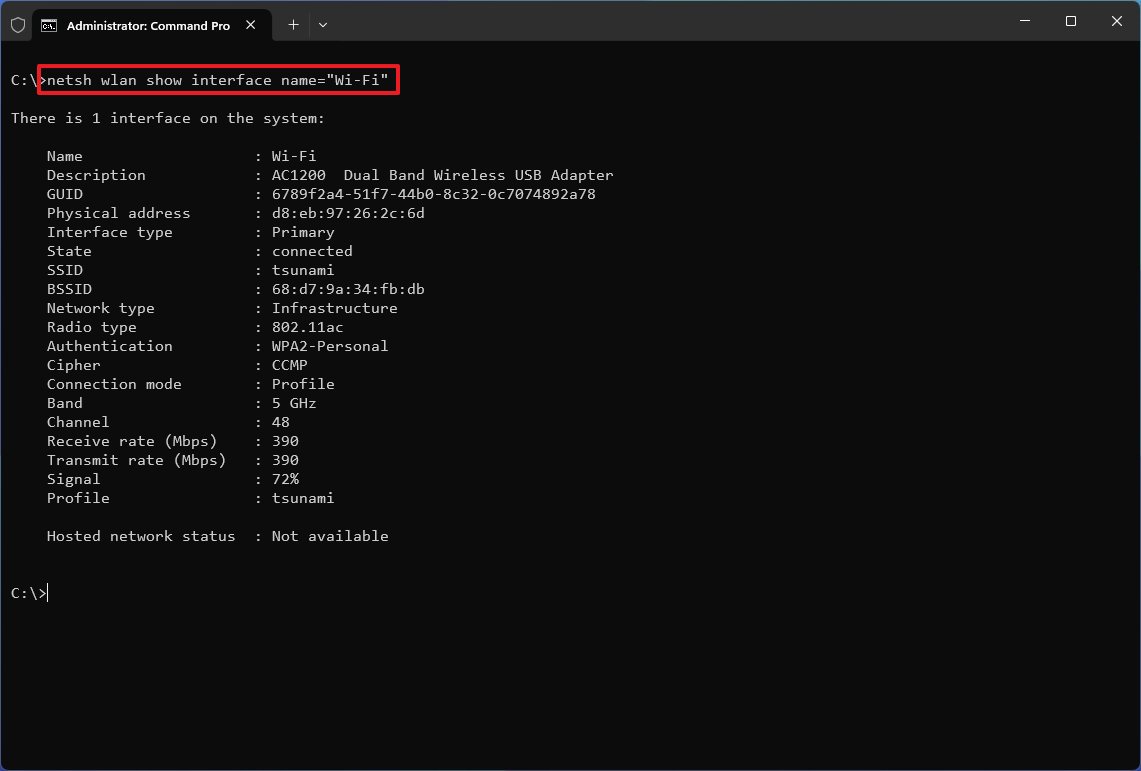
After finishing the steps, the command will show the adapter settings, together with title, description, bodily deal with, SSID, radio kind, safety authentication technique, transmission charges, and sign power.
How to view wi-fi safety key on Windows 11
To examine the wi-fi safety key with instructions, use these steps:
- Open Start.
- Search for Command Prompt, right-click the highest outcome, and choose the Run as administrator choice.
- Type the next command to view the Wi-Fi community profiles saved in your laptop and press Enter: netsh wlan present profiles
- Type the next command to view the wi-fi password and press Enter: netsh wlan present profile title=”PROFILE-NAME” key=clear
In the command, substitute the “PROFILE-NAME” with the profile title. For occasion, this command exhibits the password for the tsunami community: netsh wlan present profile title=”tsunami” key=clear
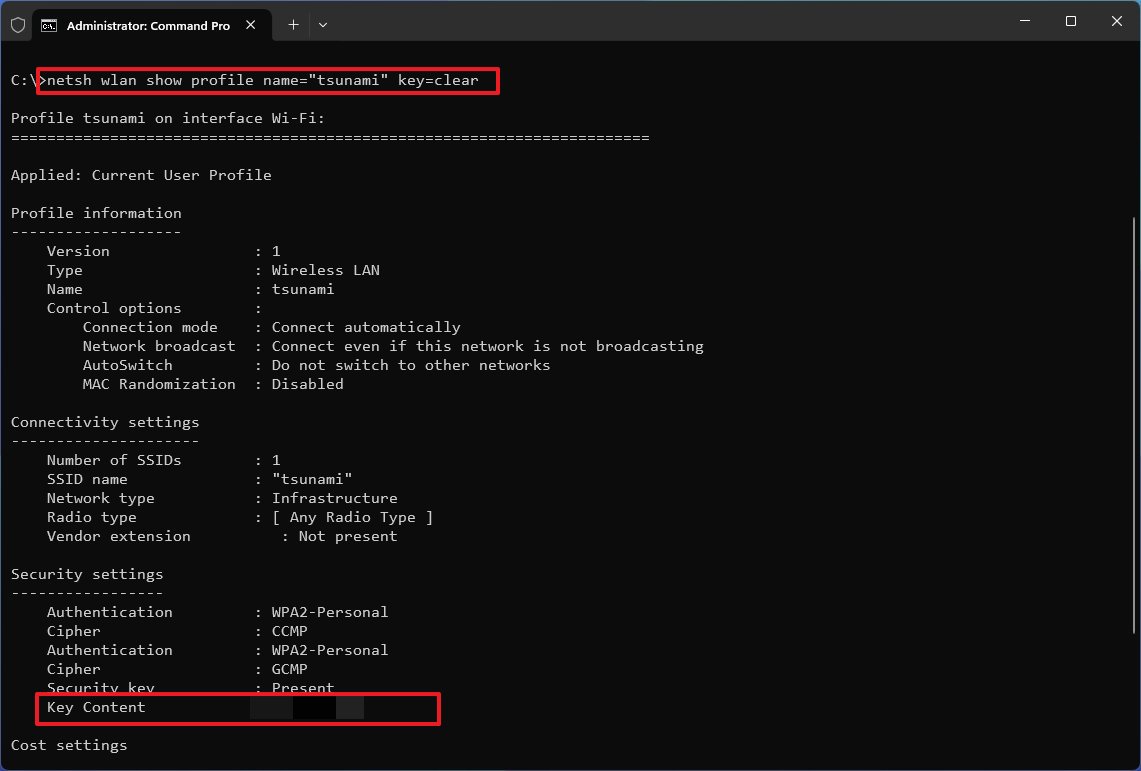
Once you full the steps, the command will print the community safety key in clear textual content for the desired profile.
How to stop wi-fi automated connection on Windows 11
To forestall your laptop from connecting to a wi-fi community mechanically, use these steps:
- Open Start.
- Search for Command Prompt, right-click the highest outcome, and choose the Run as administrator choice.
- Type the next command to view the Wi-Fi community profiles saved in your laptop and press Enter: netsh wlan present profiles
- Type the next command to show off auto-connect and press Enter: netsh wlan set profileparameter title=”PROFILE-NAME” connectionmode=handbook
In the command, substitute “PROFILE-NAME” with the title of the wi-fi profile. For occasion, this command turns off automated connections for the “tsunami” community: netsh wlan set profileparameter title=”tsunami” connectionmode=handbook
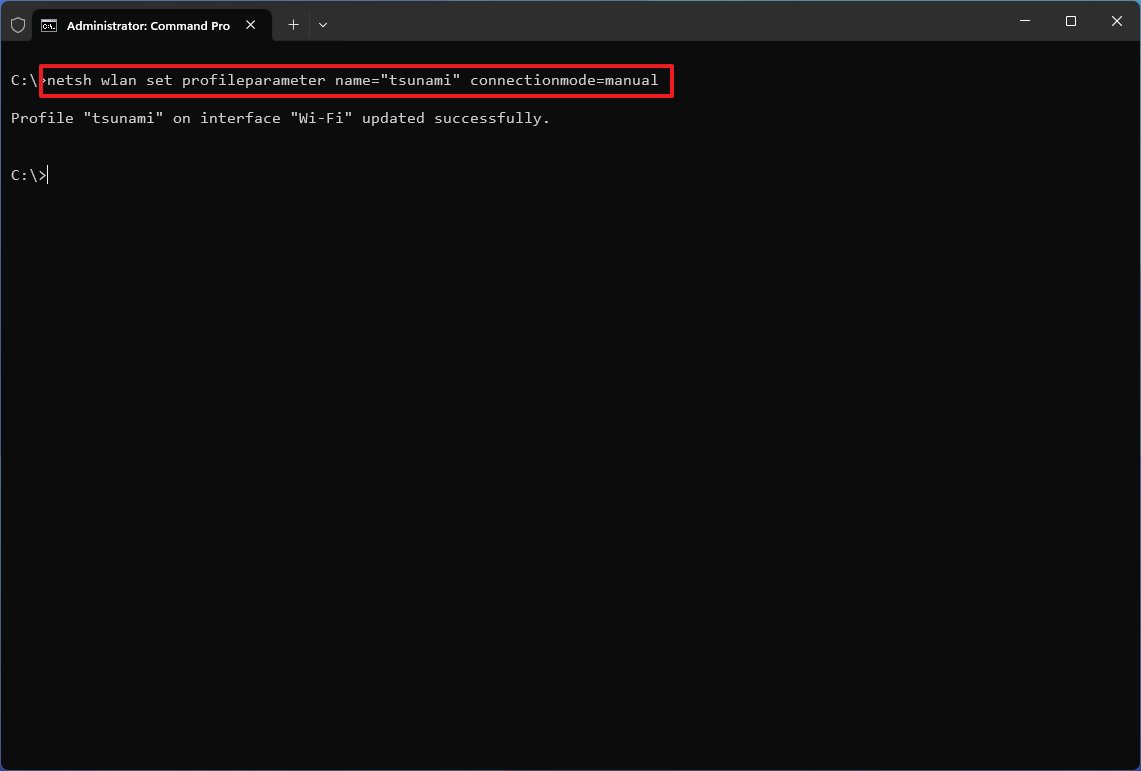
After you full the steps, the system will cease attempting to connect with wi-fi networks mechanically.
How to vary wi-fi connection precedence on Windows 11
To change the connection precedence of a Wi-Fi connection, use these steps:
- Open Start.
- Search for Command Prompt, right-click the highest outcome, and choose the Run as administrator choice.
- Type the next command to view the Wi-FI community profiles and adapter data saved in your laptop and press Enter: netsh wlan present profiles
- Type the next command to vary the community precedence and press Enter: netsh wlan set profileorder title=”PROFILE-NAME” precedence=”PRIORITY-NUMBER” interface=”ADAPTER-NAME”
In the command, substitute “PROFILE-NAME” with the wi-fi profile title you wish to change the precedence. Also, specify the precedence quantity, resembling “1” to set the best precedence, and alter “ADAPTER-NAME” for the title of the adapter. For occasion, this command makes the “tsunami” profile a precedence: netsh wlan set profileorder title=tsunami precedence=1 interface=”Wi-Fi”
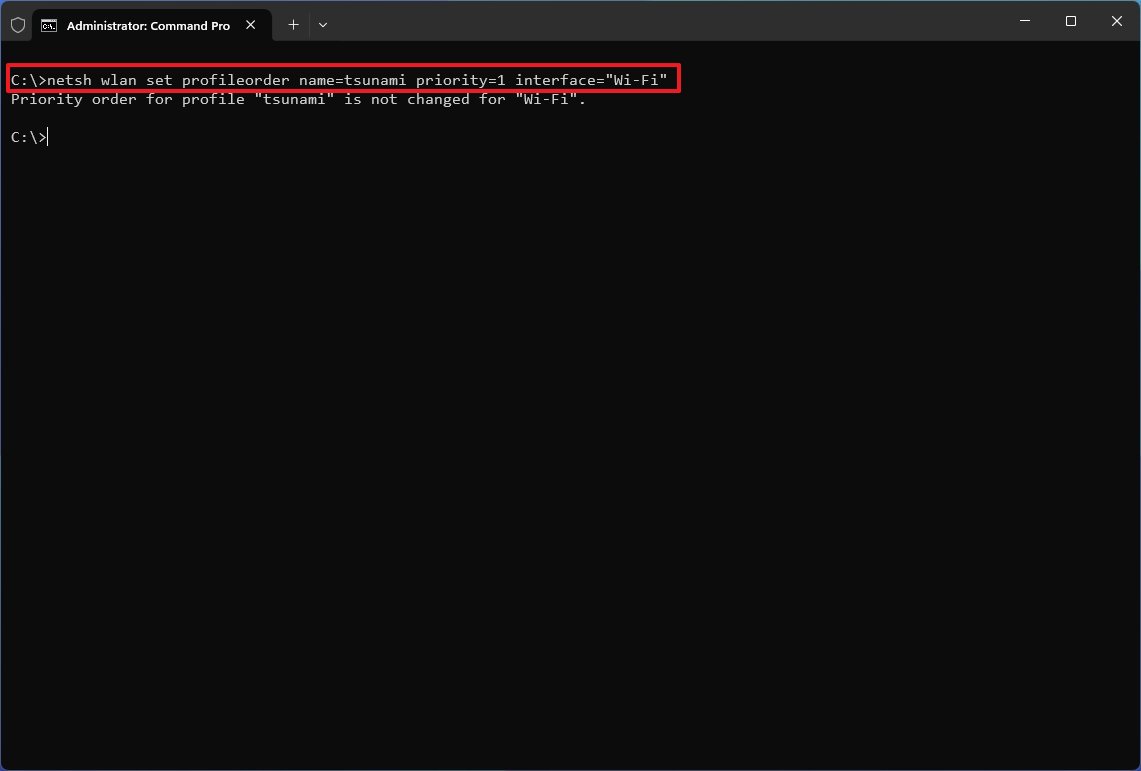
Once you full the steps, the command will set the brand new precedence for the wi-fi community.
How to delete wi-fi profile on Windows 11
To delete a Wi-Fi profile on Windows 11, use these steps:
- Open Start.
- Search for Command Prompt, right-click the highest outcome, and choose the Run as administrator choice.
- Type the next command to view the Wi-Fi community profiles saved in your laptop and press Enter: netsh wlan present profiles
- Type the next command to delete a community profile and press Enter: netsh wlan delete profile title=”PROFILE-NAME”
In the command, substitute “PROFILE-NAME” with the title of the wi-fi profile. For occasion, this command deletes the “tsunami” profile: netsh wlan delete profile title=”tsunami”
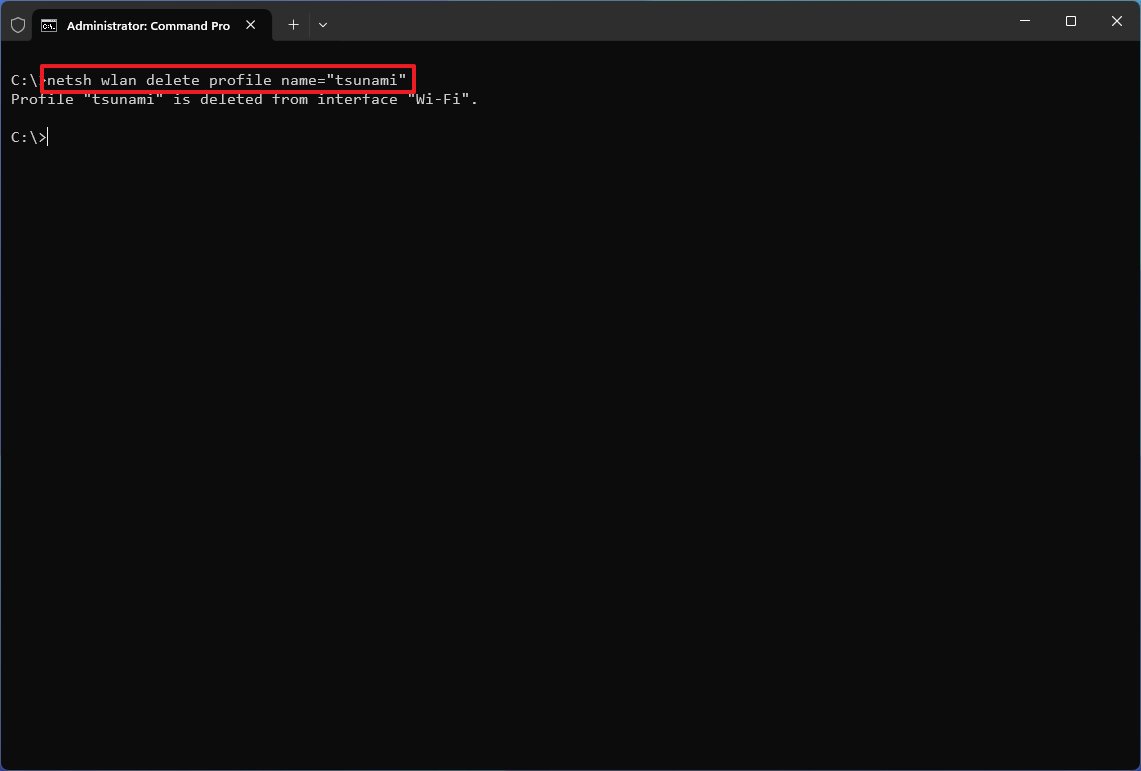
After you full the steps, the command will take away the wi-fi profiles from Windows 11.
How to export wi-fi profiles on Windows 11
Although Windows 11 can sync the wi-fi community profiles to the cloud and throughout gadgets when establishing an account with a Microsoft account, it is also doable to export and import your recordsdata utilizing the netsh command.
Export wi-fi settings
To export the wi-fi settings by way of Command Prompt, use these steps:
- Open Start.
- Search for Command Prompt, right-click the highest outcome, and choose the Run as administrator choice.
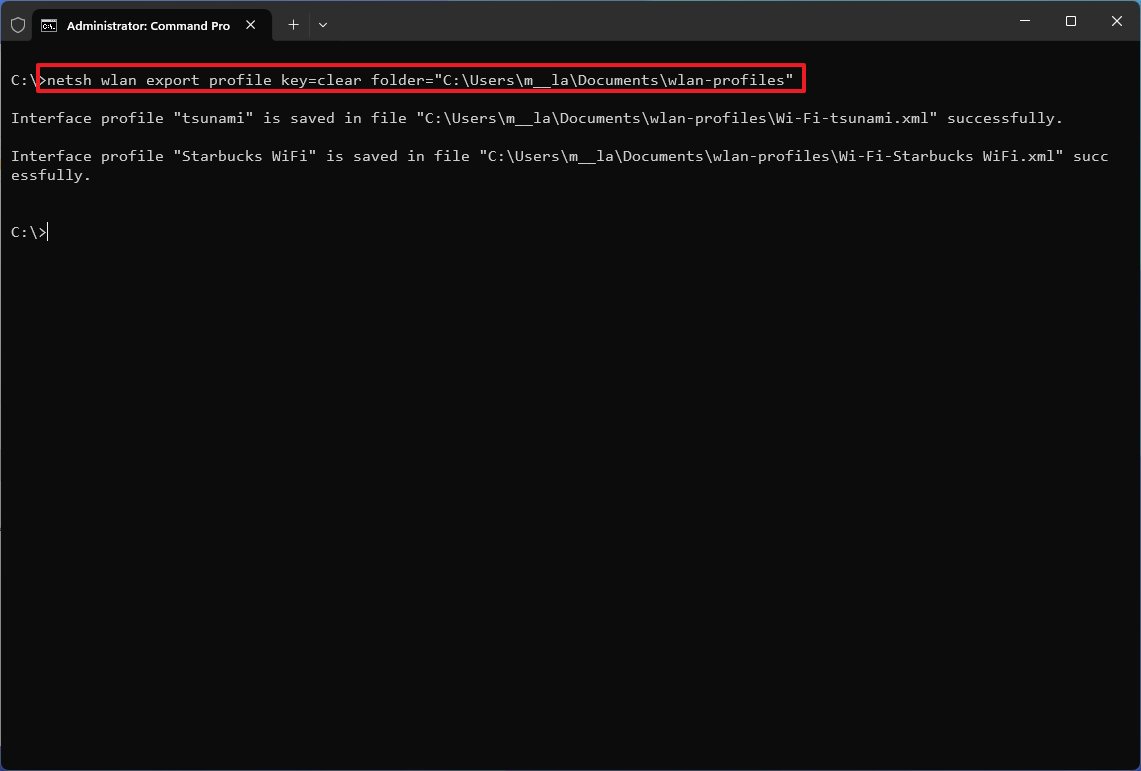
- Type the next command to export the wi-fi profiles saved on the system and press Enter: netsh wlan export profile key=clear folder=”FOLDER-PATH”
In the command, substitute “FOLDER-PATH” with the trail to export the profile. For occasion, this command exports the profiles to the “wlan-profiles” folder: netsh wlan export profile key=clear folder=”C:UsersuserDocumentswlan-profiles”
- (Optional) Type the next command to export a selected profile and press Enter: netsh wlan export profile title=”PROFILE-NAME” key=clear folder=”FOLDER-PATH”
In the command, substitute the “PROFILE-NAME” with the profile title you wish to export and the “FOLDER-PATH” with the folder location to export the knowledge. For occasion, this command exports solely the “tsunami” profile to the “wlan-profiles” folder: netsh wlan export profile title=”tsunami” key=clear folder=”C:UsersuserDocumentswlan-profiles“
Once you full the steps, the command will export the Wi-Fi profiles to the desired path as an XML file for every profile. The “key=clear” choice will retailer the safety key as clear textual content.
Import wi-fi settings
To import the Wi-Fi settings with instructions, use these steps:
- Open Start.
- Search for Command Prompt, right-click the highest outcome, and choose the Run as administrator choice.
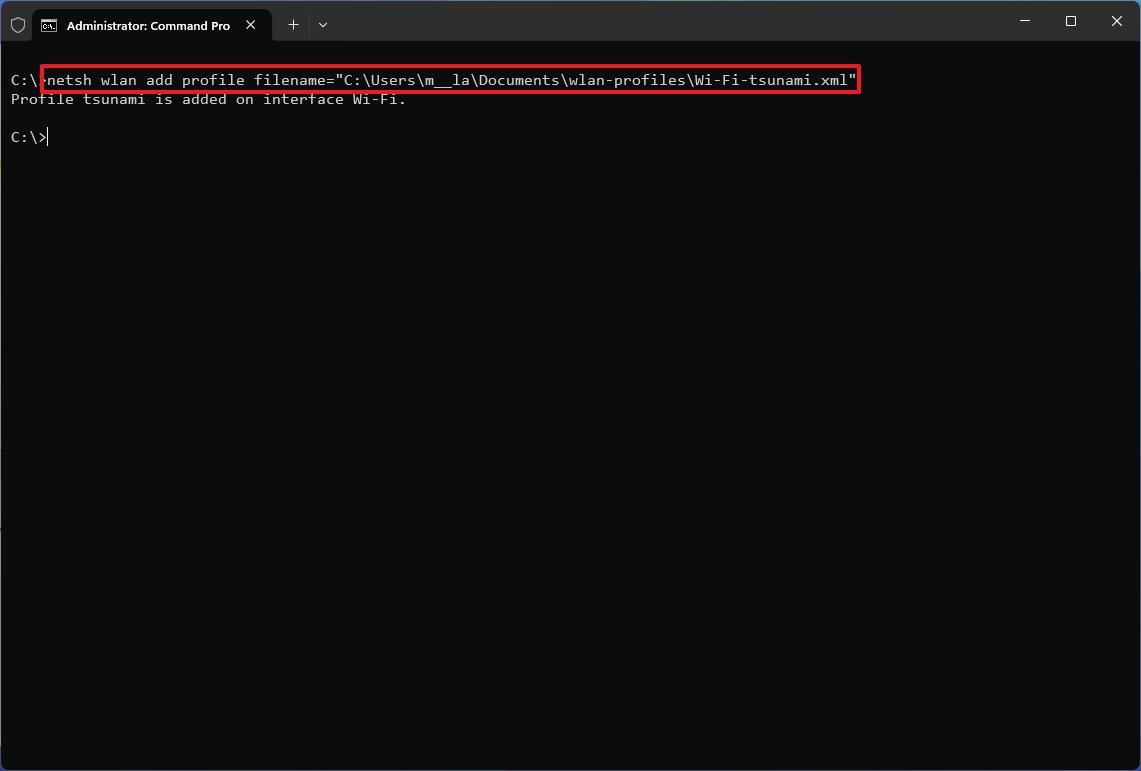
- Type the next command to import the wi-fi profiles and press Enter: netsh wlan add profile filename=”FOLDER-PATH”
In the command, substitute “FOLDER-PATH” with the trail and file title for the exported file. For occasion, this command imports a selected profile from the “wlan-backup” folder: netsh wlan add profile filename=”C:UsersuserDocumentswlan-profilesWi-Fi-tsunami.xml”
- Quick tip: If you’ve a number of profiles, you need to repeat the steps however replace the file path and filename of the exported profile.
- (Optional) Type the next command to import a profile to a selected wi-fi interface and present person and press Enter: netsh wlan add profile filename=”FOLDER-PATHWLAN-EXPORTED-FILE” Interface=”INTERFACE-NAME” person=present
In the command, change “FOLDER-PATH” for the exported file’s path and title containing the profile data and “INTERFACE-NAME” with the interface title to import the settings. For occasion, this command imports the settings to the Wi-Fi interface: netsh wlan add profile filename=”C:UsersuserDocumentswlan-profilesWi-Fi-tsunami.xml” Interface=”Wi-Fi” person=present
After you full the steps, the profile will import into the system, and you need to use it to connect with the wi-fi community with out further steps.
How to create wi-fi adapter report on Windows 11
To create a report of the wi-fi adapters, use these steps:
- Open Start.
- Search for Command Prompt, right-click the highest outcome, and choose the Run as administrator choice.
- Type the next command to create a wi-fi adapter report and press Enter: netsh wlan present wlanreport

- Type the next command to open the report and press Enter: C:ProgramDataMicrosoftWindowsWlanReportwlan-report-latest.html
Once you full the steps, the wi-fi report will open in your net browser.
The report comprises visuals of the connectivity standing, together with data resembling when the connection began, when it bought disconnected, errors, and extra. In the report, additionally, you will discover particulars concerning the community adapters’ data, profitable and failed periods, disconnect causes, and extra. The wi-fi report contains priceless particulars that can assist you troubleshoot many connectivity points.
How to attach wi-fi community manually on Windows 11
To hook up with the Wi-Fi community manually with instructions, use these steps:
- Open Start.
- Search for Command Prompt, right-click the highest outcome, and choose the Run as administrator choice.
- Type the next command to disconnect from the wi-fi community and press Enter: netsh wlan disconnect
- Type the next command to permit the system to connect with a wi-fi community and press Enter: netsh wlan join title=PROFILE-NAME
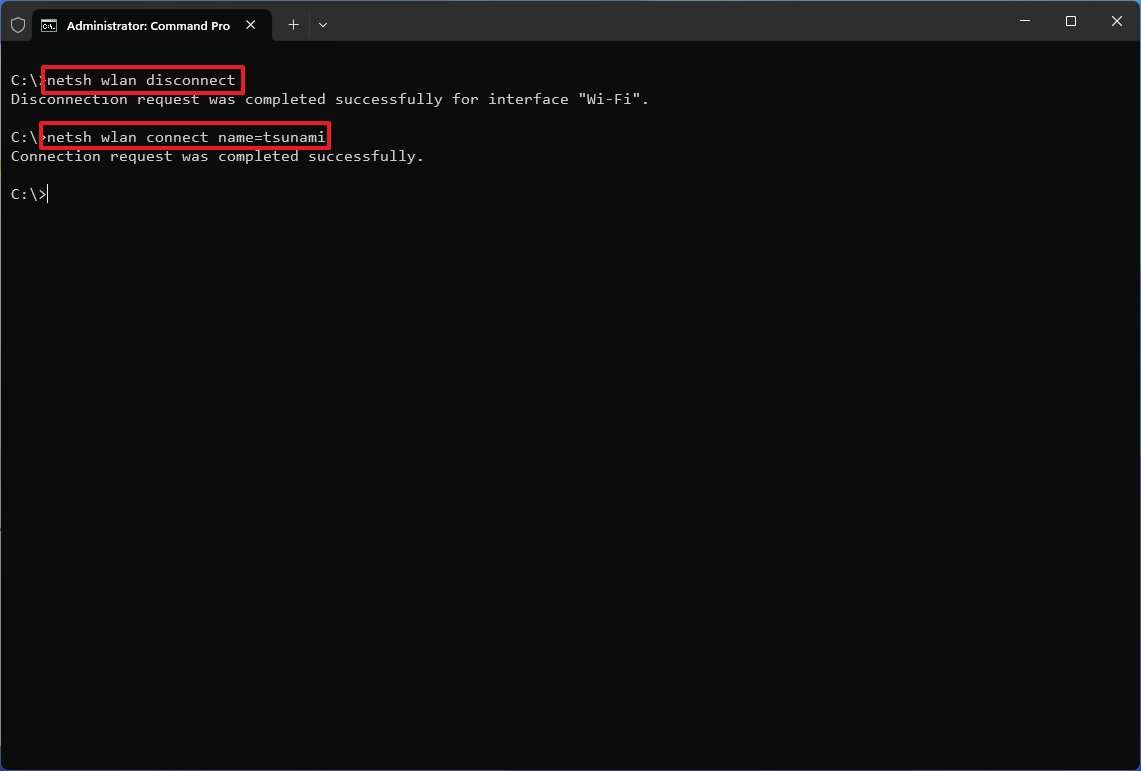
After you full the steps, the command will join or disconnect the system from the wi-fi community. If you are connecting to a community, within the command, ensure that to specify the title of the profile for the community you are attempting to determine a connection.
More assets
For extra useful articles, protection, and solutions to frequent questions on Windows 10 and Windows 11, go to the next assets: