
In this step-by-step information, you will discover ways to construct a fundamental Blender file with included basic animations. After that, you will discover ways to combine Three.js along with your React apps utilizing React Three Fiber.
Getting aware of these ideas might help you be certain your upcoming React.js functions stand out.
🔐 Here’s What We’ll Cover:
- Crafting a Blender mannequin, encompassing animations, supplies and the export course of.
- Building a React.js utility built-in with Three.js by way of React Three Fiber.
- Incorporating your personally created Blender mannequin into the React.js utility.
📝 Prerequisites:
- A basic grasp of the 3D software program Blender is advisable.
- Basic familiarity with React.js is required.
- Prior expertise with Three.js is just not essential.
Table of Contents
- 💭 What are Three.js and Blender?
- 🔧 How to Set Up React.js with Three.js
- 🔨 How to Create a Blender Model
- ✏️ Texture Baking for Procedural Materials
- ✒️ How to Implement the Blender Model into the React.js Application
- 📄 Additional data
- 📋 Wrap-up
💭 What are Three.js and Blender?
Three.js is a JavaScript library that functionas as an API, permitting you to exhibit 3D fashions inside internet browsers.
Leveraging Three.js helps you seamlessly combine interactivity and distinctive functionalities into your web site.
Blender is a sturdy software program tailor-made for crafting and refining 3D fashions. Its versatility gives boundless alternatives, catering to a large spectrum of inventive visions.
Beyond its show capabilities, Blender gives you with an array of instruments encompassing cameras, lighting, and even post-production enhancements.
When used collectively, these instruments facilitate boundless creativity, permitting you to seamlessly translate your inventive creations into your upcoming web site mission.
🔧 How to Set Up React.js with Three.js
To begin the method, set up the React.js utility:
npx create-react-app my-app
Next, we’ll set up Three.js and React Three Fiber. React Three Fiber serves as a React renderer for Three.js, harnessing the ability of React parts to streamline Three.js integration inside a React.js atmosphere:
npm set up three @react-three/fiber
For an enriched Three.js expertise, we’ll additionally combine React Three Drei, a bundle that introduces an assortment of helpers for numerous Three.js eventualities, together with a number of digicam controls, for instance:
npm set up @react-three/drei
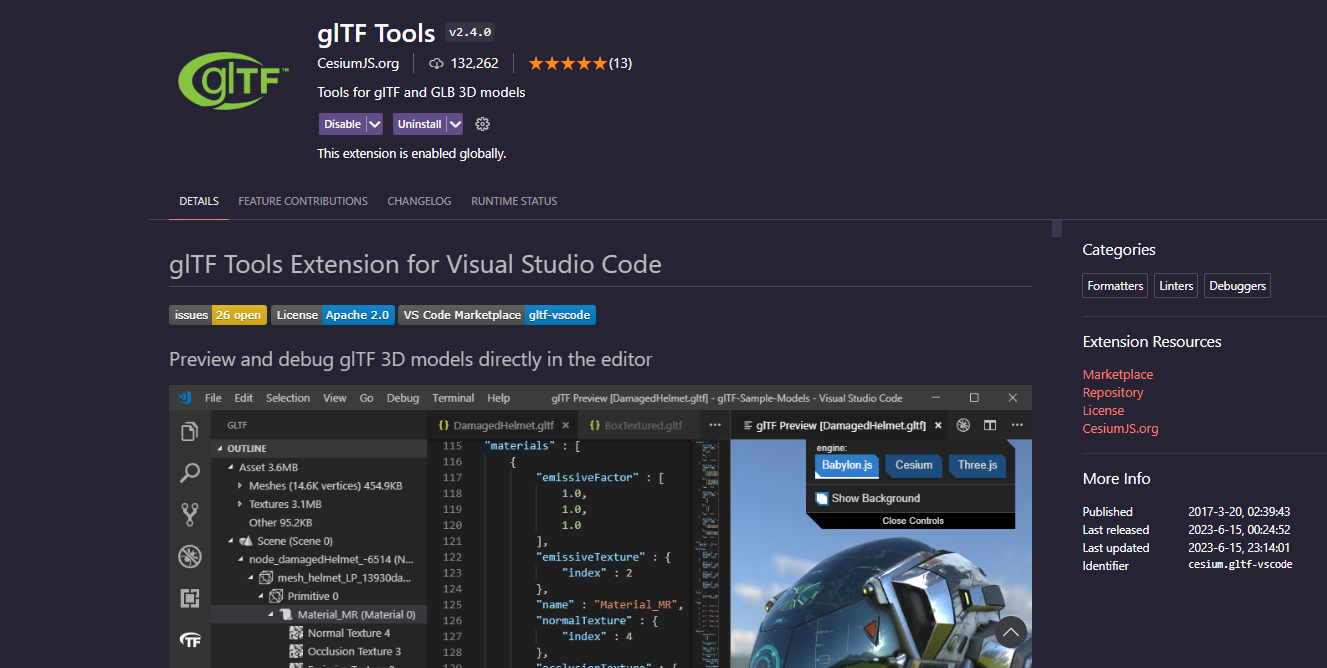
glTF Tools extension
I additionally suggest putting in the glTF Tools extension. Although not strictly essential, this extension might help you carry out numerous duties.
If you are utilizing Visual Studio Code as your Integrated Development Environment (IDE), you possibly can conveniently add the extension via the extensions tab. Again, this extension is non-obligatory, however it could considerably simplify sure processes afterward. I’ll use it all through this tutorial:
Completed setup for Three.js in React.js
The dependencies within the bundle.json file of our React.js utility now seem as follows:
"dependencies": {
    "@react-three/drei": "^9.80.2",
    "@react-three/fiber": "^8.13.6",
    "@testing-library/jest-dom": "^5.17.0",
    "@testing-library/react": "^13.4.0",
    "@testing-library/user-event": "^13.5.0",
    "react": "^18.2.0",
    "react-dom": "^18.2.0",
    "react-scripts": "5.0.1",
    "three": "^0.155.0",
    "web-vitals": "^2.1.4"
},These dependencies are adequate for carrying out a wide range of duties with Three.js in a React.js atmosphere. Of course, you possibly can incorporate any extra libraries chances are you’ll want for functions past Three.js integration.
In addition to this, I’ve additionally made the code from this tutorial obtainable on GitHub. This will assist you to rapidly entry the knowledge with out having to scroll via the complete article.
🔨 How to Create a Blender Model
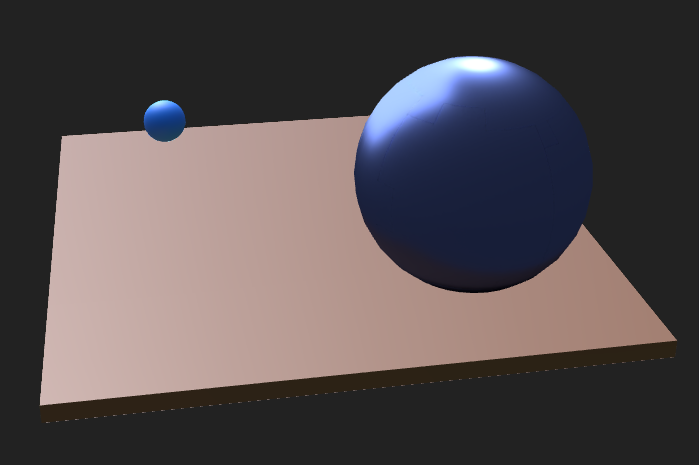
To start, our preliminary job entails making a Blender mannequin that may then be built-in into our React.js utility. For this stage, let’s think about a scene within the Layout tab the place we have three objects: two spheres and one airplane. You can add such objects with the Shift + A shortcut in Blender.
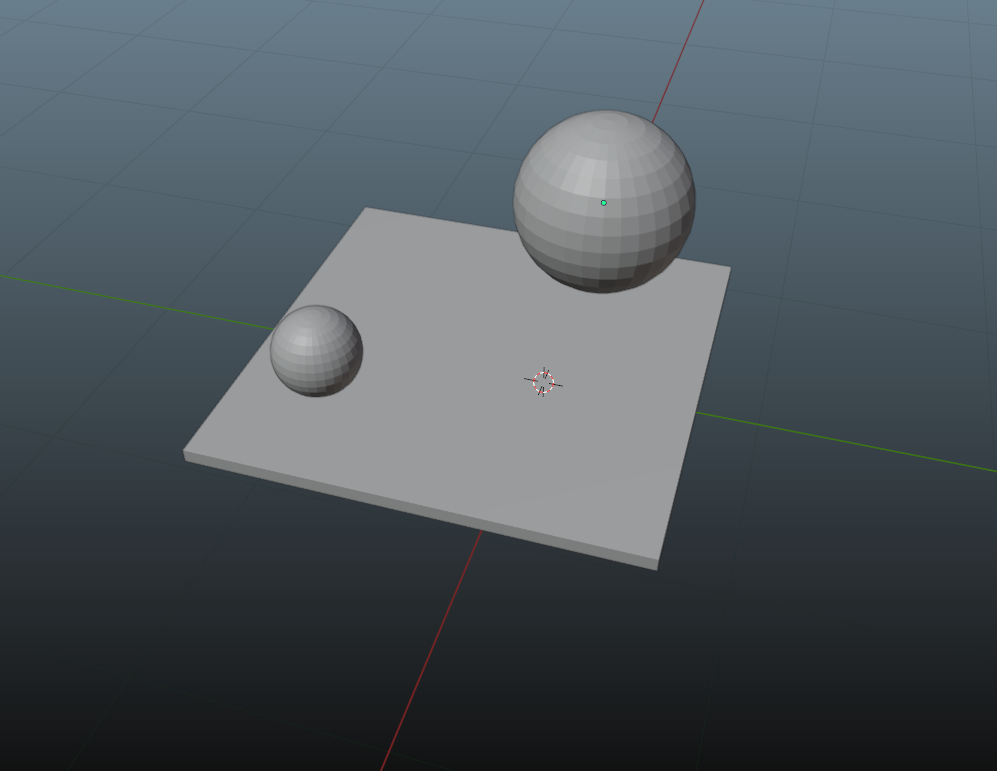
This composition consists of only a airplane and two spheres, with no extra particulars. Of course, you possibly can work on extra elaborate scene and mannequin designs in accordance with your preferences.
But for the aim of illustrating the basic technique of incorporating your customized Blender fashions into React.js, this fundamental instance will serve us simply effective.
How so as to add animations to the mannequin
Now, our focus shifts to introducing fundamental animations to all three objects inside this Blender scene. These animations can facilitate motion, rotation, and even changes in scale for the objects, enabling dynamic transformations.
In order so as to add animations in Blender to your objects, you possibly can swap to the Animation tab, subsequent to the Shading and Rendering tab.
In the Animation tab, you possibly can add factors to a sure body. For occasion, if you wish to shift a sphere a bit to the left, start by including a beginning keyframe (right-click on the article, select “Insert Keyframe,” then choose “Location”).
Afterward, transfer forward a number of frames on the article’s animation timeline, alter the article’s place, and repeat the identical course of. This approach, you will have two keyframes: the preliminary one and the brand new place.
Remember, this movement is in a single route. If you wish to repeat the animation, it is going to transfer to the brand new location after which return to its preliminary place with a soar.
To make the motion smoother, you possibly can copy the preliminary keyframe and insert it on the finish. This will make the article transfer again with a easy movement after reaching the brand new location. This can be how I arrange the keyframes in our Blender mannequin.
Of course, you possibly can add extra keyframes to make extra advanced animations. This is only a fundamental introduction to beginning with Blender animations. Like many features of Blender, there’s much more to discover and study.

In this context, it is not essential to have a radical understanding of the specifics of those animations we added right here. So, you do not really want to know to which actual place the primary sphere is being moved via the animation.
The key level is to acknowledge their presence, as they are going to be built-in into our React.js utility at a later stage so we are able to activate them within the browser.
How so as to add colours
Moving ahead, we’ll add some easy colours for the small sphere and the underlying airplane, which you are able to do throughout the Shading tab, for instance.
For fundamental colours, you may as well go to the Material Properties part of the article (right-click on the article, then select the second-to-last class on the backside). But I wish to deal with a particular scenario you would possibly encounter along with your fashions afterward. Therefore, I’ll solely use the Shading tab for setting object colours on this tutorial.
In the Shading tab, you possibly can add nodes on the backside of the display. These nodes can modify the colour and texture of an object, amongst different issues. You’ll additionally discover Vector and Shader nodes that, when mixed, can create distinctive visuals to your objects.
All these changes apply to a particular materials. So, if you need the identical visible for various objects, you possibly can merely apply the identical materials to them.
The Principled BSDF and Material Output nodes are initially generated after we open the Shading tab to lookup on of our object’s materials for the primary time. Both nodes are just about the fundamental case.
The Principled BSDF has a number of settings you possibly can mess around with. In our case we simply wish to change the Base Color property to a blue coloration.
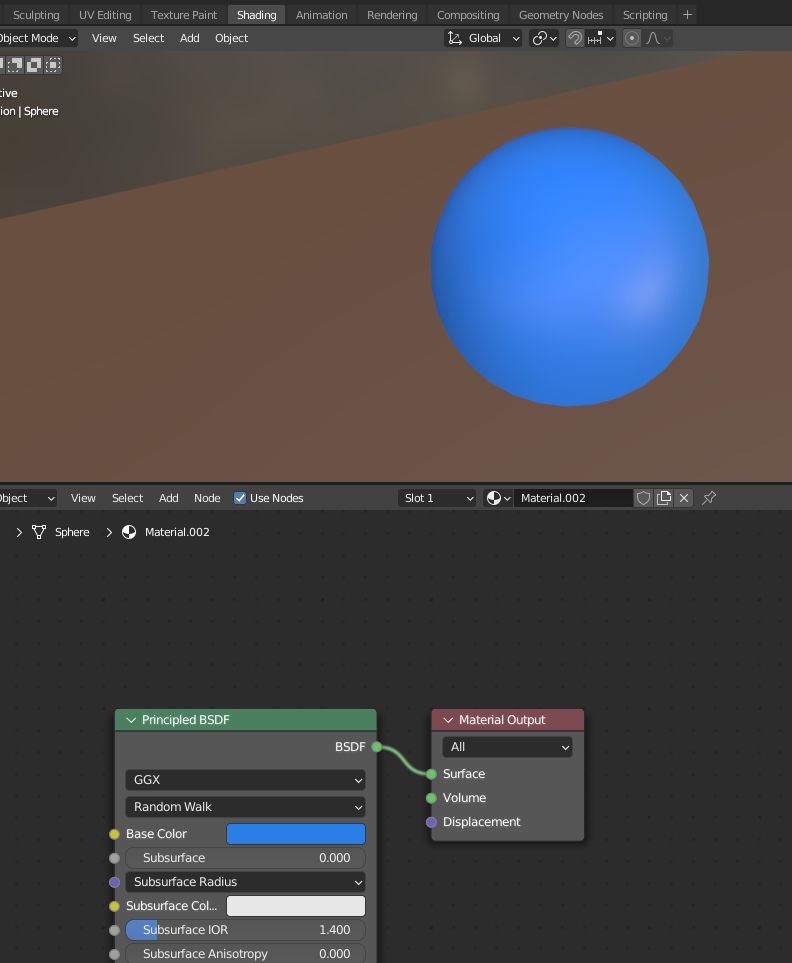
Base Color throughout the Principled BSDF nodeFor the bigger sphere, an identical materials utility is used. But, in distinction to the Principled BSDF node, we’ll use the Glossy BSDF node which is such a node from the Shader class. This will assist us acknowledge a doable concern that you simply would possibly come throughout when designing a Blender mannequin to your React.js utility – which you will note afterward.
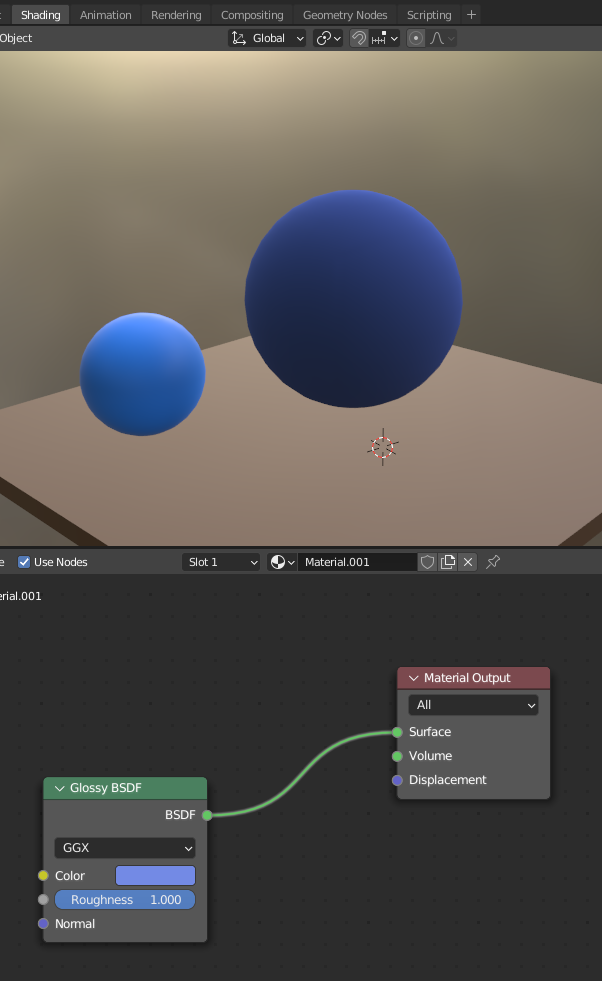
Glossy BSDF node so as to add a cloth to the big sphereOnce we have carried out this, we’re able to export our Blender mannequin. Note that this model is significantly simplified. You can work on extra detailed mannequin designs tailor-made to your preferences. Still, the general workflow stays comparable.
How to export the mannequin
To export the mannequin, we have to generate a .glb/.gltf file. This is essential as Three.js expects explicit file codecs for compatibility, and on this occasion, a .glb or .gltf file aligns with the library’s necessities.
So, as soon as you’ve got completed creating your mannequin with objects, animations, colours, and extra, you are able to do the next:
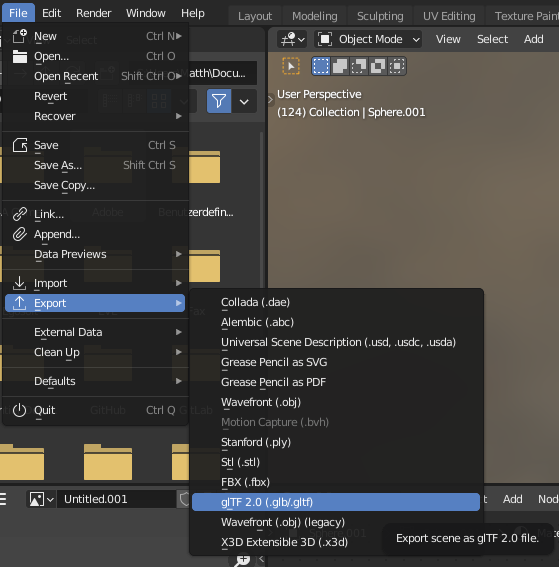
- Click on the File tab situated on the prime left nook.
- Choose Export from the choices that seem. Now, a wide range of export codecs will likely be proven.
- If you intend to make use of your mannequin with Three.js in your utility, you want to choose the
glTF 2.0 (.glb/.gltf)choice, like I discussed earlier.
After choosing this feature, a brand new window will pop up. This window helps you to choose the folder the place you wish to save your file.
On the appropriate facet of this window, there are extra decisions. You can determine which particular objects you wish to export, as an illustration. In most conditions, the default settings ought to work effectively. Just keep in mind that you may alter these settings to your liking if essential.
glTF 2.0 (.glb/.gltf) format.How to visualise the exported mannequin
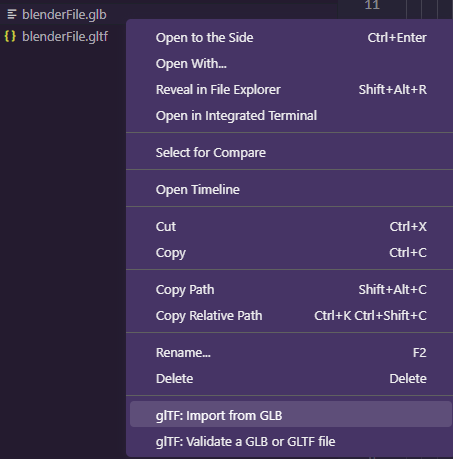
Next, let’s transition to Visual Studio Code and navigate to the folder the place we have saved our exported file.
Within this listing, you will discover a .glb file. Referring again to the glTF Tools extension setup from earlier, you possibly can merely right-click on the .glb file with a view to discover two extra choices positioned on the backside, referred to as glTF: Import from GLB and glTF: Validate a GLB or GLTF file.
In this state of affairs, we’ll go for the glTF: Import from GLB choice. This motion will generate a .gltf file in the identical folder, in our case blenderFile.gltf.
.gltf file from the unique .glb file we exported in Blender with the glTF Tools extensionWe’ve chosen this method to deliver enhanced accessibility to the .gltf file, enabling direct viewing inside Visual Studio Code via the glTF Tools extension. This will be fairly useful to test in your file previous to its precise implementation.
If we entry the newly created .gltf file, we are able to observe a bunch of knowledge based mostly on the Blender mannequin. It’s essential to notice that the specifics might differ in your case, as they’re tailor-made to mirror the attributes of the objects and scenes inside your Blender mission.
If we have a look at the upper-right nook, there’s a image that appears like a dice with a cone subsequent to it. By clicking on this image, you possibly can seamlessly preview your Blender scene instantly inside your IDE. This performance is solely accessible for the .gltf file and never relevant to the .glb file on this case.
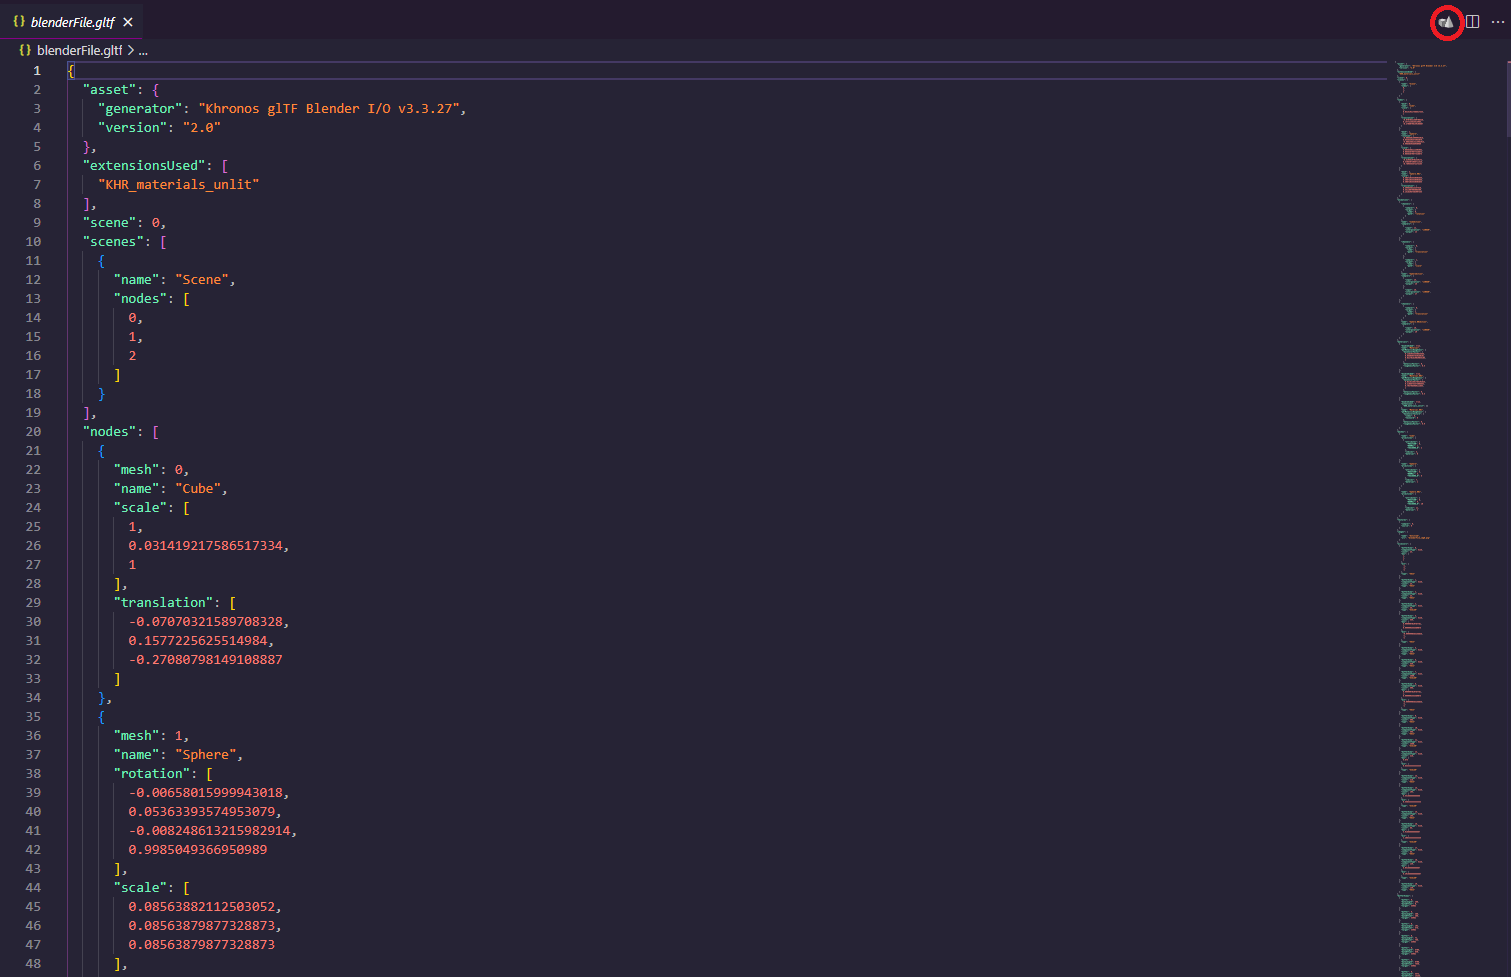
.gltf file with the choice to view the mannequin instantly in Visual Studio Code (within the upper-right nook, circled in purple)It’s price noting that you do not have to do that via the glTF Tools extension. Alternatively, numerous web sites assist you to add your file for visualization. But I’ve personally discovered this in-IDE method to be particularly handy. It centralizes the method, enabling you to evaluate your file’s integrity earlier than really implementing it.
If you discover any errors, this observe helps you to preemptively discover out whether or not the difficulty is predicated on a problematic file export or simply an implementation oversight inside your React.js utility. Consequently, I wholeheartedly suggest evaluating your mannequin file following its export from Blender.
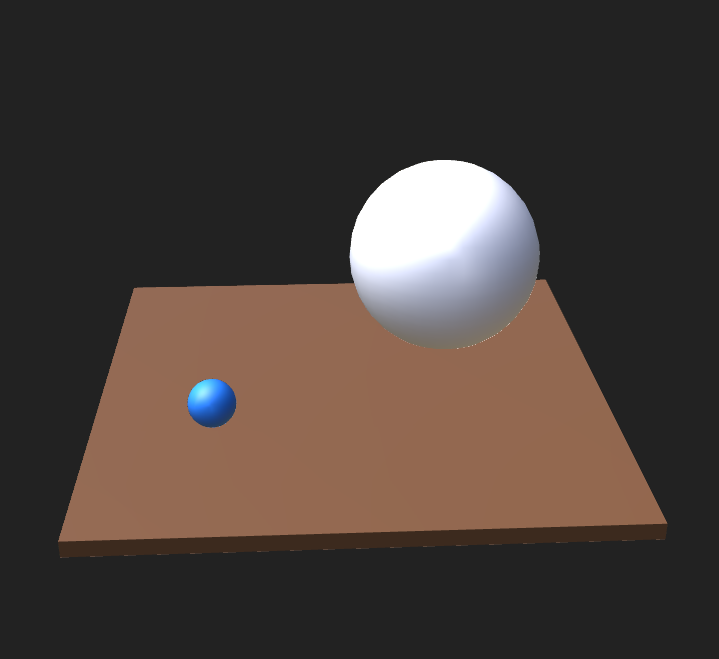
By utilizing the glTF Tools extension to view our Blender mannequin in Visual Studio Code, we are able to see that every one three objects are accurately acknowledged. Both the small sphere and the airplane are proven of their supposed colours.
But the big sphere would not have the anticipated coloration assigned and simply seems with a default white coloration as an alternative.
This discrepancy raises the query: what led to this anomaly? It’s circumstances like this that display how helpful it’s to preview your mannequin earlier than integrating it into your React.js utility.
By scrutinizing your mannequin at this stage, you possibly can affirm that the difficulty originates from the Blender mannequin itself quite than the implementation course of, on condition that we have not carried out any implementation but.
This pre-implementation evaluation proves to be helpful and allows you to diagnose and deal with potential problems earlier than continuing with the implementation course of in React.js.
✏️ Texture Baking for Procedural Materials
In a nutshell, Blender gives the flexibleness to make use of procedural nodes to your supplies. While these nodes operate seamlessly inside Blender, they don’t seem to be instantly appropriate with different recreation engines or software program frameworks reminiscent of Three.js.
To study extra, think about watching the next video. In simply 10 minutes, it demonstrates the method of texture baking, which successfully resolves the difficulty at hand.
Personally, when confronted with this problem and initially unsure about its nature, I discovered this video to be a invaluable useful resource for gaining deeper insights into the subject material.
In our particular state of affairs, whereas we would not encounter as advanced a scenario as seen within the video, we’re nonetheless confronted with using nodes that lack direct compatibility with numerous software program instruments.
Next, we’ll briefly stroll via the steps talked about within the video. However, for those who’re involved in delving deeper into this course of, I extremely suggest watching the video.
How to create a picture texture node
To begin, within the Shading tab for the fabric containing the Glossy BSDF node, we’ll introduce an Image Texture node and join it to a brand new picture (by click on on New).
We’ll go away the settings at their default values, which suggests a width and peak of 1024px. Using bigger values would significantly prolong the processing time we’ll face. Still, it is essential to notice {that a} bigger texture can supply extra element and an general improved look.
In our present scenario, we’re aiming for a fast course of. But for extra important initiatives, visible high quality may be essential. In such circumstances, choosing a better decision could possibly be fascinating.
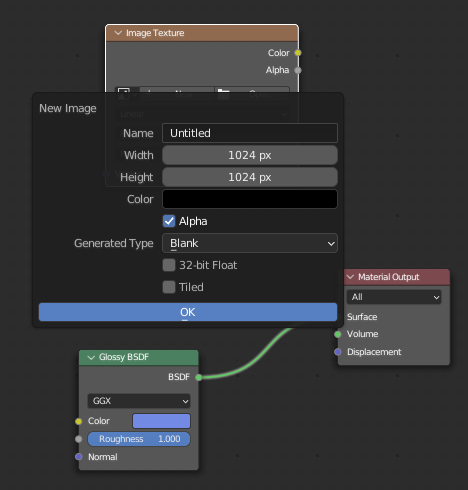
Image Texture node and assigning a brand new picture to it with default settingsHow to use the Smart UV Project course of
Next, we have to make use of the Smart UV Project choice situated within the UV Editing tab. Essentially, this motion unwraps the faces of the actual object onto a texture.
This course of permits us to specify which elements of the feel ought to be coloured and modified as quickly as we’re again within the Shading tab. To make this course of efficient, we should choose all of the faces of the big sphere.
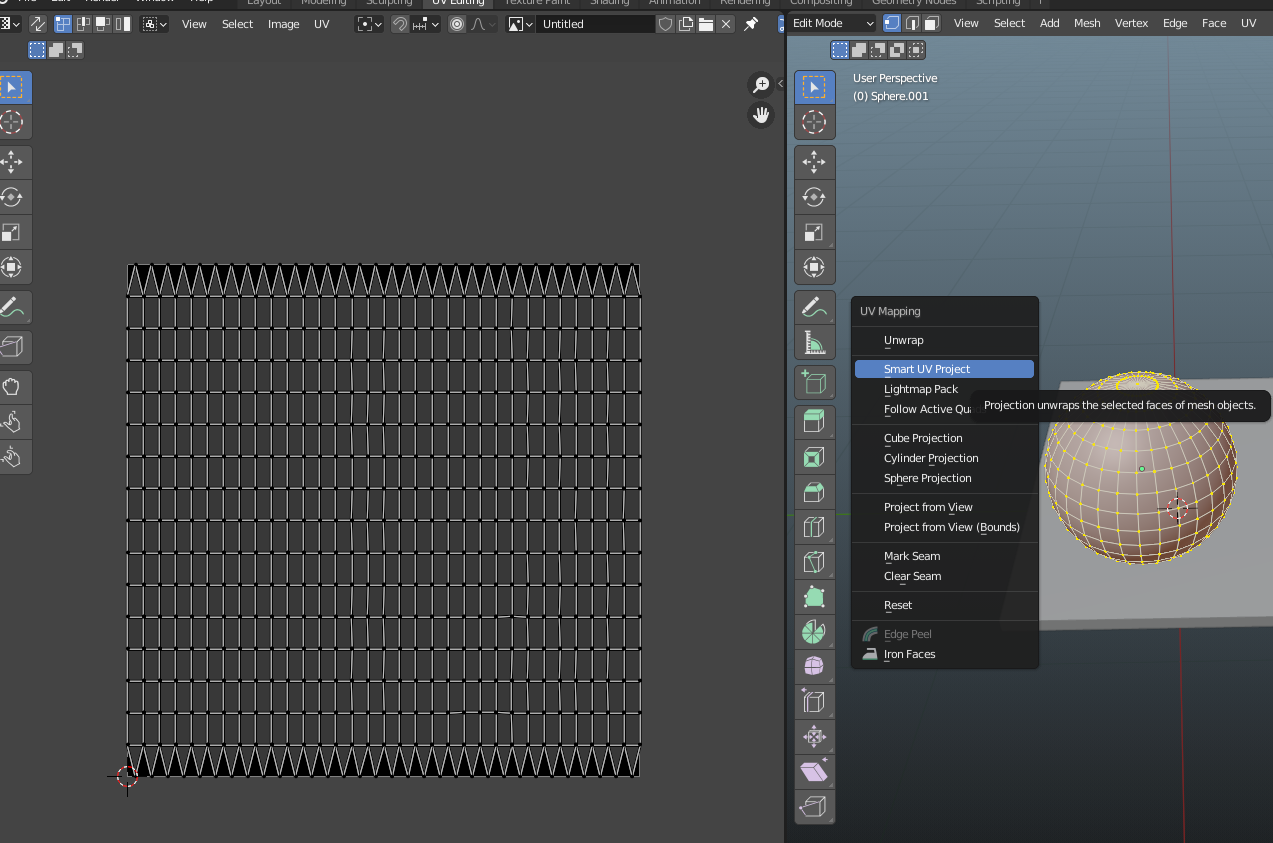
Smart UV Project on itOnce we have completed this step and utilized the default settings for the Smart UV Project process, the picture on the left —beforehand that includes a grid— will now show the shapes of the sphere we utilized this course of to. In our scenario, it looks as if the feel captured numerous angles of our sphere.
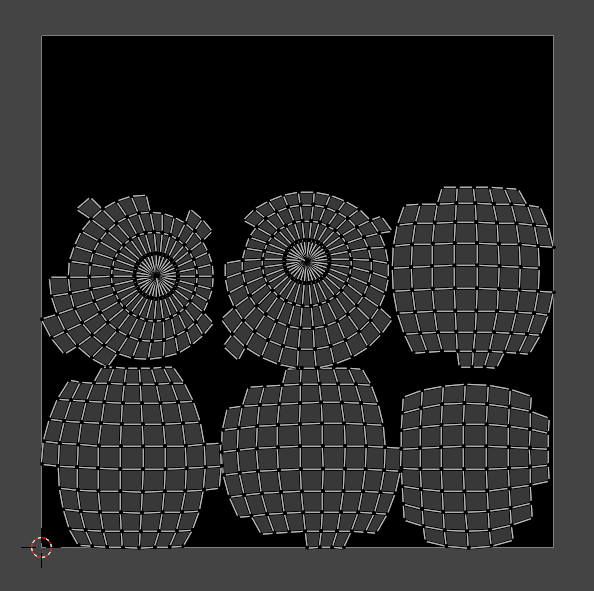
Smart UV ProjectDepending on the precise object, chances are you’ll must fine-tune the settings offered after clicking the Smart UV Project button. If you encounter challenges with a selected object, the video I shared earlier may give you extra steerage on this side.
Generally, to mitigate points, you need to optimize your object structure throughout its creation section. Avoiding the introduction of extreme edges in particular areas can stop issues like clipping, as an illustration.
The Bake course of
Now, let’s return to the Shading tab, the place we’ll entry the Render Properties on the appropriate facet (represented by the small display or TV image). If not already chosen, choose Cycles as your Render Engine. Then navigate to the Bake class, which is situated under the Performance class.
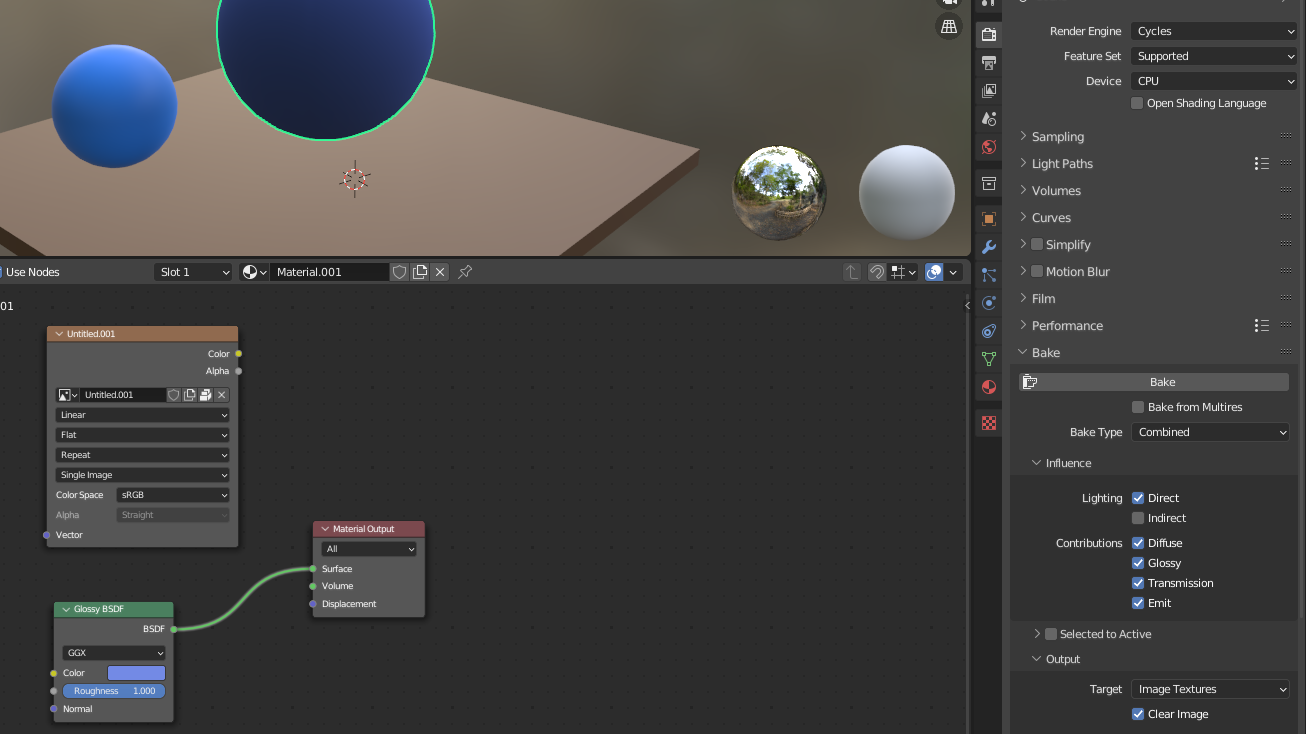
Bake choice within the Shading tab throughout the Render PropertiesWith the present default settings, you possibly can proceed by clicking the Bake button whereas making certain that each the Image Texture node and the big sphere are chosen.
Keep in thoughts that I built-in a Sun gentle into my scene, as this bake course of takes the scene’s lighting under consideration. Without adequate lighting, the outcome would possibly seem excessively darkish.
After a interval of processing (which may be extra time-consuming for those who’ve employed bigger dimensions for the Image Texture node’s picture), the baking course of will end. This ends in the feel being utilized to the picture from the Image Texture. Instead of acquiring the feel from the Shader node named Glossy BSDF, we now have entry to it via a daily “regular” picture texture.
Then we are able to set up a connection from the Image Texture node to the Material Output node, thereby efficiently implementing our materials. At this stage, there is not a big distinction in comparison with the earlier technique the place we had the Principled BSDF node linked to the Surface enter of the Material Output node.
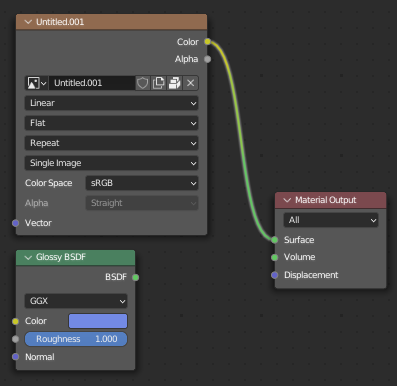
Image Texture node with the “baked” texture is linked with the Material Output node as an alternative of the Glossy BSDF nodeHow to see the ultimate outcome
Now, we are able to export the file once more, repeat the identical course of from earlier than in our IDE with glTF Tools and consider the .gltf file with the extension. Upon inspecting the end result, you would possibly discover that it is not an actual match to the model we had utilizing the Glossy BSDF node in Blender. This distinction will be primarily attributed to the lighting situations within the Blender scene.
Bear in thoughts that the method I’ve outlined is not the everyday utilization for the baking course of, since on this case you might additionally simply have picked an identical base coloration with the Principled BSDF node and would obtain just about the identical resolution, for instance.
I launched the baking course of based mostly on private expertise. There had been cases the place I encountered a state of affairs the place supplies appeared otherwise in Blender in comparison with when carried out them in a React.js utility with Three.js. This scenario prompted me to discover the idea of baking, which turned out to be a useful resolution.
To summarize, if you end up going through a state of affairs the place your supplies do not seem as anticipated in your React.js utility with Three.js, contemplating the baking course of and researching this subject can present invaluable insights. This will be notably helpful for people who find themselves new to Blender.
✒️ How to Implement the Blender mannequin within the React.js Application
To implement the Blender file, we are able to use a extremely helpful shortcut (supply: https://github.com/pmndrs/gltfjsx):
npx gltfjsx public/blenderFileIdentify.glb
It’s essential to notice that you want to retailer your Blender file throughout the public folder of your React.js utility for this step. It’s additionally price highlighting that you simply want React Three Drei to make use of this helper. So in our case, we are able to instantly use this shortcut with out the necessity for any extra preparations.
Upon executing this shortcut, we’re offered with the next file:
/*
Auto-generated by: https://github.com/pmndrs/gltfjsx
Command: npx [email protected] public/blenderStuff/blenderFile.glb
*/

import { useLayoutImpact, useRef } from "react";
import { useGLTF, useAnimations } from "@react-three/drei";

export operate Model(props) {
  const group = useRef();
  const { nodes, supplies, animations } = useGLTF(
    "./blenderStuff/blenderFile.glb"
  );
  const { actions } = useAnimations(animations, group);

  return (
    <group ref={group} {...props} dispose={null}>
      <group identify="Scene">
        <mesh
          identify="Cube"
          geometry={nodes.Cube.geometry}
          materials={supplies.Material}
          place={[-0.07, 0.16, -0.27]}
          scale={[1, 0.03, 1]}
        />
        <mesh
          identify="Sphere"
          geometry={nodes.Sphere.geometry}
          materials={supplies["Material.002"]}
          place={[-0.62, 0.43, -0.79]}
          rotation={[-0.01, 0.11, -0.02]}
          scale={0.09}
        />
        <mesh
          identify="Sphere001"
          geometry={nodes.Sphere001.geometry}
          materials={supplies["Material.001"]}
          place={[0.4, 0.55, 0.15]}
          scale={0.41}
        />
      </group>
    </group>
  );
}

useGLTF.preload("./blenderStuff/blenderFile.glb");At first look, you possibly can see that this course of has added many parts, so we principally need not add a lot on our personal.
An essential side to configure is the trail throughout the useGLTF hook. In my occasion, the correct path to include is ./blenderStuff/blenderFile.glb (this is applicable to useGLTF.preload() as effectively). This is as a result of I created a sub-folder named blenderStuff inside my public listing.
How so as to add a Canvas wrapper and different parts
With this configuration in place, we’re now prepared to make use of the Model part. But to successfully combine this Model part into our desired location, we have to make some changes within the dad or mum part.
In my case, I’ve opted to implement it inside the principle App.js file. And I’ve assigned a peak of 100vh to the App‘s CSS class to make sure the specified show.
import "./App.css";
import { Model } from "./BlenderFile";
import { Canvas } from "@react-three/fiber";
import { OrbitControls } from "@react-three/drei";

operate App() {
  return (
    <div className="App">
      <Canvas digicam={{ fov: 64, place: [-2, 2, 0] }}>
        <ambientLight depth={5} />
        <OrbitControls enableZoom={true} />
        <Model />
      </Canvas>
    </div>
  );
}

export default App;Canvas wrapper, the Model and different partsGenerally talking, you will want a part to encapsulate all of the Three.js associated parts. Within the Canvas part, there’s a chance to configure numerous settings. In my particular occasion, I’m adjusting the preliminary digicam place.
The gentle for the part performs a vital function. In our case we made use of ambientLight which can add a lightweight to the entire scene. Without ample lighting, your scene would possibly seem exceedingly darkish and even completely black regardless of the presence of object colours. You may use extra gentle sources just like the spotLight part.
The OrbitControls part, accessible from the Drei helper library, enhances your interactivity by enabling scrolling and rotation throughout the mannequin proper throughout the browser. This single line of code considerably improves consumer interactivity choices.
Remember that your Canvas part can accommodate a number of fashions. You may selectively apply parts like OrbitControls to particular Blender fashions, thereby tailoring their conduct.
To do that, you will must construct a dad or mum part for every scene you wish to make to be built-in throughout the Canvas. Within every new dad or mum part, incorporate your Blender mannequin part, together with any supplementary helper parts you wish to add.
This method proves notably advantageous when distinct fashions require totally different lighting or distinctive digicam positions, for instance.
How to implement the animations
At this level, we have established a useful Three.js Canvas atmosphere, that includes our Blender mannequin. But it is essential to keep in mind that we have additionally launched fundamental animations, which aren’t but operational.
To deal with this, we are able to leverage the pre-implemented useAnimations hook.
  const { actions, names } = useAnimations(animations, group);

  useLayoutImpact(() => {
    names.forEach((animation) => {
      actions?.[animation]?.play();
    });
}, [actions, names]);By incorporating this implementation, all animations related to this Blender mannequin will begin taking part in upon the rendering of the web page. This conduct additionally consists of an indefinite loop for every animation.
📄 Additional Information
While this tutorial primarily targeted on integrating a Blender mannequin right into a React.js utility utilizing Three.js, there is a realm of untapped potential inside Three.js that we did not cowl.
Although we did not use it on this fundamental instance, you possibly can introduce Post Processing to your Three.js fashions inside React.js. The React Three Postprocessing library serves as a invaluable device on this regard. It helps you to elevate your Three.js scenes with subtle results like Bloom or Noise results, which might add a extra superior dimension to your visualizations.
Also, when engaged on future Three.js initiatives, think about exploring the React Spring library which integrates effectively with React Three Fiber. React Spring gives the chance to include customized animations inside your Three.js scenes, on prime of any animations instantly built-in inside Blender.
For occasion, you might make a particular object inside your scene get bigger or smaller upon clicking it. As with different features of Three.js, this side would possibly improve interactivity and may be price your time to get into.
By the way in which, for those who discover that your frames are working at a decrease fee, think about toggling Hardware Acceleration inside your browser settings to probably enhance efficiency.
📋 Wrap-up
At this level, we have efficiently crafted a Blender mannequin with animations and supplies. Afterwards we built-in it into our React.js utility utilizing React Three Fiber.
Although the instance we checked out right here was fairly fundamental, the combination method stays the identical for extra advanced Blender fashions. The basic features of Three.js will be mixed with supplementary helpers to boost your scenes.
In addition to Post Processing, extra animations or additionally particular Blender supplies, features like cameras and lights usually are an important when aiming to boost the visible influence of your Blender fashions inside Three.js scenes.