
Many tasks are migrating from React to Next.js in 2023. So now’s the best time to grasp an vital step in making a Next.js utility: deployment.
Deploying a Next.js utility is an important step within the lifecycle of your internet product. And since varied deployment methods exist, choosing the right one will be difficult.
This article will focus on completely different deployment methods and practices for Next.js purposes. We will discover every technique’s strengths, together with static internet hosting, serverless features, containerisation, and conventional server deployment.
We will even be concerning important practices to optimise the deployment course of and improve the efficiency and reliability of your Next.js utility.
Here’s what we’ll cowl on this tutorial:
This article will present complete data {that a} newbie or an intermediate developer can use in deploying a easy Next.js utility.
Deploying a undertaking is extra vital than beginning it. An utility ought to clear up issues for its customers – however how can your customers clear up their issues together with your app should you do not deploy it (making it out there to the world)? The deployment course of could make all of your arduous work fail should you miss a step.
The growth course of entails:
- Putting your utility on a internet hosting platform.
- Configuring it.
- Ensuring it runs easily for customers throughout the globe.
Here are a couple of the explanation why deployment is crucial:
- User Accessibility: The usability of a undertaking is a vital criterion. Deployment is the ultimate step, with out which your customers cannot work together together with your app. Users ought to be capable of entry your undertaking and use its options easily.
- Real Users Test: Deploying your undertaking is the one solution to examine if it solves the specified downside. It means that you can take a look at and resolve bugs from actual customers and knowledge and repair the applying to work as meant.
- Scalability and Reliability: Deploying your utility permits your product to scale, deal with extra customers, and improve site visitors. Scalability and reliability are causes it’s essential to use the suitable deployment course of, because it may jeopardize your effort in case your product cannot deal with a spike in site visitors.
- Continuous Integration and Deployment (CI/CD): The deployment course of implements a seamless workflow. With CI/CD practices, your codebase is all the time examined, validated, and deployed to the manufacturing surroundings. It additionally makes it simpler so as to add options and keep away from errors.
Here is an summary of assorted deployment choices for Next.js product workflows and necessities.
Option #1: Static Hosting

A easy static web site with little or no server-side rendering will be hosted on mounted internet hosting platforms like Vercel, Netlify, Amazon Simple Storage Service (AWS S3), GitHub Pages, or Surge.
Next.js generates static HTML recordsdata throughout the construct course of, and you’ll host it in one of many above platforms.
Benefits of Static Hosting for Next.js Apps
- Improved Performance: Next.js apps generate pre-rendered HTML recordsdata throughout the constructing course of, and it helps static website era (SSG). If you host statically, the pre-rendered file will be cached on a world content material supply community (CDN), bettering efficiency by loading quick.
- Scalability: A static hosted utility with a CDN will enable for the worldwide distribution of recordsdata, thereby bettering scalability and reducing the load on the origin server. The CDN will guarantee quick load instances even throughout site visitors spikes for customers worldwide.
- Security: Static internet hosting has little or no server-side processing, which reduces the assault floor. Also, static recordsdata are much less susceptible to widespread internet utility assaults.
- Reduced Server Load: The origin server workload is diminished as a result of Next.js has pre-rendered HTML recordsdata.
- Caching Benefits: Since the static recordsdata are cached on the CDN, this can cut back the variety of requests made to the origin server.
- Cost-Effectiveness: Static internet hosting does not want database administration or server-side processing. It might be cheaper for smaller purposes and web sites with low site visitors.
Use Cases of Static Hosting for Next.js Apps
Static internet hosting is superb for Next.js Apps with little rendering and upkeep.
Here are some use circumstances to think about:
- Landing pages: This is a straightforward web site used for advertising and marketing campaigns or product launches. A Next.js touchdown web page must be hosted statically to make sure easy high-traffic dealing with and quick loading time.
- Content and Portfolio websites: Websites with a number of static contents like blogs, documentation websites, and knowledge-base websites get pleasure from improved efficiency and diminished load time after they use static internet hosting.
- Prototypes and Demos: Next.js purposes can be utilized by builders for inside demos and prototyping with purchasers as they will simply be deployed.
- Single-page Applications (SPAs): SPAs often include dynamic contents, however the static half will be pre-rendered and hosted statically to enhance loading time.
Examples of Static Hosting Platforms for Next.js Apps
Several static internet hosting platforms can simply host a static Next app.
- Vercel: This is a generally used internet hosting platform. It gives built-in options and ease of use, making it nice for internet hosting static and serverless Next.js purposes. Vercel comes with world CDN help, fast integration, and auto-deployment.
- Firebase Hosting: This is supplied by Google Firebase and helps static websites from Next.js. It additionally helps dynamic web sites however gives seamless static internet hosting.
- Netfily: This choice has one of the vital simple setups and a developer-friendly interface. It helps steady deployment, serverless features, and type dealing with.
- GitHub Pages: GitHub pages are the best setup. You create a gh-pages department, and it’ll work when you have an HTML supply, however Nextjs does not try this. So, you possibly can host your Next.js app by pre-rendering pages throughout the construct course of.
- Amazon Simple Storage Service (AWS S3): This can be utilized to host static web sites. You must configure an S3 bucket for static web site internet hosting after which use AWS Cloudfront as a CDN for higher efficiency.
- Render: This cloud internet hosting platform hosts static websites and covers serverless features. It permits Next.js static websites to be hosted.
How to Deploy a Next.js app on a Static Hosting Platform
Deploying your static Next.js app on a static internet hosting platform is straightforward. Here are the steps to comply with:
Step 1: Code your Next.js App
First, it’s essential to full your Next.js code and guarantee it is prepared for deployment. It must be examined and work as anticipated.
Then, initialise your code and commit it to a Git repository.
Step 2: Pick a internet hosting platform
Now, you simply want to decide on any internet hosting platform just like the one listed above. You’ll solely want somewhat configuration because it’s static.
You can join the free model or go professional.
Step 3. Connect your repository
When you log in to the internet hosting platform, you will see that both “Connect a Repository” or “Import undertaking” proper after clicking Create a brand new undertaking.

Give the internet hosting platform permission to entry your Git repository, and select the repository together with your Next.js utility.
Step 4: Configure deployment settings
Now, it’s essential choose the department you need to deploy. Choose the construct command. For a Next.js App, the construct command is often npm run construct or yarn construct.
Select the output listing. Since we’re deploying a Next.js app, the output is typical, out or construct.
Step 5: Deploy your app
Now it is time to deploy your app – the platform will deal with the complete course of. And then, it mechanically builds your app’s static recordsdata.
To deploy the app, click on the Deploy button or the equal as introduced by the internet hosting platform.
Step 6: Custom area
Now, you possibly can arrange your customized area from a 3rd get together or use the professional model if out there.
Set up your Domain Name System (DNS) information of your customized area to level to the internet hosting platform. (This step is non-compulsory.)
Step 7: Verify and take a look at
Once deployment finishes, you may get a Uniform Resource Locator (URL) from the internet hosting platform.
Visit the URL to substantiate that your Next.js app is efficiently deployed and works as anticipated. It ought to look one thing like this:

Step 8: Continuous deployment
Lastly, it is a good time to implement a steady deployment technique if the static internet hosting platform permits it. This will enable your modifications on the Git repository to be mechanically deployed.
To do that, it’s essential to implement webhooks to set off builds and deployments when new code is pushed.
Let’s undergo the steps for the way you’d arrange steady deployment on GitHub:
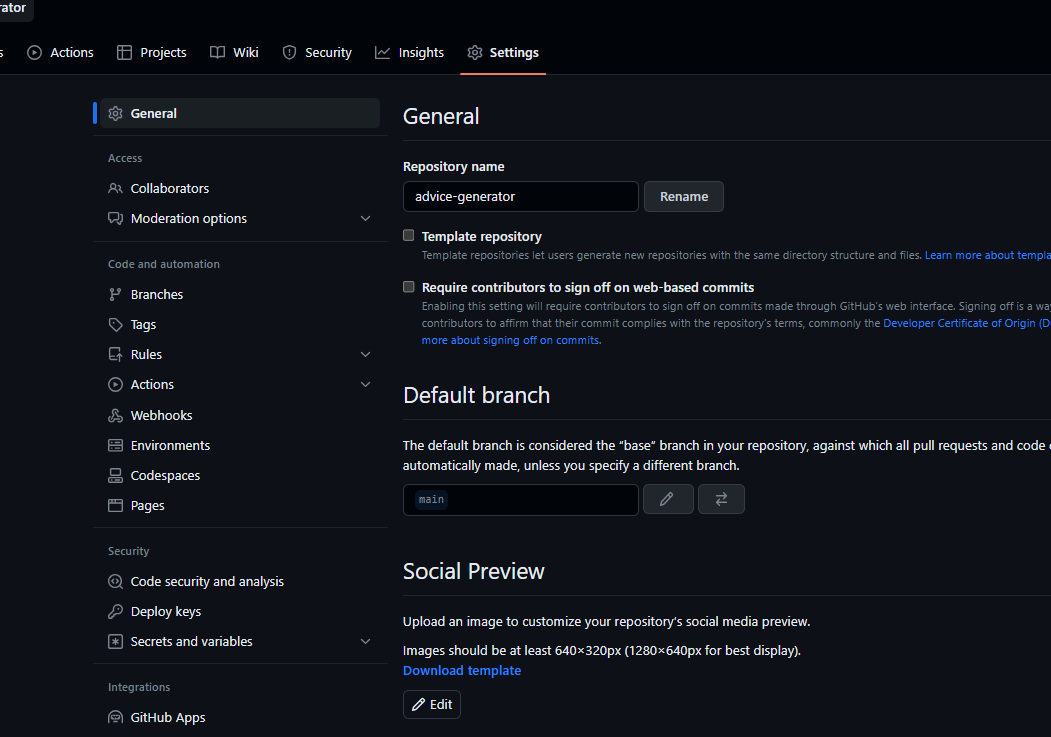
- Go to the Repository settings of the undertaking you need to deploy.
2. Select Webhooks on the left facet
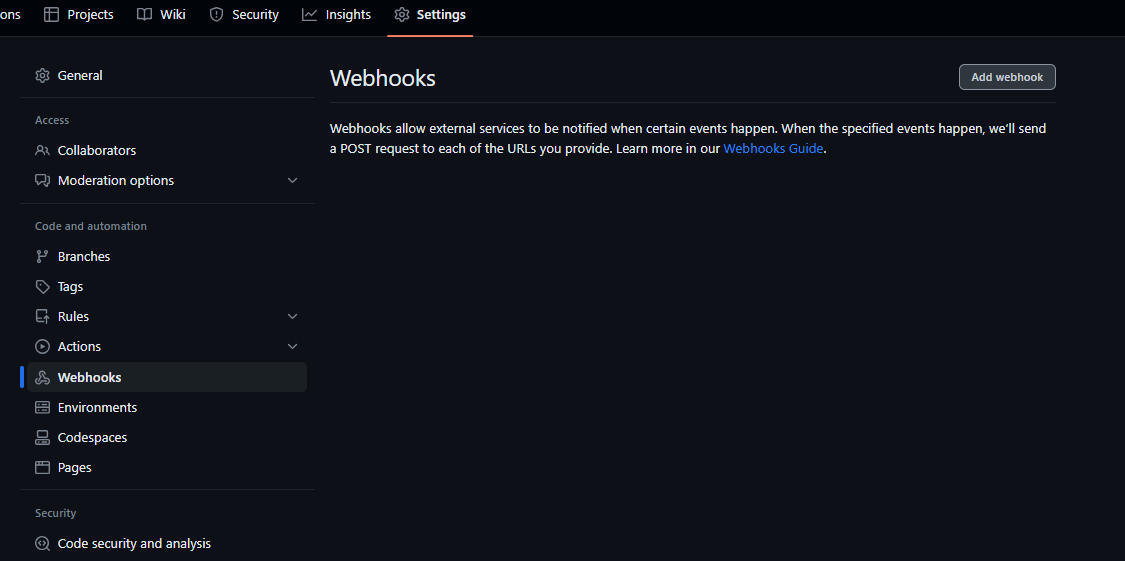
3. Click on Add webhook or New workflow
4. Configure the webhook
Provide the URL the place the internet hosting platform will dump the webhook.
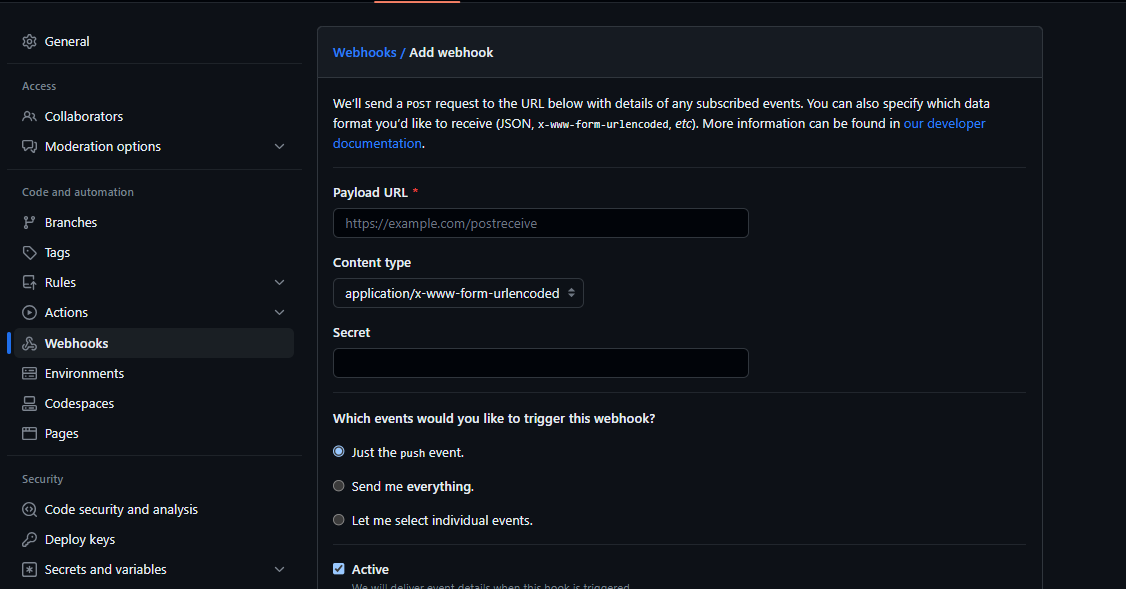
5. Select an occasion to set off
As you possibly can see, there are three occasions, and the one we have to decide is Just the Push occasion. This will set off developments when new code is pushed.
6. Add Secret
The secret is a password that provides an additional layer of safety. It might be requested by the internet hosting platform as nicely.
7. Save and Test
Save and take a look at how the webhooks are being triggered whenever you push new code.
Option #2: Serverless Functions
Next.js tasks will be built-in with serverless features reminiscent of AWS Lambda utilizing Vercel’s serverless operate or the serverless. With this selection, builders can create dynamic server-side performance with out stressing over conventional server infrastructure administration.
This deployment choice helps deal with type submission, API calls, and different server-side computations in a scalable and low cost method.
There are a couple of platforms that help the serverless operate choice:
- Amazon internet providers lambda
- Azure features
- Google Cloud operate
- IBM cloud features
- Alibaba Cloud operate
- Vercel
These platforms simplify administration and permit builders to focus extra on coding than configuration.
Benefits of Serverless Function for Next.js App
Using the serverless operate to host a Next.js app comes with a number of advantages that enhance the efficiency, they usually embody:
- Scalability: The serverless features scale in keeping with demand. They are constructed to deal with sudden spikes in site visitors and be certain that customers get a constant expertise.
- Cost effectivity: The serverless operate’s platform prices primarily based on precise utilization quite than sustaining devoted servers, which helps save price.
- Microservices Architecture: Serverless features permit you to create complicated purposes whenever you mix minor features to unravel a specific downside.
- Faster growth iterations: With serverless operate, you possibly can deal with particular options since they’re remoted and shortly make modifications with out affecting the complete undertaking.
- Security and Isolation: Since serverless features help an remoted surroundings, decreasing the bug charge on one operate affecting one other, they’re extremely secured.
- Global distribution: Serverless platforms are recognized to have a world community of information centres, which deploys your Next.js app’s operate nearer to customers and reduces latency.
Use circumstances of Serverless operate for Next.js App.
Several web sites profit loads from utilizing a serverless operate platform. Some varieties of these Next.js purposes embody:
- Forms and User Interactions apps: Using serverless features to deal with consumer logins, registrations, and different interactive parts can improve consumer expertise and efficiency by making these processes seamless and asynchronous.
- Real-time Data fetching: Serverless features can retrieve real-time data from a database or APIs with out stressing your fundamental server.
- Dynamic content material: Use the serverless operate internet hosting choice when you’ve gotten an app that generates personalised knowledge reminiscent of charts, metrics, or user-specific content material.
- Authentication and Authorization: Using a serverless operate when authenticating and authorising knowledge can enhance safety by offloading the heavy lifting of token validation and consumer administration.
- E-commerce app: The serverless features are nice for dealing with procuring cart replace orders and integrating easy fee gateways.
- search engine optimization optimisation: Using serverless features to host your Next.js app helps render search engine optimization metadata and improves search engine visibility.
Examples of Serverless internet hosting Hosting Platforms for Next.js Apps
We have listed a number of serverless operate internet hosting platforms – now, let’s focus on some standard ones.
- Vercel: Vercel is designed to suit Next.js wants seamlessly. It helps the serverless operate and presents a world content material supply community (CDN), rising efficiency and reliability.
- AWS Lambda: Amazon lambda is commonly used with Amazon API Getaway to permit you to deploy serverless features and API. This choice additionally means that you can construct customized serverless structure.
- Azure features + Azure static internet apps: This mixture by Microsoft Azure cloud means that you can simply deploy your Next.js app with serverless features.
- Google Cloud operate and Firebase Hosting: You can mix Google Cloud and Firebase internet hosting to get pleasure from CDN capabilities and serverless features whenever you deploy your Next.js app.
- Netlify: Netfily permits for simple deployment of Next.js purposes and gives serverless features. It helps type dealing with, steady deployment and a model management system.
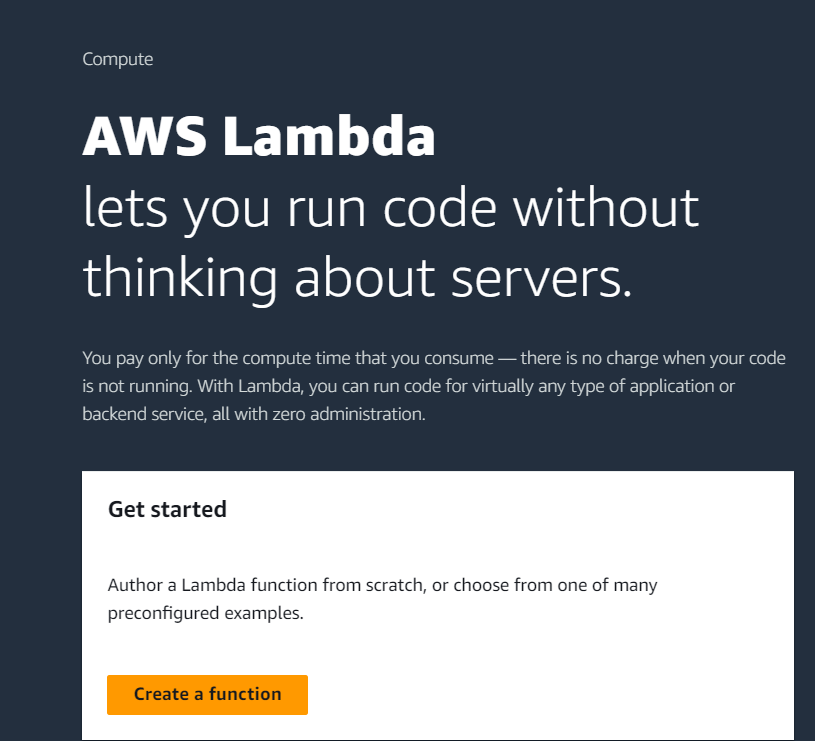
Exploring AWS Lambda’s Serverless Deployment Option
AWS Lambda by Amazon Web Services means that you can run a serverless operate with out managing servers. It is usually used to run code recordsdata in response to HTTP requests, knowledge modifications within the database, and different occasions.
Deploying your Nextjs utility on AWS Lambda is straightforward should you use the Web Adapter supplied by the platform. Let’s undergo the steps now.
Step 1: Package your Next.js utility
Make positive your undertaking is prepared and examined regionally. You can bundle your undertaking as Zip recordsdata or a Docker picture.
Choosing a Docker picture means managing, constructing, or pushing any pictures. But the zip bundle fashion is easier.
Let’s first see the best way to do it with Docker.
Step 2: Dockerize Your App
First, you may have to create a Dockerfile on the root of your undertaking. Use a Node.js base picture within the Dockerfile like so: FROM node:16.
Then, copy the Next.js app recordsdata/bundle into the container.
Install crucial dependencies utilizing this command: RUN npm set up --production. And then construct the undertaking with RUN npm construct.
Specify the command to start out the applying: npm run begin or yarn begin
Step 3: Build the docker picture
Now, use the docker construct command within the terminal to create a picture of your app and its dependencies.
Here is the command docker construct -t my-nextjs-app .
- -t; use to specify the tag of the picture, which must be the title of the undertaking
.to indicate that the docker ought to construct with the present listing
Step 4: Push Image to Container Registry:
Push the Docker picture so the AWS Lambda can simply entry it. In this case, we push to Amazon Elastic Container Registry (ECR).
Login to AWS ECR:
aws ecr get-login-password --region area | docker login --username AWS --password-stdin aws_account_id.dkr.ecr.area.amazonaws.com
Tag the Docker Image:
docker tag image_name:tag aws_account_id.dkr.ecr.area.amazonaws.com/repository_name:tag
Push the picture:
docker push aws_account_id.dkr.ecr.area.amazonaws.com/repository_name:tag
Step 5: Create AWS Lambda Function
From the AWS Lambda console, you’ll create a brand new lambda operate. Select the Container picture choice and select the docker picture from the registry.
Now let’s discover the best way to do it with the zip bundle:
Step 2: Build your Next.js App:
Use both npm run construct or yarn construct to construct your Next.js app for manufacturing. This will construct your uncooked .jsx recordsdata into HTML, CSS and Javascript code that might be introduced to the consumer’s browser.
Step 3: Create a Deployment bundle
Create the deploy listing and duplicate all wanted recordsdata, together with node_modules, bundle.json, and .subsequent. This is all it’s essential have your Next.js app prepared for manufacturing deployment.
Step 4: Create a zipper bundle
Now, create the zip bundle with all of your Next.js apps and dependencies. To do that, open your terminal and navigate to the listing of your production-ready app folder.
Then use the zip command zip -r my-nextjs-app.zip * ; this can zip the bundle in place and reserve it as my-nextjs-app.zip
If you might be on Windows, use sudo apt-get set up zip unzip to put in the zip utility.
Step 5: Upload the Zip bundle to AWS Lambda
In the AWS Lambda console, arrange a brand new Lambda operate. Choose the “Upload a .zip file” choice and add the zip bundle you created.
Here is the way you add the zip bundle to AWS Lambda
- Log in to your AWS administration console, search
Lambdawithin the providers search bar
2. Click ‘Create a operate’ to create a brand new lambda operate.
3. Configure the operate
- Select the ‘Author from scratch” choice.
- Input the operate title.
- Select the runtime; for the Next.js utility, you will want Node.js.
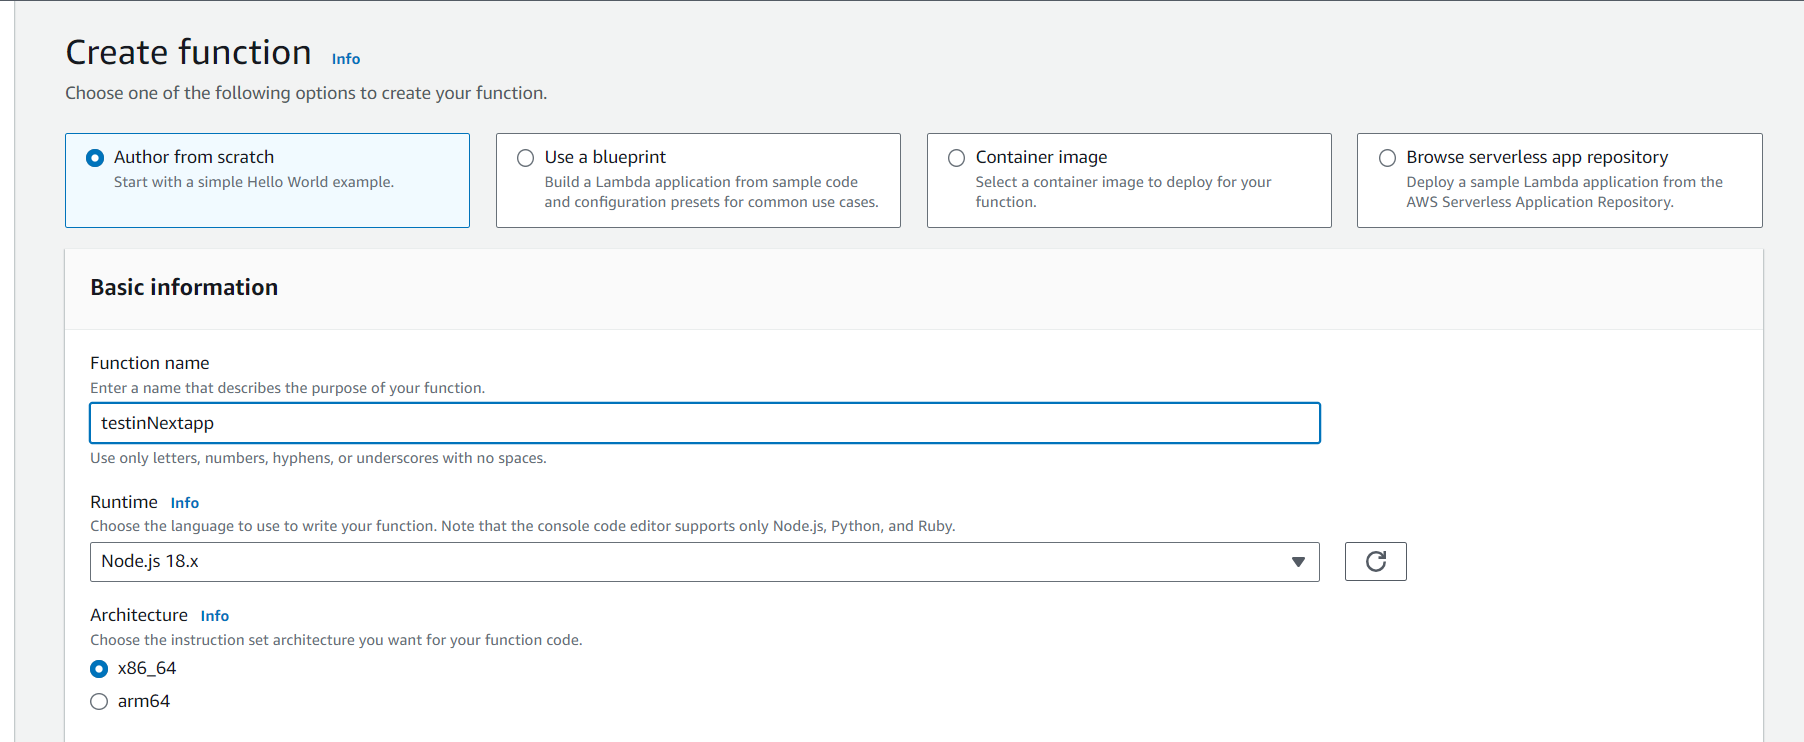
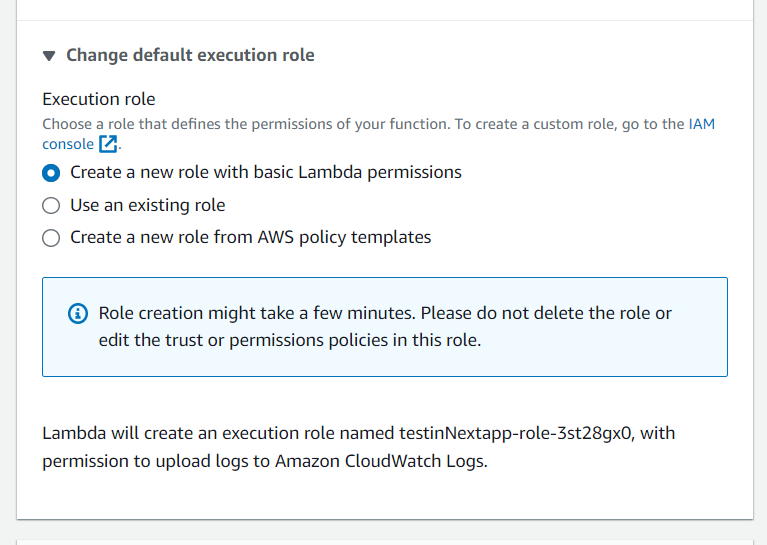
- Select an execution position that grants full permission to the Lambda operate after which click on the ‘create operate’ button.
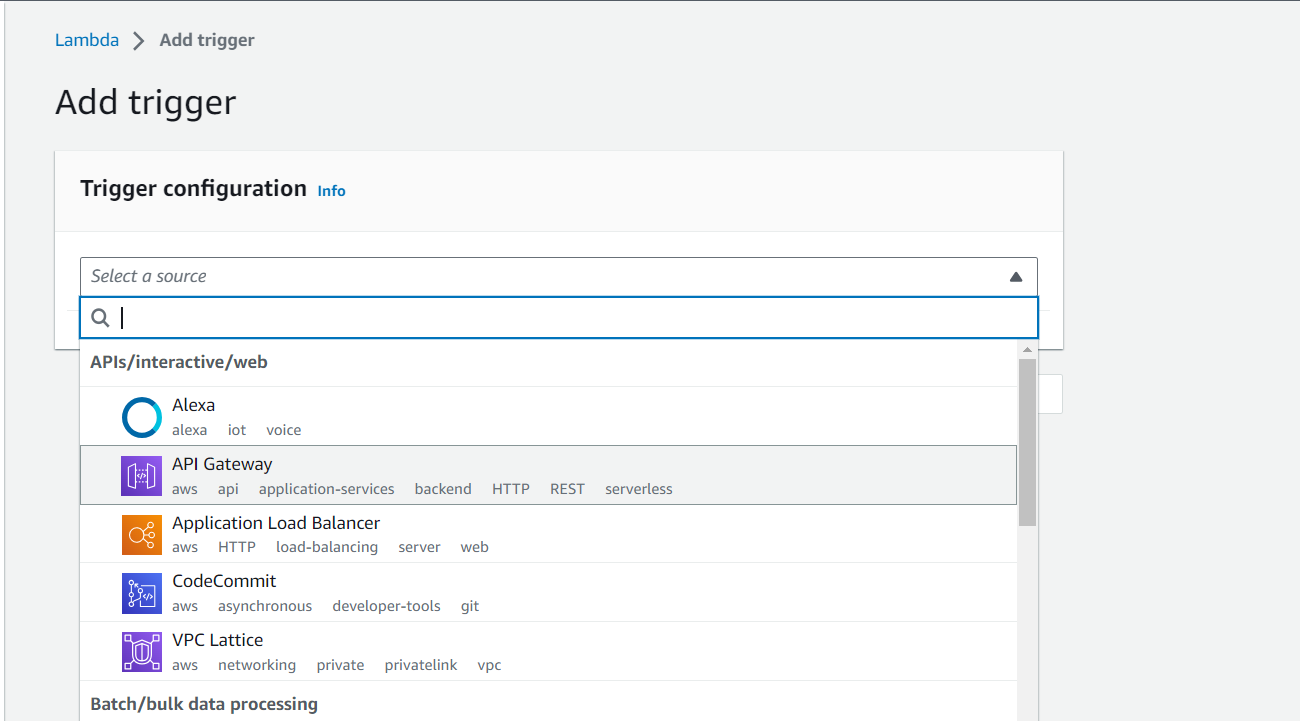
4. Configure operate triggers: click on ‘Add set off’ and choose the ‘API Getaway’ for the serverless choice. And configure as you need.
5. From the ‘Code’ tab beneath the ‘Function overview’ tab, click on on the ‘add from’ and choose the ‘.zip file’. Find the saved my-nextjs-app.zip file and add it.

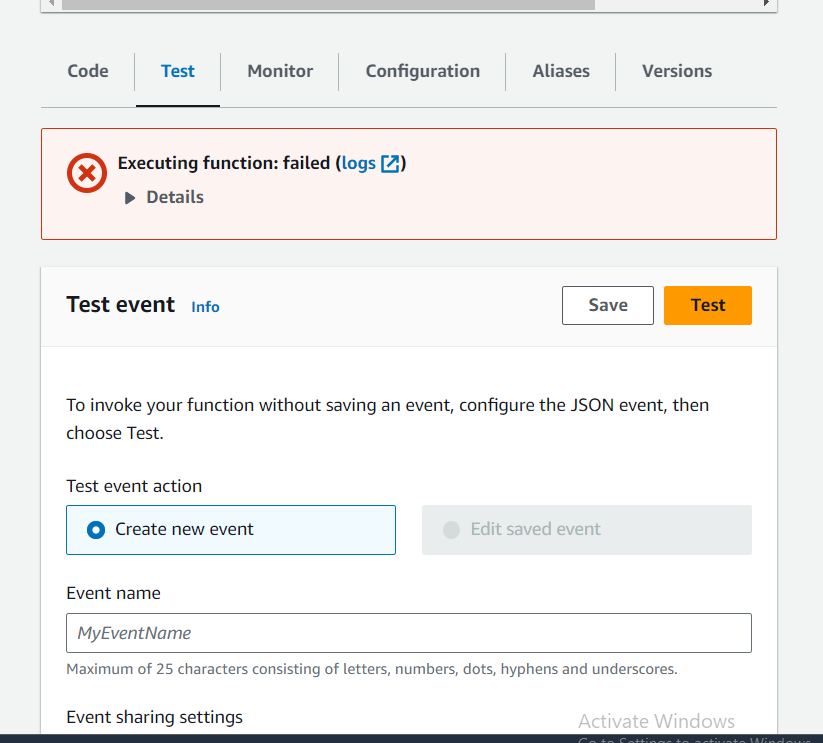
6. More configuration and take a look at: AWS administration console means that you can configure ‘vacation spot’, ‘permission’, ‘operate URL’ and plenty of extra. You may take a look at your app beneath the take a look at part.
7. Once you might be happy with the configurations and settings, you possibly can deploy it.
From now on, the steps would be the identical, so let’s proceed the method:
Step 6: Configure Lambda Function:
You’ll have to set your Lambda operate’s timeout, reminiscence, and different configurations.
Then, outline an surroundings variable (solely when it is wanted).
After that, you may need to take a look at your Lambda operate and see in case your Next.js App is working as anticipated.
Step 7: Configure API Getaway (non-compulsory)
If your undertaking is an API, you possibly can configure an API Gateway to behave because the HTTP interface to your Lambda operate.
Option #3: Containerization
This deployment choice gives a solution to bundle Next.js purposes with their dependencies and make them smaller and extra constant throughout varied environments.
You can containerise your Next.js app and deploy it through orchestration platforms like Kubernetes or Elastic Container Service (AWS ECS).
Benefits of Containerizing Next.js Applications
There are a number of advantages of utilizing a containerisation deployment technique in your Next.js app, which embody:
- Portability: The portability of containers permits builders to construct as soon as and run wherever. This shrunk file will be useful in a hybrid cloud or deployment surroundings.
- Consistency: Containers enable your Next.js app to stay the identical throughout all machines, staging, and testing. It reduces the “it does not work on my machine” downside.
- Isolation: Containers isolate the system and different containers, bettering safety and minimising conflicts between your purposes and their dependencies.
- Microservices: The container has a microservices structure that means that you can put out extra minor elements of an utility and manageable providers that may be developed and examined independently.
- Version Control: With container pictures, you possibly can retailer and model them within the registries and make modifications to improve to the subsequent model or roll again to the earlier model simply.
- Fast Deployment: Contents permit you to begin and shut down shortly, leading to quicker deployment and restoration instances.
- Infrastructure as Code (IaC): Containers work nicely with (IaC) practices, permitting you to set and handle your utility’s infrastructure through code.
How to Containerize and Deploy a Next.js App
We have touched on some steps for containerisation within the serverless operate technique part. Here are the whole steps required to deploy your Next.js app through containerisation.
Step 1: Dockerize your Next.js App
Create a Dockerfile on the root of your undertaking. Use a Node.js base picture within the Dockerfile like so: FROM node:16.
Copy the Next.js app recordsdata/bundle into the container and set up the mandatory dependencies with the command RUN npm set up --production.
Build the undertaking with this command: RUN npm construct.
Then specify the command to start out the applying — npm run begin (CMD [“npm”, “run”]).
Step 2: Build the Docker Image
Using the docker construct command within the terminal, we will create a picture of our app and its dependencies.
Then you may need to take a look at your Next.js app utilizing the docker run -p 3000:3000 nextjs-app command and ensure it really works as anticipated.
Step 3: Deploy the containerised Next.js App
Select the place to retailer your docker picture – you should utilize Amazon ECR, Docker Hub, Google Container Registry, and many others.
Next, you may need to tag and push the Docker picture. Use the command docker tag nextjs-app:newest registry-url/repository-name:tag.
Replace the registry-url/repository-name:tag together with your chosen registry platform and values.
Next, push the end tag picture to the chosen registry with this command:docker push registry-url/repository-name:tag.
Step 4: Set up your Deployment surroundings
Configure the surroundings in your chosen cloud supplier. Follow this steps
- Choose a cloud supplier like Amazon Web Services (AWS), Google Cloud Platform, Microsoft Azure or any that matches your funds and necessities. Create and log in to your account.
- Set up a container registry on the chosen supplier.
- Configure the safety and subnets and create digital networks, as they are going to management the community entry to your containerised app.
Step 5: Deploy your App
Now, deploy your Next.js app utilizing both:
- Kubernetes: Apply the YAML file like so
kubectl apply -f filename.yaml - AWS ECS: Create a brand new activity utilizing the AWS administration console or AWS CLI
Next, you may have to configure Ingress or Load Balancer to make your app out there on-line. And lastly, you may need to take a look at your deployed Next app.
Option #4: Edge-Side Rendering (ESR)
This deployment choice gives the Next.js app with edge-side rendering to get cached variations of pages from a content material supply community (CDN).
The CDN makes the pages load quicker when a consumer requests a web page the second time. This is feasible as a result of the CDN delivers pre-rendered pages, decreasing response time.
Benefits of Edge-Side Rendering (ESR) When Deploying a Next.js App
Edge-side rendering renders a part of the consumer interface on the edge servers of a CDN, however that is not the one profit. Other advantages embody:
- Improved efficiency: ESR decreases the web site’s loading time by minimising the round-trip time to the origin server. This produces quicker loading time and improved consumer expertise.
- Reduced latency: ESR masses content material from a more in-depth server, and even when the origin server is way away, customers obtain content material shortly.
- Enhanced Search Engine Optimisation (search engine optimization): search engine optimization is improved as a result of the search engine can crawl pre-rendered HTML content material from edge servers.
- Scalability: ESR shares the rendering load with origin and edge servers, which helps deal with extra customers throughout site visitors spikes with out overworking the origin server or crashing.
- Lower Server Load: ESR permits the origin server to be accountable for just some customers’ rendering requests. ESR reduces useful resource consumption and server load and improves total efficiency.
- Consistent User Experience: ESR ensures that every one gadgets, no matter browser capabilities, obtain rendered content material, offering a constant expertise.
- Cost financial savings: By utilizing edge servers, you’ll spend much less energy and assets on the origin servers.
How to Deploy a Next.js App with Edge-Side Rendering (ESR)
Deploying a Next.js app with Edge-side Rendering requires a CDN to render some elements of your Next.js app with edge servers. Here is how the method works.
Step 1: Prepare your Next.js App
Be positive that your Next.js app is practical and has been examined regionally. Ensure it is able to be deployed.
Step 2: Choose your CDN supplier
Choose a CDN supplier with ESR help. You can decide Cloudflare Workers, Vercel Edge Network, or Fastly. Decide which most closely fits your app.
Step 3: Set up the CDN Account
Set up your CDN account, which ought to solely take about 5 minutes.
- Sign up or log in to your most popular CDN supplier above.
- Select a plan that matches your funds and app’s necessities.
Step 4: Configure Edge-side Rendering
Configure ESR with the directions given by the CDN supplier. The course of entails writing scripts that inform which a part of your Next.js app must be rendered on the sting server and which elements will be served on the origin server.
Step 5: Deploy the ESR Configuration
Deploy your ESR configuration to the chosen CDN platform utilizing the suitable command on the CLI – vercel deploy, wrangler publish, and so forth.
Step 6: Test Edge-side Rendering:
Test the ESR configuration and make sure that the desired elements of your app are being rendered on the sting server. Watch the efficiency enhancements and make sure the rendering is constant throughout varied gadgets, browsers, and areas.
Step 7: Update DNS Settings
Set up the DNS setting to level to the CDN’s servers to make sure requests to your app are routed by way of the sting servers.
Step 8: Monitor and Optimise:
Once deployed, monitor the efficiency in actual life. Check the monitoring instruments supplied by the CDN to trace the metrics, latency, and consumer expertise.
Note that the steps could change relying on the CDN supplier you chose, however these are the fundamental steps for all. You can examine the documentation to study extra.
Best Practices for Next.js Application Deployment
Deploying a Next.js app is much like deploying some other internet app. Although Next.js permits backend growth, the deployment methods are nearly similar.
To deploy your Next.js apps in the perfect and best method doable, take into account the next practices:
- Optimised Builds: Optimising the construct means of your Next.js through the use of the perfect construct setting, leveraging static website era (SSR) or server-side rendering (SSR).
- Error Tracking: Integrate instruments to search out and clear up points proactively. Monitor server well being, consumer interplay, and utility to enhance consumer expertise and utility stability.
- Environment Variables: Managing delicate data API and config must be executed in an surroundings variable. Avoid placing delicate knowledge into your codebase throughout any deployment surroundings.
- Continuous Integration and Continuous Deployment (CI/CD): To lower bugs and errors in your deployed Next.js utility, it’s essential to arrange CI/CD pipelines. These pipelines will automate the method of constructing, deploying, and testing your undertaking.
- Scalability Considerations: A well-designed structure must be in place to deal with elevated site visitors. Leverage strategies reminiscent of serverless operate and caching mechanics in your utility to handle fluctuations in consumer demand.
- Automated Testing: Do automated testing in your utility to examine for efficiency and performance. You can attempt unit assessments, integration assessments, and end-to-end assessments to catch bugs earlier whereas nonetheless within the deployment stage.
- Version Control: Use a system like Git to trace modifications in your codebase and improve collaboration with teammates. With a model management platform, you possibly can simply undo errors and bugs and combine options.
- Documentation: A well-detailed doc concerning the set up directions, deployment, and configuration of your Next.js utility. This adequately written documentation will assist onboard new members and streamline the deployment course of.
These practices are unbelievable and assist obtain a easy and scalable utility.
Best Practices for Handling Environment Variables in a Next.js App
We should discuss finest practices and take note of safety. Managing surroundings variables is essential for safety and configuration administration when deploying your Next.js app.
Here are some finest practices:
- Use
.env.nativefor native deployment: Create a.env.nativefile on the root of your undertaking. This file will include variables for use solely throughout native deployment. - Use
.envfor Shared Variables: Here, you possibly can retailer non-sensitive variables dedicated to model management and share them with the crew. Create a.envfile, however do not retailer delicate data right here. - Use
.env.manufacturingfor manufacturing: The.env.manufacturingfile accommodates variables wanted throughout your app’s constructing course of. These variables within the.env.manufacturingfile take priority over these within the.envfile. - Server-side Access: Some variables saved within the
.envfile ought to solely be accessed server-side to stop exposing them to the consumer. You can use thegetServerSidePropsorgetInitialPropsstrategies to set it. - Version Control exclusion: Don’t commit variables; embody them in a
gitignorefile to stop safety points. - CI/CD integration: Use CI/CD pipelines to handle the surroundings variables and guarantee constant configuration securely.
Conclusion
Deployment is as very important as any stage of making a Next.js app; one may argue that it’s the most vital as a result of a improper configuration throughout deployment may have an effect on your app’s efficiency and drive customers away.
The methods are comparable however distinctive, and the one you choose ought to rely on the sort of web site you create. You do not want to decide on the Edge-server rendering technique whenever you make a static web site.
Follow the perfect practices above to deploy a protected and optimised Nezt.js app in your customers.
Additional assets: